Finder Bliss2 Smart Thermostat

EASY INSTALLATION
TECHNICAL SPECIFICATION
- Power supply: 3×1.5 V alkaline batteries type AAA – LR03
- Temperature adjustment: (+5…+37)°C
- Resolution: 0.1°C
- Degree of protection: IP20
- Output: 5 A 250 V AC changeover volt-free contact
- Mounting: Wall
FIXING BASE TO WALL
First, detach thermostat from its base by inserting two fingers into the central rear hole and, with the other hand, pull the front of the thermostat towards you.
FIXING BASE
Secure the Smart Bliss2 thermostat base to the wall using the screws included in the package. When fixing, be careful not to over-tighten the screws to avoid damaging the base.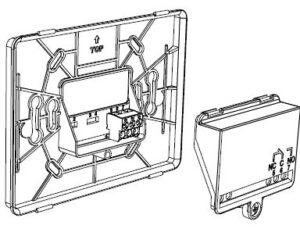
ELECTRICAL CONNECTIONS
To make the connections, first refer to instructions for your heating system (pump, valve, boiler, etc.), then remove the terminal cover and connect the appropriate wires to terminals 6 (COM) and 7 (NO) of the Smart Bliss2 thermostat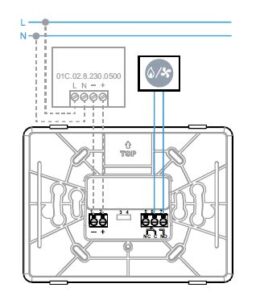
INSTALLATION
SAFETY REQUIREMENTS
The installation and assembly of electrical equipment must be performed by experienced personnel. Before connecting the thermostat, make sure that the load (pump, valve, boiler, etc.) is not powered and that it falls within the thermostat’s contact rating.
POSITIONING
Install the thermostat away from heat sources (radiators, direct sunlight, kitchens), away from doors/windows, and mount approximately 1.5 meters above floor level.
BATTERY INSERTION AND MOUNTING THE THERMOSTAT
- Insert 3 x 1.5V alkaline batteries type AAA – LR03, paying attention to the indicated polarity.
- After inserting the batteries, initialization screens will appear. Wait for this process to finish and the detected temperature will then appear.
- Mount the thermostat to its base by first engaging the bottom part of the thermostat with the lower pins of the base plate, then close the upper part of the thermostat to lock onto the upper pins.
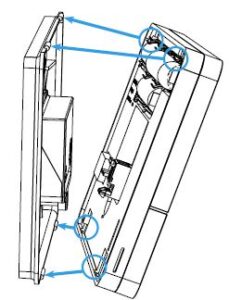
- The thermostat is now ready to be configured. However, the Gateway2 (1Y.GU.005.1) must first be installed.
GATEWAY2 INSTALLATION
Connect the Micro USB connector to the Gateway2 (1Y.GU.005.1) and plug the power supply into to the elecrical outlet.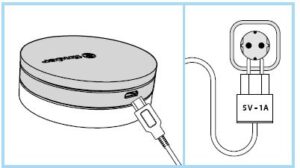
CONFIGURATION
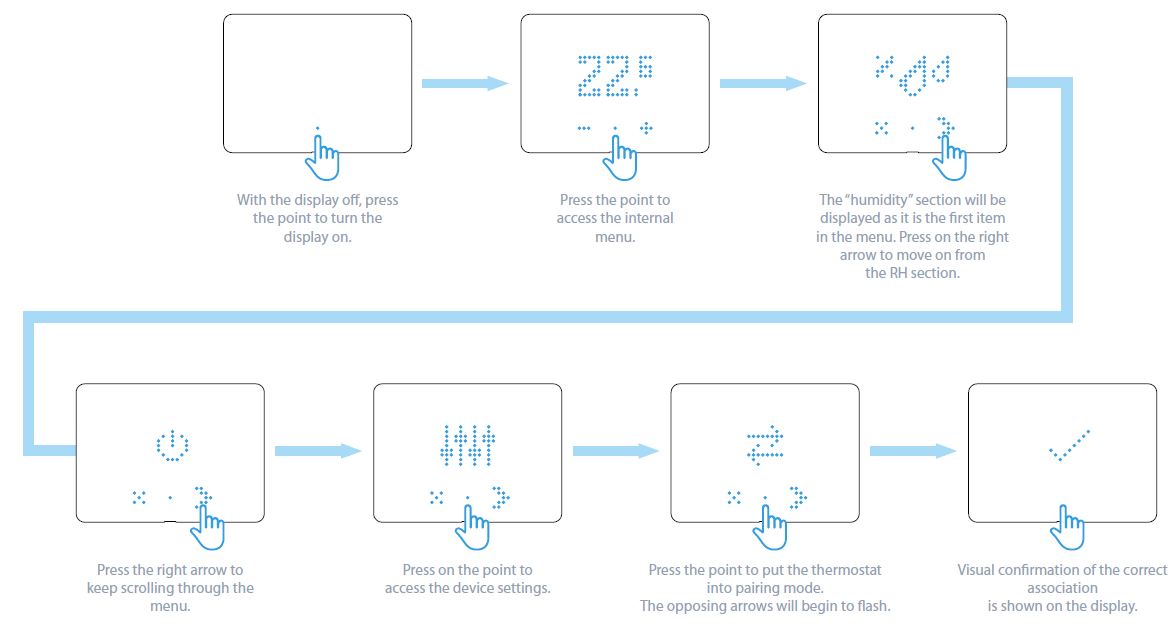
To configure the Gateway2 and the Smart Bliss2 Thermostat, download the Finder Bliss application from the Google Play Store or the Apple Store and proceed with the configuration following the tutorial on the App. When requested by the App, activate the association of the thermostat following the following screens: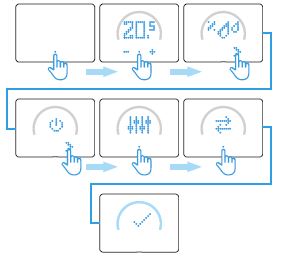
When done, the temperature detected by the Smart Bliss2 thermostat will be displayed in the application.
THE LUMINOUS BASE – NOTES
- WHITE LED
- Fading flashing: waiting for configuration
- Fixed: Wi-Fi network and Cloud connection present
- 2 Flashes: Connected to the Wi-Fi network but no connection to the Cloud (Check your Internet connection)
- 3 Flashes: No connection to the Wi-Fi network and no connection to the Cloud (Check your Wi-Fi network)
- BLUE LED
- Flashing: sending Bluetooth commands
- RED LED
- Flashing: sending commands to the Smart Bliss2 Thermostat
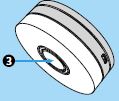
To change the light intensity of the GATEWAY2 base, press the button :
- 1 Once: Low brightness
- 2 times: Medium-Low brightness
- 3 times: Medium-High brightness
- 4 times: High brightness
RESET
Press the button for> 10 seconds to restore factory settings
OVERVIEW OF SCREENS & ICONS
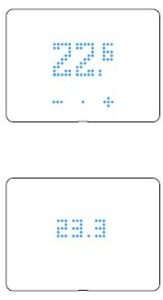
- ROOM TEMPERATURE
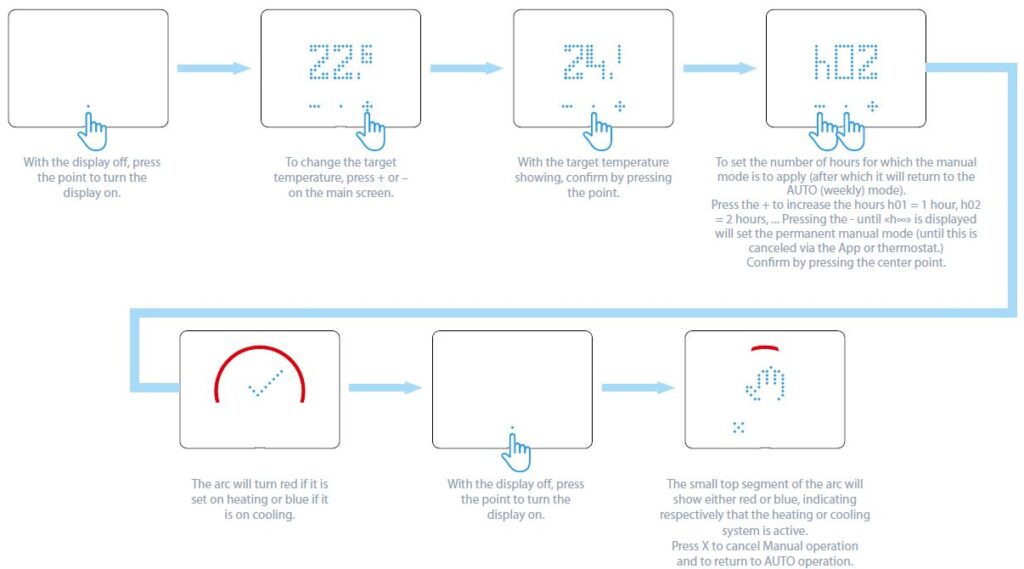
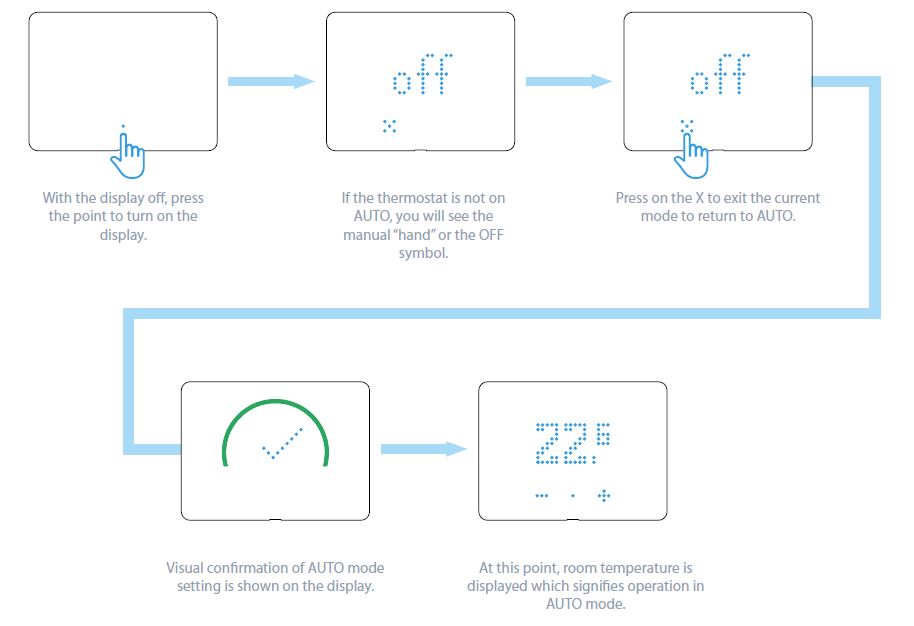
- Thermostat is set to AUTOMATIC mode (AUTO) and will respond to programming via the App. Current room temperature is displayed.
- TARGET TEMPERATURE IN MANUAL MODE
- The thermostat is set to MANUAL mode. The target temperature is displayed.
- MANUAL MODE
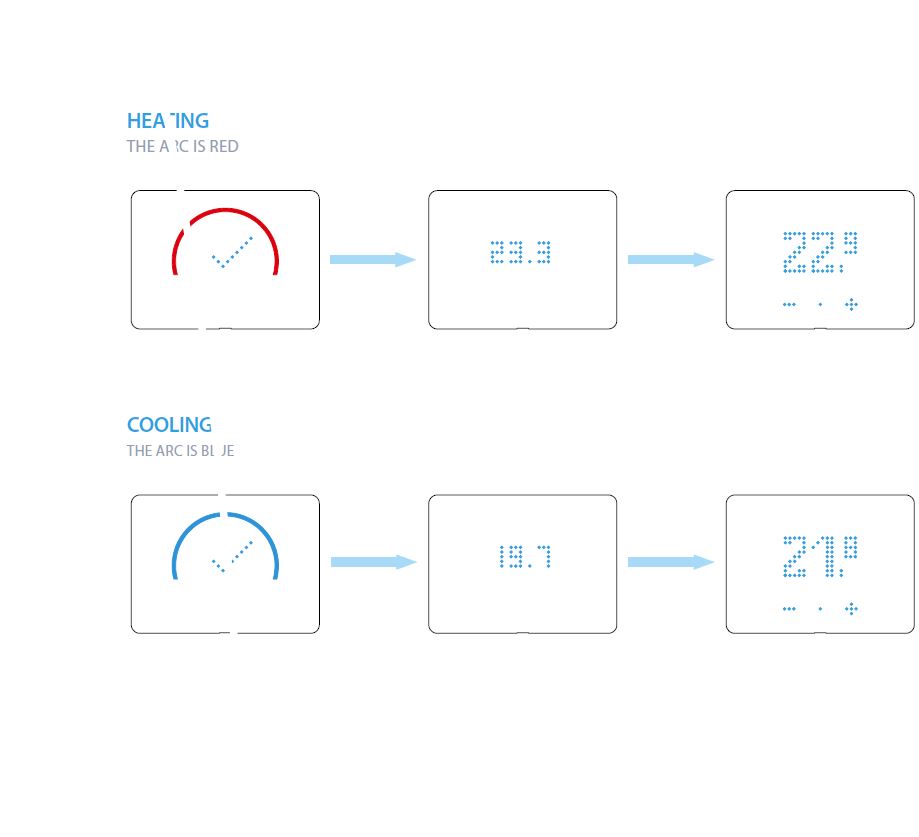
- Thermostat is set to Manual mode. If the small arc segment at the top is coloured, the heating or cooling system is active. If red – heating If blue – cooling.
- HOURS SETTING
- This displays the number of hours for which the manual mode is to apply. From 1 hour (h01) to permanent (ho).
- FULL ARC
- Appears when a setting is accepted and when the heating or cooling system is active.
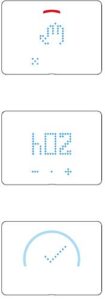
- Appears when a setting is accepted and when the heating or cooling system is active.
- HUMIDITY DETECTED IN THE ATMOSPHERE
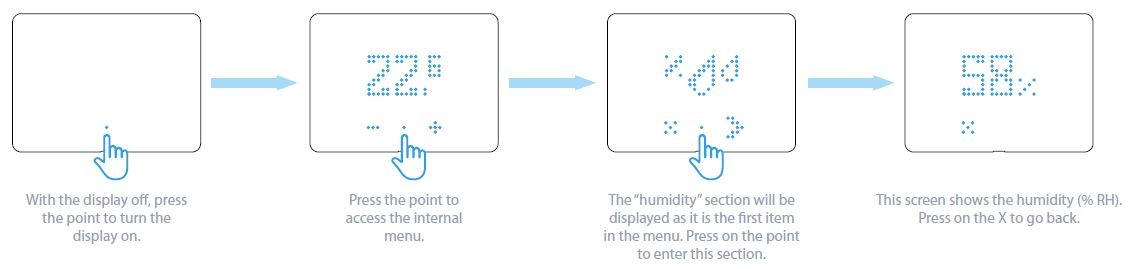
- In this section you can opt to view the level of humidity in the atmosphere (% RH). %RH Display of Relative Humidity currently present in the atmosphere.
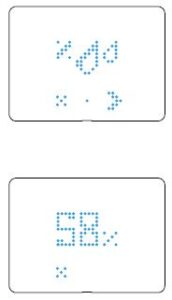
- In this section you can opt to view the level of humidity in the atmosphere (% RH). %RH Display of Relative Humidity currently present in the atmosphere.
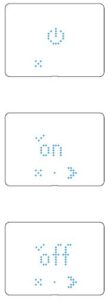
- ON/OFF SECTION
- In this section you can turn the thermostat ON or OFF.
- ON MODE
- With ON mode selected, the thermostat can function in either AUTO or Manual modes.
- OFF MODE
- With the OFF mode selected, the thermostat will still maintain a frost protection setting of + 5°C to avoid freeze damage to the system.
 SETTINGS MENU
- From here you can access the device settings.
- ASSOCIATION WITH THE GATEWAY
- The opposing arrows will flash only during the gateway pairing procedure.
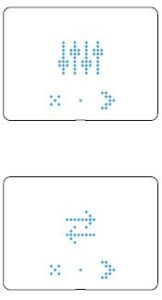
- The opposing arrows will flash only during the gateway pairing procedure.
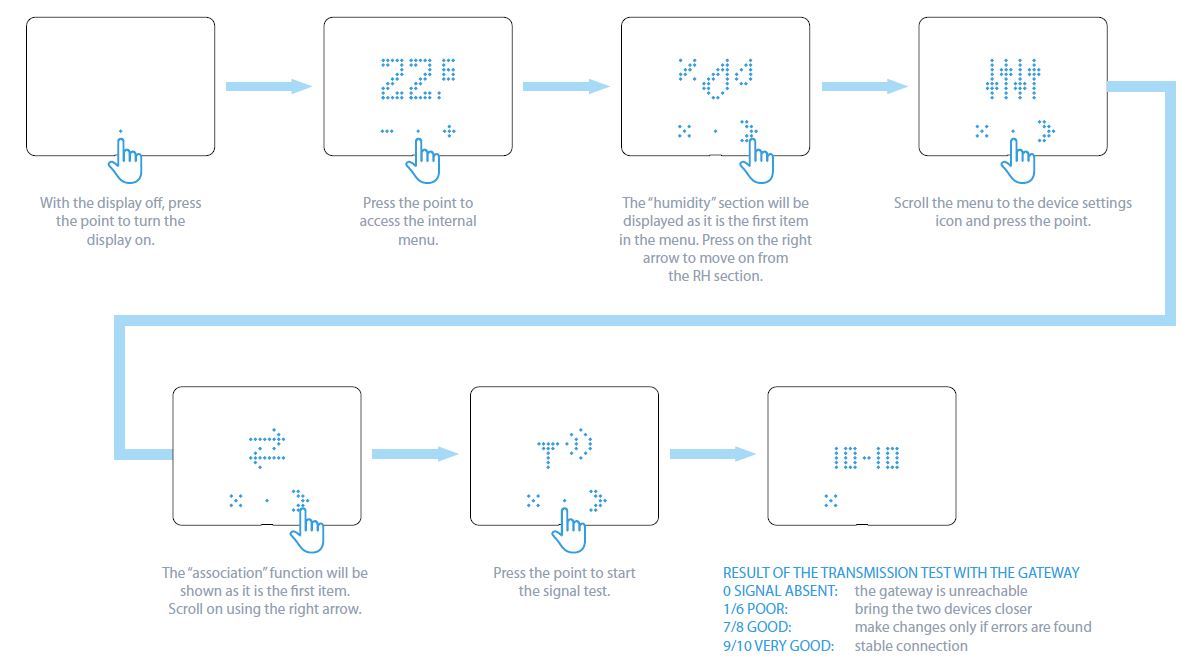
- TRANSMISSION TEST WITH THE GATEWAY
- At this point in the menu you can perform a signal transmission test between the gateway and the thermostat.
- RESULT OF THE TRANSMISSION TEST WITH THE GATEWAY
- O SIGNAL ABSENT: the gateway is unreachable
- 1/6 POOR: bring the two devices closer
- 7/8 GOOD: make changes only if errors are found
- 9/10 VERY GOOD: stable connection.
- FIRMWARE VERSION
- At this point in the menu it is possible to view the firmware version present on the device.
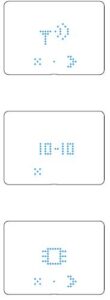
- At this point in the menu it is possible to view the firmware version present on the device.
MANUAL MODE
ON/OFF MODE 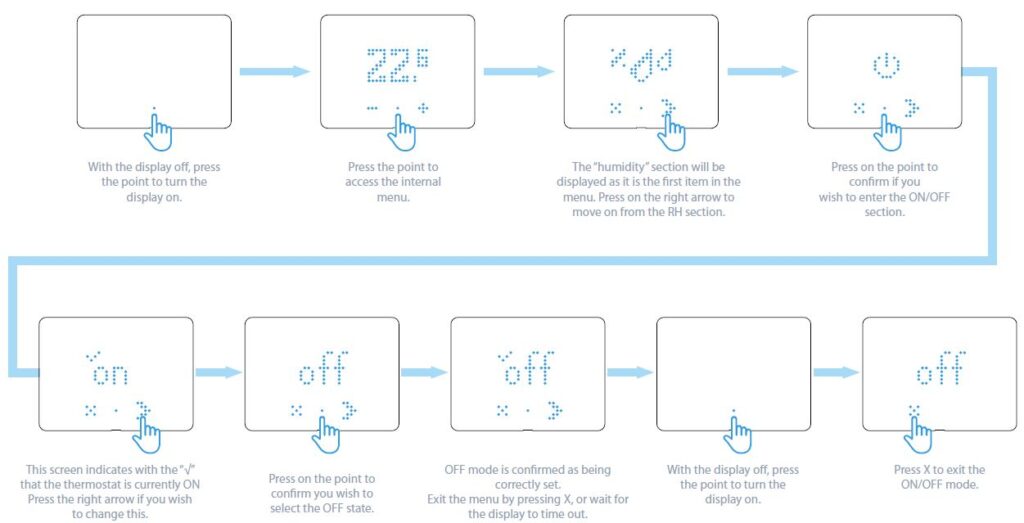
AUTOMATIC (AUTO) MODE
HUMIDITY
ASSOCIATION WITH THE GATEWAY
BEFORE FOLLOWING THE ASSOCIATION PROCEDURE, OPEN THE BLISS APP AND ADD A NEW DEVICE
TRANSMISSION TEST WITH THE GATEWAY
HEATING/COOLING
ACCORDING TO THE OPERATING MODE OF THE THERMOSTAT, YOU WILL SEE DIFFERING VISUAL FEEDBACKS ON THE LUMINOUS ARC
REFERENCE
DOWNLOAD MANUALS:
Finder Bliss2 Smart Thermostat USER MANUAL
OTHER MANUALS:
Finder Bliss2 Smart Thermostat INSTALLATION GUIDE