EPH Controls CP4 Room Thermostat RF Programmable

RFRP-OT Room Thermostat
Factory Default Setting
- Temperature indicator: °C
- Switching differential: 0.4°C
- In-built frost protection: 5°C – Not adjustable
- Clock: 24 hours
- Keypad lock: Off
- Operating mode: 5/2 day
Frost Protection
- Frost protection is built into this thermostat.
- It is pre-fixed at 5°C and is not adjustable.
- It will only be activated when the thermostat is in the OFF mode and the room temperature falls below 5°C.
Specifications
- Power supply: 2 x AA Alkaline Batteries
- Power consumption: 2 mW
- Battery replacement: Once a year
- Temp. control range: 5 … 35°C
- Ambient temperature: 0 … 45°C
- Dimensions: 130 x 99 x 25mm
- Temperature sensor: NTC 100K Ohm @ 25°C
- Temperature indication: °C
- Switching differential: 0.4°C
- Frost protection: Only operational in O mode
- Pollution degree: Pollution degree 2
How your programmable thermostat works
When the thermostat is in AUTO mode, it will operate according to the times and temperatures that have been programmed. The user can select from 6 different programs per day – each with a time and a temperature.
There is no of time, only a higher and a lower temperature. If the user wants the thermostat to be OFF at a certain time, set the temperature for this time to be low. The thermostat will turn ON if the room temperature is lower than the setpoint for the current period. Example: If P1 is set to be 21°C at 6 am, and if P2 is set to be 10°C at 8 am, the thermostat will look for the temperature to be 21°C between 6 am and 8 am.
Mounting & Installation
Caution!
- Installation and connection should only be carried out by a qualified person.
- Only qualified electricians or authorized service staff are permitted to open the thermostat.
- If the thermostat is used in a way not specified by the manufacturer, its safety may be impaired.
- Prior to setting the thermostat, it is necessary to complete all required settings described in the section.
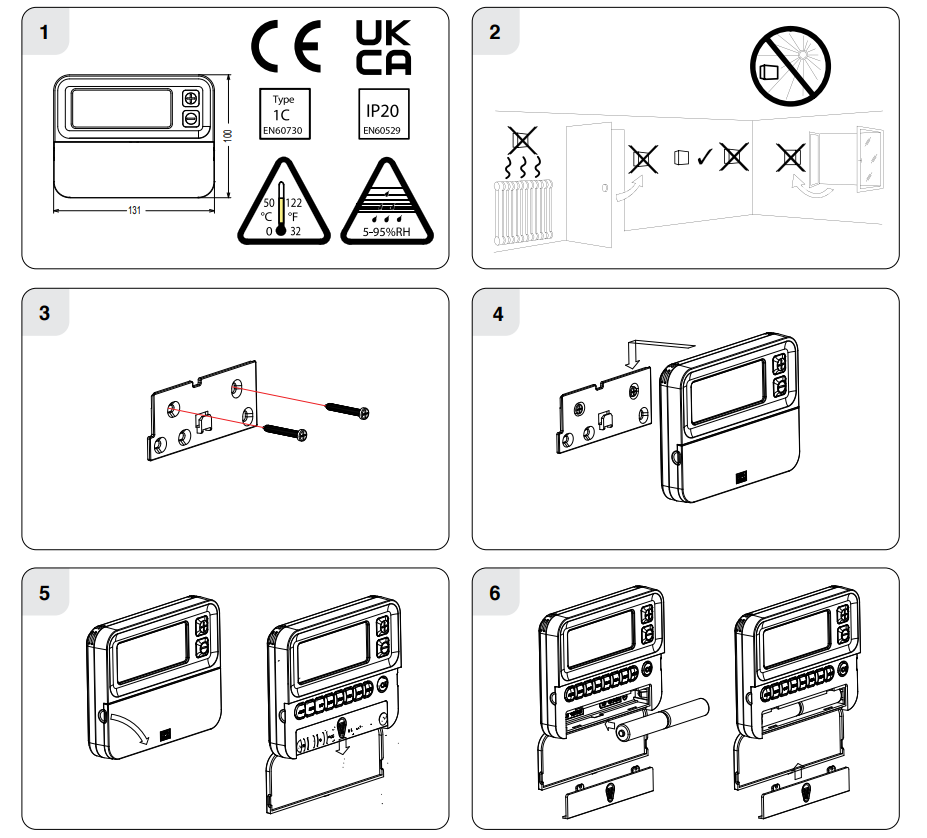
This thermostat can be mounted in the following ways:- Directly mounted on the wall
- Freestanding – Stand Included
- The mounting height should be 1.5 meters above the floor level.
- The thermostat should be wall mounted in the room where the
heating is to be controlled.
The place of installation should be chosen so that the sensor can measure the room temperature as accurately as possible. Choose the mounting location to prevent direct exposure to sunlight or other heating/cooling sources when mounted. - Fix the mounting plate directly to the wall with the screws provided.
- Attach the thermostat to the mounting plate.
- Lower the flap at the front of the thermostat. There is a battery compartment located below the buttons. Apply downward pressure to remove the cover.
- Insert the 2 x AA batteries and the thermostat will turn on.
Close the battery compartment.
RF1A Wireless Receiver
Specifications & Wiring
- Power supply: 200 – 240Vac 50-60Hz
- Contact rating: 250 Vac 10(3)A
- Ambient temperature: 0 … 45°C
- Automatic action: Type 1.C.Q
- Appliance classes: Class II appliance
- Pollution degree: Pollution degree2
- IP Rating: IP20
- Rated Impulse Voltage: Resistance to voltage surge 2500V as per EN 60730
Internal wiring diagram for RF1A-OT
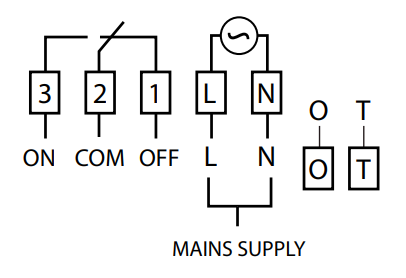
If mains voltage output is required, terminals L & 2 must be electrically linked.
Important: Do not connect Mains Voltage to OpenTherm® terminals.
Mounting & Installation
- The RF1A-OT receiver should be wall mounted in an area within 20 metres distance of the wireless thermostat. It is important that the receiver is mounted more than 1 metre away from metal objects as this will aect communication with the thermostat. The receiver should be installed at least 1 metre from any electronic devices such as radio, TV, microwave or wireless network adaptor.
- Slacken the fastening screw on the bottom of the receiver with a philips screwdriver. The receiver is hinged and can be opened 180 degrees.
- Screw the receiver to the wall with the screws provided.
- Remove the protective cover on the terminal block.
- Insert wires into terminal block in accordance with the wiring diagram.
- Close the cover and tighten the fastening screw.

OTHER MANUALS:
EPH Controls CP4 room thermostat RF programmable Operating Instructions

EPH Controls CP4 room thermostat RF programmable Installation Instructions
Skip to PDF content