EMOS T3 THERMOSTAT

ON indicator
Overview

The T3 thermostat is designed to monitor and control heating systems. It is equipped with a timed room temperature reduction (SET-BACK) function with repetition every 24 hours. It is a simple system of temperature control in a designated area. The thermostat is designed for indoor use. It is typically located in places such as offices, schools, shops, houses, etc.
Specifications
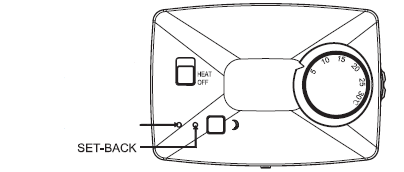
- Range of temperature control: 5 °C to 30 °C
- Maximum switching load: 7 A resistive, 3 A inductive
- Power supply: 230 V AC 50/60 Hz
- Set-back timing: 6 h/day repeated
- Control switches: MCV controlled by on/off relay
- System indication: Green LED indicates that the Set-back function is active. When the Set-back
- temperature is to drop by 5 °C, the LED is orange.
- Operating temperature: 0 °C to 40 °C
- Storage temperature: -20 °C to 60 °C
- Dimensions: 97 × 67 × 28 mm
Installation
- Make sure to read the instruction manual carefully before the first use of the thermostat, as well as the boiler and air conditioning equipment. Turn off the power supply before installing the thermostat! Installation should be carried out by qualified personnel! During installation, observe the appropriate standards.
- Choose a suitable location for the thermostat where air circulates freely, with no devices producing heat in the vicinity, such as a TV set. The thermostat should not be exposed to direct sunshine. We recommend mounting the thermostat more than 1.5 m above the floor.
Note: Never mount the thermostat on a conductive surface. - Open the cover of the thermostat – loosen the screw at the bottom of the unit and remove the top cover, as shown in Figure A.
- There are two mounting holes on the back side. Place the unit on the wall and mark the locations of the holes on the wall. Drill 6mm holes into the wall, insert dowels into holes and using screws mount the thermostat on the wall. No dowels are necessary if the thermostat is mounted on a wooden surface. In that case, drill 2.6 mm holes.
- Connection to electrical power: The thermostat is designed for switching max. 230 V/7 A. Never exceed this limit, otherwise, the thermostat will be damaged (burned). The thermostat has three power terminals: NIN, LIN, and LOUT. Use Figure B to connect lines between the thermostat and the switched heat-generating device
 (HEAT icon).
L – live
N – Neutral
1 – Install while the power supply is OFF
IMPORTANT: Ensure the power supply is OFF when installing the thermostat. - Turn the knob of the switch so that the marking on the dial is aligned with the markings on the wheel, replace the front cover, and gently screw up (Figure C).
- Turn ON the power supply. If the switching indicator (blue LED) blinks twice, the installation was fine. Within several seconds, the thermostat automatically switches to the heating control mode with the LED ON.
Note: If the switching indicator (blue LED) does not blink, turn OFF the power supply, check the wiring, and turn the unit ON again.
Operation
- Turning ON the thermostat temperature control: Set the switch to “HEAT”. The thermostat will control the room temperature.
- Room temperature is controlled by adjusting the knob to the desired temperature which is on the dial.
- Once the thermostat switches the heating system ON, the indicator light goes ON. The thermostat has built-in protection against rapid cycle change – time delay switch – thermostat does not react to change temperature settings immediately.
- Turning OFF the thermostat temperature control: Set the switch to “OFF”. Now the room temperature control will be disabled (control of the heating system will be permanently off).
Automatic temperature reduction “SET-BACK”
The function provides a temperature reduction of 5 °C for a fixed time interval. For example, if the temperature of the dial is set to 22 °C, it will be reduced to 17 °C during the SET BACK mode activation. The time period of the set-back function is 6 hours. For example, if the SET-BACK changes the temperature at 23 h, then the originally set value is resumed at 5 hours. The cycle of the SET-BACK temperature change will be repeated until the function is switched off.
Activating the SET-BACK mode
- Press the
 button, the SET-BACK function is turned on and the function LED will be orange.
 - Six hours later, the temperature automatically returns to the originally set temperature. The SET-BACK function LED is green.
- The following day at the same time, the SET-BACK function will again automatically turn the temperature to the reduced value.
- To disable the SET-BACK function, press the button again. The function LED goes out.
Care and maintenance
The product is designed to provide trouble-free service for many years if operated appropriately. Here is some advice for proper operation:
- Read carefully the manual before using this product.
- Do not expose the product to direct sunlight, extreme cold and moisture, and sudden changes in temperature (this may compromise detection accuracy).
- Do not place the product in locations prone to vibration and shocks – these may cause damage.
- Do not expose the product to excessive force, impacts, dust, high temperatures, rain or humidity
- these may cause malfunction, damage to batteries, and deformation of plastic parts.
- Do not place any open flame sources on the product, e.g. a lit candle, etc.
- Do not place the product to places with inadequate airflow.
- Do not insert any objects in the product vents.
- To clean the product, use a slightly moistened soft cloth. Do not use solvents or cleaning agents
- they could scratch the plastic parts and cause corrosion of the electric circuits.
- The product may not be exposed to dripping or splashing water. Do not immerse it in water or other liquids.
- In the event of damage or defect of the product, do not perform any repairs by yourself. Have it repaired in the shop where you bought it.
This device is not intended for use by persons (including children) whose physical, sensory or mental disability or lack of experience and expertise prevents safe use unless they are supervised or instructed
regarding the use of the appliance by a person responsible for their safety. It is necessary to supervise children to ensure they do not play with the appliance. Do not dispose of domestic waste. Use special collection points for sorted waste. Contact local authorities for information about collection points. If the electronic devices would be disposed of in a landfill, dangerous substances may reach groundwater and subsequently the food chain, where it could affect human health. The product was issued a Declaration of Conformity. The manual can be found at: http://www.emos.eu/download
Reference
Download Manual
EMOS T3 THERMOSTAT Installational Manual
![]()