
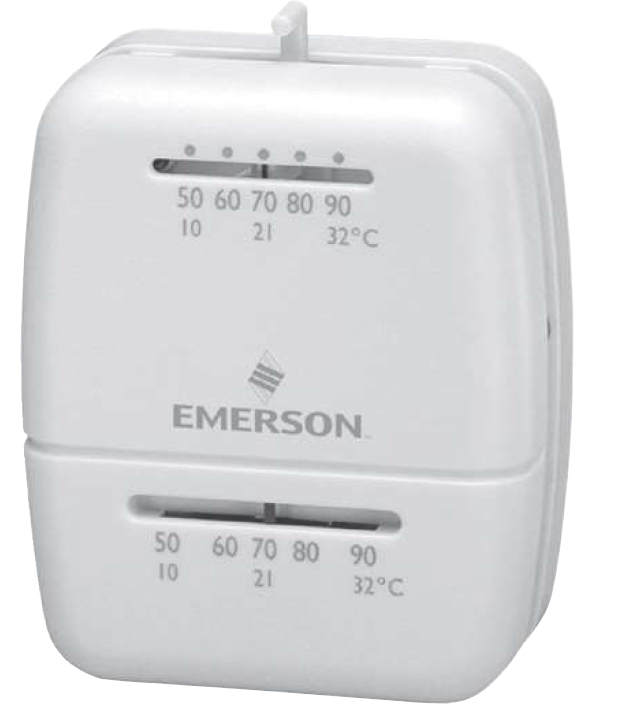
EMERSON White Rodgers 1C20 Heating Only Thermostat
YOUR THERMOSTAT REPLACES
| Description | 1C20 | 1C26 |
| Standard Heating & Cooling Systems – 4 or 5 wires | No | Yes |
| Standard Heat Only Systems | Yes | Yes |
| Millivolt Heat Only Systems – Floor or Wall Furnaces | Yes | Yes |
| Standard Central Air Conditioning | No | Yes |
| Gas or Oil Heat | Yes | Yes |
| Electric Furnace | Yes | Yes |
| Hydronic (Hot Water) Zone Heat – 2 Wires | Yes | Yes |
| Hydronic (Hot Water) Zone Heat – 3 Wires | No | No |
| Heat Pump (No Aux or Emergency Heat) | No | Yes |
| Heat Pump (with Aux or Emergency Heat) | No | No |
| Baseboard Electric Heating or Line Voltage (120 or 240 Volt) | No | No |
PREPARATIONS
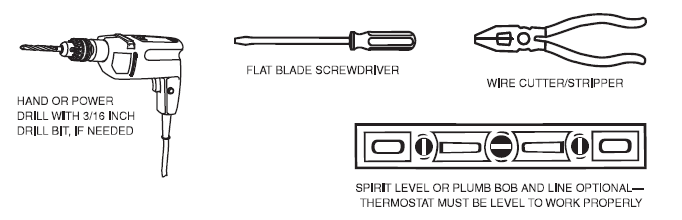
Assemble tools required as shown below.
Failure to follow and read all instructions carefully before installing or operating this control could cause personal injury and/or property damage
THERMOSTAT FEATURES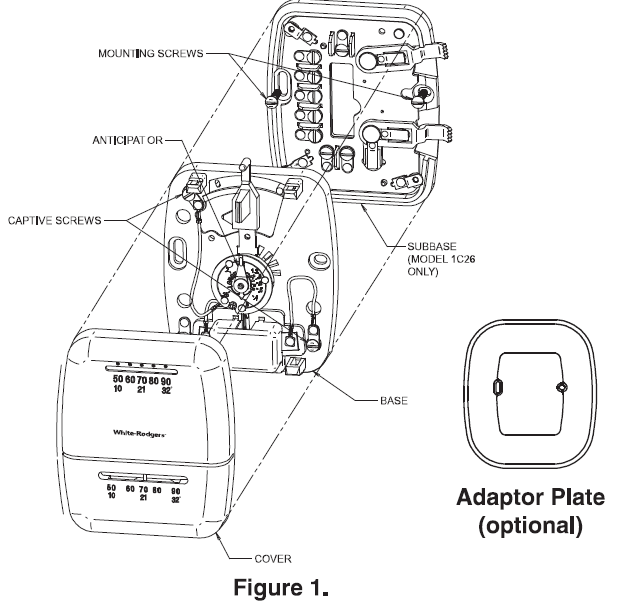
REMOVING OLD THERMOSTAT
CAUTION
To prevent electrical shock and/or equipment damage, disconnect electrical power to the system at the main fuse or circuit breaker until installation is complete. Before removing wires from old thermostat’s switching subbase, label each wire with the terminal designation it was removed from. Some models also include an adaptor plate to cover unpainted surfaces. Thermostat wires pass through the adaptor plate center opening.
- Remove Old Thermostat: A standard heat/cool thermostat consists of three basic parts:
- The cover, which may be either a snap-on or hinge type.
- The base, which is removed by loosening all captive screws.
- The switching subbase, which is removed by unscrewing the mounting screws that hold it on the wall or adaptor plate.
- Make a note here .__ ____ __, of the anticipator setting on the old thermostat for future reference and use in step 5. The heat anticipator pointer, if adjustable, will be set at one of a series of numbers representing the current rating of the primary control in your furnace. The number will be one of the following: .2, .4, .8, etc. or 0.2, 0.4, 0.8, etc.
If no heat anticipator/indication is showing, do not be concerned; move on to the next step.
A REMOVING OLD THERMOSTAT
ATTENTION! This product does not contain mercury. However, this product may replace a unit which contains mercury.
Do not open mercury cells. If a cell becomes damaged, do not touch any spilled mercury. Wearing non-absorbent gloves, take up the spilled mercury and place into a container which can be sealed. If a cell becomes damaged, the unit should be discarded.
Mercury must not be discarded in household trash. When the unit this product is replacing is to be discarded, place in a suitable container. Refer to www.thermostat-recycle.org for location to send the product containing mercury.
MOUNTING AND WIRING
WARNING
- Do not use on circuits exceeding specified voltage. Higher voltage will damage control and could cause shock or fire hazard.
- Do not short outterminalson gas valve or primary control to test. Short or incorrect wiring will damage thermostat and could cause personal injury and/or property damage.
- Thermostat installation and all components of the system shall conform to Class II circuits per the NEC code.
1 C20 (Heat Only Two Wire):
- Mount base and adaptor plate: Mount base and adaptor plate (optional) to wall using screws provided (see Fig. 1).
- Attach wires: Attach one wire to Rand the other wireto W on base.
- Skip to Step #5.
1 C26 (Heating and Cooling):
- Remove base from subbase: Loosen the three screws on the base and remove.
- Mount switching subbase/adaptor plate: Use the screws provided to mount the subbase and adaptor plate (optional) to wall (see Fig. 1 ).
- Attach wires to appropriate terminals:
- For two wire systems (Heat Only or Cool Only). If you have a two-wire Heat Only system, attach one wire to RH and one to wire W. If you have a two-wire Cool Only system, attach one wire to RC and one to wire to Y. Leave the factory installed jumper between RC and RH attached. Tighten any unused terminals securely.
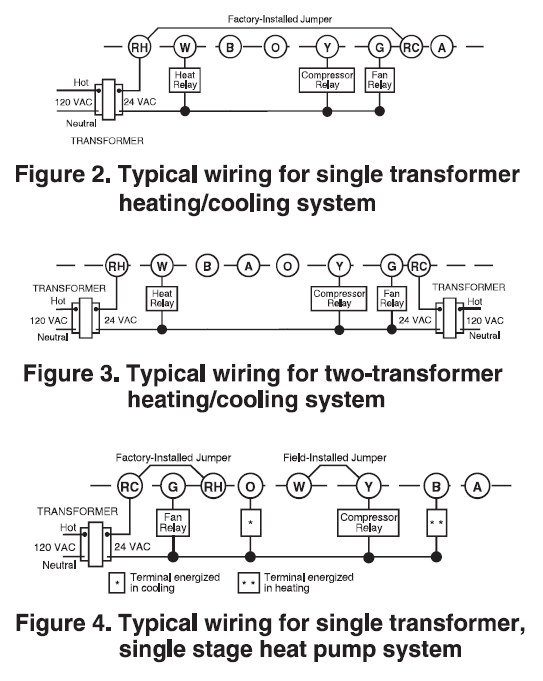
- If your system has more than two wires: Use the cross reference chart to determine correct wire connections. If you have a four-wire heat/cool system leave the factory installed jumper between RC and RH attached (see Fig 2.). If your system has five wires remove the factory installed jumper between RC and RH (see Fig 3.).
- Electric heat or single stage heat pump systems: This thermostat is configured from the factory to operate a heat/cool, fossil fuel (gas, oil, etc.) forced air system. It is configured correctly for any system that DOES NOT require the thermostat to energize the fan on a call for heat. If your system is an electric heat or heat-pump system that REQUIRES the thermostat to turn on the fan on a call for heat, remove the yellow factory-installed jumper wire from the Y terminal and connect it to the A terminal. This will allow the thermostat to energize the fan immediately on a call for heat. If you are unsure if the heating systemrequires thethermostatto control the fan, contact a qualified heating and air conditioning service person.
For single stage heat pump applications (no auxillary heat), install a short jumper wire (not included) across terminals W and Y. If the system has a reversing valve connection energized in Cooling, attach it to 0. If the system has a reversing valve connection energized in Heating, attach it to B (see Fig. 4). This thermostat will not provide multistage heating or cooling.
WARNING For California Residents: This product contains a chemical known to the state of California to cause cancer and birth defects and other reproductive harm.
CAUTION
Take care when securing and routing wires so they do not short to adjacent terminals or rear of thermostat. Personal injury and/or property damage may occur.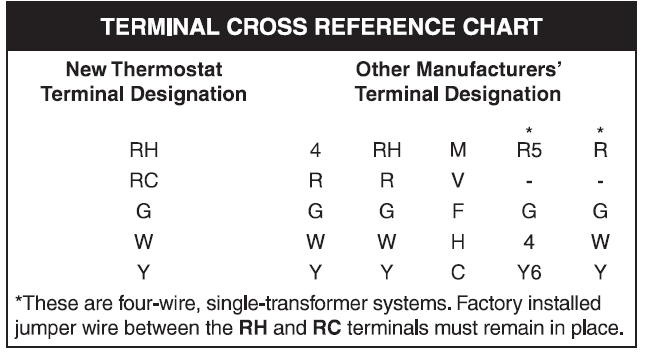
- Mount Thermostat Base: Gently push excess wire back into the wall opening and plug hole with a fire-resistant material, such as fiberglass insulation to prevent drafts from affecting thermostat operation. Mount the thermostat base to the subbase using the three captive screws on the thermostat base.(See Fig. 1) Tighten the screws securely. Remove paper tag from plastic contact cover. Proceed to Step #5.
SET HEAT ANTICIPATOR
Set anticipator to match the setting of your old thermostat you noted in Step 3, or, the anticipator should be set to match the current rating stamped on your main heating control. The heat anticipator is adjustable from 0.15 to 1.2 amps. Adjust the anticipator by rotating the contact arm (see fig. 5). The anticipator setting is indicated by the numbers on the base that the pointer points to. If you are unsure where to set the anticipator contact the heater manufacturer for a recommended setting.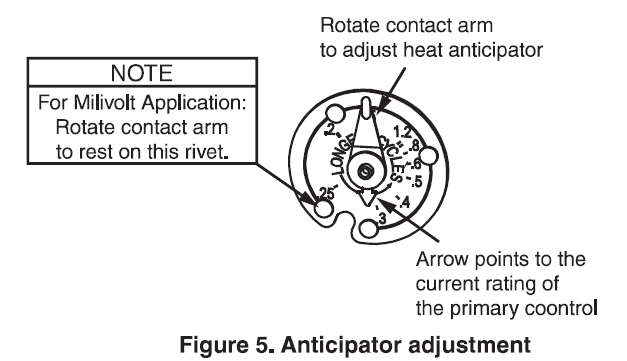
Move the pointer counterclockwise to lengthen heating system cycles; move clockwise to shorten heating cycles. Adjustments should not be greater than 1 /2 marking at a time.
Snap on Cover: Carefully align the cover with the base and snap the cover onto the base.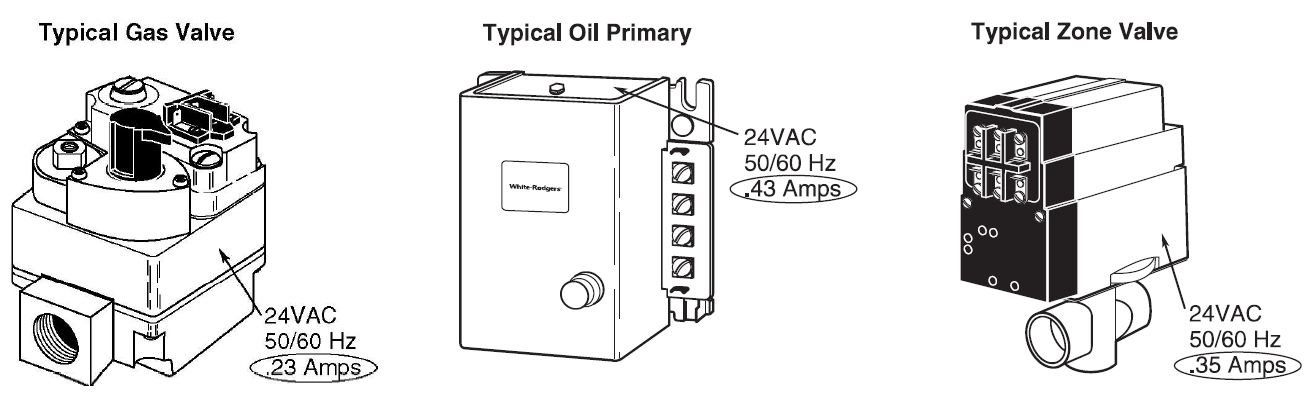
NEW THERMOSTAT OPERATION
1 C20 Heat Only – After power is turned on, slide temperature lever to desired setting. To turn heat off, slide lever all the way to the left until it clicks.
1 C26 – This thermostat is easy to operate. Fig. 6 shows how the heating/cooling system and fan operate when the switches are in various positions. After power is turned on, use the system switch to select either heating or cooling, or to turn the heating/ cooling system off. Use the fan switch to control fan operation. When the fan switch is in the AUTO position, the fan will cycle with the heating or cooling system (the fan will not run if the system switch is in the OFF position and the fan switch is in the AUTO position). When the fan switch is in the ON position, the fan will run continuously, regardless of system switch position (even if the system switch is set to OFF, the fan will run if the fan switch is in the ON position).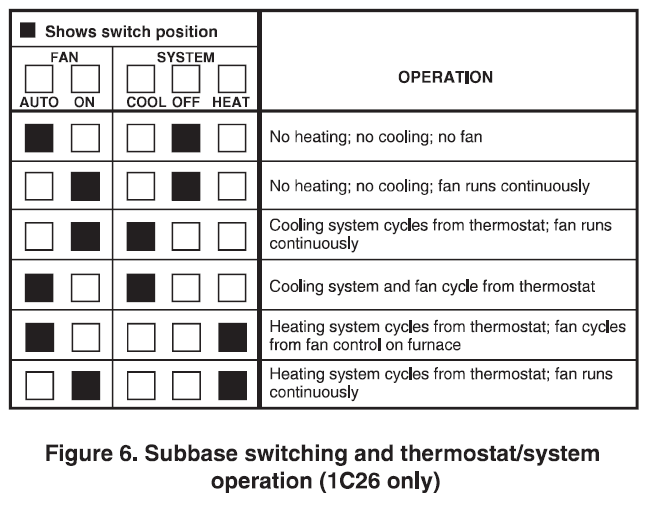
SPECIFICATIONS
ELECTRICAL DATA
- Switch Rating …………………… 24 VAC (30 VAC max.)
- Heating …………………………….. 0.15 to 1.2 Amps
- Cooling …………………………….. 0 to 1.5 Amps
- Switch Action …………………… Snap Action
Anticipator Rating:
- Heating …………………………….. Adjustable from 0.15to 1.2Amps
- Cooling …………………………….. Fixed
THERMAL DATA:
- Temperature Range …………… 50° F to 90° F (10°c to 32°C)
- Operating Humidity Range … 0 – 90% noncondensing
TROUBLESHOOTING
| Symptom | Possible Cause | Corrective Action |
| No Heat/No Cool/No Fan
(common problems) |
1. Blown fuse or tripped circuit breaker.
2. Furnace power switch to OFF. 3. Furnace blower compartment door or panel loose or not properly installed. |
Replace fuse or reset breaker.
Turn switch to ON. Replace door panel in proper position to engage safety interlock or door switch. |
| No Heat | 1. Pilot light not lit.
2. Broken or melted anticipator wire.
3. Loose connection to thermostat or system.
4. Thermostat or heating system requires replacement or service.
5. System Switch not set to Heat. |
Re-light pilot.
Excessive current or dead short in system. Have a qualified service person check the system before replacing thermostat. Verify thermostat and system wires are securely attached. Your furnace manufacturer or service person can describe how to test the heating system to verify it is operating correctly. If the heating system is capable of operation and the no heat condition persists, replace the thermostat. Set System Switch to Heat and raise temp above room temp. |
| Intermittent Heat | 1. Furnace Lock-Out Condition | Many furnaces have safety devices that shut the system
down when a lock-out condition occurs. If the heat works intermittently contact the furnace manufacturer or local service person for assistance. |
| No Cool | 1. Loose connection to thermostat or system.
2. Thermostat or cooling system requires replacement or service.
3. System Switch not set to Cool. |
Verify thermostat and system wires are securely
attached. Your cooling system manufacturer or service person can describe how to test the cooling system to verify it is operating correctly. If the cooling system is capable of operation and the no cooling condition persists, replace the thermostat. Set System Switch to Cool and lower temp below room temp. |
| Heat, Cool or Fan Runs
Constantly |
1. Possible short in wiring.
2. Possible short in thermostat 3. Possible short in heat/cool/fan system. |
Check each wire connection to the thermostat to verify
it is neatly looped under the terminals.No extra wire should stick out from under the terminals. |
| Furnace Cycles Too Fast or
Too Slow Narrow or wide temperature swing |
See Step 5, Adjusting the Anticipator. | The anticipation setting is the only adjustment that
effects the heating cycle rate. If an acceptable cycle rate is not achieved using the anticipator contact a local service person for additional suggestions.The location of the thermostat, size of the Heat/Cool System and current draw can influence the cycle rate. |
| Cooling Cycles Too Fast or Too Slow (narrow or wide temperature swing) | 1. Poor thermostat location for sensing room temperature.
2. Cooling system over or undersized. 3. Excessive Current draw influencing thermostat. |
The cycle rate for cooling can not be adjusted.The location of the thermostat, size of the Cool system and current draw can influence the cycle rate. Contact a local service person for suggestions. |
| Thermostat Setting and
Thermostat Thermometer Disagree |
1. Thermostat thermometer setting requires adjustment.
2. Thermostat setting lever requires calibration. |
The thermometer can be adjusted by using a standard slotted screwdriver.Turn the thermometer pointer screw located inside the front cover to change the setting. For calibrating the setting lever contact a local heating and
cooling service person. |
| Adjusting Thermometer | 1.Thermostat thermometer disagrees with other room thermometers. | The thermometer on the thermostat is accurately calibrated at our factory but you can adjust it by using a standard slotted screwdriver.Turn the thermometer pointer screw located inside the front cover to change
the setting. |
White-Rodgers is a business of Emerson Electric Co. The Emerson logo is a trademark and service mark of Emerson Electric Co.
white-rodgers.com
emersonclimate.com
Reference
Download manual: EMERSON White Rodgers 1C20 Heating Only Thermostat Installation Instructions
EMERSON White Rodgers 1C20 Heating Only Thermostat Installation Instructions