Elechico THP-6000 GCLP Programmable WIFI Thermostat
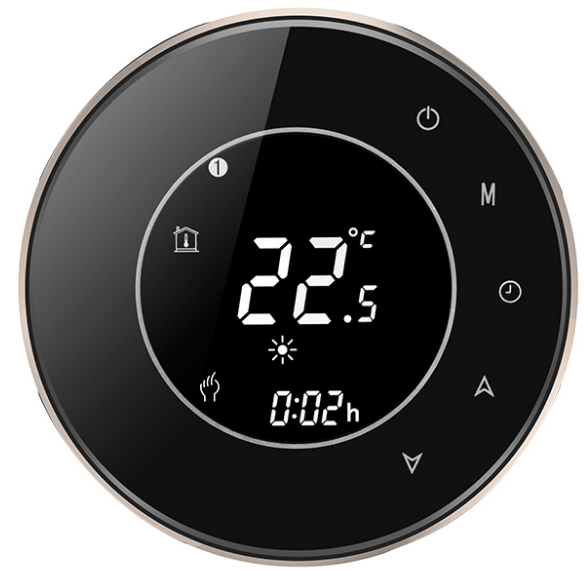
Welcome
Thank you for your purchase.
Your new thermostat will provide uniform and comfortable temperature control throughout every room in your property. We bring together technology, craftsmanship and the highest quality materials to provide you with a safe, reliable product combined with sleek, contemporary design.
Please read this installation/programming manual for comprehensive instructions on installing and operating your thermostat. Please also ensure a suitably qualified person installs your thermostat and complies with all local regulations.
In the box you will find
- Thermostat: 1pc
- User Guide: 1pc
- QC Passed: 1pc
- Screws: 2pc
- Floor Sensor (2.5m): 1pc
(Floor sensor is Optional)
ABOUT YOUR THERMOSTATS
The BHT-6000 range has been developed to control electric underfloor ,water heating or water/gas boiler systems. These units are designed for use in commercial, industrial, civil and domestic properties
MODEL DEFINITION
WH: Water heating, 3A
UH : Electric floor Heating, 16A
GC: Water/Gas Boiler, 3A
L: Backlight
P: Weekly Programmable
N: Modbus Communication
B: BACnet Communication
W: Wifi
S2: Both internal sensor and floor external sensor
For example: THP-6000 GCLP
FEATURES
On Appearance
- Negative black screen will bring you to a secret world.
- 51mm round display area helps to protect your eyes.
- Glass or Acrylic Lens is for your selection.
- Touch buttons to make simple operation.
- Amazing Silver Frame opens your modern life.
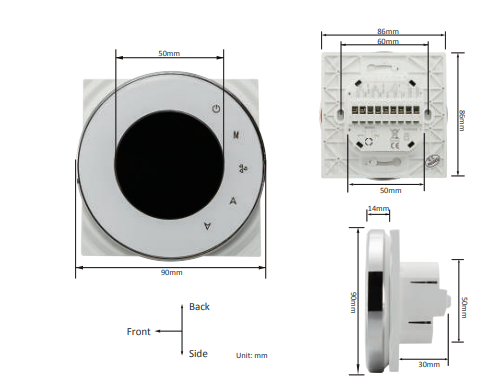
- The visiable thickenss above the wall is only 11mm.
- Rotation to connect gives you easy installation.
- 86mm hidden box and european 60mm round box is suitable.
- White, black or gold housing creates your colorful life.
On Functionality
- Powerful functions are available such as Modus/WIFI etc,
- 0.5°C Accuracy keeps temperature within the level you set.
- Data memory when power is off.
- 5+2 six periods programmable maximize comfort and economy.
- Creat thermostat group to Centralized control
- Interated with Amazon Echo, Google Home, Tall Genie, IFTTT.
- All setting languages synchronize your time zone, address and language.
- No limit to add rooms and support Smart Scene.
DIMENSION
TECHNICAL DATA
- Power Supply: 95 ~ 240 VAC, 50 ~ 60HZ
- Current Load: 3A (water heating/water boiler/gas boiler) 16A (electric heating)
- Sensor: NTC3950, 10K
- Accuracy: ‡0.5 C or +1 F
- Set Temp. Range: 5 – 35 C
- Dispaly Temp. Range: 5 ~ 99 C
- Ambient Temp.: 0 ~ 45 C
- Ambient Humidity: 5 ~ 95 % RH (Non Condensing)
- Storage Temp.: -5 ~ 45 C
- Power Consumption: <1.5W
- Timing Error: < 1%
- Shell Material: PC +ABS ( Fireproof)
- Installation Box: 86 * 86mm Square or European 60mm Round Box
- Wire Terminals: Wire 2 × 1.5 mm2 or 1 x 2.5 mm2
- Protection Class: IP 20
- Buttons: Capactive Touch Buttons
BEFORE WIRING AND INSTALLING
- 1. Read these instructions carefully. Failure to follow them could
damage the product or cause a hazardous condition. - 2. Check the ratings given in the instructions and on the product to
make sure the product is suitable for your application. - 3. Installer must be a trained, experienced service technician.
- 4. After installation is complete, check out product operation as
provided in these instructions.
CAUTION: Electrical Shock or Equipment Damage Hazard. Can shock individuals or short equipment circuitry. Disconnect power supply before installation.
WIRING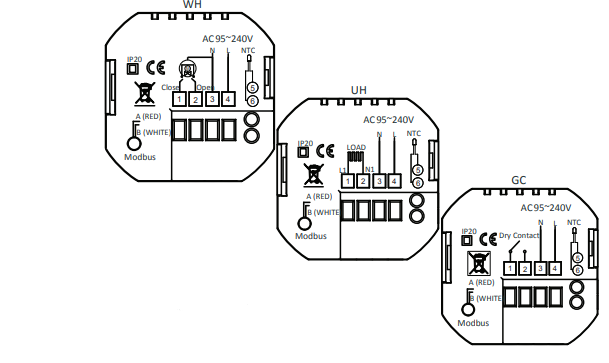
Note
- GA is for water heating;
- UH is for electric heating;
- GC is for water/gas boiler;
- NTC and Modbus is optional.
INSTALLATION
Your thermostat is suitable for installation within a standard 86mm pattress box or European 60mm pattress box.
Step 1. Keep power off. See Fig 1.
Step 2. Remove the mounting Plate by rotating the LCD part. See Fig 2.
Step 3. Connect power supply, load into the appropriate terminals. (see “Wiring your thermostat” for details and Fig 3).
Step 4. Fix the mounting plate into the wall with screws in the box. See Fig 4.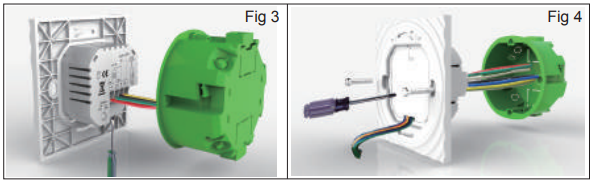 Step 5. Fasten body of thermostat and the mounting plate through rotating. See Fig 5.
Step 6. Installation complete. See Fig 6.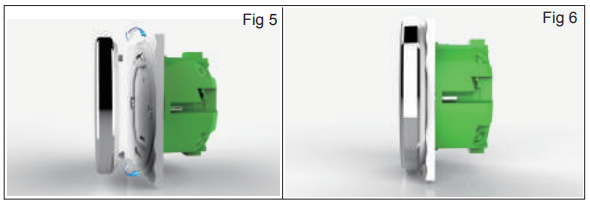
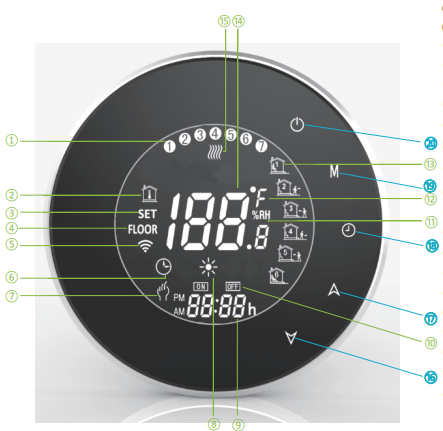
HOME SCREEN QUICK REFERENCE
- Monday To Sunday
- Room Temp.
- Set Temp.
- Floor Temp.
- Wifi
- Clock
- Manual
- Heating
- Time Display
- Timing On/Off
- Humidity
- C or F
- Period 1 to Period 6
- Room Temp. Display
- eating On
- Down Button
- Up Button Mode
- Clock Button Mode
- Mode
- Power On/off
OPERATION
During Power On
- Power On/off: Press
 to turn the thermostat on/off.
 - Manual & Programmable
Touch M (mode) to change between manual mode and programme mode. In manual mode, will show in the bottom left of the screen
In programmable mode, the period icon will show in the right side. - Setting Temperature
In the mode of programmable, set temperature, time could not be adjusted.If the user want to change, please go to manual mode or programmable mode.
In the mode of manual, press to set the desired temperature.
 - Adjusting/Setting the Clock
Touch the icon to set minute, hour and weekday (1 = Monday, 2 = Tuesday etc.) by using thearrows. Pressonce more to confirm and exit.
 - Locking your Thermostat
Press and hold thefor 5 seconds to lock/unlock your thermostat
In item 3 of high senior options, you can select full lock or half lock. - 6. Adjusting/setting the Program Schedules
When Wi-Fi connection is made, your thermostat will automatically
accept the program schedule made via the APP on your device (see
below for detailed instructions) To set the program schedules through
your thermostat (NOT via your smartphone/tablet) simply follow the
instructions as below:
Please note: Setting the programme schedule through your thermostat can only be carried out if there is no Wi-Fi connection between your thermostat and smartphone/tablet.
Touch M to change between manual mode and programme mode. In manual modewill show in the bottom left of the screen. In programme mode, touch and hold the icon until the weekday schedule settings appear (1 2 3 4 5 will show along the top of the screer
- Use the
 arrows to adjust the on time.
 - Press the icon and use thearrows to set the off time (2nd period).
- Press the icon and use thearrows to set the temp.
- Repeat this process for periods 3 4and 5 6.
- Press the icon once more to enter the Saturday schedule settings (6 will show along the top of the screen).
- Repeat the above process to set the period and temp. and Sunday schedule.
- Press once more to confirm and exit.
Default settings for program schedule
|
Time display |
WEEKDAY (MONDAY – FRIDAY)
(1 2 3 4 5 shows on screen) |
WEEKEND (SATURDAY)
(6 shows on screen) |
WEEKEND (SUNDAY)
(7 shows on screen) |
|||
| TIME | TEMPERATURE | TIME | TEMPERATURE | TIME | TEMPERATURE | |
| Period 1 | 06:00 | 20。C | 06:00 | 20。C | 06:00 | 20。C |
| Period 2 | 08:00 | 15。C | 08:00 | 20。C | 08:00 | 20。C |
| Period 3 | 11:30 | 。
15 C |
11:30 | 20 C | 11:30 | 。
20 C |
| Period 4 | 13:30 | 。
15 C |
13:30 | 。
20 C |
13:30 | 。
20 C |
| Period 5 | 17:00 | 22。C | 17:00 | 20。C | 17:00 | 20。C |
| Period 6 | 22:00 | 15。C | 22:00 | 15。C | 22:00 | 15。C |
A separate schedule may be set for weekdays (Mon – Fri) and for weekends (Sat or Sun).
- Checking the Temperature of Floor Sensor
Press and hold the W arrow for 5 seconds to display the temp. of floor sensor. - Return To Factory Default
Press the Reatore Manufacturer Defaults, you can reset thermostat.
Steps: Open your app-go into your room – click menu on the top
right corner – move to the end – Press Restore Manufacturer Defaults.
During Power Off
Setting the Functions and Options
When power is off, press and hold M andat the same time for 5 sec. in order to reach system function. Then press M to scroll through the available functions, and use thearrows to change the available options. All settings are confirmed automatically.
| Code | Function | Setting and options | Default |
| 1 | Temperature
|
-7 to 7。C |
-1 |
|
2 |
Fan control |
00:When room temp. reaches the set point,the
fan will turn off 01:When room temp. reaches the set point,the fan will turn to low speed |
0 |
| 3 | 01 | ||
| 4 | Heat/cool | 00:Cool only 01:Heat/Cool | 01 |
| 5 | Min. Set Temp. | 5 to 15。C | 05 |
| 6 | Max. Set Temp. | 5 to 35。C | 35 |
| 7 | 12/24 hours | 00:12h 01:24h | 01 |
| 8 | Display Mode | 00:Display both set temp. and room temp.
01: Display set temp. only |
00 |
| 9 | Energy saving Mode | 00: Non-energy saving Mode 01: Energy saving Mode,set Temp. keep economy Temp. | 00 |
| A |
Temp. |
10 to 30。C |
20 |
| B | Cooling Economy Temp. | 10 to 30。C | 26 |
| C | Deadband Temp. | 1 to 5。C | 1 |
| D | Standby Bightness of backlight | 3-99 bigger value,more brightness | 4 |
ABOUT WIFI
WI-FI CONNECTION
Before using your Wi-Fi thermostat for the first time,you must configure the Wi-Fi signal and settings through your smartphone or tablet This will allow communication between your connected devices
- Step 1 Download your APP (Fig 1-1)
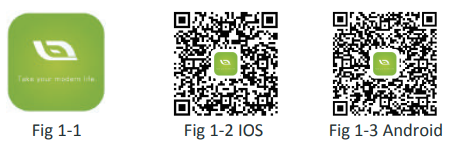 For IOS devices, search for My Smart Thermostat in Apple Store and download. Alternativelv,scan the relevant QR code here (Fig 1-2).
For Android devices, search for My Smart Thermostat in Google Play and download.Alternatively,scan the relevent QR code(Fig 1-3). - Step 2 Register your account
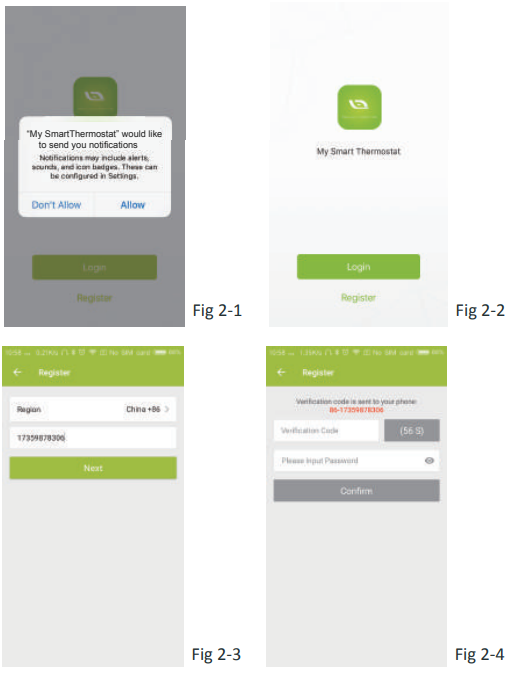 Open My Smart Thermostat, you will get a piece of notification(Fig2-1).
Click Allow to go into your page of register (Fig 2-2). Press register and enter your phone no. or email (Fig 2-3) then you can get a verification code. Input your password and confirm (Fig 2-4) to complete your registration.If you have account, pease log in - Step 3 Connect your Wi-Fi signal
On your thermostat
With power off, press and hold the arrow for eight (8) seconds.
The backlight will be on and the icon will flash one time per sec..
Then, go back to the home page of your app
Press the + on the upper right corner of the page (see Fig 3-1) to add your device. Click Confirm indicator rapidly blink (Fig 3-2) then select your network and back to your app to enter the password of your wireless router (Fig 3-3) and confirm. The app will connect automatically (Fig 3-4). This may typically take up to 5~90 seconds to complete. Your room name could be edited when the device is connected (Fig 4-4).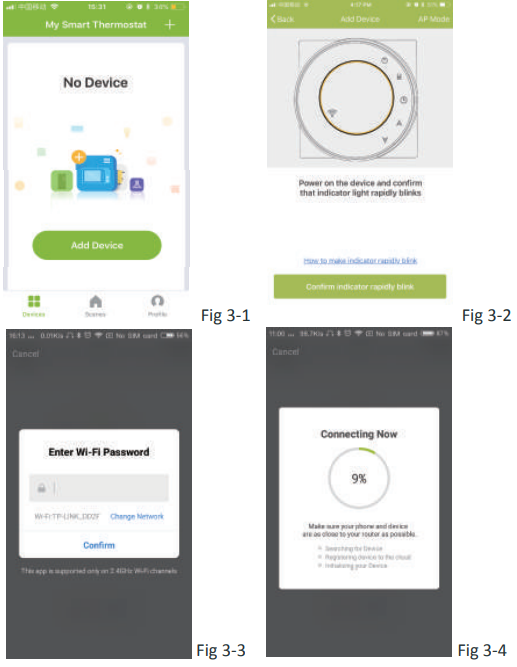
This is EZ mode which provides fast network connection between your app and your device. If your router doesn’t support it or your wifi signal is weak or you can not connect by EZ mode, press the AP Mode
on the upper right corner in Fig 3-2
If you have connected your thermostat successfully, please ignore the AP setting as below.
On your thermostat
- with power off, press and hold thearrow for eight (8) seconds.
- The backlight will be on and the iconwill flash one time per sec..
- Press and hold thearrow for eight (8) seconds again.
- The icon
 will flash one time every (3) seconds.
Then, go back to the home page of your app
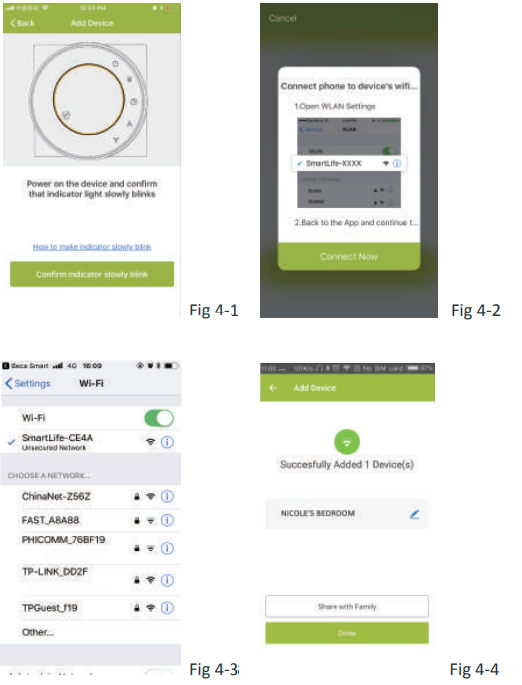
Click Confirm indicator slowly blink (Fig 4-1) then select your network and back to your app to enter the password of your wireless router (Fig 3-3) and confirm. The app will go into the page in Fig 4-2
- Press Connect now to select the wifi signal Smartlife-XXXX of your thermostat (Fig 4-3).
- Go back to your app and click Connect now then the app will connect automatically (Fig 3-4)
- This may typically take up to 5~90 seconds to complete.
- Your room name could be edited when the device is connected (Fig 4-4).
PROGRAMMING YOUR THERMOSTAT
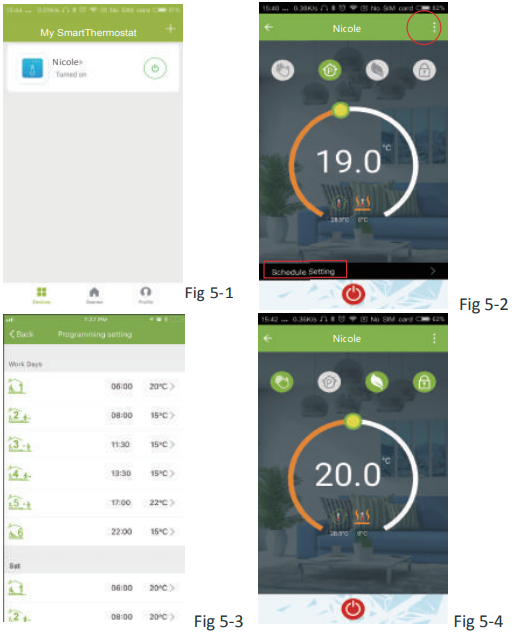
When your room is established successfully, it will display on the home screen (Fig 5-1). The round button is to turn on/off your room. Click the line into begining programming your thermostat.
 Power on/off button, press it, turn on the device, press it again, turn off the device
 Lock/Unlock button.If button is green, the screen is “Locked”, If button is grey, the screen is “Unlocked”.
 Econony button, in this mode, the temperature will be keep 20 degree. This temperature cannot be changed or adjusted.
 Manual button:In this mode, your heating can be set manually (ie. Not using the pre-programmed settings)
 Program button. When this button shows, your thermostat is in program mode and will follow any pre-set heating schedule.
- When in Manual mode, press the button to select mode and vice-versa.
Slide the yellow button backwards or forwards to manually adjust the temperature, the temperature will show in the center of the page. After a few seconds the current room temperature
will show.
- When in Program mode, click on the schedule setting (at the bottom of the page) to be taken to the schedule page (See Fig 5-2) where you can simply click on the working days (Mon-Fri) and then the time/Temp. to adjust to your prefered schedule.
- You can set 6 periods – time and temp. (Fig 5-3) Repeat the above after clicking on the Weekend (Sat -Sun) settings at the top of the page
- Once your schedule has been set, click on SAVE and the app will send the programming to your thermostat and confirm the schedule has been saved.
How to create a group?
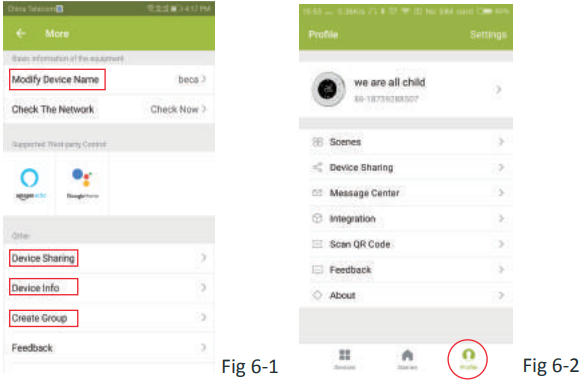
Press the menu button in the red circle (Fig 5-2) then click Create Group (Fig 6-1). Select all the rooms you want and confirm.
The one who create this group can control all the rooms at the same time.
Note: Except create the group, in this menu page, you can also modify your device name, share your device, get information of your device.
How to share your device with your family member?
- Way 1: Mentioned in the above.
- Way 2: Click your Profile at the right botton of your main page (Fig 6-2).
Select Device Sharing then add the account you want to share. You can see the sharing account you have sent and the device you have shared in this sharing page. You don’t need to do anything if you are the one shared. You can add as many as rooms you want.
How to connect your device to Amazon Echo or Google Home?
In your profile, click Integration into the using page. Press Use Now > (Fig 7-1) for your Amazon Echo or Google Home or Tmall Genie or IFTTT then you can see the operation steps.
What is your Smart Scene and How to use it?
Customize your own personal scenes to suit your needs. For example, set your home to automatically turn on thermostat on when you back home (Fig 7-2).Press + button into the setting
- Step 1: You can set a condition for Task like Temperature below 20 degree, then click Save.(Condition: Temp., Humidity, Wether, PM2.5, Air Quality,Sunrise/Sunset, Device)
- Step 2: Add a task. Press + to Select Device (Power,Set Temp, Lock Mode) to act, then Save.If you want to delete the scene, you can press Delete in the end.
NOTE: The room sound could be turned on/off in PROFILE-SETTING- SOUND. The sound is matched with the default of your system.
SIMPLE EXCEPTION HANDLING
| No. | Phenomenons | Handling |
| 1 | Power is on but without display. | * Check if the terminals between LCD panel and
Power Unit Box is loosen. |
| 2 | Without output but display works. | * Use a new LCD panel or new Power Unit Box to
replace the old one. |
| 3 | Room Temp. Is a little different from
the actual. |
* Do temperature calibration in item 1 of high
senior options |
SERVICE
Your thermostat carries an 24 months warranty from date of purchase. Service outwith the warranty period may incur a charge. More detail please contact with us directly.
REFERENCE:
DOWNLOAD MANUALS:
Elechico THP-6000 GCLP Programmable WIFI Thermostat User Guide

Elechico THP-6000 GCLP Programmable WIFI Thermostat User Guide