Drayton Digistat+ RF601N RF Room thermostat

Installation Guide
Technical Data

SINGLE CHANNEL Rl:CEMR (SCR)

Location

Room Thermostat
Care should be taken to mount the thermostat in a position which mounted on an inside wall about 1.5m (5ft) above the floor in a position where it can respond to room temperature but away from the direct influence of radiators or other appliances giving off heat.
Signal Strength
Before fixing the Digistat+RF to the wall it is recommended to first check the signal strength from that location. To do this, remove the batteries, press and hold the set’ button whilst refitting the batteries, keep the set’ button held and after a few seconds the display will show rF which indicates that the Digistat+RF is continuously sending an OFF signal to the SCR (receiver). Leave the Digistat+RF in position and return to view the SCR. If the red LED is continuously flashing, this indicates a good signal. If the red ED is not flashing, this indicates a poor signal and you need to reposition the Digistat+RF until the red ED is flashing. When the signal strength has been confirmed remove the batteries to cancel the test and follow the installation instructions. https://couples-massage-nyc.com/ https://couples-massage-nyc.com/ https://couples-massage-nyc.com/
Before Installation
If you do not have the knowledge to install the thermostat safely then you must arrange for a competent electrician to install it for you. Wiring must conform to the current IEE regulations. Prior to commencing the installation, you must ensure the mains.
Remove battery
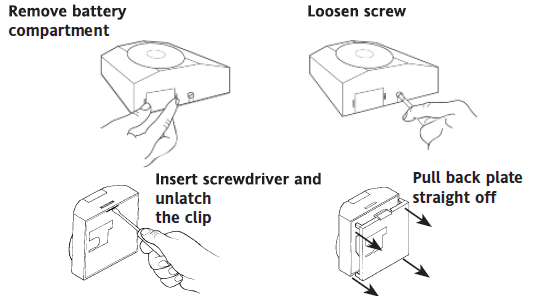
Standard cable entry is from the rear, but if surface wiring, from the top or bottom, is to be used, or extra space for cabling is required, use the optional Pattress box (sold separately).
WIRING
Room Thermostat (not RF models)

INSTALLER OPTIONS
The following installer options can be adjusted,
- Application Type
- System Capability
To enter the Installer menu, press and hold the “Set’ button for more than 10 seconds – the display will show In’ (Installer menu) as shown,

Application Type
Rotate the dial clockwise until ‘tv’ (Annlication Tvne) is shown

- Then press the ‘Set button, and the current setting is shown,

- Rotate the dial until the required Application Type is shown, then press ‘Set to confirm.

System Capability
Adjust this setting to suit the heating system’s capability.
- Rotate the dial until ‘Sy’ (System Capability) is shown

- Then press the set button, and the current setting is shown,
- Rotate the dial until the required System Capability is shown, then press ‘Set’ to confirm.
- To return to normal operation, either press the ‘Set’ button for more than 5 seconds or wait for 1 minute and it will return automatically
Hereby, Schneider Electric Controls UK LTD, declares that this Room Thermostat is in compliance with the essential requirements and other relevant provisions of RED-DIRECTIVE 2014/53/EU. Declaration of conformity can be downloaded on: www.draytoncontrols.co.uk

Other Manual:
Drayton Digistat+ RF601N RF Room Thermostat User Guide
Drayton Digistat+ RF601N RF Room thermostat Installation Guide
Skip to PDF content