
Delta Dore Tybox 117+ Wireless Programmable Thermostat

INSTALLATION
Installing the transmitter
Location: The thermostat can be wall-mounted in a room where the temperature is to be regulated from, at a recommended height of 1.5m and away from any heat sources (fireplace, direct sunlight, etc.) or draughts (window, door, etc.).
To avoid unwanted air movements that would distort the sensor measurement, the wire entry into the flush-mounted box must be plugged (mastic, glass wool, etc.).
IMPORTANT: Do not install the thermostat on a wall in contact with the outside or with an unheated room (e.g. garage, etc.).
Mounting/Connection
- Switch off the power to your setup.
- Separate the box from its base.
- Connect and secure the base. Your Tybox must be connected with flexible or rigid cables with a maximum cross-section of 1.5 mm².
- Insert the batteries
WARNING: make sure you insert the batteries facing the right way and that they are the right type (no lithium batteries). - Toggle the switch to choose the programme type: weekly (A) or daily (B).
- Close and lock the box.
- Turn on the power to your setup.
Time and date setting
- ❶ Turn the dial to
 .
. - ❷-> ❻ Set the day, month, year with + or -.
- ❼ Confirm with OK.
- ❽-> ❿ Set the hour then the minutes with + or -.
- ⓫ Confirm with OK.
- ⓬ To exit the mode, turn the dial

- Turn the dial to , then press the i button for 5 seconds (❷).
- Press the 1 button.
- To change the various settings, press the + or – buttons (❹), then press OK to confirm the change and go to the next setting (❺).
- To exit the mode, turn the dial.
Menu 1-02 Programme duration
You can set programming by the hour, half hour, or quarter of an hour. Default setting: 1 hour.
| 0 | 60 min. |
| 1 | 30 min. |
| 2 | 15 min. |
Menu 1-03 Pre-heat activation/deactivation
Pre-heat means you can enjoy the Comfort temperature you want at the scheduled hour (see § “Pre-heat function”).
Default setting: Pre-heat off
| 0 | Pre-heat off |
| 1 | Pre-heat on |
Menu 1-03 does not appear if the Comfort temperature is controlled by each radiator (menu 1-08 = 1).
Menu 1-08 Controlling the Comfort temperature
For hot water heaters with thermostatic valves, the Comfort temperature can be provided by adjusting the thermostat on each radiator.
In AUTO mode, the device will show “Conf” during Comfort periods and will be set to constant heating. Only the Economy and Frost Protection temperatures are controlled by the Tybox.
Default setting: Comfort temperature is controlled by the Tybox.
| 0 | Comfort temperature controlled by Tybox |
| 1 | Comfort temperature controlled by each radiator |
Menu 1-09 Anti-seize activation/deactivation
Anti-seize can be used outside heating periods to regularly start up the circulator/boiler/heatpump during off periods (5 minutes/week).
Default setting: Anti-seize off
| 0 | Anti-seize off |
| 1 | Anti-seize on |
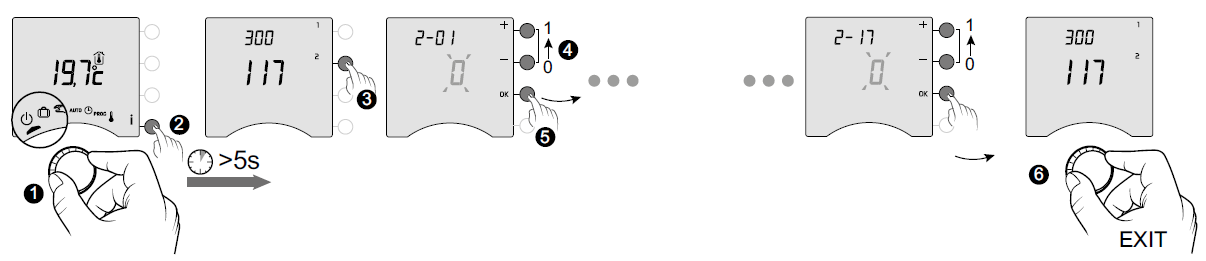
- Turn the dial to , then press the i button for 5 seconds (❷).
- Press the 2 button.
- To change the various settings, press the + or – buttons (❹), then press OK to confirm the change and go to the next setting (❺).
- To exit the mode, turn the dial.
Menu 2-01 Locking or unlocking the settings
| 0 | Changes allowed |
| 1 | No changes to the programme.
Adjusting setpoint temperature settings. |
Adjustment in manual and Comfort mode limited to between 5°C and 22°C. Economy setting limited to between 5°C and 19°C.
Frost protection setting limited to between 5 and 11°C.
Menu 2-02 Correcting the measured temperature
This menu is used to correct any difference you have notcied between the displayed temperature and the measured temperature.
- Example: If the temperature displayed by the device is 19°C and the measured temperature is 20°C, change to +1°C then confirm using OK.
- Default setting: 0°C
Adjusts from -5°C to 5°C, in increments of 0.1°C.
In order to change this setting, the unit must have been running for at least 2 hours beforehand.
Menu 2-04 Temperature displayed in AUTO mode (setpoint or room)
Default setting: setpoint temperature displayed.
| 0 | Displays setpoint temperature |
| 1 | Displays room temperature |
In normal use, press the i button to check one or other of the temperatures.
Menu 2-05 12h/24h time format
Default setting: 24h
- 24H
- 12H
Menu 2-06 Automatic summer/winter changeover
Default setting: Automatic changeover
| 0 | No automatic changeover |
| 1 | Automatic changeover |
Menu 2-07 Days until boiler/heat pump service reminder
Must be reset after every service. Default setting: “—” (function off).
- Adjustable “—” (function off) or from 1 to 365 days
- If you don’t want to use this function, leave the setting on “—”.
Menu 2-08 Control time base
The control quality depends on parameters like the building’s insulation, the number of radiators or the flooring type. The “Tips” column in the following table will help you select the setting that is appropriate for your setup. Default setting: 15 minutes.
| Choice of control type | Heater type | Generator type | Tips | |||
| 15 | 15 minutes (2) | Radiator | Boiler/Heat pump (1) | Increase the time base to extend generator run times and thus prevent starting up so often. | ||
| 30 | 30 minutes (2) | Radiator Underfloor heating | Boiler/Heat pump (1) | |||
| 45 | 45 minutes (2) | Underfloor heating | Boiler/Heat pump (1) |
Reduce the time base if you notice big differences in temperature. |
||
| 60 | 60 minutes (2) | Underfloor heating | Heat pump (1) | |||
|
|
All or nothing/ On-off |
Radiator Underfloor heating |
Heat pump (1) |
Only recommended if the PID control isn’t satisfactory.
Recommended hysteresis value: between 0.4 and 1 |
||
| Oven range heating | Hysteresis value: follow the value recommended by the range’s manufacturer | |||||

- The control is fitted with anti-short cycle protection to suppress start or stop requests when they are too short. The anti-short cycle duration is 10% of the time base selected (e.g.: if the time base is set to 30 minutes, the anti-short cycle will be 3 minutes, i.e. the thermostat will not accept any start or stop requests that are under 3 minutes).
- PID control time base:
Menu 2-11 Hysteresis setting (if 2-08 = tor)
Default setting: 0.4°C.
- Adjusts from 0.2°C to 2°C, in increments of 0.1°C.
Example:
- Setpoint 20°C. Hysteresis 0.4°C.
- Heating request if T° measured <19.8°C. Heating shuts down if T° measured> 20.2°C.
Menu 2-17 Resetting the boiler/heat pump operating hours meter
Default setting: Off
| 0 | No |
| 1 | Yes |
Once the reset is applied, the 2-17 menu automatically switches back to 0.
Settings reset
The default factory settings may be restored for each of the menus.

- 1 Turn the dial to , then press the i button for 5 seconds (❷).
- 3 Press the button on the menu you wish to reset, and hold the button for 5 seconds.
- 4 Then press the OK button to confirm the reset.
- 5 To exit the mode, turn the dial.
Technical characteristics
- Power supply using batteries: 2 x 1.5 V Alkaline – Type LR03-AAA
- Class: II insulation
- Change-over contact output: 2 A max., 230V ~
- Type: 1.C automated action
- Dimensions: 80 x 103 x 25 mm
- Protection rating: IP 30
- Installation in an environment with: normal pollution levels
- Storage temperature: -10°C /+70°C
- Operating temperature from -10°C/+40°C
- Ball test temperature: 75°C (Housing), 100°C (Terminal block)
- Rated impulse voltage: 2,500V
USE
Description

- Off mode
- Absence mode
- Manual mode
- AUTO Follows programming
- Date and time settings
- PROG Programming

- Adjusting

- setpoint temperature settings
- Comfort Economy
- Frost protection
Automatic mode (AUTO)
Turn the selector dial to AUTO.
- Your thermostat will function according to the set programme.
- Depending on the configuration during installation, your unit will continuously display the setpoint temperature or the room temperature (menu 2-04).
- If you are in the programmed Economy period, and the
 symbol flashes and the Comfort setpoint is displayed, it’s because pre-heating is in progress (see § Pre-heat function).
Override
In AUTO mode, you can use the override to change the setpoint temperature until the next programmed point.
- Press the button
- Override in progress
- At 17:00, the programme will return to its usual schedule.
To cancel the current override, press the button once more.
Example: it is 15:30 and you would like to switch to Comfort mode before the set time (17:00).
In AUTO, manual or off mode, successive presses on the i button enable you to:
- find out the room temperature or the setpoint temperature (depending on the configuration during installation (menu 2-04),
- show the boiler/heat pump operating hours meter, as well as the number of days remaining before maintenance (if this setting is on, menu 2-07),
- show any faults (see § “Changing batteries”).

Settings
Time setting
- ❶ Turn the dial to
 .
. - ❷-> ❻ Set the day, month, year with + or -.
- ❼ Confirm with OK.
- ❽->❿ Set the hour then the minutes with + or -.
- ⓫ Confirm with OK.
- ⓬ To exit the mode, turn the dial.
Adjusting temperature settings
- If the Comfort temperature is controlled by each radiator (menu 1-08 = 1), you can only set Economy and Frost protection temperatures.
- The temperature settings may be restricted (menu 2-01 = 1).
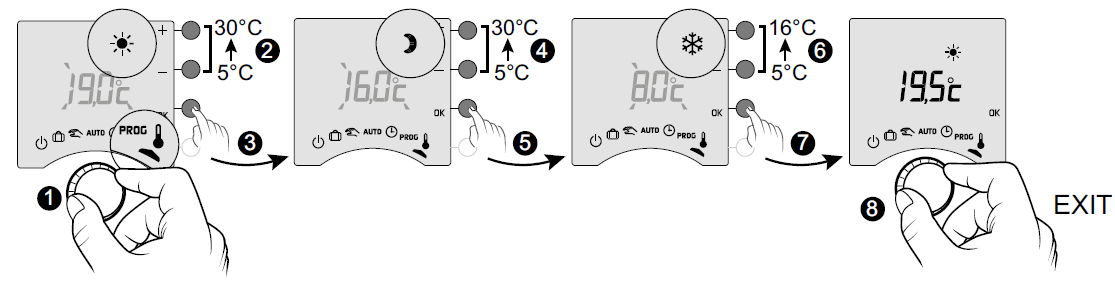

- Comfort (from 5°C to 30°C)
- Economy (from 5°C to 30°C)
- Frost protection (5°C to 16°C)
- ❶ Turn the dial to.
- The Comfort setpoint temperature flashes.
- ❷ ❸ Press + or – to adjust, then press OK to confirm and go to the next setting.
- ❹ -> ❼ Repeat the operations to adjust the Economy and Frost protection temperatures.
- ❺ To exit the mode, turn the dial.
Programming
- You can opt for weekly (PROGx7) or daily (PROGx1) programming.
- You can select your choice using the switch on the back of the device.
- You can programme in increments of one hour, 30 minutes or 15 minutes (menu 1-02).
A pre-heat function is available on this product (see § Pre-heat function).
There are two phases of programming :
Quick programming
- Choose from among the pre-set programmes available (P1 -> P5) and apply it (see table).
- For daily programmes (PROG x1), only P1 and P5 are available.
Programme customization
Customize the programme profile applied to a day based on preferences.

Quick programming
- Turn the dial to PROG.
- Choose the pre-programming to apply (see table) by successively pressing + or -.
- Confirm with OK.
- To exit the mode, turn the dial.
Customising a programme
How to set a daily programme (PROG x1)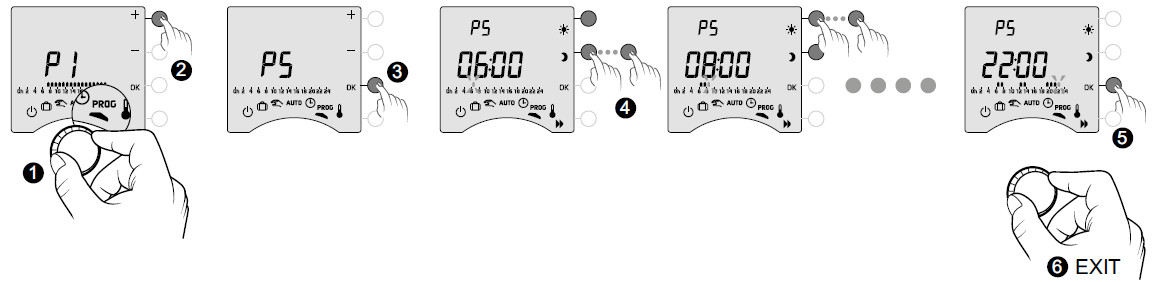
- Turn the dial to PROG.
- Press + or – to choose the programme to change (P1 or P5).
- Confirm with OK. The programme profile flashes.
- Create your programme by pressing
 for Economy periods and for Comfort periods. You can check your programme by pressing the
  button (see § Programme verification).
 - Confirm with OK.
- To exit the mode, turn the dial.
How to set a daily programme (PROG x7)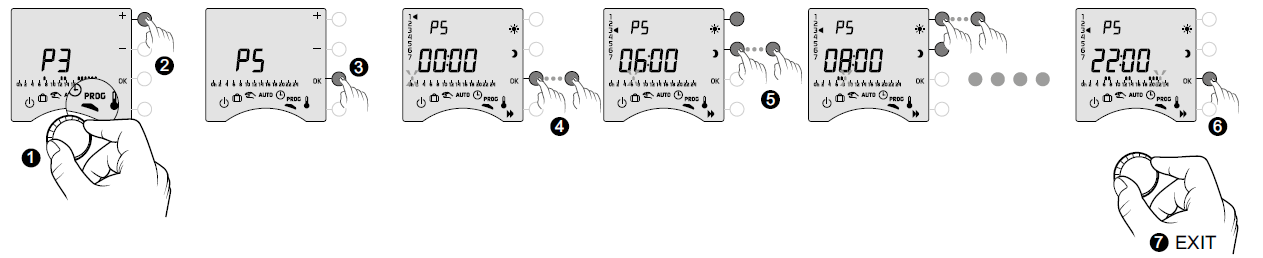
- Turn the dial to PROG.
- Press + or – to choose the programme to change.
- Confirm with OK. The programme profile flashes.
- Press OK to choose the day to change. Programming begins on day 1 (Monday) and at 12 a.m. 1: Monday, … 7: Sunday,
- Create your programme by pressing for Economy periods and for Comfort periods. You can check your programme by pressing the button (see § Programme verification).
- Confirm with OK and go to programming for the next day OR copy the programme to the next day (COPY function) by pressing OK for 3 seconds. Repeat for each day of the week.
- To exit the mode, turn the dial.
COPY function
- Used to copy the programme from one day to the next.
- To do this, press and hold the OK (❻) button for 3 seconds.
- The arrow will move to the next day, ensuring the copy has occurred
Programme verification

- Once your programme has been changed, you can check it by successively pressing the button.
- If it suits you, confirm with OK and go to the next day (if PROGx7).
- To exit the mode, turn the selector dial.
Return to initial programme
You want to reset to the initial programmes.

- Turn the dial to PROG.
- Press + or – to display “rES Pr”.
- Confirm with OK.
- Press + or – to make “YES” flash.
- Confirm with OK.
- To exit the mode, turn the dial
Manual mode
This mode is used to choose a temperature setting (5 to 30°C) that remains constant. This setting may be restricted (menu 2-01 = 1).
Turn the dial to exit the mode.
- In this mode, all programming is ignored.
Absence mode
This mode sets your home heating to Frost Protection if you are away for several days. The Frost protection setpoint is adjustable (see «Adjusting temperatures»).
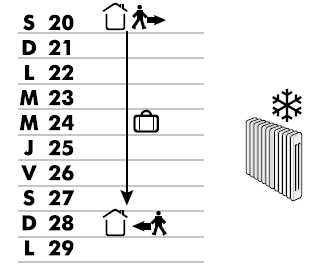
- ❶ Turn the dial to
 .
. - ❷-> ❹ Set the return date with + or -, then confirm with OK (❺). The countdown begins.
- ❻ Return to initial mode (AUTO or manual) at the end of the countdown, at 0h00.

- ❻ Return to initial mode (AUTO or manual) at the end of the countdown, at 0h00.
- To make changes to the current mode, press OK.
- To cancel, turn the selector dial.
Off mode
- This mode switches off your heating system.
- Turn the dial to
 .
. - In this mode, the thermostat only displays the room temperature.
Pre-heat function
- When changing from Economy to Comfort temperature in AUTO mode, your thermostat will anticipate the rise in temperature so that it reaches the right temperature at the scheduled time.
- Example (see opposite): 6:30 am, Economy period, currently pre-heating to reach the temperature of 20°C at 8:00 am.
The pre-heating function’s speed and accuracy is based on the heater type used and its heating inertia..

Changing batteries
The symbol  appears. You have approximately 1 month to replace the batteries (either two LR03 or AAA 1.5 V alkaline batteries).
WARNING: make sure you insert the batteries facing the right way and that they are the right type (no lithium batteries). You have 30 seconds to change the batteries before the time setting is lost (in this case, you will need to reset the date and time). The configuration and programming are stored in case the power is off for a long time.
The display shows dEF21.
You have passed the 1 month limit for low batteries. You MUST change the batteries in your device.

FAQ
Frequently Asked Questions (FAQ)
- The thermostat is on despite the programme not calling for it.
You must have turned on the pre-heat function. If so, then it is normal for your thermostat to anticipate the temperature rise and it has started pre-heating to get to the Comfort temperature at the desired time (see § Pre-heat function). - The thermostat turns off though the requested temperature has not yet been reached.
Your thermostat uses a kind of control that anticipates the inertia in temperature variations in order to calculate energy needs as accurately as possible and provide maximum comfort. On the other hand, anticipating a drop in temperature, the heating may turn on once the desired temperature has been reached.
Reference
Download Manual:
Delta Dore Tybox 117+ Wireless Programmable Thermostat User Guide
Delta Dore Tybox 117+ Wireless Programmable Thermostat User Guide