Delta Dore MINOR 1000 Wireless Room Thermostat

Technical characteristics
- Powered by 2 1.5 V lithium batteries, LR03/AAA type (supplied),10-year life (if menu CF05=0)
- Blue backlit display
- Class III insulation
- X3D wireless remote control device: 868.7 MHz to 869.2 MHz
- Maximum wireless power < 10mW
- Category 2 receiver
- Wireless range from 100 to 300 meters outside, varies depending on the associated equipment (the range can vary depending on the installation conditions and the electromagnetic environment).
- Dimensions: 81 x 88 x 21 mm
- Degree of protection: IP 30
- Wall mounting or base unit
- Storage temperature: -10°C to +70°C
- Operating temperature: 0°C to +40°C
Location – Mounting

Since the temperature measurement sensor is inside the box, you must install the thermostat flush-mounting box:
- on an accessible wall at a height of 1.50 m
- away from heat sources (fireplaces, sunlight) and draughts (windows, doors)
IMPORTANT: Do not install the thermostat on a wall in contact with the outdoors or with an unheated room (e.g. garage, etc.)
The sleeve output in the flush-mounting box must be blanked off (with mastic) in order to avoid unwanted air movements that could bias the sensor reading.
- Separate the box from its base unit by pushing the pin using a screwdriver.
- Insert the batteries, with the right polarity
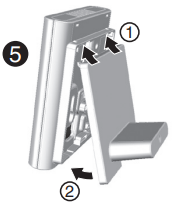
- Wall mount: attach the mount with suitable fastenings and remount the unit onto its mount.
Placed on furniture: refit the base on the unit, then assemble these to the mount.
Standby mode
- When left idle for a given period of time, the thermostat switches to standby. To wake the thermostat up, press any button.
Association
With the receiver(s)
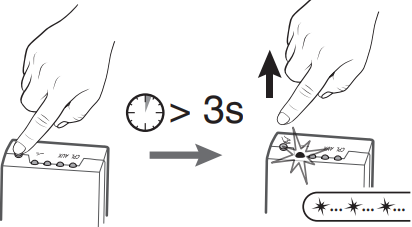
- Press and hold the receiver button for 3 seconds until the LED
 flashes. Release.
- No receiver has been associated with the thermostat:
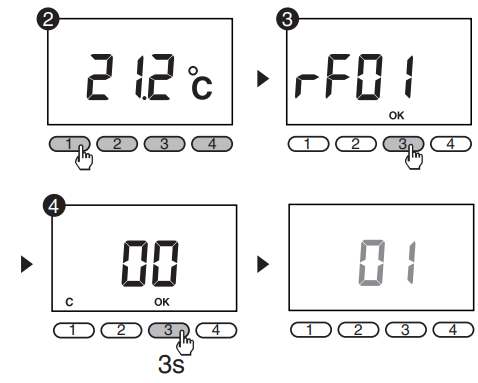
- No receiver has been associated with the thermostat:
- Press any button to display rF01.
- Press on OK, the screen displays “00”
- Press the OK button for 3 seconds.
- The screen flashes, and the thermostat searches for receivers to associate with. The number of receivers found and associated with is displayed on the screen.

- The screen flashes, and the thermostat searches for receivers to associate with. The number of receivers found and associated with is displayed on the screen.
- When the screen stops flashing, press on the OK button
- The screen displays “Loc”, the first receiver is identified by its relay flashing. Note the power of the radiator in question. Press OK.
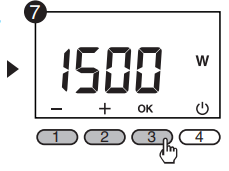
- Report the value of the radiator using the + and – buttons and then press on OK.
- If required, repeat stages ❻ and ❼ for the other registered receivers.
-
- Receivers are already associated with the thermostat
- The thermostat must be in shutdown mode.
- Press and hold the receiver button for 3 seconds until the LED flashes. Release.

- Press the 1 and 2 buttons at the same time and hold for 5 seconds. The screen will display rF01.
- Continue the association procedure from stage ❸ of the previous paragraph.
-
Configuration
The thermostat must be in shutdown mode.

- Press and hold the 1 button for 5 seconds.
- The screen displays the CF01 menu.
- Make a selection or adjust using + and -.
- Press OK to validate and go to the next setting.
- To exit the mode, press the
 button
 - Comment: the greyed-out sections of the tables correspond to default values.
CF01: Correcting the temperature measured Adjustable by -5°C to +5°C (default value: 0.0°C).
Example: if the temperature displayed by the unit is 19°C and the actual temperature (thermometer) is 20°C, set +1°C.
CF02: Temperature displayed in AUTO mode
| 0 | Temperature setting |
| 1 | Measured temperature |
CF04: Control type
| 0 | PWM control, |
| 1 | All or Nothing control |
CF05: Energy saving mode
| 0 | Display turns off after a 10-seconds without press |
| 2 | Display always illuminated |
CF07: Backlighting
| 0 | Deactivated |
| 1 | Enabled (off after timeout) |
CF08: Door/window magnetic contact function
| 0 | Deactivated |
| 1 | Activated |
When a magnetic contact is installed on a window and associated with a receiver, activate function CF08: the opening of the window will switch the heating to frost protection mode, and the symbol flashes.
CF09: Presence detection function
| 0 | Deactivated |
| 1 | Activated |
When a motion detector is associated with a receiver, activate function CF09, resulting in an automatic reduction in the temperature in the case of a prolonged absence:
- 1h30min -> current setting -1.5°C
- 3h -> current setting -3°C
- 48h -> Frost protection setting
The  symbol flashes.
CF10: Maximum setting value
- Setting from 16°C to 40°C in increments of 0.5°C.
- Default value: 30°C
CF16: Display of symbol  (heating request)
| 0 | Symbol not displayed |
| 1 | Symbol displayed |
CF19: Consumption display
| 0 | Deactivated |
| 1 | Activated |
CF22: Display of relative humidity %
| 0 | Deactivated |
| 1 | Activated |
CF26: Adjustment of frost protection setting
- Adjustment is possible from 5°C to 10°C in increments of 0.5°C.
- Default value: 8°C
CF27: Display of external temperature
- Requires an outdoor X3D sensor associated with the receiver.
| 0 | Deactivated |
| 1 | Activated |
Use

- On/Off button
- Information button
- Measured temperature or temperature setting
- Measured temperature
- Heating request
- Presence detection active
- Window/door magnetic contact active
- Locking of access to settings
- Batteries old
- Settings buttons
Information button
The information button ( i ) shows the following information:
- Measured temperature or current temperature setting (as per configuration),
- Outdoor temperature, if the receiver is associated with an outdoor sensor (menu CF27 activated).
- Display of total consumption of associated heating devices. (menu CF19 activated).
- Counter reset to zero: Press and hold the C button for 3 seconds.
- Display the relative humidity (menu CF22 activated)
- Successively press the i button to display this information.
Locking down settings
- Press and hold the i button for 5 seconds.
- The
 symbol appears. In locked mode, only the Start/ Stop ( ) and information ( i ) buttons are accessible.
 - To unlock, press and hold the i button for 5 seconds.
- The symbol disappears.
Off mode
- Press. The thermostat emits a series of 3 beeps. In this mode, heating is shut down.
- To exit from shutdown mode, press the button again. The thermostat beeps.
Troubleshooting
Automatic reset of initial settings
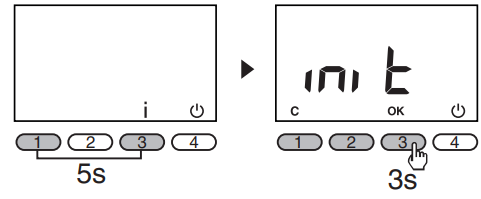
From the Shutdown mode ( ).
- Press and hold the 1 and 3 buttons simultaneously for 10 seconds until “Init” is displayed (slow flashing).
- Press and hold OK for 3 seconds.
The following parameters are initiated:
- Door/window magnetic contact function (CF08=0),
- Presence detection function (CF09=0),
- Setting value: 19°C.
All settings initialized
From the Shutdown mode ( ).
- Simultaneously press buttons 1 and 3 until “Init” is displayed (slow flash). release the buttons and then press on buttons 1 and 3 again for a further 10 seconds until “init” is displayed (fast flash).
- Press and hold OK for 3 seconds.
- All parameters of the configuration menu are reset to the default value.
- Setting value: 19°C.
Removing all associations
To remove all the associated receivers.
The thermostat must be in shutdown mode.
- Press the 1 and 2 buttons at the same time and hold for 5 seconds. The screen will display rF01.
- Press button 2 twice. The screen will display rF03.

- Press the OK button, and the thermostat will display the associated number of receivers.
- Keep the OK button pressed for 3 seconds. All the associated receivers are removed.
The “i” symbol is flashing
The thermostat is indicating an error in wireless communication.

- Press the ( i ) button.
Check
- The power supply to the system.
- If one or more receivers are off.
- That the thermostat is within wireless range of all the associated receivers.
- If one or more receivers does not work.
In the case that a receiver is out of order, you can remove the association with this faulty receiver
- Press the Stop button ( )
- Press the 1 and 2 buttons at the same time and hold for 5 seconds. The screen will display rF01.
- Press 3 times on button 2. The screen will display rF04.

- Press the OK button, and the thermostat will display the associated number of receivers.
- Then press OK for 3 seconds.
- The association with the faulty receiver(s) is deleted, and the “i” symbol will stop flashing.
Activating association wait mode for receivers already associated with MINOR 1000
From the Off mode ( ).
- Press the 1 and 2 buttons at the same time and hold for 5 seconds. The screen will display rF01.
- Press button 4 twice. The screen will display rF05.
- Press OK. The screen will display ALL:
 Activating association wait mode for all associated receivers. Press OK for 3 seconds.
- If you want to select one receiver from all the receivers already associated, press +. The screen will display Loc:
 Individual association wait mode. Repeatedly press the + or — button to select the required receiver, its LED flashes and its relay operates.
- Press OK for 3 seconds.
- Proceed in the same manner for each receiver to associate.
- Next, associate the product (door/window magnetic contact for example) with the receiver or receivers, refer to its user guide.
- Press ( ) to exit the mode if necessary.
Changing batteries

Form the moment when the symbol is displayed on the screen, you have around 3 months to change the batteries (see technical characteristics).
Display the software version
From shutdown mode ( ).

- Press button 2 for 5 seconds to display the software version.
- Press button C to leave the mode.
Remote control and programming option
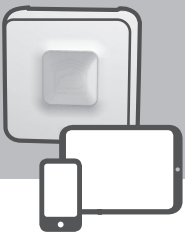
- Add the TYDOM 1.0 home automation gateway to your system and benefit from the remote control and programming features using the TYDOM smartphone and tablet application.


Reference:
Download manuals:
Delta Dore MINOR 1000 Wireless Room Thermostat User MANUALS
