Computime Group GES2181 Energy Saving Thermostat
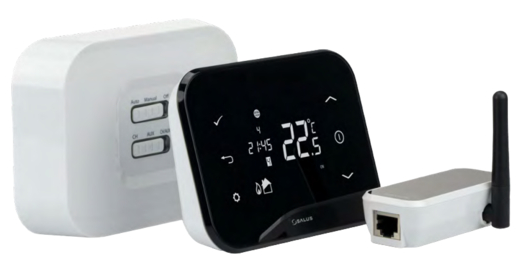
PRODUCT OVERVIEW
The GES2181 Energy Saving Thermostat can connect to 3 Heat / 2 Cool conventional Heat Pump HVAC systems. The thermostat’s smart ZigBee™ technology enables it to communicate with your utility company so you can receive messages about energy saving events and price reductions. In addition, the easy‐to‐use interface makes it simple to control your energy consumption.
SAFETY INSTRUCTIONS
Purpose and correct use:
- Read these instructions carefully and keep in a safe place for future reference.
- Only an authorized, qualified installer should install this unit. All manual / safety instructions and electricity supplier’s regulations must be adhered to.
- Only connect this unit to a 24‐volt A/C power source.
- Do not install this unit at an altitude of over 2000 meters.
- This standalone mounted electronic unit serves as a temperature control system only in dry, closed living and office spaces. Do not place the unit in a bathroom or area of excessive moisture. Do not allow the unit to get wet.
- Place the unit in an easy‐to‐reach position where you can comfortably reach the buttons and view the screen.
- Do not expose the unit to: temperatures below 5°C or above 40°C; humidity above 80% or pollution above level 2.
- Do not expose the unit to voltage fluctuations of more than +/‐ 10%.
- Clean the unit with a dry, soft cloth. Do not use solvents or aggressive cleaning agents.
- The manufacturer accepts no responsibility for damage caused by non‐observance of these instructions.
Environmental Protection
Unwanted electrical appliances can be recycled and should not be discarded along with regular household waste. Please help to support the conservation of resources and protect the environment by returning this appliance to your nearest collection centre (if available).
INSTALLATION
Please refer to Appendix for installation guide.
HOME SCREEN
- The Home screen is the main display screen. If you do not press any buttons for 30 seconds, the thermostat will return to the Home screen.
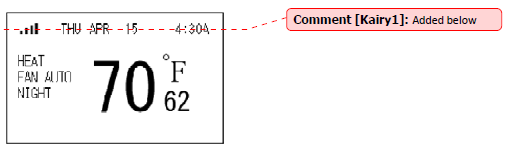
- The large temperature reading on the Home screen is the current temperature. The small temperature reading is your setpoint temperature
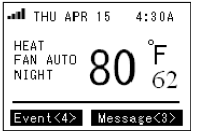
- To quickly change the setpoint temperature:
- Press UP or DOWN.
- When you receive an event or message from the utility company, ‘Event’ or ‘Message’ appears on the bottom of the Home screen and advises how many events or messages you have received, and the event’s level of importance.
SET HEAT/COOL MODE
- When you are in the Home screen, press SYS and the screen opposite appears.
- Press SYS repeatedly to select one of the following options:
- ‘Heat’, ‘Cool’ or ‘Off’ (Conventional HAVC)
- ‘Heat’, ‘Emer’ (Emergency Heating), ‘Cool’ or ‘Off’ (Heat pump HVAC)
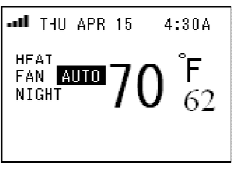
- Press MENU to confirm your selection and return to the Home screen.
Note: Make sure you press MENU to confirm your changes or they will not be saved.
SET FAN MODE
- When you are in the Home screen, press FAN and the screen opposite appears.
- Press FAN repeatedly to select ‘Fan On’ or ‘Fan Auto’.
- Press MENU to confirm your selection and return to the Home screen.
MAIN MENU SETTINGS
- Press UP or DOWN to scroll through the Main menu options.
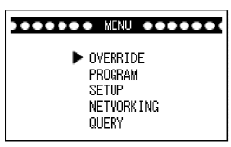
- Press SELECT to enter a menu.
Note: Make sure you press MENU to confirm your changes or they will not be saved.
Override menu
When you receive an event or message from the utility company, ‘Event’ or ‘Message’ appears on the bottom of the Home screen and advises how many events or messages you have received, and the event’s level of importance. You can view the details by repeatedly pressing INFO (see the ‘Viewing events and messages’ section for more information). In the Override menu, you can choose to accept or reject events and messages, and set the Mthermostat to ‘Vacation’ to override the programmed settings.
To reject events:
- Select and enter the Override menu.
- Press UP or DOWN to select ‘Reject Current Event’ or ‘Reject All Events’.
- Press SELECT to confirm. If you reject an event, a message appears to ask if you are sure you want to reject it, press
- SELECT to confirm the rejection or MENU to return to the previous screen
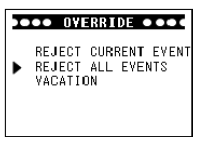
Note: Once you have rejected a current event, the unit will continue to reject all new events. If you have rejected all events, the unit will reject all events stored on the system and any new events that may occur. To enable the unit to accept events once again, you must select ‘Accept Current Event’ or ‘Accept All Events’ as shown below.
To accept events:
- Select and enter the Override menu.
- Press UP or DOWN to select ‘Accept Current Event’ or ‘Accept All Events’.
- Press SELECT to confirm.
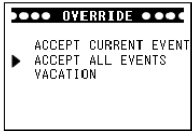
Note: The unit will automatically accept events unless you have set it to reject events and vice-versa.
To set your vacation time:
This setting will override your selected program settings in the Program menu while you are on vacation.
- Select and enter the Override menu.
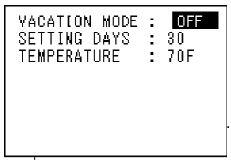
- Press UP or DOWN to select ‘Vacation’ and the screen opposite appears.
- Press SELECT to confirm.
- Use UP or DOWN to scroll through the settings and press SYS or FAN to change a setting. You must set the
- ‘Vacation Mode’ to ‘On’ to activate this function.
- Press MENU to confirm and return to the previous screen
- When the vacation mode is activated, your utility company can override your temperature setting
when the new event setting saves energy, for example:
- In wintertime when the outdoor temperature is cold, you may set your vacation temperature to 10°C to prevent pipes from freezing. However, if the utility company sends an event to reduce the temperature to 8°C to save energy, it will override your vacation temperature and make the new ‘Heat Set Point’ 8°C.
- In summertime, if you have set your vacation temperature to 20°C and the utility sends an event to increase the temperature to 25°C in order to save energy, it will override your vacation temperature and make the new ‘Cool Set Point’ 25°C.
Note: The utility company cannot override your vacation temperature if you have set the unit to ‘Reject All Events’.
Program menu
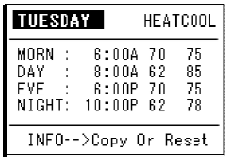
To edit the time and temperature settings for any day of the week:
- Select and enter the Program menu and the screen opposite appears.
- Use UP or DOWN to scroll through the settings and press SYS or FAN to change a setting.
- Press MENU to confirm and return to the previous screen.
To copy or reset a program:
- Select and enter the Program menu.
- Press INFO and the screen opposite appears.
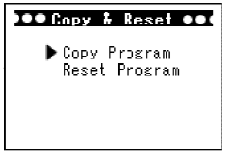
- Use UP or DOWN to select ‘Copy Program’ or ‘Reset program’ and press SELECT to confirm.
- If you selected ‘Copy Program’, use the UP and DOWN buttons to select a day that you want the program settings to be copied to and press SYS until the ‘N’ changes to a ‘Y’.
- Then press SELECT and ‘Successfully Copied’ displays.
- If you selected ‘Reset program’, ‘Are you sure you want to RESET the program?’ appears.
- Press SELECT to confirm or MENU to exit and return to the previous screen.
- When you reset the program, all the Program menu settings return to the factory default settings.
To edit the Setup menu:
- Select and enter the Setup menu and the screen opposite appears.
- Use UP or DOWN to scroll through the settings and press SYS or FAN to change a setting.
- Press MENU to confirm. Here’s a list of what the Setup menu settings mean
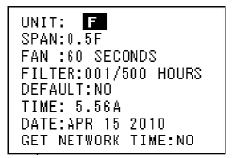
| Unit | Changes the display measurement from Celsius to Fahrenheit or vice‐versa. If you select this option, ‘This action will restore all user [thermometric] settings to the default settings.
Continue?’ displays. Press SELECT to confirm or MENU to exit and return to the previous screen. |
| Span | Changes the temperature span from 0.5 to 2.0°F in increments of 0.5°. |
| Fan | The fan will continue to run for 0, 30, 60 or 90 seconds after cooling is turned off. |
| Filter | Sets a time (up to 500 hours) for the system to remind you to change or clear the fan’s filter. |
| Default | If you select this option, ‘Are you sure to RESTORE all settings to factory default’ displays. Press
SELECT to confirm or MENU to exit and return to the previous screen. |
| Time | Changes the time. |
| Date | Changes the date. |
| Get Network
Time |
If you select and confirm ‘Yes’, a signal will be sent out to search for the network time and this
will be updated on your thermostat. |
Networking menu
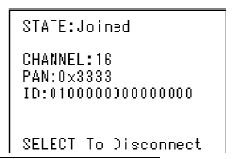
The networking menu advises if the thermostat is communicating with your utility network or if you are disconnected from the network.
To connect to your utility network:
- Select and enter the Networking menu.
- If you not connected to your utility network, the ‘Not Connected’ screen appears.
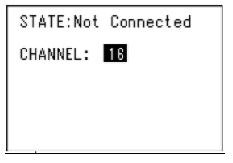
- Use UP or DOWN to select one of the following:
- ‘Auto’ – enables an automatic scan for the channel.
- ‘All’ – searches all channels.
- ‘Channel’ – If you know your channel number enter it here (numbers 1 to 26).
Note: If your assigned channel number has more than one ID number you can use UP or DOWN to scroll through and select your preferred ID.
- Press SELECT to confirm and start the channel search.
- When you have successfully connected, the ‘Joined’ screen appears and the LED light is green. it will take approximately one minute for the connection process to complete. If you experience problems connecting to your utility network, please contact your utility company.
To disconnect from your utility network:
- Select and enter the Networking menu. You should see the ‘Joined’ screen opposite.
- Press SELECT to disconnect and the message ‘Are you sure?’ appears.
- Press and hold MENU and INFO simultaneously to confirm, or press MENU to exit and return to the previous screen.
Note: The right LED lights up when you are disconnected.
Query Menu
The query menu allows you to retrieve and view recent events, prices or messages from your utility company.
- Select and enter the Query menu and the screen opposite appears.
- Use UP or DOWN to scroll through the onscreen queries and press SELECT to enter the menu option:
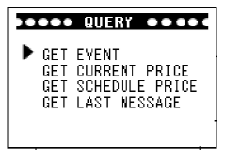
- ‘Get event’ – Press UP or DOWN to select the time and date. Use SYS or FAN to enter the date you wish to view events from. Then use DOWN to scroll to the last setting in the menu and this will automatically send out your query.
- ‘Get current price’ – When you select this option your request to be notified of the current price options will automatically be sent out.
- ‘Get schedule price’ – Follow the same steps as ‘Get event’ to automatically send out your request for the schedule price.
- ‘Get last message’ – When you select this option your request to be notified of your last message received will automatically be sent out.
Note:
If ‘Please join network first!’ appears on the display, you need to connect your thermostat to the utility network see the Networking menu section for details. A reply to your query should be received within 15 seconds.
VIEWING EVENTS AND MESSAGES
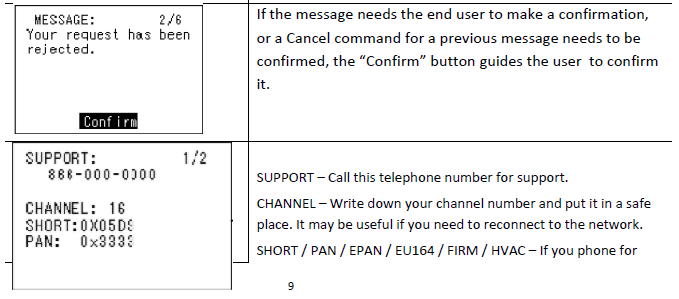
When you are in the Home screen, press INFO repeatedly to view the following notifications from your utility company: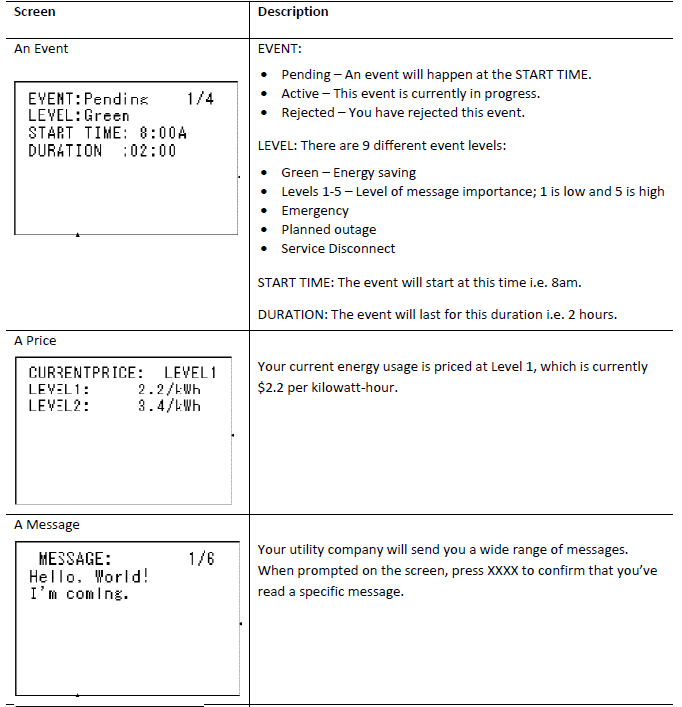
INDICATORS
There are two LEDs. One is Yellow in color and the other is tri-color. The Yellow LED is for For HVAC
system indication and Tri-color (Green, Orange and Red) for Utility Information indication.
Yellow Color LED:
- HVAC system working normal: Off
- HVAC system working normal with Network Identify Request from Server or utility company:
- Flashing
- HVAC system error/warning: On
Tri-color (red, green and) LED:
- Demand Response from Utility Company is running: Red LED on
- Current energy price is at Low level: Green LED on
- Current energy price is at Medium: Green LED on
- Current energy price is at High level: Orange LED on
- Current energy price is at Critical level: Red LED on
PRICE TEMPERATURE OFFSET
There are (3) three settings programmed in the thermostat in response to different energy price level. Below is a table of for the Price temperature offset:
| Energy Level | LED Indicator | Offset (in F) |
| Medium | Green | 2 |
| High | Orange | 4 |
| Critical | Red | 6 |
RESET
To reset the unit, insert a thin, blunt instrument into the RESET hole on the side of the unit. Please note that resetting the unit will return it to the factory default settings.
SPECIFICATIONS
| Temperature unit | °C/°F |
| Operating temperature | 32 – 113 °F (0 – 45 oC) |
| Indoor temperature measurement range | 40 – 99 °F (5 – 37 oC) |
| RF frequency | 2.40 – 2.48 GHz |
| RF range | Up to 1300 Ft (400m) Line of Sight |
| A/C power | 18‐30 V AC at R and C terminals |
|
Size |
13.6 (L) x 10.6 (W) x 2.6 (H) cm
5.4” (L) x 4.2” (W) x 1” (H) |
| Weight | 0.76lb (345g) |
FCC
Warning: Changes or modifications to this unit not expressly approved by the party responsible for compliance could void the user’s authority to operate the equipment.
This device complies with Part 15 of the FCC Rules. Operation is subject to the following two conditions:
- this device may not cause harmful interference, and
- this device must accept any interference received, including interference that may cause undesired operation.
NOTE: This equipment has been tested and found to comply with the limits for a
Class B digital device, pursuant to Part 15 of the FCC Rules. These limits are designed to provide reasonable protection against harmful interference in a residential installation. This equipment generates, uses and can radiate radiofrequency energy and, if not installed and used in accordance with the instructions, may cause harmful interference to radio communications. However, there is no guarantee that interference will not occur in a particular installation. If this equipment does cause harmful interference to radio or television reception, which can be determined by turning the equipment off and on, the user is encouraged to try to correct the interference by one or more of the following measures:
- Reorient or relocate the receiving antenna.
- Increase the separation between the equipment and receiver.
- Connect the equipment into an outlet on a circuit different from that to which the receiver is connected.
- Consult the dealer or an experienced radio/TV technician for help.
FCC RF Radiation Exposure statement:
This equipment complies with FCC RF radiation exposure limits set forth for an uncontrolled environment. This equipment should be installed and operated with a minimum distance of 20 centimeters between the radiator and your body.
ETL
This thermostat is a Class 3 product and must be operating by approved power source under 18-30VAC. It must be connected to 18-30AC supply of HVAC System or transformer approved by UL/cULICSA.
- Disconnection means: Type 1B
- Pollution Dearee: 2
Rated Impulse voltage: 330V
For installation, please refer to the installation and wiring diagram under
Appendix.
Warning: Do not connect any of the terminals to 110V/220V AC supplv.
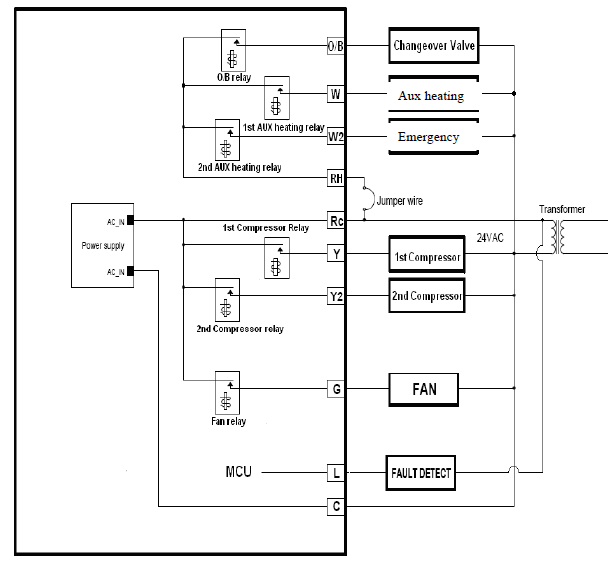
Wiring Diagram
Terminal definition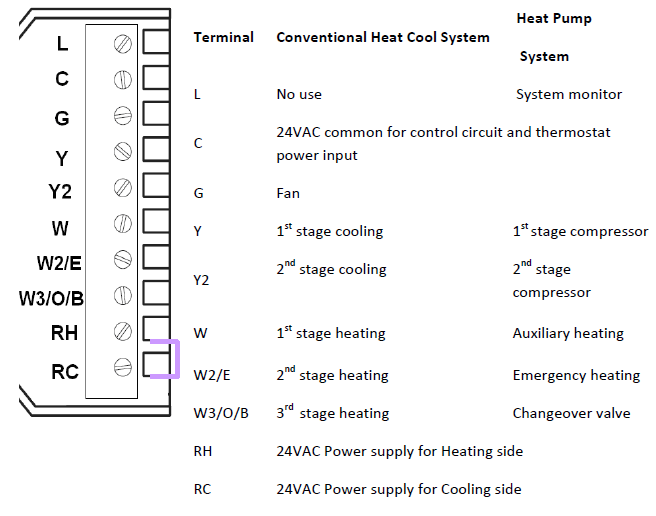
Wiring diagram for Heat pump system
Wiring diagram for conventional Heat Cool system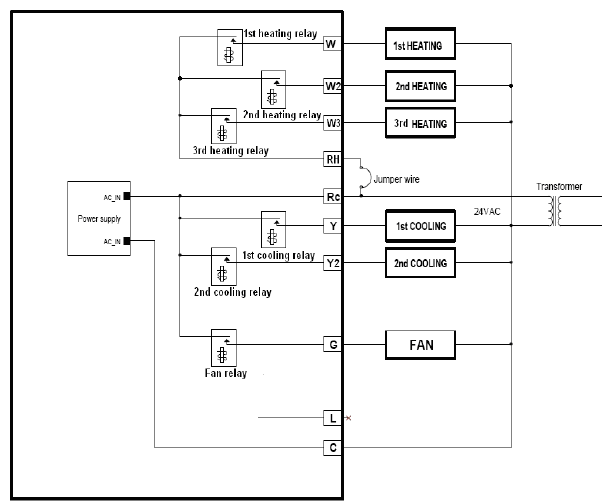
REFERENCE:
DOWNLOAD MANUALS:
Computime Group GES2181 Energy Saving Thermostat Instruction Manual

Computime Group GES2181 Energy Saving Thermostat Instruction Manual