Chaffoteaux Easy Control ii Programmable Thermostat

OVERVIEW
The timer-controlled thermostat enables you to programme your central heating system for the entire week, so as to have the desired temperature at the desired time. Below are some instructions to help you operate the device in a straightforward, logical manner. Read them carefully and enjoy the comfort!
SAFETY RULES
This manual constitutes an integral and essential part of the product. Carefully read the instructions and warnings contained in this manual: they provide important information concerning the operation and maintenance of the device. Installation, maintenance and any other interventions must be performed by fully qualified personnel, in conformity with all applicable regulations and the instructions provided by the manufacturer.
- In the event of faults and/or malfunction, switch the device off and do not attempt to perform any repairs yourself. Contact a qualified professional instead.
- Any repairs must be carried out by qualified technicians using original spare parts only. Failure to comply with the above may jeopardise the device’s safety and void the manufacturer’s liability.
WARNING
This device is not intended for use by persons (including children) with reduced physical, sensory or mental abilities, or who lack the necessary experience and knowledge, unless they are supervised or have been adequately instructed on the device’s operation by a person responsible for their safety. Children must be supervised at all times to ensure that they do not play with the device.
PRODUCT CONFORMING TO EU DIRECTIVE 2012/19/EU – Italian Legislative Decree 49/2014 concerning the treatment of Waste Electrical and Electronic Equipment (WEEE)
The barred wheeled bin symbol appearing on the appliance or on its packaging indicates that the product must be collected separately from other waste at the end of its useful life.
The user must therefore deliver the decommissioned product to an appropriate local facility for separate collection of electrotechnical and electronic waste. Alternatively, the appliance to be scrapped can be delivered to the dealer when purchasing a new equivalent appliance. Electronic products for disposal measuring less than 25 cm can also be delivered free of charge to electronic equipment dealers with a surface area of at least 400 m2, without having to purchase other products. Proper separated collection of the decommissioned appliance for its subsequent recycling, treatment and eco-compatible disposal helps to prevent negative effects on the environment and human health, besides encouraging reuse and/or recycling of its constituent materials.
SYMBOL LEGEND
- Failure to comply with this warning entails the risk of injury to persons, which in some circum-stances may be fatal.
- Failure to comply with this warning may result in serious damage to property and plants or injury to animals.
- The manufacturer is not liable for damage resulting from improper use of the product or failure to install it as instructed herein.
- Do not perform operations that involve removing the appliance from its installation loca-tion.
- Damage to the device.
- Do not climb onto chairs, stools, ladders or unstable supports to clean the device.
- Personal injury caused by falling from a height or shearing (stepladders shutting accidental-ly).
- Do not use any insecticides, solvents or aggressive detergents to clean the appliance.
- Damage to plastic or painted parts.
- Do not use the appliance for any purpose other than normal domestic use.
- Damage to the device caused by operation overload.
- Damage to objects caused by improper use.
- Do not allow children or inexperienced people to operate the appliance.
- Damage to the appliance due to improper use.
- During the cleaning, maintenance and connection operations, it is necessary to isolate the appliance from the mains supply by removing the plug from the socket.
- Personal injury due to electrocution.
TECHNICAL DATA
| Power supply | 2 x type AA RL6 – 1.5 V alkaline batteries |
| Receiver power supply (wireless version) | mains 230 V 50 Hz |
| RF frequency band (wireless version) | ISM (868.0–868.6) MHz |
| Max. cable cross-sectional area | 1.5 mm2 |
| Temperature adjustment range | 0–50°C |
| Control functions | Fuzzy Logic Algorithm |
| Temperature set-points per day | 6 |
| Time setting resolution | 5+2 or 4 daily programming slots with 4 temperature levels |
| Dimensions | 136 x 97 x 26 mm |
| Dimensions (wireless version) | 136 x 98 x 62 mm |
PRODUCT TECHNICAL SHEET
| Supplier name | ARISTON | CHAFFOTEAUX | ELCO |
|
Supplier identification model |
TIMER-CONTROLLED THERMOSTAT 3319483 – 3319484 |
EASY CONTROL II 3319486 – 3319487 |
PROGRAMMABLE ROOM THERMOSTAT II 3319489 – 3319490 |
| Temperature control class | I | I | I |
| Energy efficiency contribution (%) for space heating | +1% | +1% | +1% |
| Addition of an external probe: | |||
| Temperature control class | II | II | II |
| Energy efficiency contribution (%) for space heating | +2% | +2% | +2% |
PRODUCT DESCRIPTION
Buttons
- A. “+ “ and “–” button Temperature adjustment
- B. “Function” buttons
- C. Display
Display
- Programming menu
- Settings menu
- Alarm
- Room temperature
- Current time
- Heat request
- Optimisation
- Battery flat
- Wireless signal (3319484 – 3319487 – 3319490)
- Key lock
- Temperature adjustment
- Planning period
- Day
STATUS ICONS

- TEMPERATURE ADJUSTMENT ACTIVE
- The programmed temperature was modified manually.
- BATTERY FLAT
- Roughly 10% charge remaining
- HEAT REQUEST
- The room temperature is below the set value (the boiler starts).
- OPTIMISATION ACTIVE
- (enabled by the installer).
- ONE-HOUR OVERRIDE ACTIVE
- Temporary room modification set for one hour.
- WIRELESS SIGNAL
- The thermostat is connected to the receiver (3319484 – 3319487 – 3319490)

 HEATING PROGRAMME
- SETTINGS
- BACK
- Return to the previous page or menu.
- CONFIRM
- Confirm a change or a selection.
- STANDBY
- Start or stop heating.
NAVIGATING WITHIN THE MENU
- Press the
 MENU menu button to access the main menu.
 - Press the
 button to select a menu item; the selected item will start flashing.
 - Press the
 button to confirm the selection.
 - Press the button to adjust the setting and to save the change or skip to the next selection.
- Press the
 button to return to the previous selection.
REPLACING THE BATTERIES
The thermostat is powered by 2 x AA batteries even if no corresponding icon appears on the display during normal use. The battery icon will only appear in case of low battery. Lift the front flap of the timer-controlled thermostat. Remove the battery compartment cover by pushing it downwards and sliding it outwards.
 appears when the battery level reaches roughly 10%; at this point, the batteries must be replaced as soon as possible.
 + flashes when the battery level is very low and the batteries must be replaced immediately to avoid any interruption in the heating system.
- Replace them only with 2 new type AA LR6 1.5 V alkaline batteries lasting roughly 2 years in relation to how the thermostat is used.
WARNINGS
- Do not use new and flat or different-type batteries in the same system.
- Do not dispose of the batteries with unsorted household waste.
- The batteries must be disposed of separately from normal waste in accordance with the local regulations, so that they can undergo special treatment.
SETTINGS (DATE AND TIME)
- Press the left button to access the main MENU.
- Press the button to select the settings of the SET menu, then press the right button to confirm the selection.

- Press the right button to select the YEAR (or to skip to the MONTH).
- Press the button to set the YEAR, press the right button to confirm.

- Press the right button to select the MONTH (or PLUS to skip to the DAY).
- Press the button to set the MONTH, press the right button to confirm.
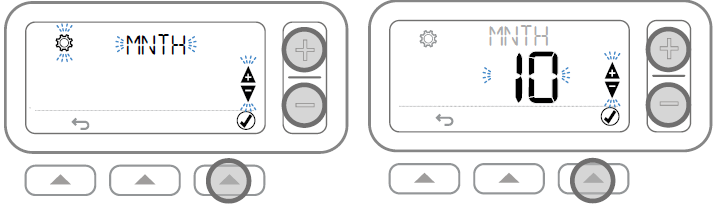
- Press the right button to select the DAY (or PLUS to skip to the HOUR).
- Press the button to set the DAY, press the right button to confirm.

- Press the right button to select the HOUR (or to skip to the MINUTES).
- Press the button to set the HOUR, press the right button to confirm.

- Press the right button to select the MINUTES
- Press the right button to select the MINUTES. Press the button to adjust the MINUTES, press the right button to confirm.
HEATING PROGRAMME
The thermostat is supplied with the following pre-defined programme. Following the steps below to modify the heating scheduling.

- Press the left button to access the main MENU.
- Press the button to select the settings of the PROG menu, then press the right button to confirm the selection.

- Press the button to select the DAY, press the right button to confirm.
- Press the button to select the period to be adjusted, then press the right button to confirm.

- Press the button to set the TIME, press the right button to confirm.
- Press the button to set the TEMPERA- TURE, press the right button to confirm.

- Repeat these steps to modify the periods and the days remaining or press the right button to save the changes and return to the home page.
COPY PROGRAMME
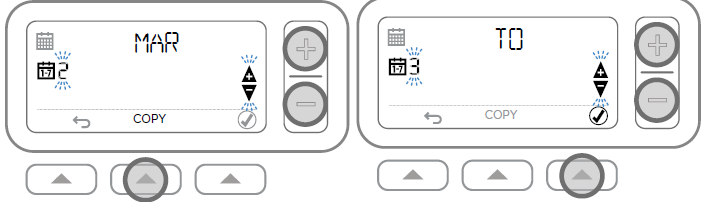
- Press the button to select the day on which the schedule must be COPIED, then press the central button to confirm.
- Press the button to select the day on which to copy the PROGRAMME, then press the right button to confirm.
- Press the button to select the period to be DELETED.
- Press and hold the left button for 3 seconds then press the right button.

- Repeat steps 10 and 11 to enable the period again.
DEVICE MODE
AUTOMATIC OPERATION AUTO
- During normal use, the timer-controlled thermostat will follow the set schedule in-dicated by the icon.
TEMPORARY MODIFICATION OF THE TEMPERATURE
- Press the button to set the new de- sired TEMPERATURE.
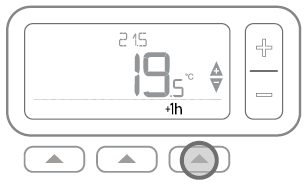
- Press the right to modify a time. The timer-controlled thermostat will maintain the temperature value for 1 h before returning to the pre-set room temperature.
- To cancel the change, press the right button again.
MANUAL OPERATION MAN
- Manual operation allows for deactivating the central heating schedule.

- The timer-controlled thermostat operates by maintaining the manually set tempera-ture for every moment of the day; the dis-play will show .
TEMPERATURE MODIFICATION
- Press the button to set the new desired TEMPERATURE. The set temperature will be maintained until it is modified once again.
KEYPAD LOCK
- Simultaneously press the left and right buttons for 5 seconds.
- The display will show the
 (de-pending on the settings given by the in-staller): the timer-controlled thermostat will operate with the limited or absent keypad function.
UNLOCK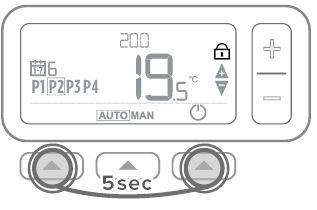
- To unlock the keypad, simultaneously press the left and right buttons for 5 seconds.
- The icon will disappear from the display and all the keypad functions will be restored.
STAND-BY MODE (with anti-frost protection)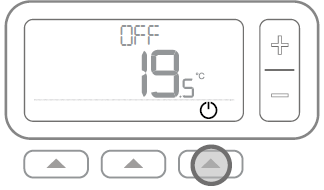
- To save energy, for example during summer or when the doors and windows remain open for long, deactivate the space heating function.
- Press the right button. “OFF” and the rele-vant icon will appear on the display.
- Press the right button again to switch the space heating on.
In this mode, space heating will only activate if the room temperature falls below 5°C, in order to protect piping from freezing up.
INSTALLATION
POSITIONING
The device detects the room temperature, therefore several factors should be taken into account when choosing an installation site. Position the device far from heat sources (radiators, sunlight, fireplaces, etc.) and from draughts, doorways and windows which could affect the temperature readings. It should be installed approximately 1.5 metres above the floor level.
WARNING: Installation should be performed by a qualified technician.
Prior to connecting the timer-controlled thermostat to the boiler, cut off the power to the boiler.
When drilling the wall to install the device, be careful not to damage any electrical wires or existing piping.
- Fasten the base of the timer-controlled thermostat to the wall in the chosen position, using the screws supplied with the kit (Fig. 1)
- Insert the wires into the appropriate slot and connect them to terminals A and B (Fig. 1)
- Connect the terminal of the timer-controlled thermostat to terminal TA1 on the boiler’s PCB
- Position the timer-controlled thermostat onto the base by inserting the edges into their appropriate housings (Fig. 2)
- Insert the two hooks of the cover into their housings and swivel the cover towards the wall (Fig. 3)
INSTALLATION (wireless version) ONLY FOR THE FOLLOWING MODELS: 3319484 – 3319487 – 3319490
In order to function properly, the wireless timer-controlled thermostat must be combined with a receiver. The timer-controlled thermostat – receiver combination is preconfigured by the manufacturer; this means that the devices must be operated in the same location.
RECEPTION TEST
In order to verify the correct signal transmission, power the timer-controlled thermostat by inserting the batteries supplied with the kit, as mentioned previously. Keep the timer-controlled thermostat roughly 2–3 metres away from the receiver and perform the procedure outlined in the receiver instruction manual.
- After completing the test, proceed with the timer-controlled thermostat installation.
Wall mounting
- Fasten the base of the timer-controlled thermostat to the wall in the chosen position, using the screws supplied with the kit (Fig. 1)
- Position the timer-controlled thermostat onto the base and push it downwards (Fig. 2)
Mounting the table-top support
- Fasten the support to the base (Figs. 3 and 4)
- Position the timer-controlled thermostat onto the base and push it gently downwards (Fig. 5)
NOTE:
If the green LED on the receiver does not flash or if the red LED does not turn on, one of the components of the system (timer-controlled thermostat and receiver) has been swapped or replaced.
To solve the problem, consult the receiver instructions for the reconnection procedure.
RECEIVER (wireless version)
WARNING: Install the receiver outside the boiler and well away from electromagnetic fields (e.g.: tele-vision set, computer, refrigerator, microwave oven), as these could affect the operation of the device. Take extra care when positioning the device near lifts, stairways and metal wall structures, as these may have an isolating effect with regard to signal transmission and reception. Inside a typical residential building, the two devices must communicate reliably within a 30 m radius.
The signal strength of the Receiver depends on the number of walls and ceilings separat-ing it from the timer-controlled thermostat. After selecting the position of the receiver, verify whether the communication with the timer-controlled thermostat is satisfactory.
NOTE: The connection between the re-ceiver and the timer-controlled thermostat (included in the same package – Fig. A) is pre-configured by default, thus it must be in-stalled in the same place. This makes the in-stallation process straightforward and quick. If the products are replaced or exchanged with other packages, perform the recog-nition procedure according to the instruc-tions indicated in the “Recognition proce-dure” paragraph.
INSTALLATION AND WIRING
- Separate the mounting base from the top part (Fig. 1).
- Fix the receiver base to the wall in the chosen position, using the plugs and screws supplied with the kit, and insert the cable through the relevant cable opening (Fig. 2).
- Disconnect the boiler from the power supply.
- Connect the receiver’s terminal to terminal TA1 on the boiler PCB and connect the power supply cables (Fig. 3).
- Position the receiver on the base and turn the receiver by pressing against the wall (Fig. 4).
- Power the boiler.
RECOGNITION PROCEDURE (wireless version)
The timer-controlled thermostat communicates in wireless mode with the receiver connected to the boiler.
If the timer-controlled thermostat loses the wireless communication or is defective, the boiler can be switched on and off manually through the button located on the receiver box.
- The
 icon will appear on the timer-controlled thermostat display if there is a strong wireless signal.
The receiver LED for the icon lights up steady GREEN. - If the wireless signal is lost, the + icon will flash on the timer-controlled thermostat display.
The receiver LED for theicon flashes RED. - If the communication is lost, move the thermostat to another point and attempt to restore the communication.
To do this, switch the boiler on and off through the receiver:
Press the button once to switch the boiler on or off. The button’s LED must be:
- GREEN when the boiler is on.
- OFF when the boiler is off.
TROUBLESHOOTING

INSTALLER PARAMETERS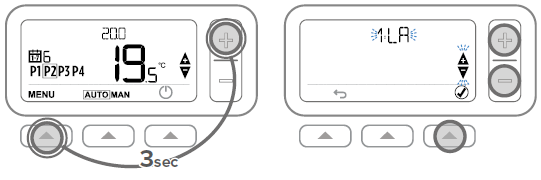
- Simultaneously press the left and buttons for 3 seconds.
- Press the button to select 1 LA,
- press the right button to confirm
| No. | Description | Setting |
| 1LA | Language | 1-EN, 2-NL, 3-FR, 4-DE, 5-IT, E-ES |
| 2CR | Heating cycle frequency | 1, 3, 6, 9, 12 |
| 3OT | Minimum switch-on time | 1–5 min |
| 4LL | Lower limit | 5–21°C |
| 5UL | Upper limit | 21–35°C |
| 6SO | Scheduling | 1–7, Day / 2–5+2 |
| 8SS | External sensor | 0-Disabled / 1-Enabled |
| 9LC | Self-protection mode | 0-Disabled / 1-Enabled |
| 10BL | Backlight | 0-Disabled / 1-Enabled |
| 11CL | Clock format | 0–24 h / 1–12 h |
| 12DS | Daylight saving time | 0-Disabled / 1-Enabled |
| 13TO | Temperature offset | –3 / +3°C |
| 15SD | Restore scheduling | 0 / 1- Reset |
| 16FS | Restore default settings | 0 / 1- Reset |
| 17OP | Optimal start | 0-Deactivated / 1-Optimal start / 2-Delayed start |
| 18OS | Optimal stop | 0-Disabled / 1-Enabled |
| 19LK | Lock options | 0-Partial / 1-Complete |
OPTIMISATION
The timer-controlled thermostat is equipped with an optimisation function that helps to save energy while maintaining optimal comfort levels. If the optimisation function is enabled, the display will show the  icon. By default the function is disabled – consult the instructions in the installation guide for its activation.
- Optimal start memorises the duration required for reaching the set temperature inside the home, therefore, if necessary, switch on the heating function a little earlier so that it can reach this temperature at the scheduled time.
- Delayed start saves energy by slightly delaying the start of heating on the basis of the differ-ence between the set temperature and the room temperature. The more these temperatures are close the longer the delay.
- Optimal stop saves energy by switching off the heating function a little earlier than the sched-uled time. If the home is at the right temperature, you will not notice any effect on the temper-ature, but you should notice the difference in the energy bill.
REFERENCE:
DOWNLOAD MANUALS:
Chaffoteaux Easy Control ii Programmable Thermostat User Manual

Chaffoteaux Easy Control ii Programmable Thermostat User Manual