
Breeze33 BZ33-302TSP Programmable Thermostat
Specifications
- The display range of temperature …………….. 32″F to 99″F (0″C to 40″C)
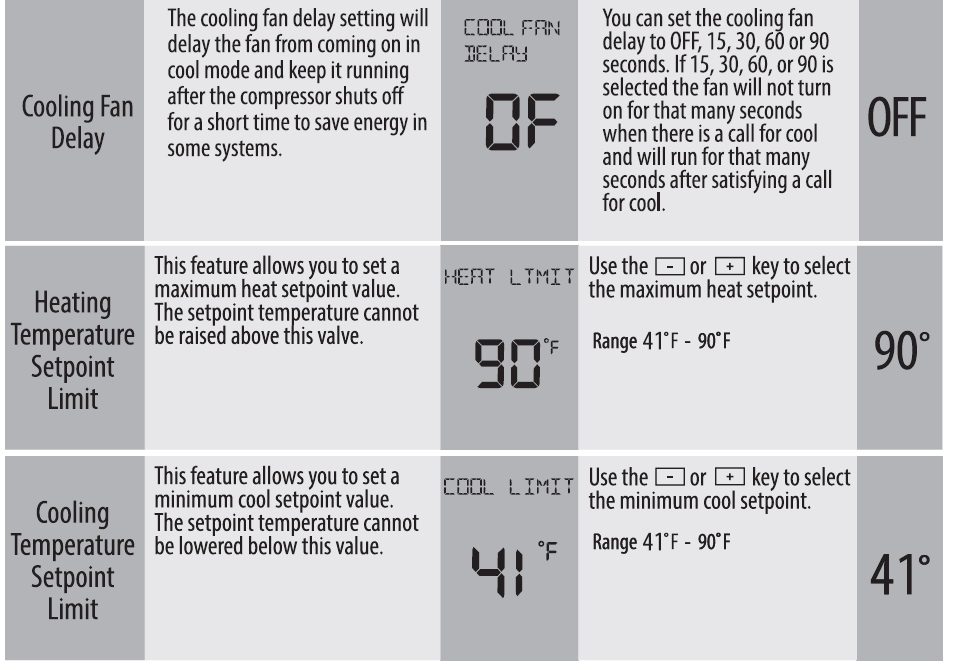
- The control range of temperature ___ 41 “F to 90″F (5″C to 32″()
- Load rating ___________ , amp per terminal, 1.5 amp maximum all terminals combined
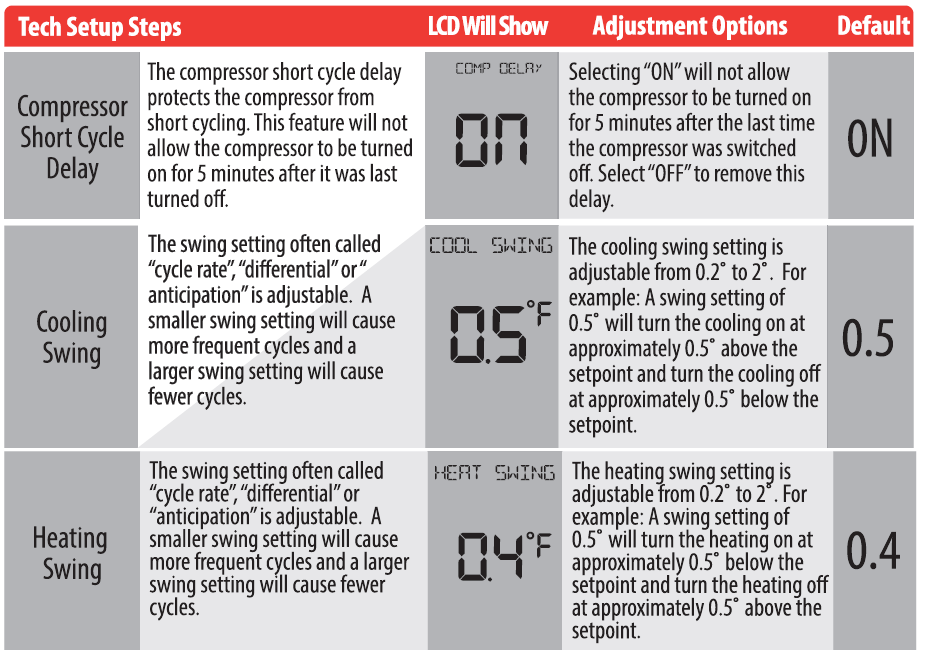
- Swing (cycle rate or differential) ____ Heating is adjustable from 0.2• to 2.0°
- Cooling is adjustable from 0.2· to 2.0·
- Power source __________ , s to 30 VAC, NEC Class II, 50/60 Hz for hardwire – Battery power from 2 AAA Alkaline batteries
- Operating ambient——- 32°F to+ 105°F (0″C to +41 “CJ
- Operating humidity 90% non-condensing maximum
- Dimensions of thermostat 4.7″W x 4.4″H x 1 “D
Wall Locations
The thermostat should be installed approximately 4 to 5 feet above the floor. Select an area with average temperature and good air circulation
Subbase Installation
- Horizontal Mount
- Vertical Mount
Mount Thermostat
Align the 4 tabs on the subbase with corresponding slots on the back of the thermostat, then push gently until the thermostat snaps in place
Battery Installation
Battery installation is optional if thermostat is hardwired (Rand C terminal connected to 24V power).
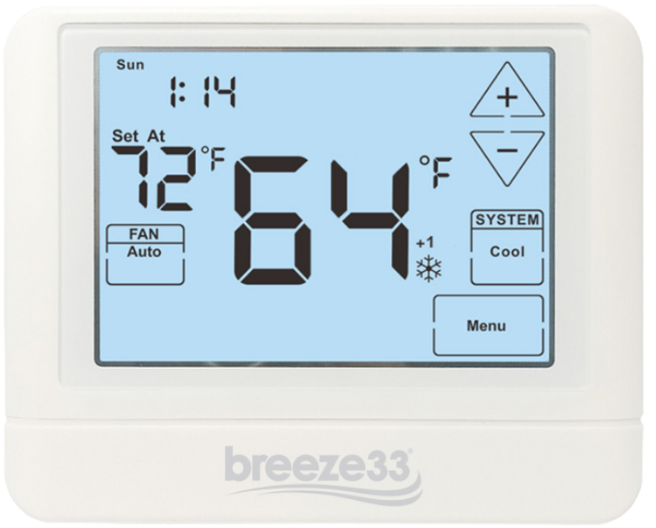
Getting to know your thermostat
- Fan Buttons
- Next step Buttons
- Set time Buttons
- Program Buttons
- Menu Buttons
- System Buttons
- Setpoint Buttons
- Battery Cover
- Button/Battery Access Door
- Days of the week and time
- Indicates the current room temperature
- Displays the user selectable setpoint temperature
- Hold is displayed when thermostat program is permanently overridden.
- System Operation Indicators:
- The compressor delay is active if these are flashing.
- Programmable Time Periods:
- Residential uses 4 time periods – WAKE, RETURN, LEAVE and SLEEP.
- Program Menu Options:
- Shows different options during programming.
- Low Battery Indicator:
- Replace batteries when this indicator is shown.
Wiring
- If you are replacing a thermostat, make note of the terminal connections on the thermostat that is beign replaced.
- In some cases, the wiring connections will not be color copied. For example, the green wire may not be connected to the G terminal.
- Loosen the terminal block screws. Insert wires then retighten the terminal block screws.
- Place non flammable insulation into the wall opening to prevent drafts.
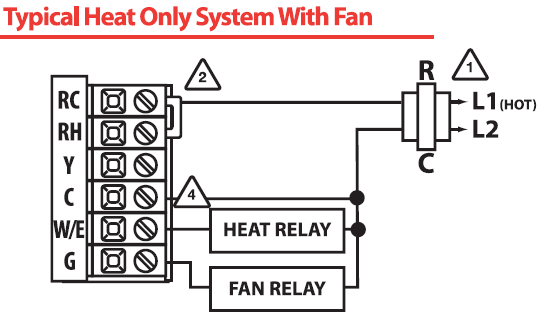
CTerminal
The C (common wire) terminal does not have to be connected when the thermostat is powered by batteries
Wire Specifications
Use shielded or non-shielded 18-22 gauge thermostat wire
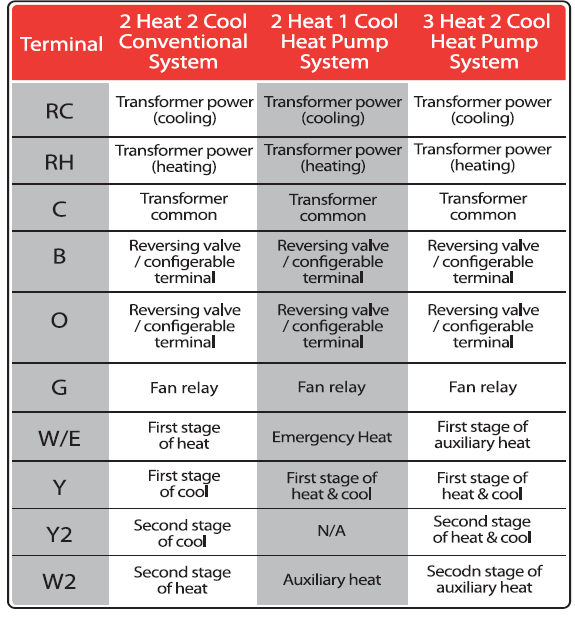
Terminal Designations
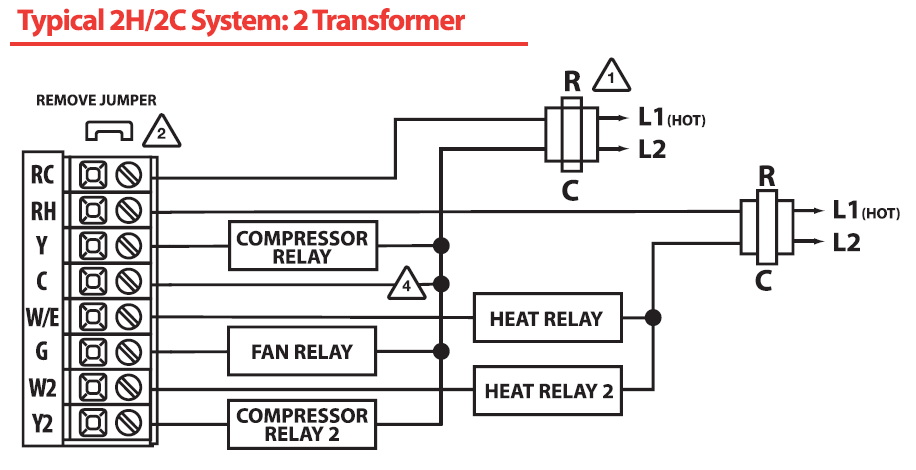
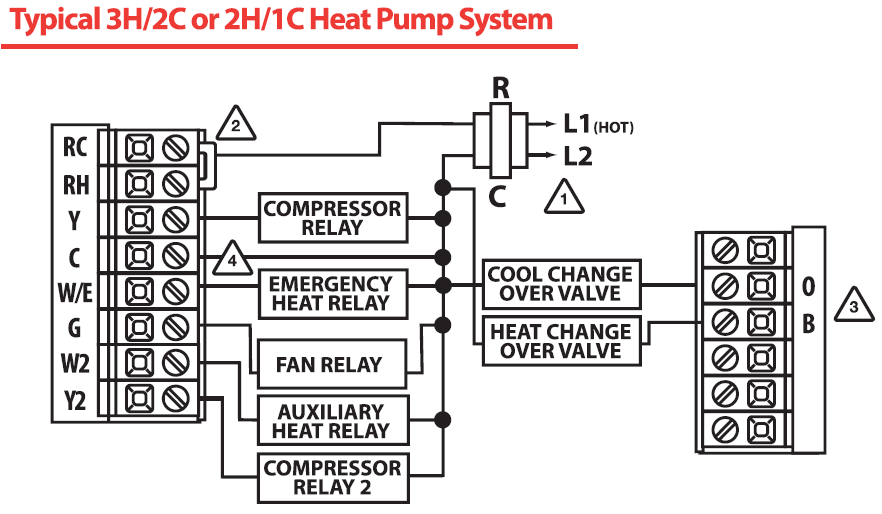
This thermostat is shipped from the factory to operate a conventional heating and cooling system. This thermostat may also be configured for a heat pump system. See theuheat pump” configuration step on page 14 of this manual to configure the thermostat for heat pump applications
|
RC |
Transformer power (cooling) | Transformer power (cooling) | Transformer power (cooling) |
| RH | Transformer power (heating) | Transformer power
(heating) |
Transformer power (heating) |
| C | Transformer common | Transformer
common |
Transformer common |
| B | Reversing valve
/ configerable terminal |
Reversing valve
/ configerable terminal |
Reversing valve
/ configerable terminal |
| 0 | Reversing valve
/ configerable terminal |
Reversing valve
/ configerable terminal |
Reversing valve
/ configerable terminal |
| G |
Fan relay |
Fan relay |
Fan relay |
| W/E | First stage
of heat |
Emergency Heat |
First stage of auxiliary heat |
| y | First stage of coo l | First stage of
heat&cool |
First stage of
heat&cool |
| Y2 | Second stage of cCXJI |
N/A |
Second stage
of heat & cool |
| W2 | Second stage of heat |
Auxiliary heat |
Secodn stage of
auxiliary heat |
Wiring Diagrams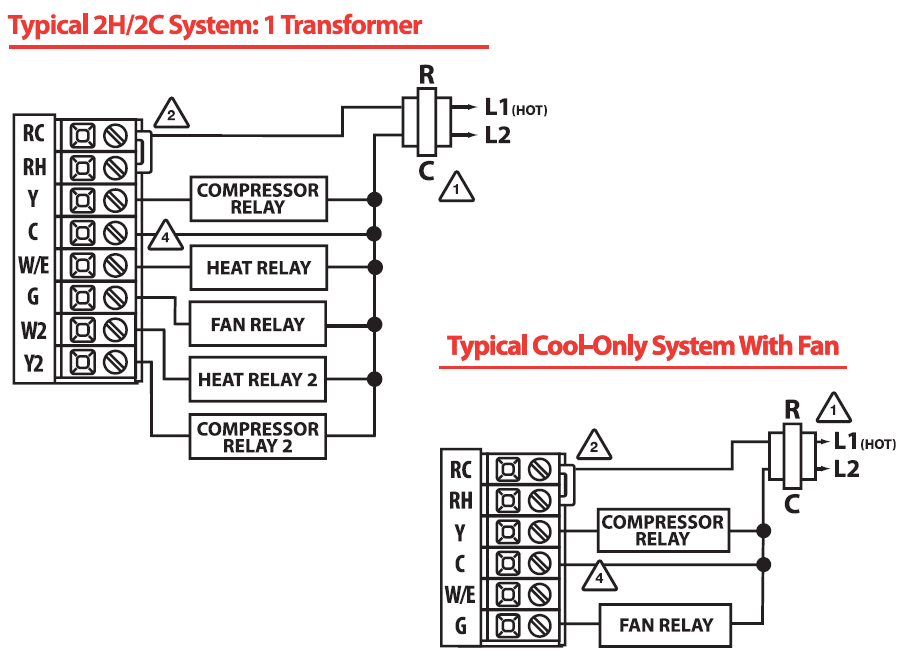
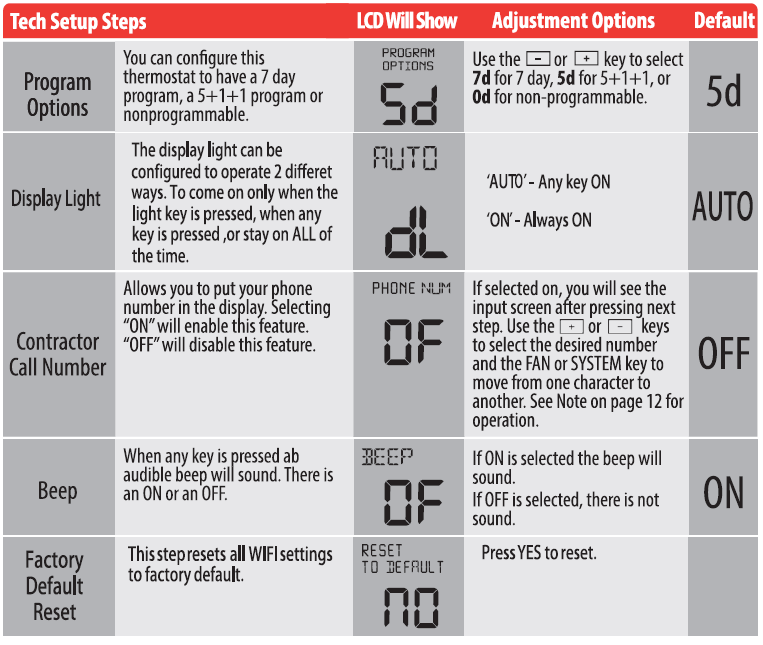
Technician Setup
- Press MENU button
- Press and hold the TECHNICAL SETUP button fur 3 seconds.
- This 3-second delay is designed so that homeowners do not accidentally access the installer settings.
- Configure the installer options as desired
- Use D or G to change settings and the NEXTSTE P or PREV
- STEP key to move from one to another.
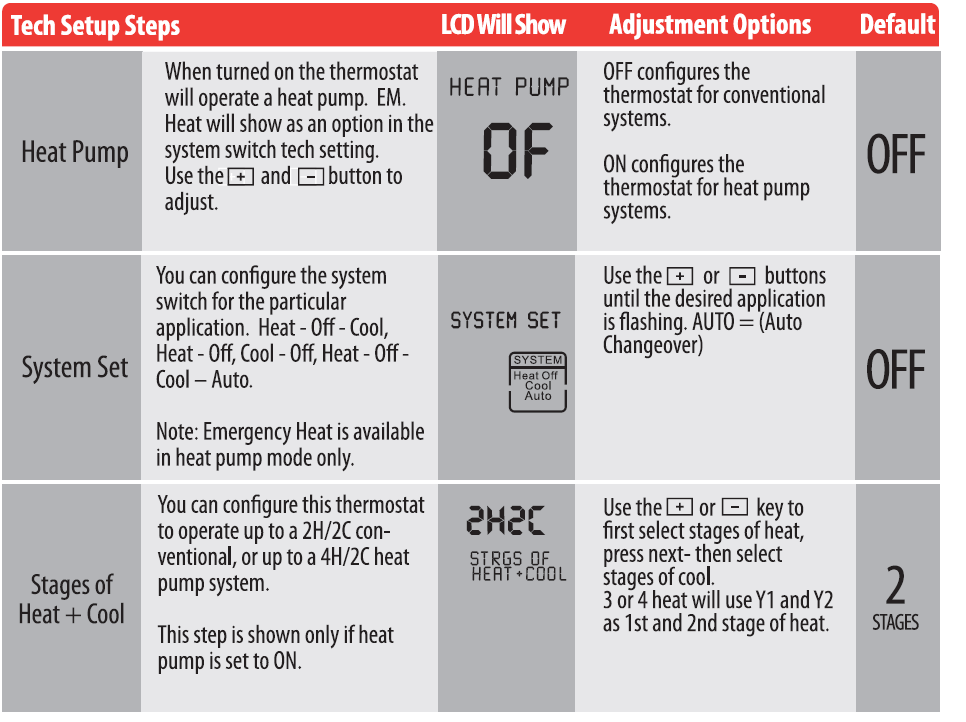

Note: Only press DONE key when you want to exit the Technician Setup options
Swing Setting Tip
The second stage will turn on at 2x the swing setting. The second stage will turn off when 1x the swing is reached. For example, if the swing setting is 0.5 degrees for heating and the thermostat is set at 70°F, the first stage will turn on at approximately 69.5 “F. The second stage will turn on at 69°F. The second stage will turn off at 69.s°F and the first will turn off at 70.5 °F. If the third stage is used, it will turn on at 68.5 °F and turn off a approximately 69°F.
A Note About Keypad Lockout:
The function of activating your lockout choice takes place after you have exited tech setup. To lock or unlock the keypad hold down the MENU for 3 seconds
Contractor Call Number Note:
If contractor call number is selected ON, your phone number will show in the display if there has been a continuous call for heating or cooling for 24 hours or if the FAN button is held down for 3 seconds. To remove the phone number from the display, hold the fan button down for 3 seconds
Programming
Set Time
- Press the MENU button
- Press SET TIME
- Day of the week will be flashing. Use the
 G key to select the current day of the week.
 - Press NEXT
- The current hour is flashing. Use the key to select the current hour. When using 12-hour time, make sure the correct a.m. or p.m. choice is selected.
- Press NEXT
- Minutes are now flashing. Use the key to select current minutes.
- Press DONE when completed
Set Program Schedule
To customize your 5+ 1 + 1 program schedule, follow these steps Weekday:
- Select HEAT or COOL with the system switch. Note: You have to program heat and cool each seperately.
- Press the MENU button (If menu does not appear first press RUN SCHED)
- Press SET SCHED. Note: Monday-Friday is displayed and the WAKE icon is shown. You are now programming the wake time period for the weekday setting.
- Time is flashing. Use the key to make your time selection for the weekday WAKE time period. If you want the fan to run continuously during this time period, select ON with the fan key.
- Press NEXT
- The setpoint temperature is flashing. Use the key to make your setpoint selection for the weekday wake period.
- Press NEXT
- Repeat steps 4 thru 7 for weekday LEAVE time period, for weekday RETURN time period, and for weekday SLEEP time period.
Saturday:
Repeat steps 4 thru 7 for the Saturday WAKE time period, LEAVE time period, RETURN time period, and for the Saturday SLEEP time period.
Sunday:
Repeat steps 4 thru 7 for the Sunday WAKE time period, LEAVE time period, RETURN time period, and for the Sunday SLEEP time period.
To customize your 7 Day Program schedule, follow these steps:
- Select HEAT or COOL using the system key. Note: You have to program heat and cool each separately.
- Press MENU
- Press SET SCHED. Note: Monday is displayed and the WAKE icon is shown. You are now programming the WAKE time period for that day.
- Time is flashing. Use the key to make your timeselection for that day’s WAKE time period. Note: If you want the fan to run continuously during this time period, select ON with the FAN key.
- Press NEXT.
- The setpoint temperature is flashing. Use the key to make your setpoint selection for that day’s WAKE period.
- Press NEXT.
- Repeat steps 4 through 7 for that day’s LEAVE time period, RETURN time period, and SLEEP time period.
- Tuesday, Wednesday, Thursday, Friday, Saturday, Sunday Repeat steps 4 thru 7 for the remaining days of the week.
All of our programmable thermostats are shipped with an energy saving pre-program. Your thermostat can be programmed to have all the weekdays the same, a seperate program for Saturday, and a seperate program for Sunday. There are four time periods for each program (WAKE, LEAVE, RETURN, SLEEP}.
Thermostat Quick Reference
A Note About Auto Changeover:
If in Auto ~ou have the ability to switch between Auto Heat or Auto Coo by pressing the System key. This can be done once the current mode has reached its set-point. For exami:,le: If in Auto Heat, the heat setpoint must be satisfied before the thermostat will allow you to switch to Auto Cool. You can switch out of Auto by holdini down the System key. To get back into Auto, you must toggle t e System key to Auto.
A Note About Programmable Fan:
The programmable fan feature will run the fan continuously during any time period it is programmed to be on. This is the best way to keep the air circulated and to eliminate hot and cold spots in your building.
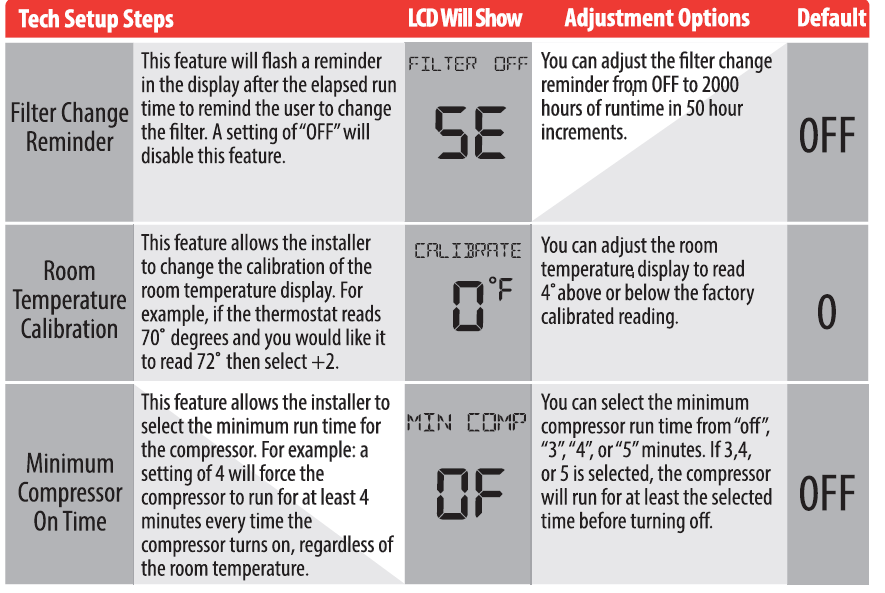
Reminders Note:
Once a Reminder has been turned on and set, the elapsed time can be checked by navigating to it’s tech setup step. The elapsed time will then appear in the text field. It can also be reset at that time by a press and hold of the third button from the left for 3 seconds. Resetting an expired Reminder can be done without entering tech setup, by a press and hold of the 3rd button from the left for 3 seconds.
|
Weekday |
Wa ke | 6AM | 70°F (21°() | 75°F (24°() |
| Leave | 8AM | 62 ° F ( 17°( ) | 83 ° F (28″() | |
|
Ret urn |
6PM |
70 ° F (2 1°( ) |
75° F (24°() |
|
| Slee p | 10 PM | 62 ° F ( 17°( ) | 78°F (26°( ) | |
|
Saturd ay |
Wake |
6AM |
70°F (21 °( ) |
75°F (24°( ) |
| Leave | 8AM |
62 ° F ( 17°( ) |
83 ° F (28″() |
|
|
Ret urn |
6PM |
70°F (21°() |
75° F (24°() | |
| Slee p | 10 PM | 6 2° F(l r c J | 78°F (26″() | |
|
Sund ay |
Wake |
6AM |
70°F (2 1°( ) |
75 ° F (2 4“( ) |
| leave | BAM |
62 ° F ( 17°( ) |
83 ° F (28″() |
|
|
Ret urn |
6 PM |
70 °F (2 1°( ) |
75° F (24°() | |
|
Slee p |
10 PM |
6 2 ° F (1 7° C) |
78 ° F (26°() | |
Warranty
Breeze33 Products LLC (Breeze33) warrants to the ORIGINAL PURCHASER that its thermostats shall be free from defects in material and workmanship under normal use and service for a five (5) years. This warranty cannot be transferred- it is extended only to the original Purchaser or First User of the Product. By accepting and keeping this Product you agree to all of the warranty terms and limitations of liability described below. Breeze33’s obligations under the warranty set forth above shall be to replace any Breeze33 Thermostat which is defective.
WHAT IS NOT COVERED?
The warranty above does not cover and Breeze33 is not liable for, (i) installation, (ii) any labor charges or (iii) products which have been damaged as a result of any accident, misuse, abuse, neglect, improper installation or maintenance, the use of abrasive or organic solvent cleaners, modification, failure to use the register, grille, or diffuser in accordance with instructions provided by Breeze33.
HOW TO OBTAIN WARRANTY SERVICE
Contact our warranty department at 740-314-4404 to report the defect. Return failed product with proof of purchase,your name, and address within 30 days offailure to:
LIMITATION OF LIABILITY
Breeze33’s liability on any claim of any kind, including, without limitation, warranty, negligence and/or breach of contract, shall in no case exceed the purchase price paid by the Customer. IN NO EVENT SHALL BREEZE33 BE LIABLE FOR ANY SPECIAL, INCIDENTAL, CONSEQUENTIAL (INCLUDING, WITHOUT LIMITATION, DAMAGE TO PROPERTY) OR PUNITIVE DAMAGES, DAMAGES IN THE NATURE OF PENALTIES OR SIMILAR OR RELATED DAMAGES OF ANY KIND.
DISCLAIMER OF WARRANTIES
BREEZE33 EXPRESSLY DISCLAIMS ALL WARRANTIES, EXCEPT AS EXPLICITLY STATED HEREIN, TO THE FULLEST EXTENT PERMITTED BY LAW, WHETHER WRITTEN, ORAL, EXPRESS OR IMPLIED, INCLUDING ANY WARRANTY OF PERFORMANCE, MERCHANTABILITY, FITNESS FOR A PARTICULAR PURPOSE, AND NON INFRINGEMENT. THIS DISCLAIMER INCLUDES ANY ORAL WARRANTIES OR REPRESENTATIONS MADE OR IMPLIED BY ANY AGENT, EMPLOYEE, SUBCONTRACTOR, MANAGER, DIRECTOR AND/OR REPRESENTATIVE OF BREEZE33.
REFERENCE:
DOWNLOAD MANUALS:
Breeze33 BZ33-302TSP Programmable Thermostat Installational Manual
![]()
Breeze33 BZ33-302TSP Programmable Thermostat Installational Manual
Leave a Reply