Braeburn 7320 Smart Wi-Fi Thermostat
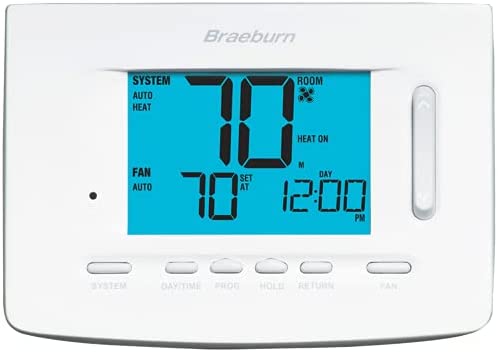
Wire and Install Thermostat
- Properly wire and configure the thermostat.
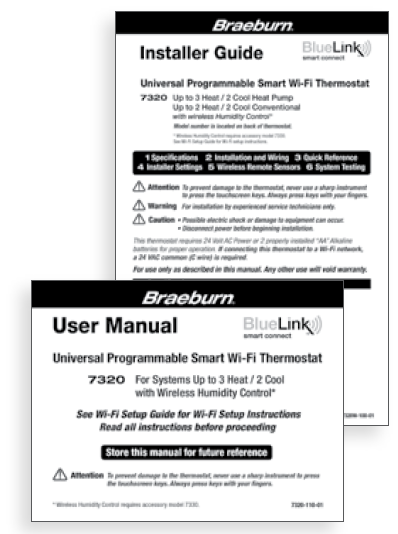
Refer to the Installer Guide. - Refer to the User Manual for programming and maintenance.
NOTE: The thermostat must have 24 VAC with a common “C” wire to use Wi-Fi.
Helpful videos can be found at www.bluelinksmartconnect.com/wifi.
Set-Up for Connection
Before beginning setup you will need to:
- Know your Wi-Fi network name and password
- Have a valid e-mail address
- Get the FREE app

Apple® Devices:
Download the BlueLink Smart Connect® application from the Apple® App Store
AndroidTM Devices:
Download the BlueLink Smart Connect® application from the Google Play Store
Desktop Computer:
Go to www.bluelinksmartconnect.com and create an account.
NOTE: Your desktop PC must have a wireless connection.
Login and Register
- Open the application or select login on the www.bluelinksmartconnect.com website.
- Select REGISTER and complete the information on the registration screens.

You will need a valid e-mail address to complete the registration. - Once you reach the Create Account screen, select REGISTER.
 NOTE: Do not close the app until you have completed registration.
Enter Serial Number
- Enter the thermostat serial number. You can locate this number on the back of the thermostat or on the enclosed thermostat registration card. Enter this number into the application and select ENTER.
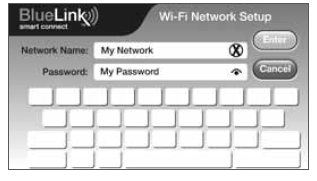
NOTE: If you removed the thermostat to locate the serial number, make sure to reconnect it before selecting ENTER. - Enter your network name (SSID) and password, select ENTER.
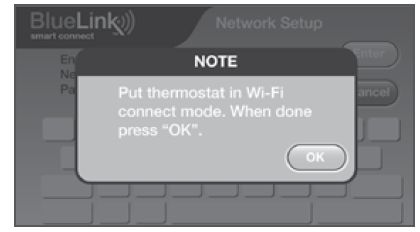
The application will now instruct you to put the thermostat into Wi-Fi connect mode.
Enable Wi-Fi on Thermostat
- On the thermostat, press and hold the CONFIG and DAY/TIME buttons for 3 seconds.

- The display will alternate the words WIFI and SKIP and the
 symbol will flash.
- Press the
 button until the word SCAN appears on the display.
NOTE:
If you are already connected to a Wi-Fi network, you will see the network name (SSID) displayed 4 characters at a time with a solid ![]() symbol. If needed, clear Wi-Fi settings and return to step 5.1 (See “Clear your Wi-Fi settings”). If you are not connected to 24 VAC the thermostat will not display any Wi-Fi information, and SENS will appear in the display.
symbol. If needed, clear Wi-Fi settings and return to step 5.1 (See “Clear your Wi-Fi settings”). If you are not connected to 24 VAC the thermostat will not display any Wi-Fi information, and SENS will appear in the display.
Connect to Thermostat
- Return to the application and select OK. The word WAIT will appear in the thermostat display.
- The application will prompt you to go to your smartphone, tablet or computer Wi-Fi settings and select the BlueLink_WiFi network. See samples shown.

NOTE: Do not exit the application. Minimize it so that you can return to the same screen after selecting the BlueLink_WiFi network. This is usually done by pressing the home button on your smartphone or tablet.
Complete Setup
- After selecting the BlueLink_WiFi network, use the home key to return to the application and select OK.

- Once a connection is made, Connection Successful will appear in the application screen. At the thermostat, your network name followed by the MAC address will appear.
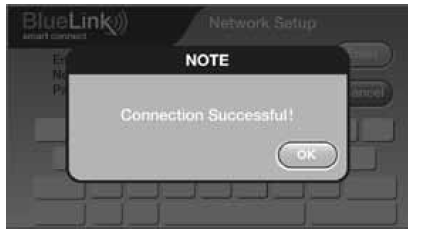
- At the thermostat, press RETURN to exit Wi-Fi setup mode.
NOTE: After setup is complete, make sure to return your device to the original wireless network.
Changing Your Wi-Fi Settings
First Clear Your Thermostat Wi-Fi Settings
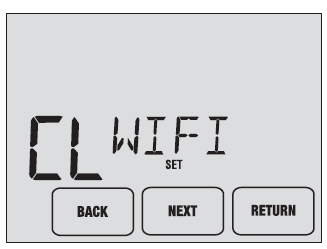
- Press and hold the CONFIG button for 1 second.
- The display will change showing the first User Option.
- Press NEXT until you see the word WIFI in the display.
- Press the button until CL WIFI appears.
- Press RETURN to exit and clear all Wi-Fi settings.
Then Update Your App Settings
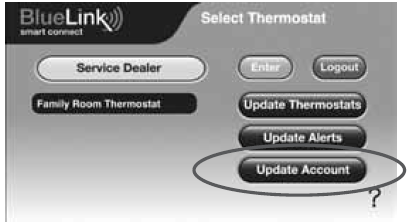
- Open the app and select Update Account.
- Enter your account password.
- Select Wi-Fi Settings.
- Select the thermostat you wish to change.
- Choose WI-FI Network or WI-FI Password and select Enter.
- Update the information and select Enter.
NOTE: To complete setup, follow the instructions in the app and refer to sections 5 – 7.
Record Network Information for Future Reference
Network Name (SSID)
Network Password
Thermostat Serial Number #
You may need this information later or if calling for support.
Visit www.bluelinksmartconnect.com for support materials.
Braeburn Systems LLC 2215 Cornell Avenue
Montgomery, IL 60538
Technical Assistance: www.braeburnonline.com
844-BLU-LINK (844-258-5465) (U.S.)
630-844-1968 (Outside the U.S.)
©2015 Braeburn Systems LLC
All Rights Reserved
Made in China.
Apple and the Apple logo are trademarks of Apple Inc., registered in the U.S. and other countries. App Store is a service mark of Apple Inc. All other trademarks are the property of their respective owners.
REFERENCE:
Download Manual: Braeburn 7320 Smart Wi-Fi Thermostat User Manual
https://device.report/energystar/2321952
Braeburn 7320 Smart Wi-Fi Thermostat – Energy Star Certification