bnthermic WT26 Wi-Fi PROGRAMMABLE Thermostat
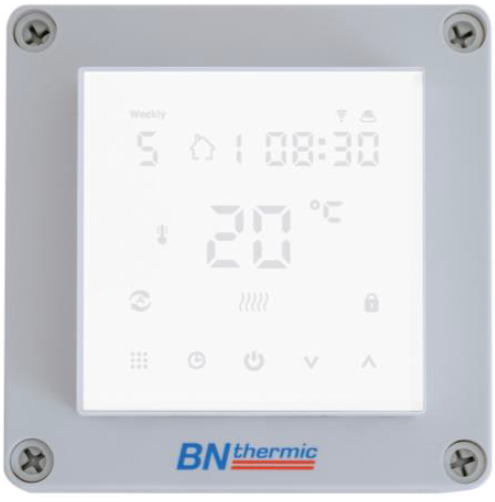
Thank you for purchasing a BN Thermic product. Manufactured to a high standard, this product will, if used according to these instructions and properly maintained, give you years of trouble free performance. Please ensure instructions remain with your customer for their reference.
REGISTER
PLEASE REGISTER THIS PRODUCT ONLINE TO ACTIVATE YOUR GUARANTEE AT www.bnthermic.co.uk
IMPORTANT: PLEASE READ THESE INSTRUCTIONS, NOTE THE SAFE OPERATIONAL REQUIREMENTS, WARNINGS, AND CAUTIONS. USE THIS PRODUCT CORRECTLY, AND WITH CARE FOR THE PURPOSE FOR WHICH IT IS INTENDED. FAILURE TO DO SO MAY CAUSE DAMAGE AND/OR PERSONAL INJURY AND WILL INVALIDATE THE WARRANTY.
SECTION A – USER INSTRUCTIONS
For installation instructions go to page 4
INTRODUCTION & SPECIFICATION
The WT26 Wi-Fi Thermostat is an easy to install and use 7 Day, 6/1 Day or 5/2 Day Programmable Room Thermostat which offers six time and temperature changes per day. It is designed to provide automatic time and temperature control for heating using its inbuilt air temperature sensor or a remote sensor (optional extra). The thermostat works in conjunction with an app available on Google Play or the App Store. All settings are stored in the controller with battery back-up.
| WT26- Programmable Heater Controller | |
| Programming | 7 Day, 6+1 Day or 5+2 Day (Default 5+2 Day) |
| Power Supply | 230V ac 50 Hz 26A Maximum Load (Battery back-up) |
| Remote Sensor (Optional) | CXS, CXSIP, BBS and BBSIP (IP versions are IP65 rated) |
| Temperature Range | 1°C to 45°C (Default 5°C to 30°C) |
| Display | LED + Standby brightness setting. |
| No. Events Per Day | 6 |
| Tamper Resistant | Facility for locking the screen or the screen except “On / Off”. |
| Dimensions | 125mm (H) x 125mm (W) x 90mm (D). |
| Electrical Protection | Class II IP20 |
|
Complies with: |
EN 301489-1, EMC Directive 2014/30/EU,
EN60950-1:2006 + a11:2009 + a1:2010 + a12:2011 + a2:2013 |
OPERATING GUIDE
Connecting Thermostat to Android or iPhone App
- You will need a 4G or 5G mobile phone and wireless router.
- Download “Smart RM”
 app from Google Play (Android users) or the App Store (iPhone users).
 - If you cannot find “Smart RM” or already have “Smart Life”
 app the thermostat can also be used with this.
If you are intending to use the thermostat with your mobile phone, we recommend you set up the app as soon as possible. Adjusting the settings of the thermostat is much quicker using your phones display and buttons. Most settings are available on the app. The time and day number are automatically sent from the app once paired.
Instructions for pairing your phone to the app are included but if you require a digital version or the latest update, just scan the correct QR code below for your phone type.

MANUAL SETTING OF THE THERMOSTAT- When app is not available or not used
To Set Time and Week Day Number
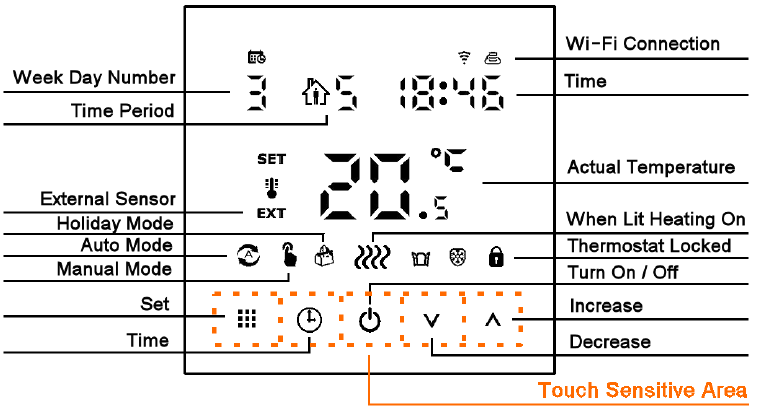
- Turn thermostat on by pressing the screen in the touch sensitive area until all the buttons light up.
- Press the
 button and the minutes will start to flash. Adjust the minutes by pressing the
  or
or  buttons. When correct, press button and the hours will flash. Set these by pressing the or buttons. When correct, press button and the day number will flash. Set this by pressing the or buttons. When correct, press . Note that Monday is 1, Tuesday 2 etc. If you don’t press a button for 5 seconds, display returns to standby mode and you will need to repeat section b above.
Programming – The controller is pre-set to the following times and temperatures:-

By default, the controller is set to 5+2 days. This means when programming Monday – Friday settings will all be the same and you can then program different settings for Saturday – Sunday. If you require 7 day or 6+1 day settings, go to “default settings” and adjust parameters first (See section 5).
To adjust or program the time & temperature periods
- Make sure the thermostat is on or turn on by pressing the screen in the touch sensitive area until all the buttons light up.
- Press and hold the
 button for 3-5 seconds until the time starts to flash, display will also show “5” underneath the date symbol and the first period symbol will show. Adjust the hours by pressing the or buttons. When correct, press button and the minutes will flash. Set these by pressing the or buttons. When correct, press button and the temperature will flash. Set this by pressing the or buttons. When correct, press and the second period symbol will show, and the hours will flash. Now repeat the above to set all 6 periods. Once set, the days will change to 2 and you repeat the above procedure to program Saturday and Sunday.
 - Note “5” on the display while programming means you are setting all 5 weekdays “2” on the display while setting means you are programming Saturday & Sunday. If you change the default to 6+1, ”6” on the display means you are setting Mon – Saturday and “1” is for Sunday. Lastly if you change the default settings to 7, “7” on the display means you are setting Mon – Sunday. If you don’t press a button for approx. 5 seconds the controller will automatically store the settings and exit programming mode.
Run Modes
- Turn thermostat On or Off by pressing the
 button.
 - When “ON” press to toggle between Auto mode
 and Manual mode
 .
. - When in Auto mode you can override the set temperature by pressing the or buttons. This override will last until the next program period and is shown by both the and symbols.
- When in Manual mode you can override the set temperature by pressing the or buttons. Note:- The thermostat will stay in Manual mode with the same set temperature until you switch it to Auto mode or turn the thermostat off. At any time, you can return to the auto temperature set point by pressing the button until only the Auto mode shows.
Locking the controller
The controller has 2 lock settings selected in the default settings (see section 5). Half lock, when set only allows the On / Off button to be pressed. Full lock disables all buttons except the unlock sequence. Putting the controller in lock mode, indicated by a symbol on the screen is done by  pressing and holding the button until the symbol appears. Unlocking is the reverse process.
Holiday Mode – Note: 1 day = 24 hours count down
Holiday days (count down) and temperature set point can be set so that the heating runs at a lower temperature whilst you are away and reverts back to normal when you return. To access, make sure controller is on and then press button for 3-5 seconds until the screen displays “Off”. Change to “On” by using the or buttons. Then press button to set the number of days you are away by using the or buttons. Then press button to set the temperature required while you are away by using the or buttons. Finally press button to set. Holiday mode is shown by a symbol displayed on the screen. Once set and counting down, to exit holiday mode early press the button.
SECTION B – INSTALLATION AND MASTER SETTINGS
INSTALLATION SAFETY INSTRUCTIONS
ELECTRICAL SAFETY
WARNING! It is the responsibility of the owner and the installer to read, understand and comply with the following: You must check all electrical products, before use, to ensure that they are safe. You must inspect power cables, plugs, sockets and any other connectors for wear or damage. You must ensure that the risk of electric shock is minimised by the installation of appropriate safety devices. A Residual Current Circuit Breaker (RCCB) should be incorporated in the main distribution board. If in any doubt consult a qualified electrician. You must also read and understand the following instructions concerning electrical safety.
- The Health & Safety at Work Act 1974 makes owners of electrical appliances responsible for the safe condition of those appliances and the safety of the appliance operators. If in any doubt about electrical safety, contact a qualified electrician.
- Installation should always be carried out by a qualified electrician or a competent person in accordance with current electrical regulation.
- Ensure that the cables are always protected against short circuit and overload.
- The unit should be protected by a suitably rated isolator and fuse or MCB.
- This controller is IP20 rated and is suitable for indoor use only.
GENERAL SAFETY INSTRUCTIONS
- Remove all packaging and store it away from children, check the package and controller for visible damage or tampering.
- Familiarise yourself with the applications and limitations of the controller.
- only use recommended attachments and parts. To use unauthorised parts may be dangerous and will invalidate your warranty.
- DO NOT use in areas where hazardous gasses or dusts may be present.
- DO NOT disassemble the controller for any reason. There are no user serviceable parts inside.
- DO NOT use this controller to perform a task for which it has not been designed.
- Please leave the user instructions with the end user where they should be kept in a safe place for further reference
INSTALLATION
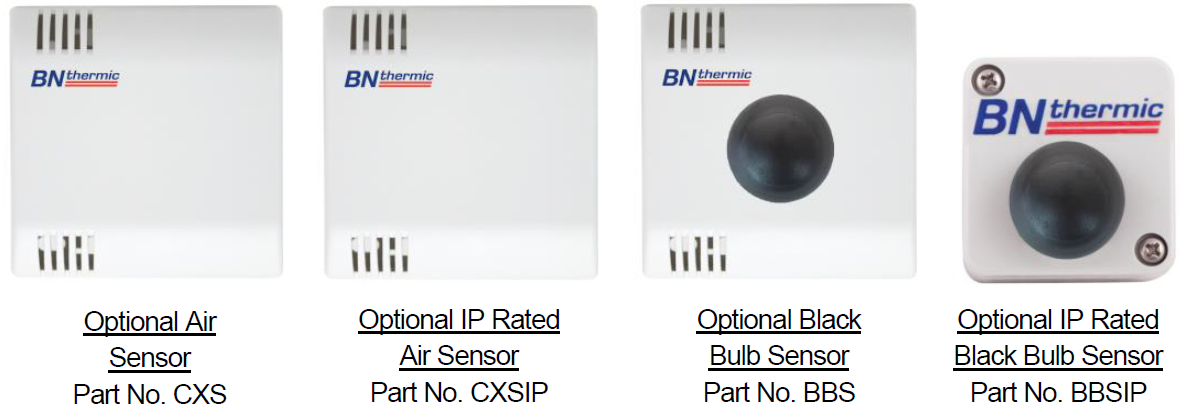
The WT26 thermostat can be used with its internal air sensor or if required with an optional remote air sensor or optional remote black bulb sensor. Sensors are wired to terminals 5 and 6. Polarity of the sensor wires does not matter.
CHOOSING A LOCATION FOR YOUR WT26 OR REMOTE SENSOR
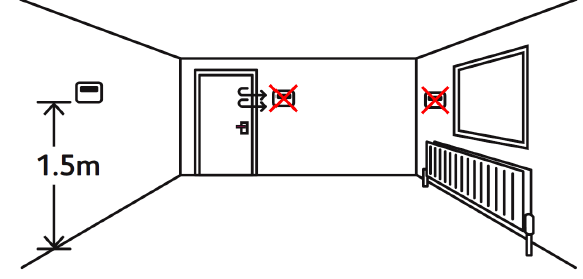
The WT26 controller or sensors should be mounted on an internal wall approximately 1.5 meters from floor level and should be in a position away from draughts, direct heat and sunlight. If you decide to use remote sensors you will need to change “BN” to “N2” on the advance default settings. See page 8 for more information.
INSTALLING THE WT26
Screw the WT26 in position using suitable fixtures and fittings.
There are 4 holes in the corners of the case, or you can drill additional holes in the back.
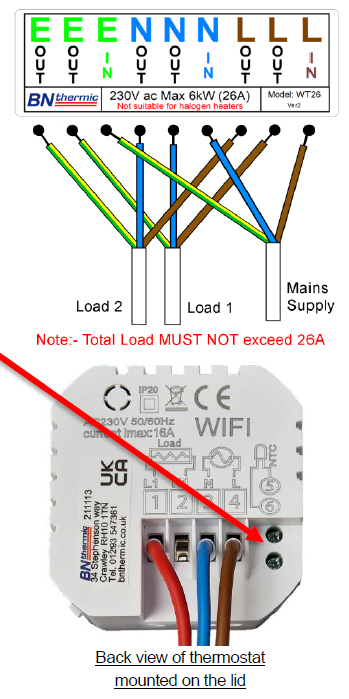
- Wire the thermostat as per picture to the right, making sure all the terminals are done up tightly.
- If you are using a remote sensor connect to terminals 5 and 6 (marked NTC). These are positioned on the thermostat mounted on the front cover. You can use any insulated copper wire. Polarity of the sensor does not matter. (you will also need to change the default settings to activate the remote sensor see page 8).
- Do NOT exceed total load of 26A this can be a single load of 26A or multi loads totalling 26A. For loads greater than this, use an additional relay box (RB26) or contactor. If using a contactor, the thermostat must only control the coil of the contactor.
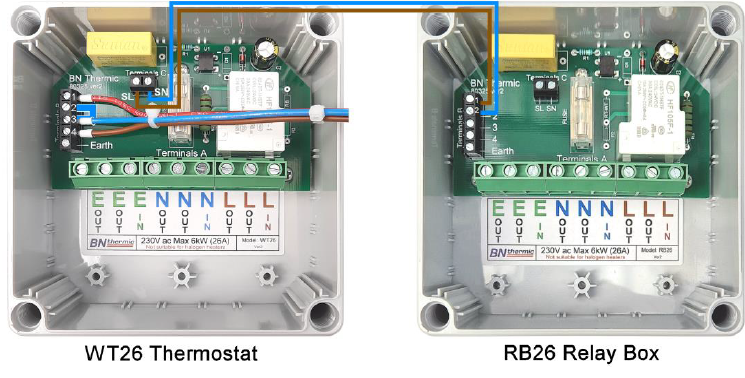
- To connect a relay box giving an additional 26A to the thermostat connect brown wire (Live) between SL and terminal 1 of the relay box. Connect blue wire (Neutral) between SN and terminal 2 of the relay box. Also add a link blue wire between terminal 2 and 3 of the thermostat. Connect yellow & green wire (Earth) between Earth connection on the Thermostat and Earth connection on the relay box. Use 0.75mm² 3 core cable. (See picture below).
CHANGING THE MASTER / DEFAULT SETTINGS.
There are various master / default settings that can be changed by entering the default settings. To enter these settings, turn off the thermostat by pressing the button. Now press the screen in the touch sensitive area until all the buttons light up. Then press and hold the button for 3-5 seconds until the A1 appears on the screen. You are now in settings mode and if you don’t press any button for 5 seconds the display reverts back to off mode. Press button to switch to next option and press or buttons to adjust the data. If you wish to exit the settings without waiting 5 seconds press the button.
| No. | Setting Options | Data Setting Function | Default |
|
A1 |
Temperature calibration. |
-9⁰C to +9⁰C in 0.5⁰C steps. (Can be used to fine tune temperature reading so it matches another thermostat). |
0⁰C |
| A2 | Differential between set point and On and Off. | 0.5⁰C – 2.5⁰C in 0.5⁰C steps. | 0.5⁰C |
| A3 | lock settings. | 0 = half lock 1 = full lock | 0 |
|
A4 |
Power Cut function. |
0 = Power heating as per controller memory. 1 = Shut down controller after power cut.
2 = Shutdown heating but turn controller on after power cut. |
0 |
| A5 | Display Standby Brightness. | 0 = Off 1 = Half brightness 2 = Full brightness | 1 |
|
A6 |
Programming selection. |
0 = 5 + 2 (same settings Mon-Fri + Sat-Sun) 1 = 6 + 1 (same settings Mon-Sat + Sun)
2 = 7 days same |
0 |
|
A7 |
Minimum set point of internal sensor if BN set to N1 or N3 or external sensor if BN set to N2. |
1⁰C – 10⁰C |
5⁰C |
|
A8 |
Maximum set point of internal sensor if BN set to N1 or N3 or floor sensor if BN set to N2. |
20⁰C – 45⁰C |
30⁰C |
| A9 | Minimum set point of external sensor if BN set to N3. | 1⁰C – 10⁰C or ( = Not active) | 5⁰C |
| AA | Maximum set point of external sensor if BN set to N3. | 20⁰C – 70⁰C or ( = Not active) | 27⁰C |
| AB | External sensor differential only used if BN set to N3. | 1⁰C – 9⁰C in 1⁰C steps. | 1⁰C |
|
AC |
Window Opening detection. |
= Not active
10 – 20⁰C = Sudden drop set point at which heating turns off. |
|
| AD | Window Opening OFF period. | 10 – 20 minutes (only if AC above is set to a temperature and not ). | 10 |
| AE | Factory Reset. | Press & hold key until whole screen shows. Note: – This also resets the Wi-Fi Connections. |
ADVANCE DEFAULT SETTINGS
To enter the advance settings, turn off the thermostat by pressing the button. Now press the screen in the touch sensitive area until all the buttons light up. Then press and hold the button for 3-5 seconds until the advance options appears on the screen. You are now in settings mode and if you don’t press any button for 5 seconds the display reverts back to off mode. Press button to switch to next option and press or buttons to adjust the data. If you wish to exit the settings without waiting 5 seconds press the button.
| No. | Setting Options | Data Setting Function | Default |
|
BN |
Sensors used. |
N1= Built in sensor only. N2= External sensor only.
N3= Built in sensor and external sensor. NOTE.- N3 only used for specialist applications if recommended by BN Thermic. |
N1 |
| BC | DO NOT USE – leave set at 0 | DO NOT USE – leave set at 0. | 0 |
| BO | Product Version | Cannot be changed. |
USING AS A CONVENTIONAL THERMOSTAT
It is easy to set up your WT26 thermostat to operate as a simple, conventional thermostat without the need to programme different times and temperatures. There are 2 steps.
- Set the temperature required – Refer to “Run Modes” on page 3 and use manual mode, then select the required temperature by using the or buttons.
- Lock the thermostat – Refer to “Locking the controller” on page 3. Locking the thermostat will disable all the buttons except the on/off button. If you want to disable the on/off button as well, you will need to change the default lock settings before starting this process (see section 5).
SENSOR FAULT CODES
E1 or E2 fault codes are displayed if the sensors are faulty or are not connected. The thermostat will stop heating until the fault is corrected. E1 = Internal sensor faulty. E2 = External sensor faulty or not present.
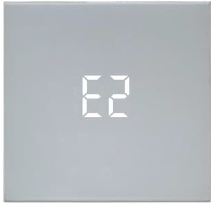
If in the advance default settings shown above, you have selected N3 for option BN (Sensors used) you will get a fault code and the thermostat will not work, please select either N1 if you are using the internal sensor or N2 if you are using an external mounted sensor.
NOTE: It is our policy to continually improve products and as such we reserve the right to alter data, specifications and component parts without prior notice.
WEEE REGULATIONS
This appliance bears the symbol of the crossed waste bin. This indicates that, at the end of its useful life, it must not be disposed of as domestic waste, but must be taken to a collection centre for waste electrical and electronic equipment. It is the user’s responsibility to dispose of this appliance through the appropriate channels. Failure to do so may incur penalties established by laws governing waste disposal.
REGISTER: Activate your warranty by registering online at www.bnthermic.co.uk and retain this installation data for future reference.
IMPORTANT: No liability is accepted for incorrect use of this product.
WARRANTY: Your BN Thermic product is guaranteed for one year from date of purchase. We will repair or replace at our discretion any part found to be defective. We cannot assume any consequential liability. This guarantee in no way prejudices your rights under common law and is offered as an addition to consumer liability rights.
Reference
Download Manual:
bnthermic WT26 Wi-Fi PROGRAMMABLE Thermostat INSTRUCTIONS Manual

bnthermic WT26 Wi-Fi PROGRAMMABLE Thermostat INSTRUCTIONS Manual