beca BHP-6000 Heat Pump Thermostat
INTRODUCTION
Thank you for your purchase. Please confirm that this product is suitable for your heating equipment before installation; *Before installation or maintenance, please make sure to keep the power off; *Please strictly follow the wiring diagram for wiring installation; *Installation to the wall, please confirm that the fasteners are suitable for this product; *Do not pull the cable too hard, otherwise the product will be damaged; *If a hard plastic wire is used in the installation process, it must be bent to an appropriate angle in advance; *Please arrange for professionals to install; *Please contact the after-sales service for equipment failure, please do not try to repair it yourself; * After installation, please refer to this manual to check again to ensure normal and safe use, and keep this manual properly. In the box you will find
IN THE BOX
- Thermostat 1pc
- QC Passed 1pc
- Screws 2pc
- User Guide 1pc
SYSTEM TYPE
- Warm air, hot water, high efficiency furnaces, heat pumps, steam, gravity.
- Heat only–including power to open and close zone valves, and normally open zone valves.
- Heat only with fan.
- Cool only.
FEATURES
On Appearance
- Negative black sceen will bring you to a secret world.
- 51mm round display area helps to protect your eyes.
- Touch buttons to make simple operation.
- Amazing Silver Frame opens your modern life.
- The visiable thickness above the wall is only 11mm.
- Rotation to connect gives you easy installation.
- Wall mounted or suitable for the installation of Europe, China, Japan, USA and Italy.
- White, black or brushless stainless steel housing creates your colorful life.
On Functionality
- Powerful functions are available such as WIFI etc,.
- 0.5℃ accuracy keeps temperature within the level you set.
- ℃&℉is changeable.(On thermostat)
- 5+1+1 four periods programmable.
- Temporary programmable.
- . Holiday mode.
- All setting languages sunchronize your time zone, address and language.
- No limit to add thermostats in App.
- Support Smart Scene.
- . Support to make group and two stage groups.
- Support device sharing.
TECHNICAL DATA
- Power Supply: AC/DC24V ±10%
- Current Load: 1A (Inductive) 3A (Resistance)
- Sensor: NTC3950, 10K
- Set Temp. Range: 42-122℉(5~50℃)
- Accuracy: ±1℉
- Display Temp. Range: 41~210℉(5~99℃)
- Ambient Temp: 32~113℉(0~45℃)
- Ambient Humidity: 5~95%RH(Non Condensing)
- Storage Temp: 23~113℉ (-5~45℃)
- Timing Error: <1%
- Power Consumption: <1.5W
- Shell Material: PC+ABS(Fireproof)
- Available Installation 1: Wall mounted
- Available Installation 2: Hole Distance of 62±5mm (Europe, China and Japan)
- Available Installation 3: Hole Distance of 86±3mm (USA and Italy etc,.)
- Wire Terminals: Wire 2×1.5mm2 or 1×2.5mm2
- Protection Class: IP20
- Buttons: Capactive Touch Buttons
DIMENSIONS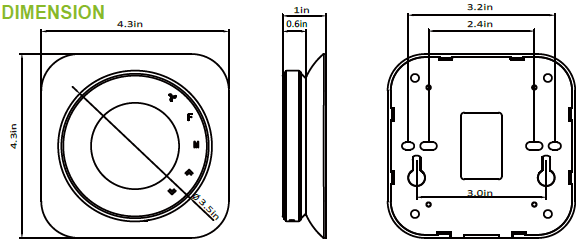
BEFORE WIRING AND INSTALLATION
- Read these instructions carefully. Failure to follow them could damage the product or cause a hazardous condition.
- Check the rathings given in the instructions and on the product to make sure the product is suitable for your application.
- Installer must be a trained, experienced service technician.
- After installation is complete, check out product operation as provided in these instructions.
WIRING All wiring must comply with local electrical codes and ordinances. This thermostat works with 24V heating and cooling systems. There Y1, W1 share one terminal, Y2, W2 share one terminal.
1Stage Heat pump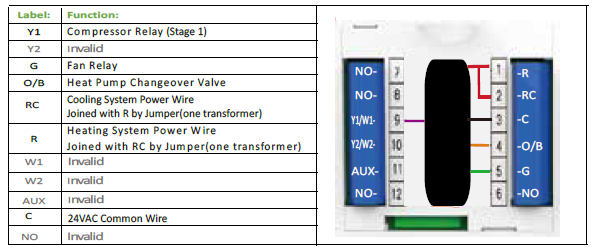
2Stage Heat pump
2Stage Heat pump with Aux Heat
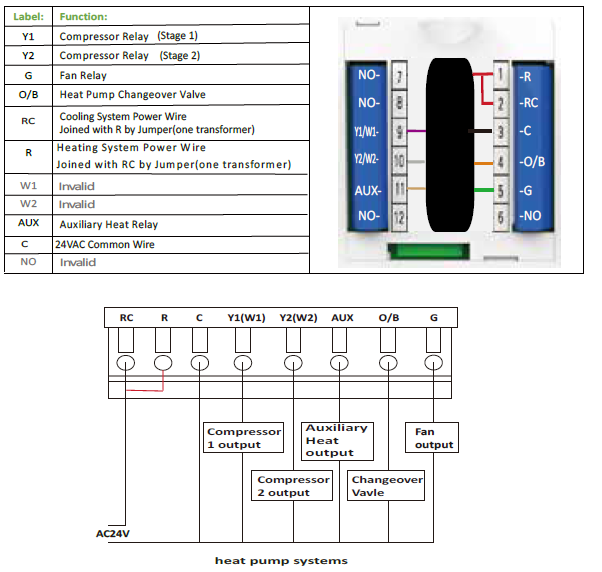
| No. | Type | Terminals | Wiring | Compressor delay |
| 0.0 | 1H/1C (conventional) | R. G. W1. Y1 | Diagram conventional systems | none |
| 1.0 | 1H/2C (conventional) | R. G. W1. Y1. Y2 | none | |
| 2.0 | 2H/2C (conventional) | R. G. W1. Y1. W2. Y2 | none | |
| 3.0 | 2H/1C (conventional) | R. G. W1. Y1. W2 | none | |
| 4.0 | 1H/1C (heat pump) | R. G. O/B. Y1(W1). |
Diagram heat pump systems |
1 min (default) |
| 5.0 |
2H/1C (heat pump) |
R. G. O/B. Y1(W1).
Y2(W2) |
1 min (default) |
|
| 6.0 | 2H/2C (heat pump) | R. G. O/B. Y1(W1).
Y2(W2) |
1 min (default) |
|
| 7.0 | 3H/2C (heat pump) | R. G. O/B. Y1(W1). AUX.
Y2(W2) |
1 min (default) |
INSTALLATION
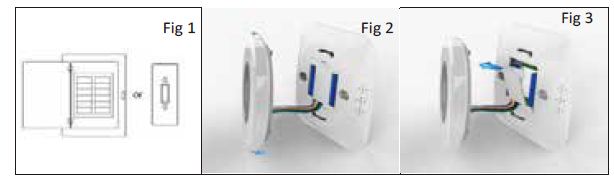
- 1. For wall mounted.
- Step 1. Keep the electricity off.
- Step 2. Remove the mounting plate by rotating the LCD part.
- Step 3. Open the insulating cover.
- Step 4. Connect power supply and load into the appropriate terminals. (see”Wiring your thermostat” for details and
- Step 5. Close the insulating cover and fasten body of thermostat and the mounting plate by rotating.
- Step 6. Measure the position you want to place and lock the two screws in the box into the wall. Fix the head of screws into the slot of the back of thermostat.
- For the distance 62±5mm (Europe, China and Japan.)
- Step 1. Keep the electricity off
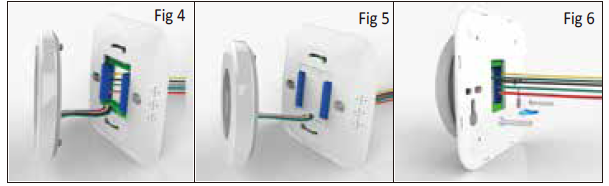 Step 2. Remove the mounting plate by rotating the LCD part.
 - Step 3. Open the insulating cover.
- Step 4. Connect power supply and load into the appropriate terminals. (see”Wiring your thermostat” for detai).
- Step 5. Close the insulating cover and fix the mounting plate (the two holes inside) into the wall with screws in the box.
- Step 6. Fasten body of thermostat and the mounting plate by rotating.
- Step 1. Keep the electricity off
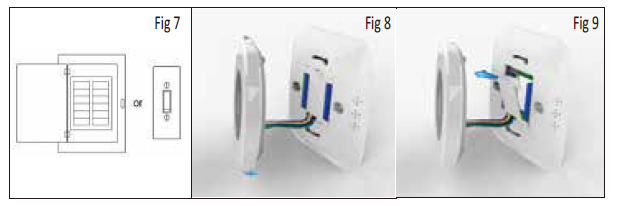
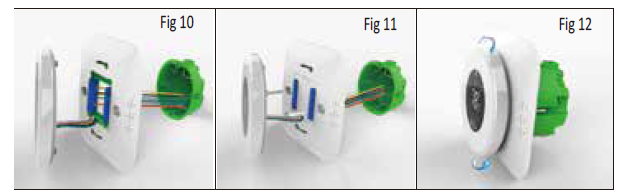
- For the distance 86±3mm (USA and Italy etc,.)
- Step 1. Keep the electricity off.
- Step 2. Remove the mounting plate by rotating the LCD part.
- Step 3. Open the mounting plate by a slot screwdriver. 15.
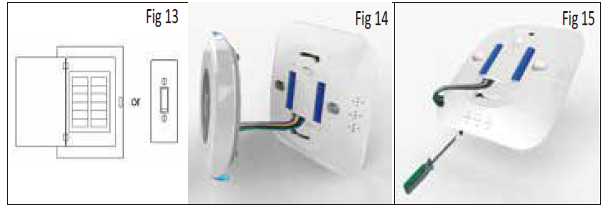
- Step 4. Connect power supply and load into the appropriate terminals.(see”Wiring your thermostat”for details and
- Step 5. Fix the mounting plate(the two holes outside) into the wall with screws in the box.
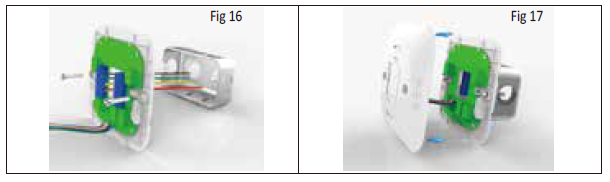
- Step 6. Connect the front plate and mounting plate.
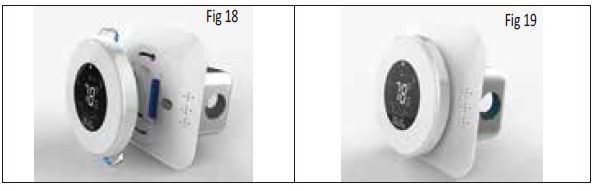
- Step 7. Fasten body of thermostat and the whole mounting plate by rotating.
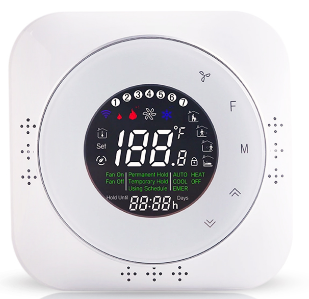
HOME QUICK REFERENCE
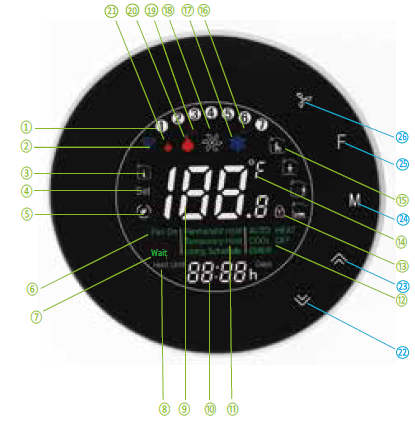
- Monday to Sunday
- Wifi
- Room Temp
- Set Temp
- Energysaving(Keycard Out)
- Fan
- Wait till the output works
- Holiday Mode
- Room Temp. Display
- Time Display
- Functions
- System Mode
- Lock
- Fahrenheit/Celsius Degree
- Periods
- +1 2nd Stage Cool
- 1st Stage Cool Fan
- +1 2nd Stage Heat
- 1st Stage Heat
- AUX Heat
- Down Button
- Up Button
- 24 Auto/Cool/Heat/Off
- Permanent Hold/Temporary
- Hold/Using Schedule/Holiday
- Fan On/Fan Auto
OPERATION
- Setting the Fan
- Press to select the Fan Auto, Fan ON. Auto indicates fan is running its schedule; On indicates fan schedule is set to On.
- Function and Programmable
- Press and hold F to set the Permanent Hold, Using Schedule, Temporary Hold. These functions will appear on the screen.
- Permanent Hold – Manual. In this mode, press to set temperature.
- Temporary Hold. During Using Schedule or in this mode, press to set the temporary temp.
- It will be invalid till the start time of the next scheduled period.
- Using Schedule. 5+1+1 four periods programmable.
- Holiday Mode. Changes temperature setting for a designated number of days.
How to set your time?
- Press and hold F for 5 sec. till the min of time will flash
- Touch the icon to set your minute.
- Then press F, the hour of time will flash; Touch the icon to set your hour.
- Then press F, the week of time will flash; Touch the icon to set your week.
How to adjust your schedule?
- After the above time setting, touch the icon F appear(1 2 3 4 5 will show along the top of the screen).
- Use the and arrows to adjust the time for the 1st period(Get Up). Press the icon F use the and arrows to set the temp. for the 1st period. Repeat this process for periods 2-4.
- Get Up — Period when you awaken and want your home at a comfortable temperature.
- Go Out — Period when you are away from home and want an energy-saving temperature.
- Go Home — Period when you return home and want your home back to a comfortable temperature.
- Sleep — Period when you are asleep and want an energy saving temperature
How to adjust your holiday?
Press F till the letters Hold Until displays and days flash on the screen then click and arrows to set the days of holiday. When the flashing of days stops, you can press and arrows to set the temp.. Holiday mode will be valid immediately.
Selecting System Mode
- Press M to select the mode AUTO,COOL,HEAT,OFF,EMER.
- HEAT — Thermostat controls the heating system.
- OFF — Both heating and cooling systems are off.
- COOL — Thermostat controls the cooling system.
- AUTO — Thermostat automatically changes between heating and cooling operation, depending on indoor temperature.
- EMER — Emergency heat cycles to maintain temperature.
Advanced Options
Press and hold until 5 seconds in order to reach system functions. Then press to change the different items.
| User
Setup Number |
Function |
Setting and options |
Default |
| 1 | Temperature
calibration |
-7 to -1℃(-13 to -2 ℉ ) |
-5 |
|
2 |
Temp. Difference for the change of system in
auto mode |
0 to 5℃(0 to -9℉) |
03 |
| 3 | ℉ or ℃ | 0:℃ setting
1:℉ setting |
1 |
| 4 |
Filter change reminder |
0–5 (month) |
03 |
| 5 | Min. Set Temp. | 5 to 15℃(41 to 59℉) | 05 |
| 6 | Max. Set Temp. | 15 to 45℃(59 to 113℉) | 45 |
| 7 | 12/24 hours | 0: 12h 1: 24h | 1 |
|
8 |
O/B |
0—changeover valve—O/B terminal is energized in cooling (factory setting) 1—changeover valve—O/B terminal is energized in
heating |
1 |
| 9 |
Date (year) |
Select number of current
calendar year (1-99) |
19 |
| A |
Date (month) |
Select number of current
calendar month (1-12) |
01 |
| B |
Date (day) |
Select number of current
calendar date (1-31) |
1 |
| C | Deadband Temp. | 1 to 5℃(2 to 9℉) | 1 |
| D | Backlight adjustment | 3 — 99 (Brightness) | 10 |
| E | Delay setting for output | 1–5 minute | 01 |
| F | Fan output ( Heat) | 0:Without Fan 1: With Fan | 01 |
ABOUT WIFI
WIFI CONNECTION
Before using your Wi-Fi thermostat for the first time,you must configure the Wi-Fi signal and settings through your smartphone or tablet, This will allow communication between your connected devices
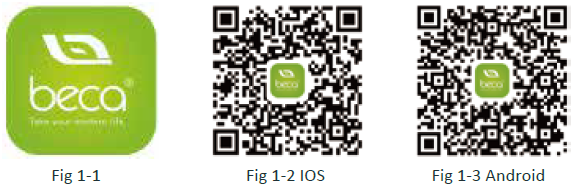
- Step 1 Download your APP (Fig 1-1)
 Step 2 Register your account
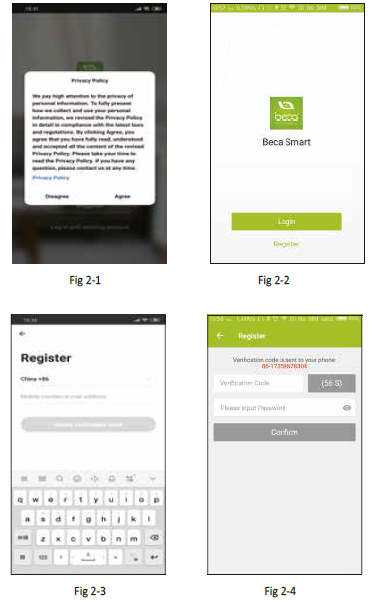
- Open your BecaSmart, you will get a piece of notification (Fig 2-1)
- Click Allow to go into your page of register (Fig 2-2). Press register and enter your phone no. or email (Fig 2-3) then you can get a verification code. Input your password and confirm (Fig 2-4) to complete your registration. If you have account, please log in
- Step 3 Connect your Wi-Fi signal
- On your thermostat
- Press and hold the
 arrow for eight (8) seconds.
- Press and hold the
- The backlight will be on and the icon
 will flash one time per sec..
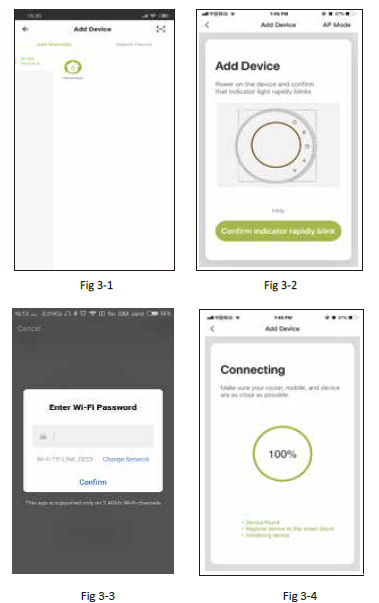
- Then, go back to the home page of your app Press the + on the upper right corner of the page (see Fig 3-1) to add your device.
- Click Confirm indicator rapidly blink (Fig 3-2) then select your network and back to your app to enter the password of your wireless router (Fig 3-3) and confirm.
- The app will connect automatically (Fig 3-4). This may typically take up to 5~90 seconds to complete. Your room name could be edited when the device is connected
- On your thermostat
- Press and hold the arrow for eight (8) seconds. The backlight will be on and the icon will flash one time per sec..
- Press and hold the arrow for eight (8) seconds agian.
- The icon
 will flash one time every (3) seconds.
 - Then, go back to the home page of your app
- Click Confirm indicator slowly blink (Fig 4-1) then select your network and back to your app to enter the password of your wireless router (Fig 3-3) and confirm.
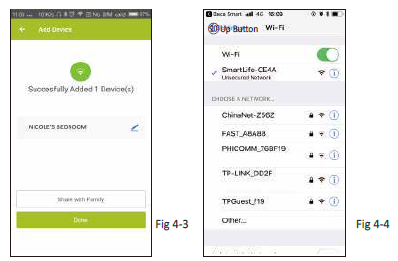
- The app will go into the page in Fig 4-2.
Press Connect now to select the wifi signal Smartlife-CE4A of your thermostat ( - Go back to your app and click Connect now then the app will connect automatically
- This may typically take up to 5~90 seconds to complete.
- Your room name could be edited when the device is connected
- Press and hold the
PROGRAMMING YOUR THERMOSTAT
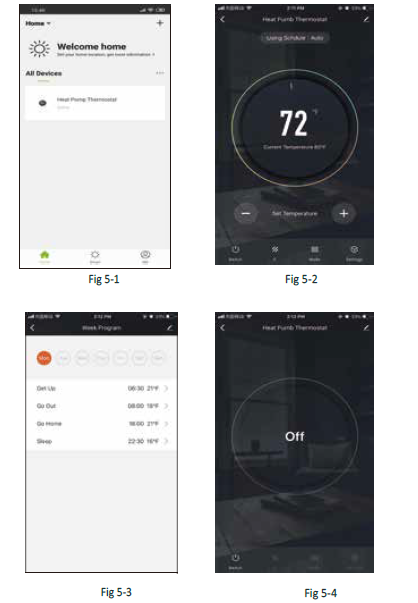
- Power on/off bution. When the screen is bright, it is power on; when the screen is dark, it is power off.
- This symbol represents function and you can choose Permanent Hold/Temparary
- Hold/Using Schedule/Holiday Hold
- Mode,press it you can choose Auto/ Cool/Heat/Emer/Off.
- This is the setting symbol. You can set the device name, location, greate group and so on.
 .
.
How to share your device with your family member?
- Way 1: Mentioned in the above
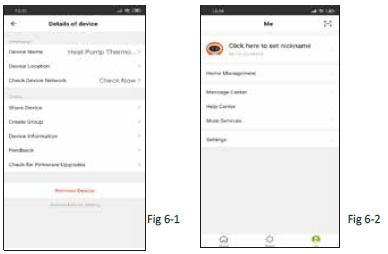
- Way 2: Click your Profile at the right bottom of your main page (Fig 6-2).
- Select Device Sharing then add the account you want to share.
- You can see the sharing account you have sent and the device you have shared in this sharing page.
- You don’t need to do anything if you are the one shared.
- You can add as many as rooms you want
How to connect your device to Amazon Echo or Google Home?
In your profile, click Intergration i nto the using page. Press Use Now > (Fig 7-1) for your Amazon Echo or Google Home or Tmall Genie or IFTTT then you can see the operati on steps.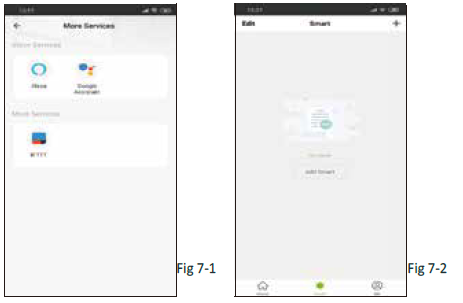
What is your Smart Scene and How to use it?
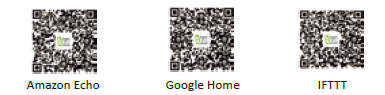
- Customize your own personal scenes to suit your needs.For example, home (Fig 7-2).Press + button into the setting.
- Air Quality,Sunrise/Sunset,Device)
- Step 2: Add a task. Press to Select Device (Power,Set Temp,Lock Mode) to act, then Save.If you want to delete the scene,you can press Delete in the end.
SIMPLE EXCEPTION HANDLING
| No. | Phenomenons | Handling |
| Power is on but without display. | * Check if the terminals between LCD panel and Power Unit Box is loosen. | |
| Without output but display works. | * Use a new LCD panel or new Power Unit Box to replace the old one. | |
| Room Temp. Is a little different from the actual. | *Do temperature calibration in item 1 of high senior options |
REFERENCE
DOWNLOAD MANUAL
beca BHP-6000 Heat Pump Thermostat User Guide
