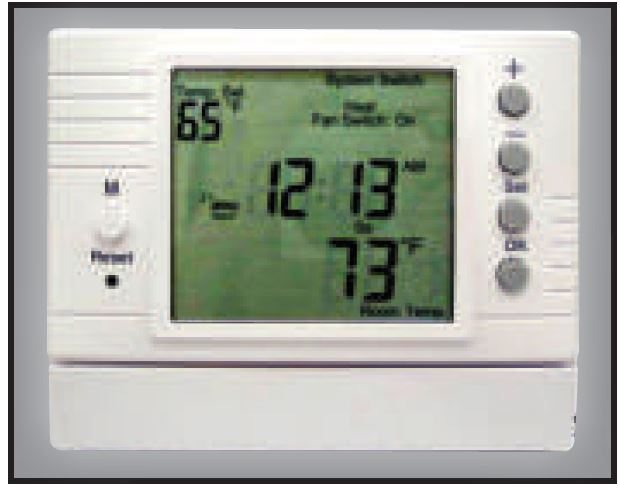
AZEL D-500 PROGRAMMABLE THERMOSTAT
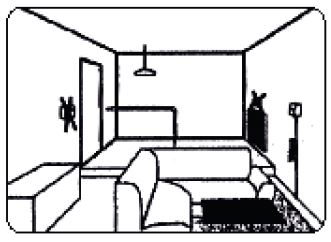
LOCATION FOR INSTALLATION
Look for a location, which has a constant temperature in the house and it is not near the door entry or air condition outlet
INSTALLATION
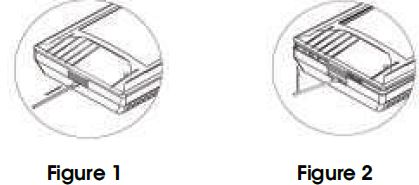
Open the top housing as shown in Figures 1 and 2 with a screwdriver:
 Be careful not to touch or move the slide switches on the front and the back cover. If the switches are moved from their original position, see NOTE ON INSTALLING THE FRONT LCD COVER on page 3
USER SETTING
- C/F selection: Press. +/- to choose F/C setting. Then press OK to enter 24H/12H setting.
- 24H/12H selection: Press. +/- to choose 24H/12H setting. Then press OK to enter DATE setting.
- DATE: Press. +/- to choose YEAR. Then press OK to enter Month setting.
- MONTH: Press +/- to choose MONTH. Then press OK to enter DAY setting.
- DAY: Press +/- to choose DAY. Then press OK to enter CLOCK setting.
- CLOCK: Press +/- and OK to adjust current HOUR and MINUTE.
- Then press OK to enter the DIFFERENTIAL setting.
- DIFFERENTIAL: Press +/- to choose desired switching differential(1 or 2). Then press OK to enter FILTER setting.
- FILTER: Press +/- to select filter hours from 100-hour to 9900-hour.
- Note: for fan coil system, replacing the filter after using for certain period of time in order to maintain the system performance. When this function is activated, LCD will display “Reminder” signal on main screen when the filter timer is expired. This function is not effective for the system without FAN.
- Press OK to return to main screen and run the settings.
WIRING DIAGRAMS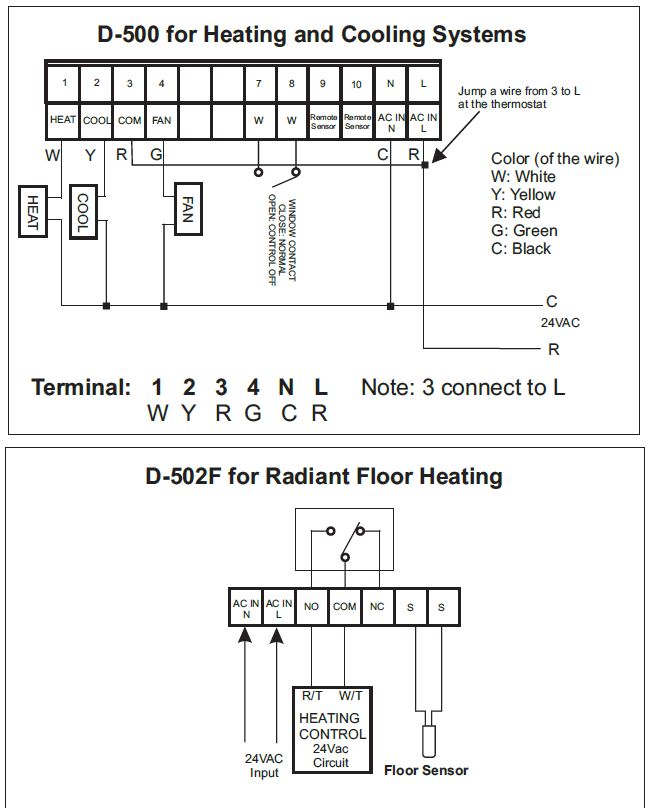
PROGRAMMING THE THERMOSTAT
Note: During the program setting mode, the thermostat will return to normal operating mode if no key is pressed for 30 secs.
KEYPAD DESCRIPTIONS
- SET key: Use to enter program mode/view mode plus other functions.
- +/- key: + key increase or skip to next step. – key decrease or return to previous step.
- OK key: Press to enter setting or return to run the program.
- RESET key: Press to reset the settings to factory default.
- Manual Key: Override function control key.
PROGRAM REVIEW
- Press SET.
- Press OK to review each Temperature/Time Setting (Program)
PROGRAM SETTING:
- To set each daily program for all 7 days
- Press SET to enter program setting, which starts with Mo-MORN (Monday-Morning).
- Press +/- to adjust 1st Temperature setting (P 1 Temperature)
- Press OK to select Mo-Morn Time setting ( P 1 Time)
- Press +/- to adjust Time setting
- Follow procedures above to finish Temperature/Time setting for the rest of program period for all 7 days.
- When finished all program setting, press SET twice and then press OK to start running the program.
To use COPY function for setting daily program
- Select any day of the week and complete entire Temperature/Time setting of that day. Take that day as reference for the COPY function.
- (Use the same programming procedure as above).
- Press SET to enter program setting, and then press SET again, From should be flashing on LCD.
- Press + to select the day that its entire daily Temperature/Time setting has previously been completed.
- Press OK to confirm selected date of reference and enter next stage copy programs to. LCD should begin to flash To on screen after pressing OK.
- Press + to select date that you want to copy programs to.
- Press OK to confirm selected date. The selected date will stop flashing.
- Press + to continue selecting more dates for copying programs to.
- Press OK to confirm each selection.
- To delete selected date, press – and the last selected date should be flashing. Press – again to delete this date. Repeat pressing – to delete more dates (in reverse order of selection).
- After COPY setting is finished, press OK twice to run the program.
THE BUILT-IN PROGRAMS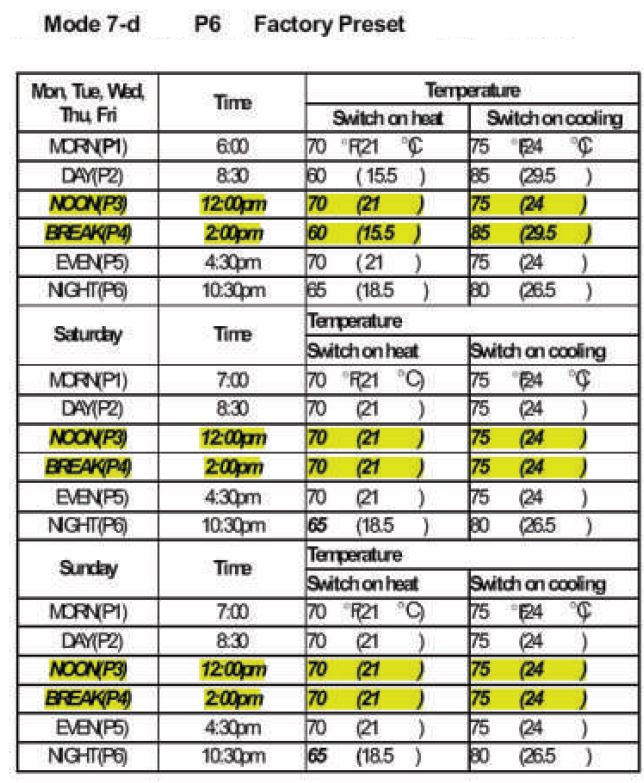
OVERRIDE FUNCTION
A. Temporary Override
- Change the current Temperature setting until next scheduled period time.
- Press + or – to adjust the Temperature.(Temp. Set in flashing)
- Wait for 10 seconds, the thermostat will automatically run this temporary override function, or press OK to run the setting. (Users should read “Temporary Override” on LCD screen)
- When Temporary Override is running, press OK to cancel
- Temporary Override function.
- For the following 3 override functions, if there is no keypad input for 30 seconds, thermostat will resume operation.
B. Comfort Override
- Change the current temperature setting and hold new setting for certain hours. Thermostat will resume its original programmed setting when Comfort Override function is expired.
- Press the MANUAL key.
- Press + or – to adjust Temperature. (Temp. Set in flashing)
- Press OK to enter selection of duration of Comfort Override
- Press + or – to adjust Time (minimum 1 hour).
- Press OK to run Comfort Override.
- When Comfort Override is running, Press OK to cancel this command.
- C. Permanent Hold Temperature – Change current temperature setting and to execute new setting permanently until this command is cancelled by pressing OK.
- Press MANUAL and then press MANUAL again to choose this override function.
- Press + or – to adjust Temperature.(Temp. Set in flashing)
- Press OK to run Permanent Hold Temperature function.(LCD display will indicate that it is running)
- When Permanent Hold Temperature is running, press OK to cancel this command.
D. Temperature Until (Vacation Hold)
- Change current temperature setting and execute new setting until certain date.
- Press MANUAL key 3 times to choose this override function.
- Press + or – to adjust Temperature. (Temp. Set in flashing)
- Press OK to select desired duration of Hold-Temperature Until.
- Press + to select Month first and then Press OK again to enter Day selection. Press + again to select desired DAY.
- Press ‘OK’ to run Hold Temperature Until function.
- When Hold Temperature Until is running, press OK to cancel this command.
HOW TO ERASE MEMORY BACKUP (EEPROM)
Press OK and – keys at the same time for 6 seconds, Reset will appear on LCD display, then press Reset button on the front housing with a pen to delete all previous settings in the memory. Thermostat will resume its factory preset programs.
BACKLIGHT OPTION
Press and hold OK, then press + key simultaneously to select different BackLight mode. Each press of + key will toggle between different modes in according to the Light Bulb symbol on the top left of LCD screen:
 No Light Bulb means BackLight is turned off
 Backlight always ON Auto: On for 25 seconds when any key is pressed.
NOTE ON INSTALLING THE FRONT LCD COVER FOR D-502F MODEL
In order for the D-502F thermostat to work properly, the slide switch on the front LCD cover must be aligned with the slide switch on the back cover. After installation, if the word “FLOOR’ is displayed on the upper right corner of the LCD screen, then the front cover is properly aligned with the back cover. If the word “FLOOR” is missing on the upper right corner of the LCD screen, then remove the front coNOTE ON INSTALLING THE FRONT LCD COVER FOR D-502F MODELver and move the slide switch to the correct position as shown below:
NOTE ON INSTALLING THE FRONT LCD COVER FOR D-500 MODEL
For D-500 model, both slide switch should be set to the first position from the top before closing the cover.
D-500
- Display Format: Liquid Crystal Display(LCD) with backlit
- Contact Rating: 7.5A
- System: Cool-Off-Heat-Auto (changeover)
- Fan Control: On/Auto
- Temperature Display Range: 32-122°F(0-50°C)
- Temperature Control Range:
- Heat: 41°F to 95°F(5°C to 35°C)
- Cool: 43°F to 97°F(6°C to 36°C)
- Remote control Cut-off of Heat/Cool/Fan output
- Accuracy: ±1°F
- Power Supply: 24 Vac, 50-60Hz
- Switching Differential: 1-2°F(0.5-1.0°C)
- Dimension: 138x 110 x 32 mm D-502F
- Display Format: Liquid Crystal Display(LCD) with backlit
- Floor Temperature Control Range: 41-113°F(5- 45°C)
- Temperature Display Range: 32-140°F(0-60°C)
- Contact Rating: 16A
- Control Floor Temperature in Radiant Floor
Heating System
- Remote control Cut-off heating output
- Accuracy: ±1°F
- Power Supply: 24 Vac, 50-60Hz
- Switching Differential: 1-2°F(0.5-1.0°C)
- Dimension: 138x 110 x 32 mm
AZEL
- For more product information, please visit: www.azeltec.com
- P.O. Box 53138
- 10 Royal Orchard Blvd.
- Thornhill, Ontario, Canada L3T 7R9
- Ph: 905-223-5567 Fax: 905-223-3778
- Email: [email protected]
Reference
Download Manual:
AZEL D-500 PROGRAMMABLE THERMOSTAT USER GUIDE
