American Standard Link UX360 Programmable Thermostat

Congratulations!
Introducing your new American Standard® Link system.* Communicating technology enables remote system monitoring and peace of mind. This guide will introduce you to many of the features of your new American Standard Link system. To enjoy the full benefits of your system, it should be connected to an American Standard Home account. For online support go to www.asairhome.com. Scroll to the bottom of the page and select Help. *SC360 System Controller (TSYS2C60A2VVU) is required.
Features Include

- Wi-Fi Configuration for SC360
- Allergy Clean/Quick Clean Cycles
- Humidity Sensor
- Programmable Scheduling
- One Touch Presets
- System Alerts
- Screen Saver
- Color Themes
- System Software Upgrades
- Diagnostics
- Sensor Averaging

American Standard Home Benefits
The UX360 is designed to work in concert with American Standard Home to provide the convenience and advantages of a Smart Home.
Simplified Scheduling
Log into the American Standard Home website. Simply point and click and your customized schedule is set straight away.
Runtime History
Keep track of your system by downloading the cooling and heating system runtime history from American Standard Home.
Diagnostics
With your approval, Diagnostics allows your local dealer to remotely monitor your home’s heating and cooling system using real-time performance data, ensuring you receive the highest possible level of Customer Service from American Standard and your American Standard Dealer. Ask your dealer about Diagnostics.
American Standard Home Remote Climate Access is included with the purchase of American Standard smart connected controls. Up to eight American Standard smart controls, of any combination, may be connected to an American Standard Home account without a monthly service fee. Additional smart controls and home automation devices may require a monthly subscription for remote access via most web-enabled smartphones, tablets, and computers. Internet service and American Standard Home registration are required. Ask your American Standard dealer for details.
Home Screen


Settings

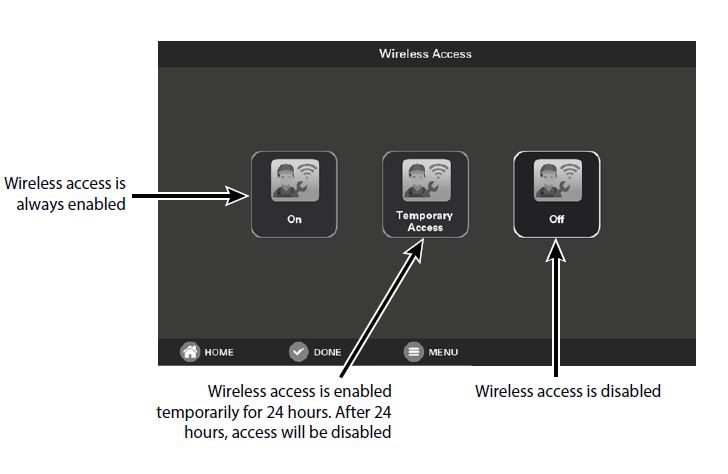
Wireless Technician Access
Wireless technician access allows the technician to wirelessly connect to the communicating equipment on the system.
Thermostat Settings
Navigate to Thermostat Settings by selecting: Home Screen > Menu > Thermostat

NOTE: Indoor sensor calibration settings are disabled when the thermostat is not enabled as an indoor sensor. Please contact your dealer for help.
Screen Settings
Display
Navigate to Display Settings by selecting: Home Screen > Menu > Screen Settings > Display Select your preferred display brightness, backlight, screen saver, and color theme settings and press Done.

Access Restrictions
Navigate to Access Restrictions by selecting: Home Screen > Menu > Screen Settings > Access Restrictions The UX360 features several levels to restrict access to functionality. Select the desired level of access restriction and select Done. Applying an access restriction will cause the screen to lock when inactive for one minute.

| Restriction | Description |
| None | No restrictions applied |
| Low | Menu access is disabled |
|
Medium |
– Menu access is disabled
– Configurable limit for adjusting heating and cooling setpoints |
| High | Access is disabled for all settings |
Weather
Navigate to Weather by selecting: Home Screen > Menu > Weather The weather feature is only available when registered with American Standard Home.
Current Weather
To view your local weather, select Today.
5-day Forecast
Select Forecast to view the 5-day forecast.
Postal Code
To set or change the weather location, select Postal Code, enter your zip code or postal code and then select Done.

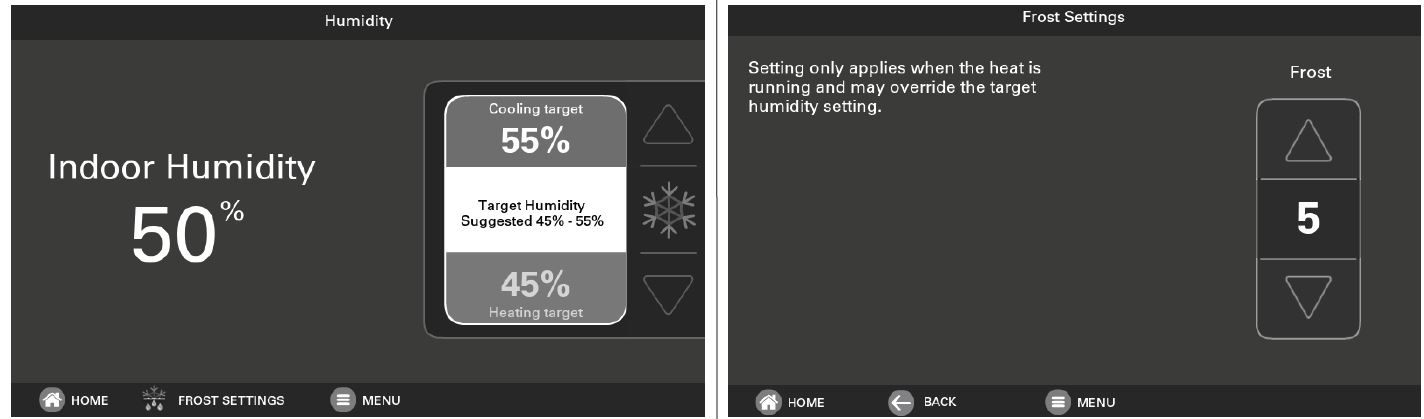
Indoor Humidity
Navigate to Indoor Humidity by selecting: Home Screen > Menu > Humidity Select the indoor humidity target. Frost settings only apply when heating is running and may override the target humidity setting.
System Info
Navigate to System Info by selecting: Home Screen > Menu > System Info
Alerts
Active system alerts will be displayed here. For more details please contact your dealer.

Notifications
System notifications such as air filter, service and American Standard Home registration reminders will be displayed here.

About
Displays information about all the communicating equipment on the system. Specific details include but are not limited to model number, serial number, software version, installation date, and network information. Details and equipment listed will vary with each system.

System Name
Enter a custom, meaningful name for the system.

1-Touch Presets
Navigate to 1-Touch Presets by selecting: Home Screen > Menu > 1-Touch Presets 1-Touch Presets provide predetermined Heating and Cooling Set Points for Home, Away and Sleep time periods.

Configuring 1-Touch Presets
- To change the Cooling Set Point, press the COOLING SET POINT to activate the setting. The current System Mode indicator will display
 this symbol. Use the UP and DOWN Arrows to adjust the Set Point to the desired temperature.
 - To change the Heating Set Point, press the HEATING SET POINT area to activate the setting. The current System Mode indicator will display
 this symbol. Use the UP and DOWN Arrows to adjust the Set Point to the desired temperature.
 - Repeat the process for Home and Sleep settings.
- Press DONE, then HOME to return to the Home Screen.
Note: 1-Touch Presets are not available when Scheduling is enabled.

1-Touch Presets (cont.)

Scheduling
Navigate to Scheduling by selecting: Home Screen > Menu > Schedules The UX360 Thermostat is capable of adjusting the temperature settings throughout the day according to a user-programmable schedule.
Each day of the week can have its own unique schedule, and each day can have a maximum number of four periods. Periods define the time of day when the target temperature is adjusted. Each day can have from one to four periods, and each day can have a different number of periods. The Scheduling Screen shows the start time for each Period highlighted across the top row.
Important:
Scheduling must be enabled before a schedule can be defined. To verify that scheduling is enabled, navigate to MENU

- SCHEDULES and verify scheduling is enabled. If enabled, a Weekly Schedule will be displayed. If not enabled, press the ENABLE SCHEDULE button.

Changing the Schedule

Changing Period Start or End Times

- Press anywhere in a Period to make it active. Other Periods will dim and the Start and End times for this Period will be in black boxes at the top of the screen.
- Press TIME START or TIME END and adjust the time on the screen.
NOTE: The UX360 uses intelligent technology and will not allow setting an illogical start or end time. Periods must be at least 30 minutes in duration.
Changing Period Set Points
- Press the active Period’s Cooling or Heating Temperature Set Point.
- Adjust the Set Point using the UP or DOWN arrows.
Changing the Period Name
- Press the PERIOD NAME (Wake, Away, etc.).
- Select a predefined name or press NEW and select NEXT.
- If selecting a new name, enter the name using the on-screen keyboard.
- Press NEXT.
Adding Periods

- Select ADD PERIOD, and the Add Period Screen is displayed.
- Press the green circle where you would like to insert a Period.
- Choose a name for the new Period or select New to define a Custom Name and select NEXT.
- If selecting a new name, enter the name using the on-screen keyboard.
- Select NEXT.
Deleting Periods
- From the Schedule Screen select DELETE PERIOD, and the Delete Periods Screen is displayed.

- Press the TRASH CAN icon in the Period(s) you wish to delete.
- Select DONE to save your changes and return to the Schedule Screen. The changes should be reflected in the display.
Network Connection
Navigate to Network Settings by selecting: Home Screen > Menu > Settings > Network Please connect your American Standard Link system to your home internet connection for remote and diagnostic access.

- Turn Wireless to ON and then select Connect to WiFi Network.
- Select your network.
- Enter the password and select CONNECT.
Mobile App Registration
To control your home climate system from your web enabled smartphone, tablet or computer go to www.asairhome.com or use your mobile app to set up an American Standard Home account. Download the American Standard Home mobile app from the Google Play™ Store or App Store®, then launch the app. If you already have an account, log in and select CONNECT NEW DEVICE.

From the mobile app Dashboard select the Menu icon and then select CONNECT NEW DEVICE.

Select System Controller.

Select CONTINUE

The mobile app will generate a Pin Code. Record the Pin Code.


Adding/Removing Devices
To Add or Remove Z-Wave® Devices select: Home Screen > Menu > Smart Home
Adding Z-Wave Devices
- From the HOME Screen, select MENU, then select Smart Home.
- Select ADD DEVICE and follow the device manufacturer’s instructions for setting the Z- Wave device into learning mode.

- Select NEXT if a list of security types is displayed.

- If prompted, enter the 5-digit DSK PIN Code for the device being added and then press ACCEPT. This PIN Code can usually be found on the back of the device, on the box, or in the device’s instruction manual.

Removing Z-Wave Devices
- From the HOME Screen, press MENU, then select American Standard Home.
- Select REMOVE DEVICE and follow the manufacturer’s instructions for setting the Z- Wave device into learning mode. You will have four minutes to set the device into learn mode after selecting the REMOVE DEVICE button.
Advanced Z-Wave Settings
Select ADVANCED for additional Z-Wave functions including unregistering your bridge from American Standard Home or factory resetting your bridge. See the Advanced Z-Wave Settings section for more information.
Update Network
Select UPDATE NETWORK to update the network of your bridge. Updating the network can generate a lot of Z-Wave traffic over the network and can take up to 15 minutes to complete.
Adding Devices (via mobile app)
Alternatively, your UX360 allows you to add Z-Wave devices using the American Standard Home app on your mobile device.
Adding Z-Wave Devices
- Start the American Standard Home app.
- Select the menu button in the top left corner.
- At the bottom of this slide-out menu, select Connect New Device.

- Select Z-Wave Device.

- Select Continue and then prepare the device for inclusion by following the device manufacturer’s instructions for setting the Z- Wave device into learning mode.


- Select Grant Keys if a list of security keys is displayed.

- If prompted, enter the 5-digit DSK PIN Code for the device being added and select Accept DSK. This PIN Code can usually be found on the back of the device, on the box, or in the device’s instruction manual.

Advanced Bridge Settings
The Advanced screen contains three very powerful functions. Each of these functions is very specific and should be approached with a measure of caution.
Unregister
Removes the bridge from American Standard Home. All remote control features will be disabled.
Factory Reset
Resets all Z-Wave information and removes all devices from the bridge. If this bridge is the primary controller for your network, resetting it will result in all the devices in your network being removed. Following the reset, it will be necessary to remove and then add all of the devices back to your network.
Bridge Information
If this bridge is being used as a secondary or inclusion controller in the network, please reset this bridge only in the event that the primary controller is missing or otherwise inoperable.
Learn
To add the bridge to an existing network, follow your primary controller’s instructions to put the primary controller into Add Mode. Then press the Learn button on the bridge. This function copies a new Z-Wave network to the bridge from another controller. This function is not allowed if your bridge is a primary controller with included Z-Wave devices.

When adding the bridge to an S2 controller, the S2 DSK will be displayed after pressing the Learn button on the bridge.

Other Features
Automatic Software Updates
To take full advantage of the features and benefits of the UX360 Smart Thermostat, the latest software revision should be installed. An internet connection to the SC360 System Controller is required for software updates. When the SC360 is connected to the Internet, software updates to the installed communicating equipment will occur automatically and do not require user intervention. All communicating equipment on the system will be upgraded, including the UX360, SC360, and indoor and outdoor units. About American Standard Heating and Air Conditioning American Standard has been creating comfortable and affordable living environments for more than a century. For more information, please visit www.americanstandardair.com.
The manufacturer has a policy of continuous data improvement and it reserves the right to change design and specifications without notice. We are committed to using environmentally conscious print practices.
All trademarks referenced are the trademarks of their respective owners. Google is a trademark of Google LLC. Z-Wave is a trademark of Z-Wave Alliance. Representative-only illustrations are included in this document. 012-5063-01B-EN 24 Feb 2022 Supersedes 012-5063-01A-EN (August 2021)© 2022 American Standard Heating and Air Conditioning.
Reference
Download Manual:
American Standard Link UX360 Programmable Thermostat User Guide
![]()
American Standard Link UX360 Programmable Thermostat User Guide