OJ ELECTRONICS UDG4 Touch Thermostat

Menu Structure
Introduction
- Congratulations on the purchase of your new touch thermostat. We hope that you will enjoy the ease of use offered by the touchscreen and the intuitively designed user interface. You can program the thermostat in any way you would like with the options provided under Heating Schedule and User Settings.
- The thermostat will switch your underfloor heating system on at predetermined times each day of the week. You can set individual temperatures for up to six separate events for each day of the week. Lowering the temperature when your home is unoccupied will reduce your energy costs without reducing comfort.
- The thermostat comes with a preset heating schedule that is suitable for most homes. Unless you change the settings, the thermostat will operate according to this preset heating schedule.
- The thermostat features an adaptive function that automatically changes the heating start times to ensure that the required temperature has been reached at the beginning of any specific event. After a few days, the adaptive function will have learned how much earlier the heating must be switched on.
- The resistive touchscreen only requires a soft tap with your fingertip to register the touch.
- In this manual, the touch areas on the screen will be referred to as buttons.
General Operation
- The thermostat has two physical buttons. A ground fault circuit interrupter (GFCI) test button is located on top of the thermostat, and a power/reset button is located on the right side of the thermostat.
- The GFCI should be tested monthly (all settings, including time and date, will be remembered).
- The thermostat is an intuitively operated touch thermostat in which the touchscreen is used to navigate through the menus and to change the settings.
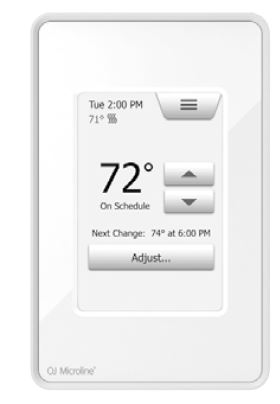
- The function of the buttons and icons on the home screen can be seen below.
Accept/Back/Cancel/Arrow Up/Arrow Down/Arrow Left/Arrow Right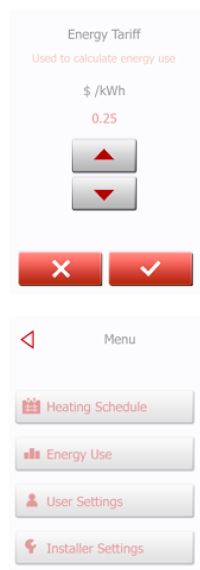
- Whenever you change a parameter setting, you must tap the “Accept” button for the thermostat to acknowledge the change.
- Accept” is shown on the screen as “√”.
- Back” is shown on the screen as a button marked with a hollow arrow pointing to the left.
- In the various menus and submenus, you will find the “Back” button in the lower-left corner of the touchscreen.
- Tap the “Back” button to return to the previous menu.
- Cancel” is shown on the screen as a button marked “X”.
- Although “Cancel” has the same effect as “Back”, it also results in all the unsaved settings being discarded.
- As soon as you leave a home screen and enter one of the menus, either a “Back” button or a “Cancel” button will be shown.
- To return to the home screen, tap Back/Cancel once or multiple times depending on where you are in the menu structure.
- Arrow Up”, “Arrow Down”, “Arrow Left”, and “Arrow Right” are used to toggle settings and values and to navigate through the menus. The “Arrow Up” and “Arrow Down” buttons are accelerated buttons. Holding either of them will make the value change continuously.
Ground Fault Circuit Interrupter (GFCI)
- The thermostat has a built-in GFCI that ensures personal safety in case of ground faults.
- It is important that the GFCI is tested monthly. Installation and use must be according to the national and local regulations.
Testing the GFCI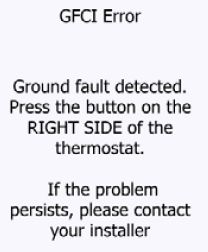
- Press the test button on the top of the thermostat.
- The test is successful if the red light in the test button lights up and a GFCI error text is shown on the display. Press the power/reset button on the lower right side of the thermostat to reset the GFCI.
- The red light should go out and the display should return to its normal appearance.
- If this does not occur, contact your electrician.
- If, during normal operation, the GFCI trips even though the test button was not pressed, there could be a ground fault! To determine whether this was caused by a ground fault or by nuisance tripping, press the power/reset button.
- If this causes the red light in the test button to go off and stay off, it was nuisance tripping and the system is operating correctly.
- If the red light remains on, there is a ground fault! In this case, you should contact your electrician.
Icons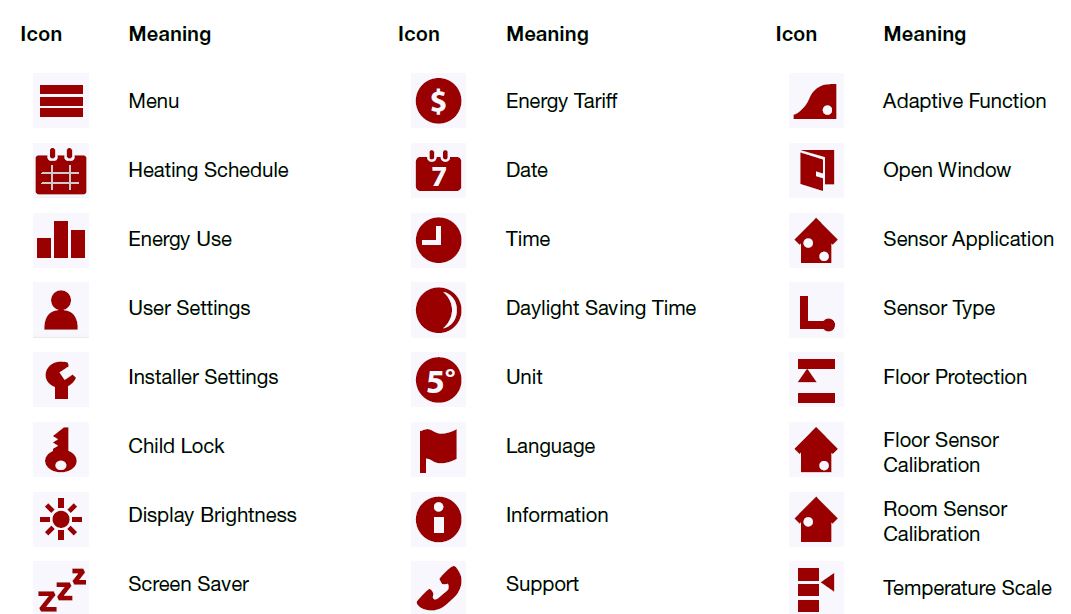
Icon Meaning

- Factory Reset
- Accept
- Back
- Cancel
- Arrow Up
- Arrow Down
- Arrow Left
- Arrow Right

- Copy to
- Adjust… for a few days” in the future is activated
- Heating is activated
- The heating is activated with an adaptive mode
- Note
Set the language
First, you must set the language. The chosen language will become the default language for the thermostat. The language can be changed under Menu/User Settings/Language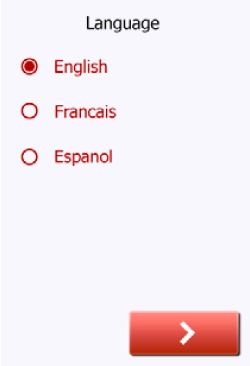
A system Test is an automatic test of the thermostat and sensors. Tap the “Arrow Right” button to continue. 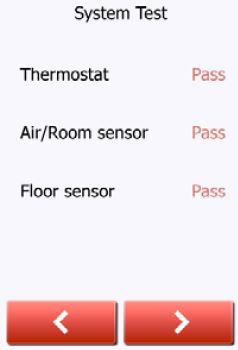
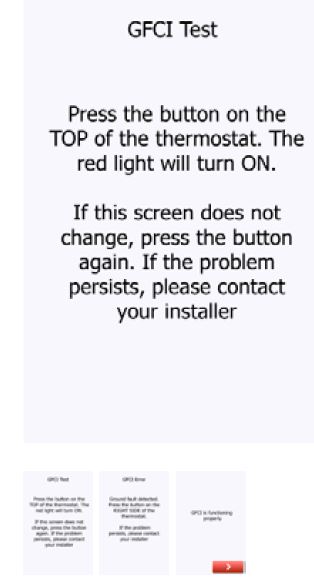
GFCI Test
- Press the test button on the top of the thermostat.
- The test is successful if the red light in the test button lights up and a GFCI error text is shown on the display.
- Press the power/reset button on the lower right side of the thermostat to reset the GFCI.
- Tap the “Arrow Right” button to continue.
Set the preferred temperature unit
- Tap the temperature unit that you prefer.
- Tap the “Arrow Right” button to continue.
The temperature unit can be changed under Menu/User Settings/Unit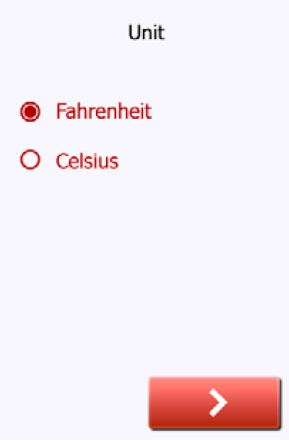
Set the floor load
- Set the load of the underfloor heating system to be controlled by the thermostat.
- Tap the “Arrow Right” button to continue.
This setting can be changed later if a factory reset is performed.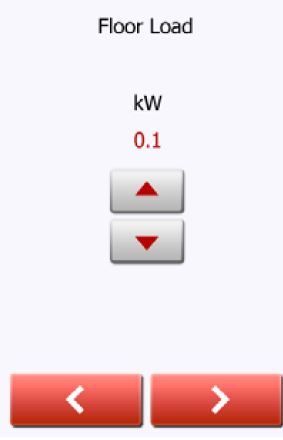
Set the sensor type
- Tap the sensor type installed in the floor.
- Tap the “Arrow Right” button to continue.
If you want to use the thermostat with the room sensor only, you must complete the Setup Wizard using “Default” as the floor sensor type before going to: Menu/Installer Settings/Sensor Application and choosing “Room”.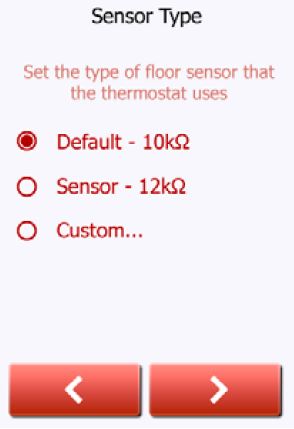
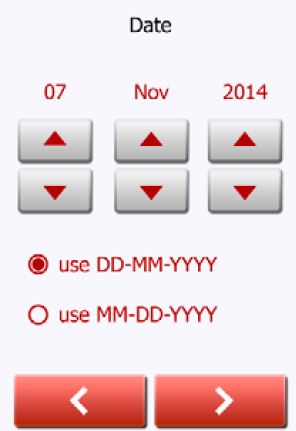
Set the date
- Tap the “Arrow” buttons to change the values.
- Tap the preferred date format.
- Tap the “Arrow Right” button to continue.
- The time can be changed under Menu/User Settings/Time
Set floor protection
Set the floor protection according to the floor type
- Tap the preferred limits that are used to protect the floor.
- Tap “√” to continue
Floor protection settings can be changed under Menu/Installer Settings/Floor Protection. 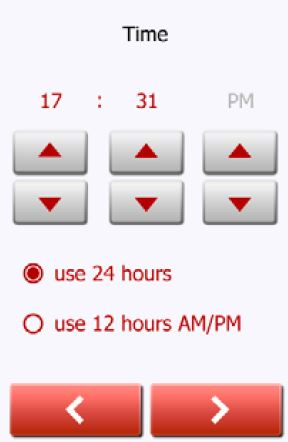
Thermostat activation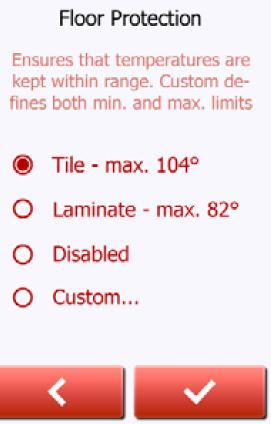
- Tap the “√” button to activate the thermostat.
Programmed Heating Schedule
The thermostat allows you to control the temperature automatically according to a weekly schedule of your choice. The thermostat comes with a pre-programmed schedule for easy and economical heating control of most homes, see Factory Settings: Preset Schedule.
The schedule can be changed under Menu/Heating Schedule
Operating Modes
- Scheduled operation
- Manual Operation
- Manual Operation Adjust
- For a few hours…
- For a few days…
- Permanently
- Regulator Mode
Scheduled Operation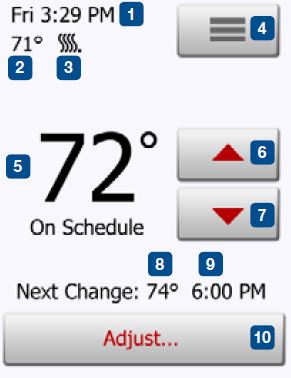
- The system will operate in Scheduled Operation unless you choose to override the scheduled events with Manual Operation or the thermostat application is set to Regulator mode.
- During Scheduled Operation, the temperature is controlled automatically according to the programed heating schedule – see “Heating Schedule”.
- The function of the buttons and symbols shown on the home screen varies according to the chosen operating mode.
Scheduled Operation home screen:
- Day and time.
- Measured temperature.
- Heating indicator. If visible, the underfloor heating system is currently active.
- Tap her to access the menu.
- Current target temperature/setpoint.
- Tap here to increase the temperature.
- Tap here to decrease the temperature.
- Current thermostat operating mode.
- Information on the next thermostat behavior change.
- Tap here to adjust the length of time the displayed target temperature/setpoint is to remain valid.
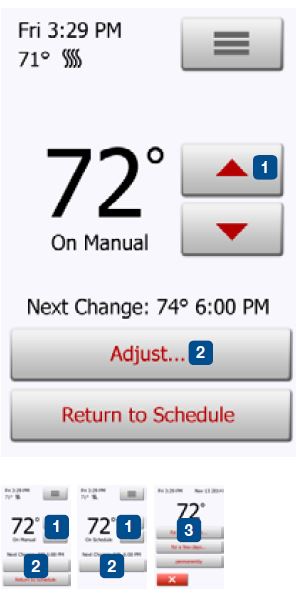
Manual Operation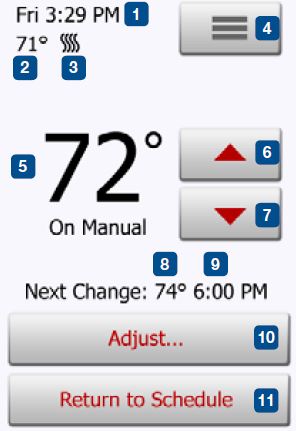
Note: The temperature set manually on the home screen is a temporary setting. The manual override setting will be automatically canceled at the beginning of the next event in the Scheduled Operation.
- During Scheduled Operation, you can use the arrow buttons on the home screen to override the programed target temperature/setpoint for Scheduled
- Operation and to set the required temperature manually.
- Use the “Arrow Up” or “Arrow Down” button to select the required temperature.
- The “Return to Schedule” button will then appear on the home screen – you should tap this button if you want to end Manual Operation and return to Scheduled Operation.
You can also choose “Adjust…”.
- Day and time.
- Measured temperature.
- Heating indicator. If visible, the underfloor heating system is currently active.
- Tap here to access the menu.
- Current target temperature/setpoint.
- Tap here to increase the temperature.
- Tap here to decrease the temperature.
- Current thermostat operating mode.
- Information on the next thermostat behavior change.
- Tap here to adjust the length of time the displayed target temperature/setpoint is to remain valid.
- Tap here to return to Scheduled Operation. Available only when the thermostat is operated manually.
Manual Operation Adjust
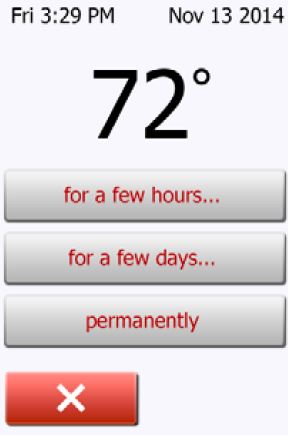
Allows you to maintain the displayed target temperature/setpoint or a Manual Override for longer than just the next event change or for a specific time period. You can use the “Adjust…” options to specify the length of time the displayed target temperature/setpoint should last. When the set time period has elapsed, the thermostat will automatically revert to Scheduled Operation.
- Adjust… for a few hours
- Adjust… for a few days
- Adjust… permanently
Adjust… for a few hours
- The “for a few hours…” option lets you determine the length of time the displayed target temperature/setpoint should remain valid. The time set defines when the thermostat will revert to Scheduled Operation. The period of time until the thermostat reverts to Scheduled Operation can be set from 15 minutes and up to 24 hours.
You can set the:
- Hour
- Minutes (in 15-minute intervals: 00, 15, 30, or 45)
- AM or PM (if 24-hour time format is selected, this is not applicable)
- On the home screen, adjust the temperature to the preferred level using the “Arrow Up” and “Arrow Down” buttons.
- Tap the “Adjust…” button.
- Then tap the “for a few hours…” button.
- Tap the “Arrow” buttons for the parameter that you want to change.
- Confirm your choice with “√” or discard it with “X”. The thermostat will automatically return to the home screen.
Adjust… for a few days
The “for a few days…” option lets you determine the length of time the displayed target temperature/setpoint should remain valid. The settings define when the thermostat is to start using the chosen target temperature/setpoint and when it is to revert to Scheduled Operation. The period of time starts at midnight and includes the start date. The period of time ends at midnight and the end date is NOT included the manual override period.
- On the home screen, adjust the temperature to the preferred level using the “Arrow Up” and “Arrow Down” buttons.
- Tap the “Adjust…” button.
- Then tap the “for a few days…” button.
- Tap the “Arrow” buttons for any parameter that you want to change for the start date.
- Confirm your choice with “Arrow Right” or discard it with “X”.
- If confirmed, the end date must be set by tapping the “Arrow” buttons for any parameter that you want to change.
- Confirm your choice with “√” or discard it with “Arrow Left”.
- The thermostat will automatically return to the home screen.
- If “for a few days…” is enabled for a period of time in the future, a clock is displayed on the home screen.
The “for a few days…” option can be disabled by tapping “Return to Schedule” on the home screen or rescheduled by repeating steps 1 to 7.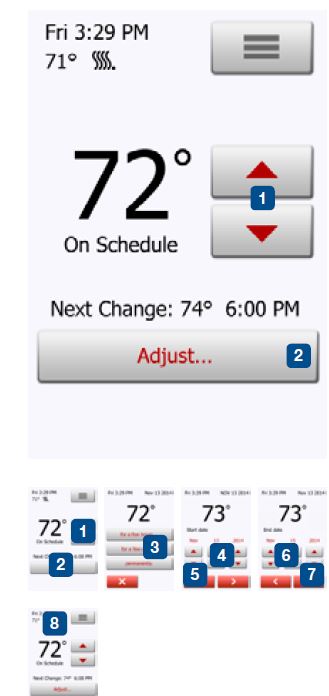
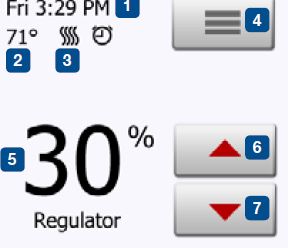
Regulator Mode
- In this mode, the thermostat operates as a regulator and no sensors are used. The setting is a percentage of the full load in steps of 10%.
- Note that Floor Protection is not active when using the thermostat as a regulator. Regulator mode is activated under Menu/Installer Settings/Sensor Application/Regulator
- Note: Regulator mode is not available with software version 1012N100.
- Day and time.
- Measured temperature (if available).
- Heating indicator. If visible, the underfloor heating system is currently active.
- Tap her to access the menu.
- Current target percentage of full load/setpoint.
- Tap here to increase percentage of full load/setpoint.
- Tap here to decrease percentage of full load/setpoint.
Thermostat Setup Menu
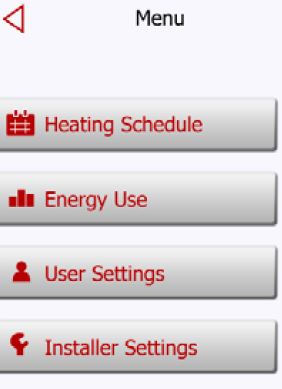
- Heating Schedule
- Energy Use
- User Settings
- Installer Settings
Heating Schedule
Heating Schedule
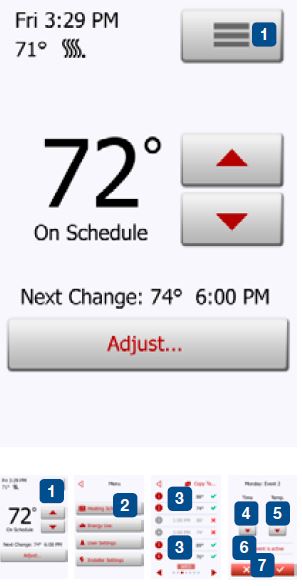
- The heating schedule allows you to control the temperature automatically accord-ing to a programed schedule of your choice. The thermostat comes with a pre-programmed heating schedule for easy and economical heating control, see Preset Schedule under Factory Settings.
- Tap the “Menu” button on the home screen.
- Then tap the “Heating Schedule” button to access the various schedule options.
- This screen consists of a list of six events and four buttons. Each event is num-bered, and the start time, target temperature/setpoint, and activity status are displayed. “Back”, “Copy to…”, “Arrow Left”, and “Arrow Right” buttons are located in the corners of the screen. The day for which the event applies is displayed at the bottom of the screen.
- Grayed-out events marked with a red “X” are not currently in use.
- To change the start time, temperature, and activity status for a specific event, tap on the event to the right of the number.
- To change the start time for the event, tap the “Arrow Up” and “Arrow Down” buttons.
- To change the temperature for the event, tap the “Arrow Up” and “Arrow Down” buttons.
- To toggle between the event being active or inactive, tap the “The event is ac-tive” or “The event is inactive” button. The text shown on the button reflects the current activity status of the event. Note! Event 1 is always active.
- Confirm your choice with “√” or discard it with “X”.
- The thermostat will automatically return to “Heating Schedule”.
- Once the event settings for this day are as wanted, you can, if you wish, use the same settings for other days by tapping the “Copy to” button in the top right corner of the screen. This will allow you to copy the event settings to other days specified by you.
- If you want to set other days differently, tap the “Arrow Left” or “Arrow Right” button to toggle between weekdays.
You can then set the schedule for the other days by repeating steps 3 through 8. - Once you have finished setting the schedules, tap the “Back” button to return to the Thermostat Setup Menu.
Energy Use
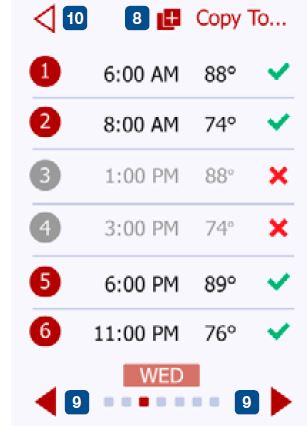
The “Energy Use” button allows you to read out energy usage data for your underfloor heating system.
- Tap the “Menu” button on the home screen.
- Then tap the “Energy Use” button to access the readouts.
- You can choose between four different readouts:
- Last 24 hours: A graph of usage during each hour of the past day will be displayed. The graph shows minutes per hour.
- Last 7 days: A graph of usage during each day of the past seven days will be displayed. The graph shows hours per day.
- Last 12 months: A graph of usage during each month of the past year will be displayed.
- The graph shows hours per month.
- Energy Use Data An overview of the electricity consumption (kWh) and heating costs for the time periods specified above. (Note: price per
- kWh must be set under Menu/User Settings/Energy Tariff).
- You can toggle between the readouts using the “Arrow Right” or “Arrow Left” button.
- Tap the “Back Arrow” button to return to the menu.
- Tap on “Edit Energy Tariff…” to change the energy tariff, see 11.3.4 Energy Tariff.
User Settings
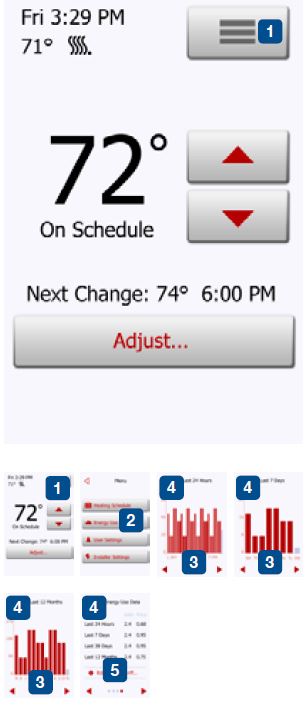
- Under User Settings, you can change the settings of the following items.
- Note: if an item is grayed out, it is not available due to other settings.

- Child Lock
- Display Brightness
- Screen Saver
- Energy Tariff
- Date
- Time
- Daylight Saving Time
- Unit
- Language
- Information
- Support
Child Lock 1/2
The child lock prevents children and others from tampering with the thermostat and changing any of its settings.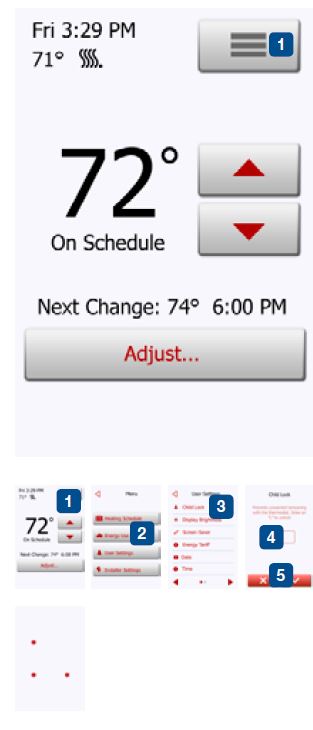
- Tap the “Menu” button on the home screen.
- Then tap the “User Settings” button to access the various user settings.
- Tap the “Child Lock” button.
- Tap the “OFF/ON” button to the setting that you prefer.
- Confirm your choice with “√” or discard it with “X”.
- The thermostat will automatically return to “User Settings”.
- The child lock is activated together with the screen saver if the thermostat has not
- been operated for a few minutes – it takes 15 seconds to dim the display and a further two minutes before the screen saver starts.
- Before you can operate the thermostat again, you must unlock the child lock in the following way.
From the idle home screen:
- Tap the screen to activate it. Three circles containing dots will be displayed on the screen.
- Draw an “L” on the screen in a single stroke without lifting your finger from the screen. Start by touching the dot in the circle in the upper left corner, then slide your finger downwards to the dot in the circle in the lower left corner, and continue sliding your finger to the dot in the circle in the lower right corner, forming an “L”. If done correctly, the home screen will appear.
- Please note that the child lock will be reactivated when the thermostat returns to
screen saver mode – unless it is deactivated under - Menu/User Settings/Child Lock.
- Note: Child Lock is not available with software version 1012N100
Display Brightness
This option allows you to change the brightness of the display.
- Tap the “Menu” button on the home screen.
- Then tap the “User Settings” button to access the various user settings.
- Tap the “Display Brightness” button.
- Select one of the five levels of brightness using the “Arrow Up” or “Arrow Down” button.
- Confirm your choice with “√” or discard it with “X”.
The thermostat will automatically return to “User Settings”.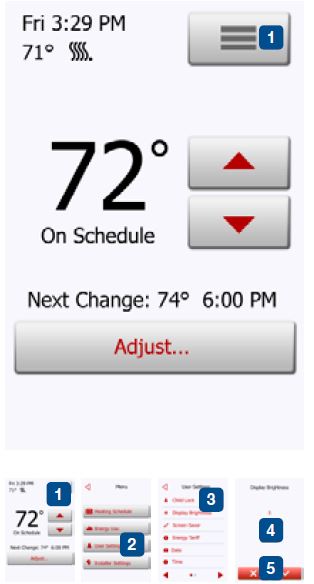
Screen Saver
This option allows you to select the information to be shown on the screen when it is idle.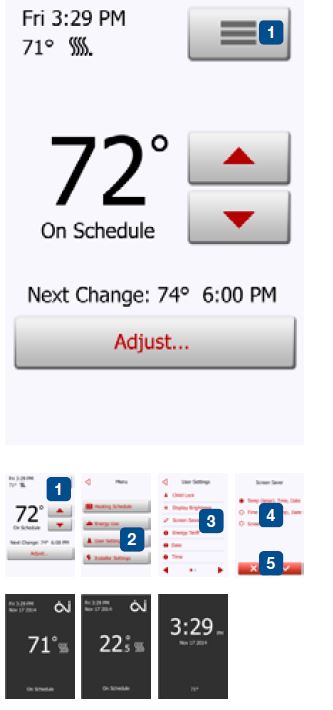
- Large: temperature. Small: date and time.
- Large: time. Small: temperature and date.
- Screen Off. This setting minimizes energy consumption.
- Tap the “Menu” button on the home screen.
- Then tap the “User Settings” button to access the various user settings.
- Tap the “Screen Saver” button.
- Tap the information that you want to be shown in screen saver mode.
- The temperature is shown in large format. The time and date are shown in a small format. (See example)
- Time is shown in large format. Temperature and date are shown in small format. (See example)
- Screen Off.
- Confirm your choice with “√” or discard it with “X”.
The thermostat will automatically return to “User Settings”.
Energy Tariff
- This option allows you to enter the various data used to calculate energy use.
- The “Energy Use” function uses this information to calculate electricity consumption and the cost of heating for a given period of time.
- Tap the “Menu” button on the home screen.
- Then, tap the “User Settings” button to access the various user settings.
- Tap the “Energy Tariff” button.
- Tap the “Arrow Up” or “Arrow Down” button to set the price that you pay per kWh.
- Confirm your choice with “√” or discard it with “X”.
The thermostat will automatically return to “User Settings”.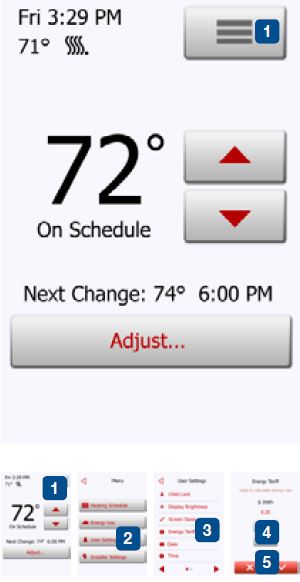
Date
This option allows you to change the date, which is shown in some screen savers
and is used for functions such as “Daylight Saving Time”.
- Tap the “Menu” button on the home screen.
- Then tap the “User Settings” button to access the various user settings.
- Tap the “Date” button.
- Tap the “Arrow Up” or “Arrow Down” button to set the date, month, and year.
- Tap the date format that you prefer.
- Use DD-MM-YYYY
- Use MM-DD-YYYY
- Confirm your settings with “√” or discard them with “X”.
The thermostat will automatically return to “User Settings”.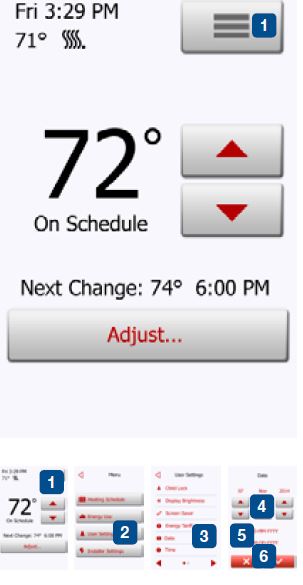
Time
This option allows you to change the time, which is used by the clock to control heating schedule events during Scheduled Operations.
- Tap the “Menu” button on the home screen.
- Then tap the “User Settings” button to access the various user settings.
- Tap the “Time” button.
- Tap the “Arrow Up” or “Arrow Down” button to set the hours, minutes, and AM/ PM.
- Tap the time format that you prefer.
- Use 24 hours
Use 12 hours (AM/PM)
- Use 24 hours
- Confirm your settings with “√” or discard them with “X”.
The thermostat will automatically return to “User Settings”.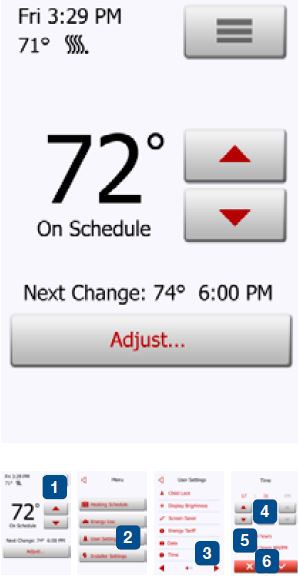
Daylight Saving Time
When enabled, the “Daylight Saving Time” function will automatically adjust the thermostat clock to daylight saving time.
- Tap the “Menu” button on the home screen.
- Then tap the “User Settings” button to access the various user settings.
- Tap the “Arrow Right” button to access the second page of User Settings.
- Tap the “Daylight Saving Time” button.
- Tap the “OFF/ON” button to the setting that you prefer.
- Confirm the setting with “√” or discard it with “X”.
The thermostat will automatically return to “User Settings”.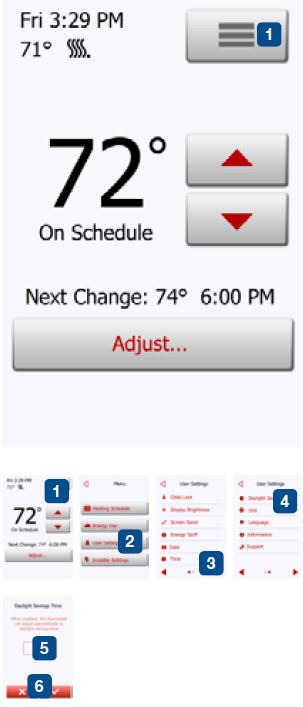
Unit
- Tap the “Menu” button on the home screen.
- Tap the “Arrow Right” button to access the second page of User Settings.
- Tap the “Unit” button.
- Tap the unit that you prefer:
- Celsius
- Fahrenheit
- Confirm your choice with “√” or discard it with “X”.
The thermostat will automatically return to “User Settings”.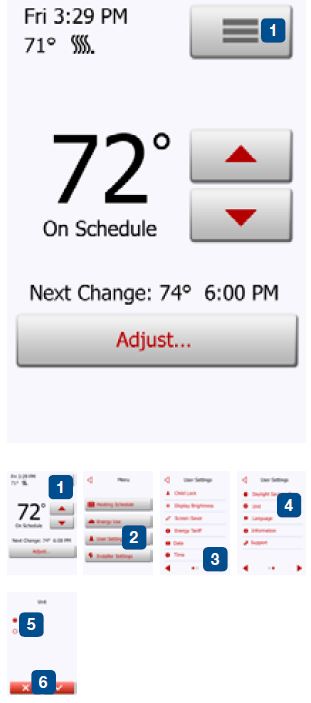
Language
This option allows you to change the language used on the screen.
- Tap the “Menu” button on the home screen.
- Then tap the “User Settings” button to access the various user settings.
- Tap the “Arrow Right” button to access the second page of User Settings.
- Tap the “Language” button.
- Tap the language that you prefer:
- English
- French
- Spanish
- Confirm your choice with “√” or discard it with “X”.
The thermostat will automatically return to “User Settings”.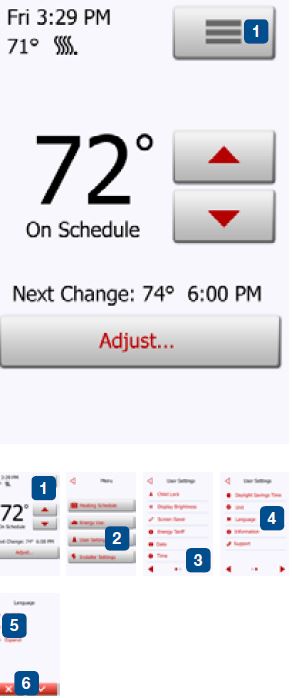
Information
This option provides a readout containing service information:
- Tap the “Menu” button on the home screen.
- Then tap the “User Settings” button to access the various user settings.
- Tap the “Arrow Right” button to access the second page of User Settings.
- Tap the “Information” button.
- To obtain detailed information, you can scan the QR Code with a suitable device with Internet access. Software supporting QR Code scanning (e.g. an app) is required. Scanning the QR Code provides data that is valid at the precise time of scanning.
- If “View as text” is selected, the data relevant to support personnel and others is displayed.
- Tap the “Back” button, several times if necessary, to return to “User Settings”.
QR Code is a registered trademark of DENSO WAVE INCORPORATED.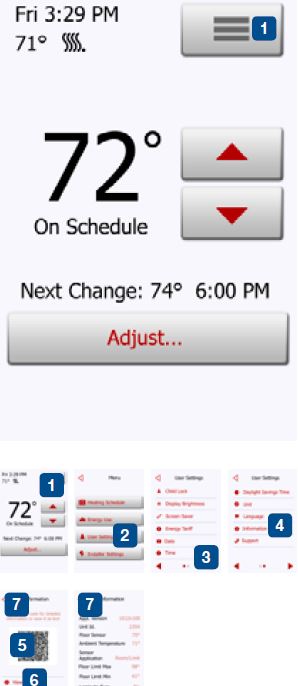
Support
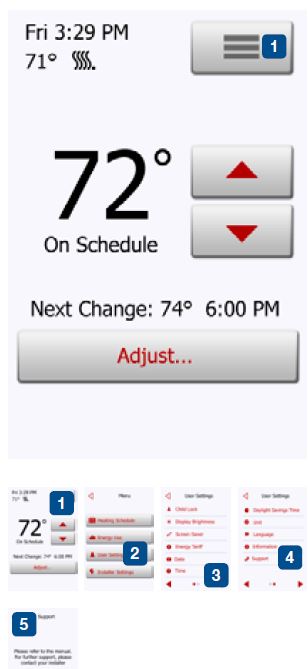
This option provides information on obtaining support for the thermostat. Please consult the “Troubleshooting” section of this manual before calling for support. If troubleshooting does not help, you should contact your installer.
- Tap the “Menu” button on the home screen.
- Then tap the “User Settings” button to access the various user settings.
- Tap the “Arrow Right” button to access the second page of User Settings.
- Tap the “Support” button.
- Tap the “Back” button to return to “User Settings”.
Installer Settings
Under Installer Settings, you can change the settings of the following items.
Note: if an item is grayed out, it is not available due to other settings.

- Adaptive Function
- Open Window
- Sensor Application
- Sensor Type
- Floor Sensor Calibration
- Room Sensor Calibration
- Floor Protection
- Factory Reset
Adaptive Function
- With this feature enabled, the room will already have reached the target/setpoint the temperature at the beginning of a scheduled event.
- After just a few days, the adaptive function will have automatically calculated how much earlier the heating must be turned on to achieve this.
- Select “OFF” if you simply want the heating to start at the beginning of an event.
- Tap the “Menu” button on the home screen.
- Then tap the “Installer Settings” button to access the various installer settings.
- Tap the “Adaptive Function” button.
- Tap the “OFF/ON” button to the setting that you prefer.
- Confirm your choice with “√” or discard it with “X”.
The thermostat will automatically return to “Installer Settings”.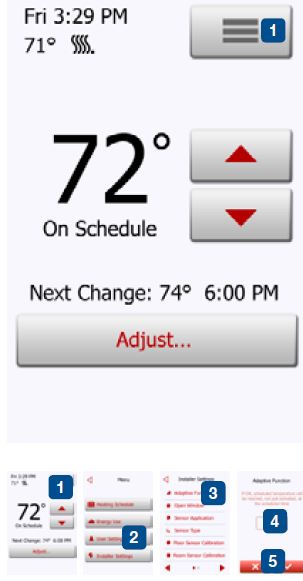
Open Window
- This option allows you to enable the “Open Window” function.
- The thermostat can detect an open window by registering a rapid drop in temperature.
- With the function enabled, the thermostat shuts off the heating for 30 minutes if an open window is detected.
- Tap the “Menu” button on the home screen.
- Then tap the “Installer Settings” button to access the various installer settings.
- Tap the “Open Window” button.
- Tap the “OFF/ON” button to the setting that you prefer.
- Confirm your choice with “√” or discard it with “X”.
- The thermostat will automatically return to “Installer Settings”.
- If an open window is detected by the thermostat, the “Open Window” screen will appear, and the function can be canceled by tapping “Cancel”.
Note: Open Window is not available with software version 1012N100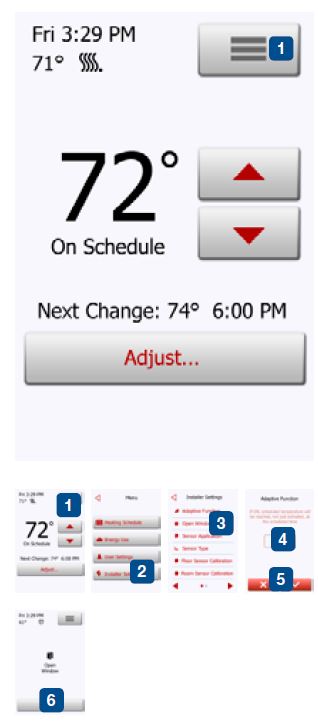
Sensor Application
- This option allows you to choose which sensor is used to control the heating system.
- Floor: With this setting, the floor sensor controls the heating system.
- Room/Floor Protection: With this setting, the room sensor controls the heating system while the floor sensor limits heating according to the temperature limits set under Menu/Installer Settings/Floor Protection.
- Room: With this setting, the room sensor built into the thermostat controls the heating system.
Note! Floor Protection is not active while using the Sensor Application “Room”. - Regulator: With this setting, the thermostat operates as a regulator and no sensors are used. The setting is a percentage of the full load in steps of 10%.
- Note that Floor Protection is not active when using the thermostat as a regulator.
- Floor limit temperatures are set under Menu/Installer Settings/Floor Protection.
- Note that changes made under “Sensor Application” do not influence the “Floor Protection” settings.
The maximum temperature depends on the floor type and temperature unit.
- Tap the “Menu” button on the home screen.
- Then tap the “Installer Settings” button to access the various installer settings.
- Tap the “Sensor Application” button.
- Tap the application that you want to use.
- Floor
- Room/Floor Protection
- Room
- Regulator
- Confirm your choice with “√” or discard it with “X”.
The thermostat will automatically return to “Installer Settings”.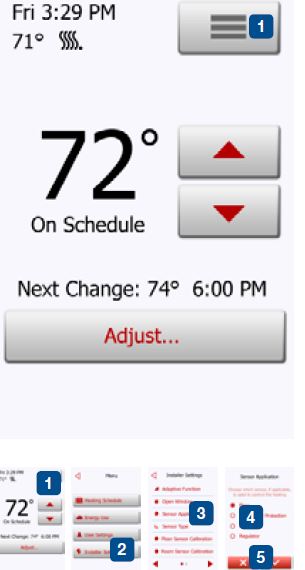
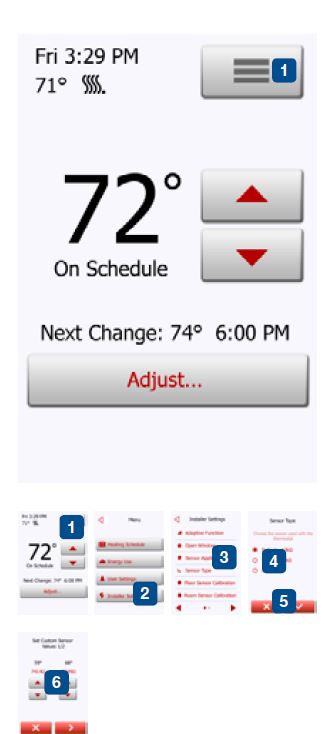
Sensor Type
- This option allows you to choose the type of floor sensor used with the thermostat.
- You can thus choose to use an existing sensor with the thermostat, e.g. in renovation projects.
- Choose the sensor actually used from the list. The sensor supplied with the thermostat is an OJ sensor listed as: “Factory”.
- Default 10 kΩ (this is the sensor supplied with the thermostat)
- Sensor 12 kΩ
- Custom
- Tap the “Menu” button on the home screen.
- Then tap the “Installer Settings” button to access the various installer settings.
- Tap the “Sensor Type” button.
- Tap the type of floor sensor actually used.
- Default 10 kΩ (this is the sensor supplied with the thermostat)
- Sensor 12 kΩ (OJ sensor)
- Custom
- Confirm your choice with “√” or discard it with “X”.
- If “Custom” is chosen, you must provide resistance values for the sensor concerned at four given temperatures. Ask the supplier of your sensor for these values.
- Tap the “Arrow Up” or “Arrow Down” to set the resistance for the various temperatures.
- Tap the “Arrow Up” or “Arrow Down” to set the resistance for the various temperatures.
- Use the “Arrow Right” or “Arrow Left” button to toggle through the temperatures for which resistance must be set.
Then, repeat steps 6-7 until all four resistance values have been set. - When all four values are set, tap the “Arrow Right” button.
- A warning screen will be displayed. Tap “√” to confirm the use of an alternative sensor.
The thermostat will automatically return to “Installer Settings”.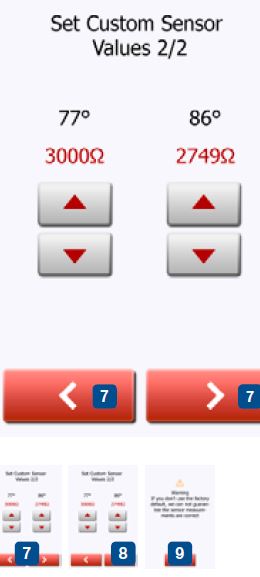
Floor Sensor Calibration
- This option allows you to calibrate the floor sensor.
- You can calibrate the sensor if the temperature reading differs from the actual floor temperature.
- Note that changes to floor sensor characteristics may damage certain floors.
- You can calibrate the sensor with ±17°F or ±10°C in steps of 1°F or 0.5°C in the following way:
- Tap the “Menu” button on the home screen.
- Then tap the “Installer Settings” button to access the various installer settings.
- Tap the “Floor Sensor Calibration” button.
- Use the “Arrow Up” or “Arrow Down” button to set the floor temperature actually measured.
- Confirm that you want to calibrate the sensor with “√” or cancel with “X”. If the temperature is confirmed with “√”, a confirmation screen will be displayed briefly.
- The thermostat will automatically return to “Installer Settings”.
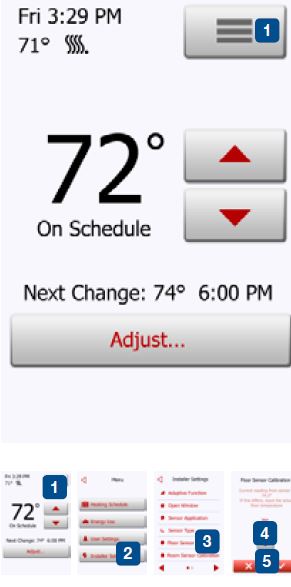
- The thermostat will automatically return to “Installer Settings”.
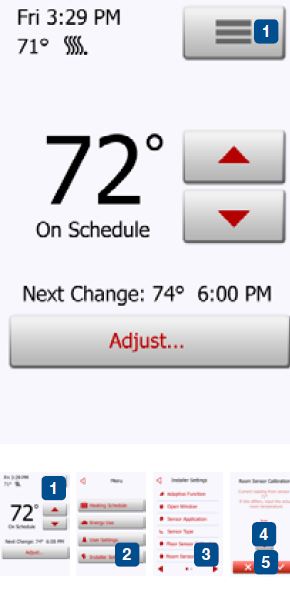
Room Sensor Calibration
- This option allows you to calibrate the room sensor.
- You can calibrate the sensor if the temperature reading differs from the actual room temperature.
- Note that changes in room sensor characteristics may damage certain floors.
- You can calibrate the sensor with ±17°F or ±10°C in steps of 1°F or 0.5°C in the following way:
- Tap the “Menu” button on the home screen.
- Then tap the “Installer Settings” button to access the various installer settings.
- Tap the “Room Sensor Calibration” button.
- Use the “Arrow Up” or “Arrow Down” button to set the room temperature actually measured.
- Confirm that you want to calibrate the sensor with “√” or cancel with “X”.
- If the temperature is confirmed with “√”, a confirmation screen will be displayed briefly.
- The thermostat will automatically return to “Installer Settings”.
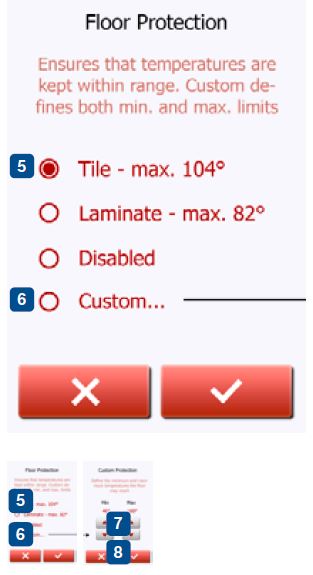
Floor Protection
This option ensures that the floor temperatures are kept within range.
There are four different settings:
- Tile – the maximum floor temperature is set to 104°F/40°C
- Laminate – the maximum floor temperature it set to 82°F/28°C
- Disabled – the floor is not protected against excessive heating
- Custom – you can define the minimum and maximum temperatures that the floor is permitted to reach.
- The maximum temperature limit protects wooden floors from excessive heat.
- The minimum temperature limit prevents the floor from becoming uncomfortably cold when heating is not needed, e.g. in a bathroom with tiles.
- The minimum temperature limit can also be used as frost protection.
- Note that the minimum temperature function will increase energy consumption.
- Although it is still possible to set the target temperature/setpoint to a value higher than the floor protection limit, the floor temperature will be prevented from reaching a temperature higher than that defined here if the system has been installed according to the Quick Guide.
- Tap the “Menu” button on the home screen.
- Then tap the “Installer Settings” button to access the various installer settings.
- Tap the “Arrow Right” button to access the second page of Installer Settings
- Tap the “Floor Protection” button.
- Choose the floor protection which is relevant for your floor.
- If Tile, Laminate, or Disabled is selected, proceed to step 8.
- If Custom is chosen, you must define minimum and maximum temperatures for the floor.
- Use the “Arrow Up” or “Arrow Down” buttons to set the minimum and maximum temperatures.
- Confirm your choice with “√” or discard it with “X”.
- The thermostat will automatically return to “Installer Settings”.
- NOTE: If the maximum floor temperature is set too high, temperature-sensitive floor types may be permanently damaged.
- For precise information, please ask your flooring supplier.
Factory Reset
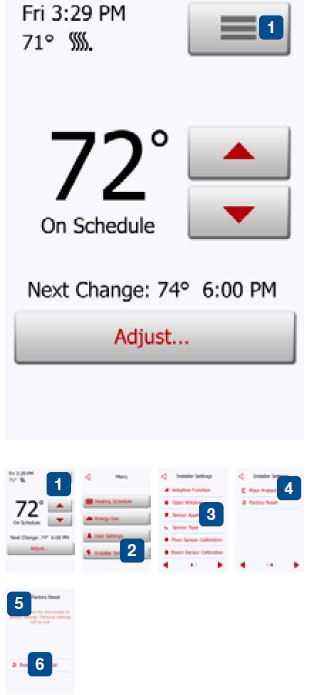
This option allows you to restore the thermostat to factory settings.
Note! This action cannot be undone, and all of your personal settings will be lost.
- Tap the “Menu” button on the home screen.
- Then tap the “Installer Settings” button to access the various installer settings.
- Tap the “Arrow Right” button to access the second page of Installer Settings.
- Tap the “Factory Reset” button.
- Tap “Back” if you want to maintain your settings and return to “Installer Settings”.
- Tap “Reset Thermostat” if you want to restore the factory settings.
- A confirmation screen will be displayed.
- The thermostat will then be reset and the “Startup Wizard” will appear on the screen.
- Note! All personal settings will be lost.
Preset schedule
| Monday-Friday | ||||
| Event | Start time | Laminate floor | Tile floor | Activated |
| 1 | 06:00 AM | 82°F / 28°c | 88°F / 31°c | √ |
| 2 | 09:00 AM | 74°F / 23.5°c | 74°F / 23.5°c | √ |
| 3 | 12:00 PM | 82°F / 28°c | 88°F / 31°c | x |
| 4 | 01:00 PM | 74°F / 23.5°c | 74°F / 23.5°c | x |
| 5 | 05:00 PM | 82°F / 28°C | 88°F / 31°C | √ |
| 6 | 11:00 PM | 74°F / 23.5°c | 74°F / 23.5°c | √ |
| Saturday-Sunday | ||||
| event | start time | laminate floor | tile floor | Activated |
| 1 | 08.00 Am | 82°F / 28°c | 88°F / 31°c | √ |
| 2 | 11:00 Pm | 74°F / 23.5°c | 74°F / 23.5°c | √ |
Troubleshooting
Error messages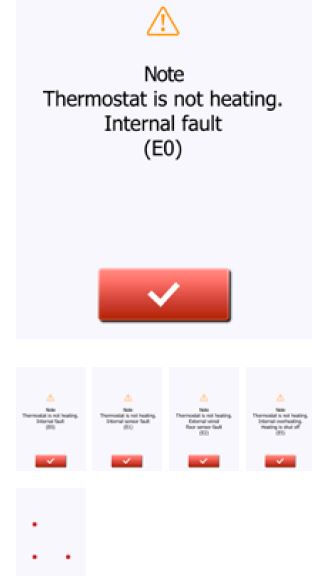
- If a fault or error occurs, the thermostat will display one of the following error messages:
- E0: Internal failure. The thermostat is defective. Contact your installer.
- The thermostat must be replaced.
- E1: Internal sensor defective or short-circuited. Contact your installer.
- The thermostat must be replaced.
- E2: External wired floor sensor disconnected, defective, or short-circuited.
- Contact your installer for reconnection or replacement.
- E5: Internal overheating. Contact your installer in order to have the installation inspected.
- Note! If any of the above-mentioned errors occur, the heating is shut off.
- Three circles containing dots are shown on the screen; the thermostat cannot be operated.
- The thermostat is in “Child Lock” mode. See the section titled “Child Lock” in this manual for instructions on how to unlock it.
- A circle containing a dot is displayed in the upper left corner of the screen and the
following text is displayed: “Press on the filled circle”. - Pressure has probably been applied to the screen while power was connected or the thermostat was turned on. Restart the thermostat in the following way to continue using it:
- Hold the power/reset button on the right side of the thermostat to switch it off.
- Press the power/reset button on the right side of the thermostat to turn it back on.
- The thermostat will then boot normally.
The OJ trademark is a registered trademark belonging to OJ Electronics A/S · © 2014 OJ Electronics A/S
REFERENCE:
DOWNLOAD MANUALS:
OJ ELECTRONICS UDG4 Touch Thermostat User Manual
OTHER MANUALS:
OJ ELECTRONICS UDG4 Touch Thermostat Product Specifications Guide
OJ ELECTRONICS UDG4 Touch Thermostat QUICK START GUIDE