
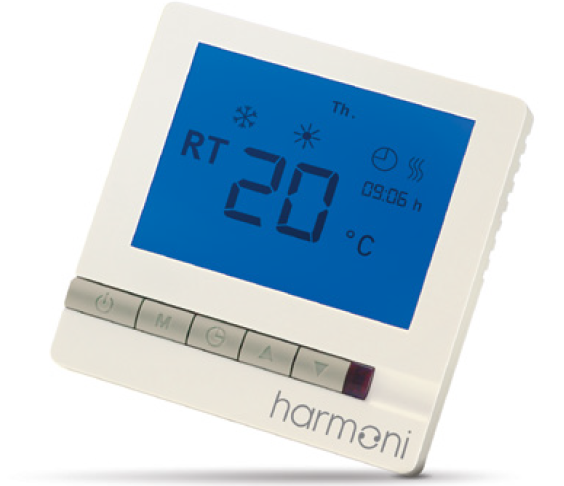
Harmoni 25 Programmable Thermostat
Introduction
Harmony 25 is an advanced digital timer thermostat used for controlling electrical underfloor heating elements. The thermostat is designed for fixed installation only. It can be used to control your floor heating system by either the floor temperature, the room temperature, or both together.
Please note
The thermostat must be installed by an authorized electrician. In order to obtain the Harmoni 2-year warranty, an authorized electrician/installer must fill in the warranty details (see page 15). More information on this product can be found at: www.harmoni-stat.co.uk
Installing & wiring the thermostat
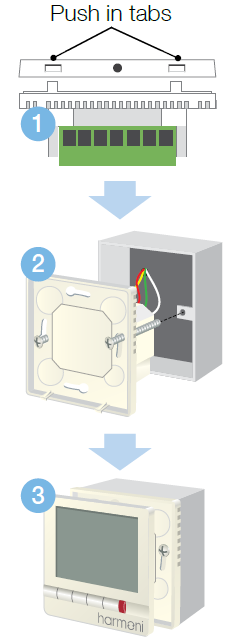
- To mount the thermostat to the wall box/socket, open the thermostat by gently pushing in the two tabs at the bottom of the casing with a screwdriver.
- To fix the thermostat, attach the cables (see wiring diagram below) and screw them into the wall box/socket.
- Once fastened and the cables connected, reconnect the front panel to the back.
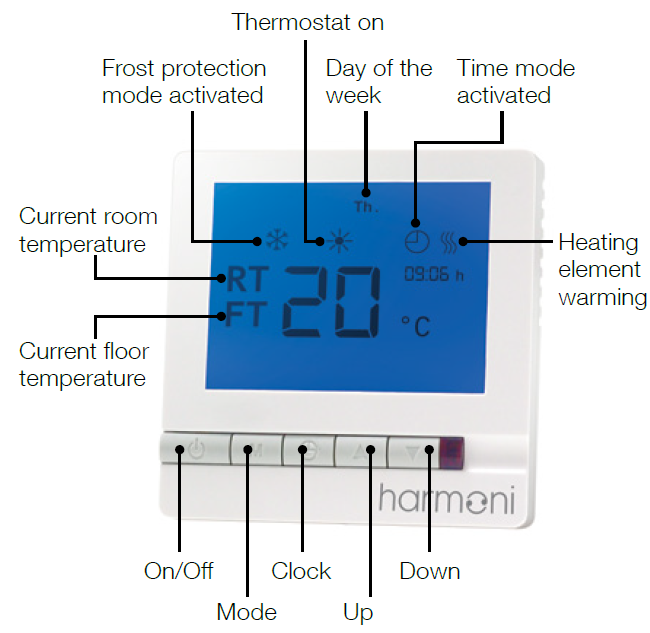
Basic functionality
Power on/off
Press ![]() to turn the thermostat on or off
to turn the thermostat on or off
Select how to control your floor heating system
This can be controlled by pressing mode :
- Floor temperature: Mode 2
The heating element turns on/off around a floor temperature setpoint (the temperature shown in the display is the actual floor temperature). - Room temperature: Modes 1 & 4
The heating element turns on/off around a room temperature setpoint (the temperature shown in the display is the actual room temperature). - Combined floor & room temperature: Modes 3 & 5
The heating element turns on/off around a room temperature setpoint with a requested max. floor temperature (Note: floor temperature is prioritized over room temperature).
Change between the above floor heating modes:
With the thermostat turned off.
- Press
 and
and for 6 seconds
 - Select modes 1 to 5 (see table on next page for details)After choosing the desired mode do not press any further buttons and the thermostat will go back to normal standby mode.
Recommended settings
Harmoni recommends the following settings for different types of floor construction:
| Program mode | Top Flooring | |
| Wooden floor* | Tiled floor† | |
| 1 (room sensor) If total effect: 0W–1840W | ü | |
| 2 (floor sensor) If total effect: 0W–2990W | ü | ü |
| 3 (combined room & floor sensor) If total effect: 1840W–2990W | ü | ü |
| 4 (room sensor)
If total effect: 1840W–2990W |
ü | |
| 5 (combined room & floor sensor) If total effect: 0W–1840W | ü | ü |
- Top flooring is made of materials such as parquet, laminate, massive wood, carpet, or linoleum.
- Top flooring is made of materials such as tiles, concrete, or marble.
Basic functionality
Setting the clock
- Press once and the hour will flash.
- Use the
 (Up/Down key) to select the hours.
 - Press again until minutes flashes.
- Use the (Up/Down key) to select the minutes.
- Press the button again until the weekday flashes.
- Use the (Up/Down key) to select the day of the week.
After setting the day, do not press any buttons and the thermostat will go back to normal operating mode.
Setting the maximum floor temperature
This function is used mainly for wooden floors and is only available in program modes using the floor sensor (modes 3 and 5) The temperature setting should be a maximum of 35°C, which is also the default set point of the thermostat. If you choose to control the floor temperature solely by the floor sensor (mode 2), the max. floor temperature is set to 35°C and cannot be changed.
Change the floor temperature max. limit (mode 3 & 5)
- Make sure the thermostat is turned off.
- Hold the button for 10 seconds until the display shows

- Release the button and the display will show the SET
- Enter the maximum floor temperature (range 20°C–45°C).
Reading the floor temperature (modes 3 & 5 only)
- Make sure the thermostat is turned on.
- Press once, the FT will flash, and the display will show the floor temperature.
- In mode 2 (floor sensor) the display always shows the current floor temperature.
- In modes 1 & 4 (room sensor) the display always shows the current room temperature.
Frost protection mode
- To enable frost protection mode, turn off the thermostat.
- Press for 3 seconds.
- Select 01 (00 = disabled).
- When frost protection has been enabled the display shows

- When enabled and the thermostat is turned off, heating will activate if the room/floor temperature is lower than 5°C; heating will stop if the room/floor temperature is higher than 7°C.
Timer functionality
Activating timer mode
With the thermostat turned on, press the button for 3 seconds. The following settings will be available:
00 = Override (disable timer functionality)
01 = Programmable. And the display will show.
Leave the thermostat and the display will return to normal.
Programming the timer (mode 1)
When programming you need to select the Programmable function (01) and the display must show (see above). You can now set the heating programs. The thermostat must have four heating periods for weekdays and four heating periods for the weekend.
Please note: The programming of the whole calendar week must take place in one continuous process, so it is a good idea to have the periods written down for reference
when programming the thermostat. For the weekend you will also need to program two periods. You can choose one of the periods to be very short or an extension of the other.
For example, on weekdays
- Period 1 starting at 07.00: Temperature setting 22°C
- Period 2 starting at 08.30: Temperature setting 18°C
- Period 3 starting at 17.00: Temperature setting 22°C
- Period 4 starting at 23.00: Temperature setting 18°C
Example, weekend
- Period 1 starting at 09.00: Temperature setting 22°C
- Period 2 starting at 23.00: Temperature setting 18°C
- Period 3 starting at 23.01: Temperature setting 22°C
- Period 4 starting at 23.02: Temperature setting 18°C
My settings
Weekdays
- Period 1 start at ______________ Temp __________°C
- Period 2 start at ______________ Temp __________°C
- Period 3 start at ______________ Temp __________°C
- Period 4 start at ______________ Temp __________°C
Weekend
- Period 1 start at ______________ Temp __________°C
- Period 2 start at ______________ Temp __________°C
- Period 3 start at ______________ Temp __________°C
- Period 4 start at ______________ Temp __________°C
Timer functionality
Program your settings
- Press the for 3 seconds until the number “1” and “Mo Tu We Th Fr” is displayed.
- The first switching time for weekdays can now be programmed.
- Use (The up/Down key) to set the required start time.
- Press to confirm this setting.
- Use the (Up/Down key) to set the required temperature.
- Press to confirm this setting.
- Repeat the switching time process for weekdays 2,3 & 4.
- After you have programmed times 1–4 for the weekday, you can set the switching times for the weekends; “Sa Su” will be displayed.
- Use (The up/Down key) to set the required start time.
- Press to accept this setting.
- Use the (Up/Down key) to set the required temperature.
- Repeat the switching time process for weekends 2,3 & 4.
- To disable the timer, select “Override” (Mode 01).
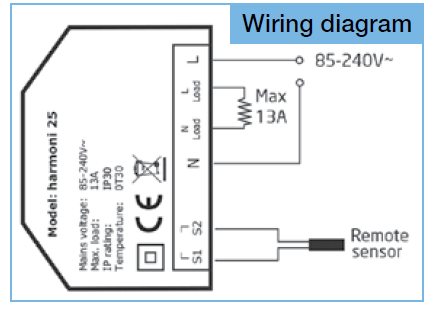
Technical specifications
| External sensor | NTC 10 kOhm at 25° C |
| Sensor values: | |
| 15°C | 14.8 kOhm |
| 18°C | 13.1 kOhm |
| 20°C | 12.1 kOhm |
| 22°C | 11.2 kOhm |
| Display | LCD |
| Power consumption | <2W |
| Set-point range | Room: 5°C to 35°C Floor: 20°C to 35/45°C |
| Accuracy | ±1°C |
| Buttons | Touch pad |
| Switch current rating | <13A (resistive load) |
| Mains voltage | 85–240V~ |
| Dimensions | 86 × 86 × 13mm (W×H×D) |
| Fixing screw width | 60mm |
| Housing | ABS + PC Flame Retardant |
| Operating rating | 0~30°C, 5~95% RH (non-condensing) |
| SW class | A |
| Ball pressure test | 100°C |
| Pollution degree | 2 |
| Weight | 253 g |
Disposal information

Harmoni warranty 8
- Name ………………………………………………………………………….
- Address ………………………………………………………………………
- …………………………………………………………………………………..
- County ………………………………….. Postcode……………………….
- Address ………………………………………………………………………
- Phone ………………………………………………………………………….
- Email ………………………………………………………………………….
- Please note In order to obtain the Harmoni 2-year warranty, an authorized electrician/installer must fill in the details below.
Electrician Installation
Installer …………………………………….. date ……………………..
Thermostat Article
name ………………………………………… number …………………
Stamp:
harmony
- Edison House
- Edison Close
- Ransomes Europark
- Ipswich
- Suffolk IP3 9GU
- United Kingdom
- T: 01473 559088
- F: 01473 276678
- E: [email protected]
- www.harmonithermostat.co.uk
Harmoni cannot accept any responsibility for any errors in catalogs, brochures, and other printed material. Harmoni reserves the right to alter its products without notice. This also applies to products already on order provided that such alterations can be made without subsequent changes to specifications already agreed. All trademarks in this material are the property of Harmoni. Harmoni and the harmony logotype is trademarks of Edison House Ltd. All rights reserved.
Reference
Download Manual:
Harmoni 25 Programmable Thermostat Installation Guide
Other Manual:
Harmoni 25 Programmable Thermostat Product Specification Guide
![]()
Leave a Reply