bnthermic U16c PROGRAMMABLE THERMOSTAT
Description
The U16c programmable thermostat provides the following temperature control modes:
- A mode: controls and displays the ambient air temperature
- F mode: controls and displays the floor temperature using an external temperature sensor (default mode)
- AF mode: controls and displays the ambient air temperature and maintains the floor temperature within desired limits using an external temperature sensor
Use this button to disable heating (e.g. in the summer). The thermostat remains powered and continues to display the time and temperature.
Display The thermostat displays the amount of heating required to maintain the desired temperature. For example, is displayed when heating is at 40 percent.
| Display | |||||
| % of heating | 1 to 24% | 25 to 49% | 50 to 74% | 75 to 99% | 100% |
Faceplate Installation
- Refer to the installation guide of the power base.
- Insert the tabs at the top of the faceplate in the slots at the top of the power base.
- Secure the faceplate using the captive screw underneath the base
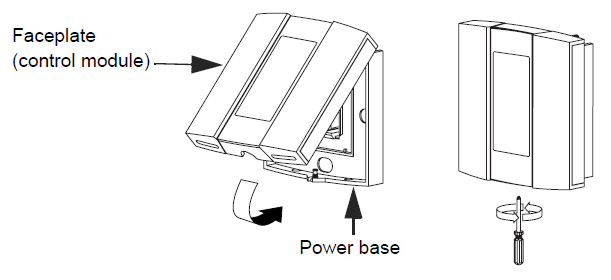
NOTE: Keep the thermostat’s air vents clean and unobstructed at all times
Power Up
Apply power to the thermostat at the main electrical panel. At power-up, the thermostat is in manual mode ![]() and displays the actual (measured) temperature. The setpoint temperature is 28 °C (82 °F).
and displays the actual (measured) temperature. The setpoint temperature is 28 °C (82 °F).
Error Messages
- LO The actual temperature is below 0 °C (32 °F).
- HI The actual temperature is above 70 °C (158 °F).
- Er The thermostat built-in sensor is defective. Replace the thermostat.
- E1 The floor sensor circuit is opened. Check the sensor connections.
- E2 The floor sensor circuit is shorted. Replace the sensor.
Configuration
Control Mode Selection
- Press and hold the Clear button for 3 seconds. The current control mode is displayed (ctl).
- Press the
 to select between A, AF and F.
NOTE: If you have chosen the A or F mode, go to step 7. If you have chosen the AF mode, the thermostat will control the ambient temperature while keeping the floor temperature within desired limits. If the floor temperature is too low or too high, the thermostat will turn heating on or off to maintain the floor temperature within the limits regardless of the ambient temperature. The minimum and maximum floor temperature limits are factory-set at 5 °C (41 °F) and 28 °C (82 °F) respectively. To modify the limits, continue with the next step: - Press the Clear button briefly. The minimum limit is displayed (FL:LO).
- Press the button to set the minimum limit.
- Press the Clear button briefly. The maximum limit is displayed (FL:HI).
- Press the buttons to set the maximum limit.
- Press the Mode/Return button to exit and save the changes.
NOTE: If no button is pressed for 60 seconds, the thermostat will save the changes and return to normal display.
Other Configurations
This procedure allows you to choose the following configurations:
Parameters/Default settings
- Temperature format: °C
- Time format: 24H
- Early Start setting (see the note below): On
- Press and hold the Pgm button for 3 seconds. The current temperature unit is displayed (unit).
- Press the to toggle between °C and °F.
- Press the Pgm button briefly. The current time format is displayed (Hr).
- Press the to toggle between 24H and 12H.
- Press the Pgm button briefly. The current Early Start setting is displayed (ES).
- Press the to toggle between OFF and On.
- Press the Mode/Return button to exit and save the changes.
NOTE: Early Start can be used in Automatic mode only. When this function is set to On, the thermostat calculates the optimal time to start heating in order to obtain the desired temperature by the set time. The thermostat re-assesses the start time daily based on the previous day’s results.
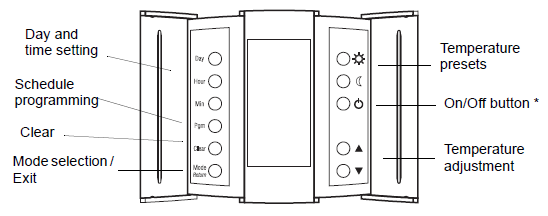
Clock and Day Setting
- Press the Hour button to set the hour.
- Set the Min button to set the minutes.
- Set the Day button to set the day.
- Press Mode/Return to exit and save the changes.
Daylight Savings (DLS) Time
When the DLS function is set to US, the thermostat switches to Daylight Savings Time on the second Sunday of March and to normal time on the first Sunday of November. When the DLS function is set to Eu, the thermostat switches to Daylight Savings Time on the last Sunday of March and to normal time on the last Sunday of October.
NOTE: The DLS function is OFF (default setting) when the clock loses its setting.

- Press the Day button (3 seconds) until DLS appears on the screen.
- Press the to toggle between US, Eu and OFF.
- Press the Day button briefly. The year setting is displayed.
- Press the to set the current year.
- Press the Day button briefly. The month setting is displayed.
- Press the to set the current month.
- Press the Day button briefly. The date setting is displayed.
- Press the to set the current date.
- Press Mode/Return to exit and save the changes.
Temperature Adjustment
Setpoint Temperature
- The thermostat normally displays the actual (measured) temperature.
- To view the setpoint, press one of the buttons once. The setpoint will appear for the next 5 seconds.
- To change the setpoint, press one of the buttons until the desired temperature is displayed. To scroll faster, press and hold the button.
Backlight
The screen is lit for 12 seconds when any button is pressed.
Preset Temperatures
The thermostat has 2 preset temperatures:
- Comfort temperature

- Economy temperature

To use a preset temperature, press the corresponding button. The corresponding icon will be displayed.
The following table shows the intended use and the default value of each of the preset temperatures
| Icon | Intended use | A/AF modes | F mode |
| Comfort
(when at home) |
21 °C (70 °F) | 28 °C (82 °F) | |
| Economy
(when asleep or away from home) |
16.5 °C (62 °F) | 20 °C (68 °F) |
To store a preset temperature:
Set the desired temperature using the ![]() buttons.
buttons.
Press and hold the corresponding temperature preset buttonuntil the corresponding icon is displayed
Modes of Operation
The thermostat has 2 modes of operation: automatic mode and manual mode.
Automatic Mode
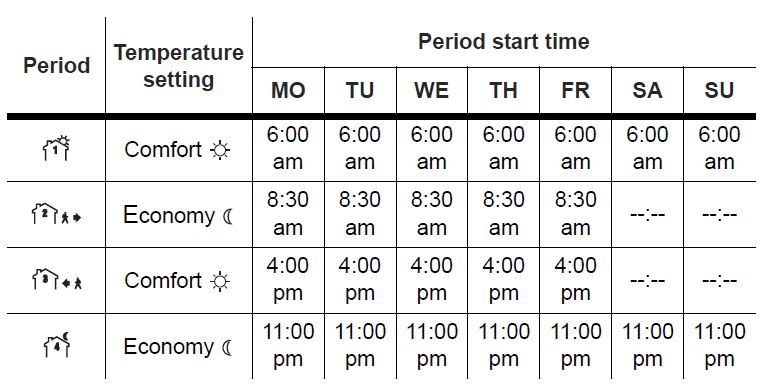
Use automatic mode if you want the thermostat to follow the programmed schedule. The schedule has 4 time periods and uses the 2 preset temperatures. The thermostat switches to Comfort temperature in periods 1 and 3 and to Economy temperature in periods 2 and 4. The following table shows the intended use of eachtime period

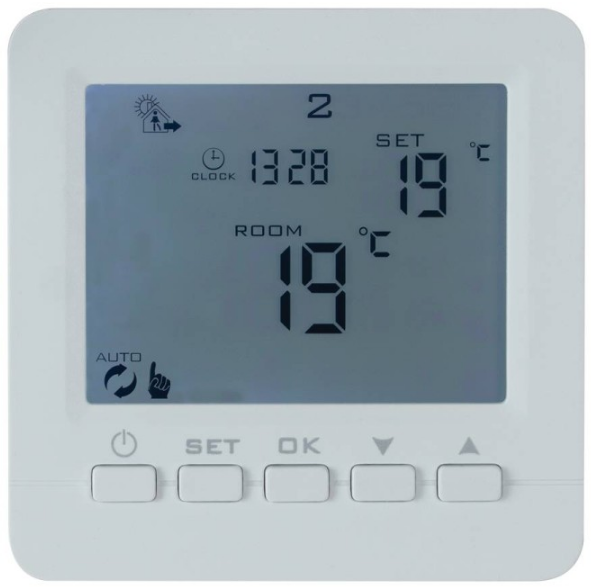
To use the automatic mode, press the Mode button to display on the screen. The current period number will also appear
Preprogrammed schedule
The thermostat has been programmed with the following schedule.
Temporary bypass
You can override the temperature of the current period by pressing the![]() or buttons. The new setpoint will be used until the beginning of the next period. The clock icon
or buttons. The new setpoint will be used until the beginning of the next period. The clock icon ![]() flashes during the bypass.
flashes during the bypass.
To cancel the bypass, press the Mode button.
Customizing the schedule
- Press Pgm. Period 1 of Monday is displayed.
- If you wish to select another day, press Day repeatedly until the desired day is displayed.
NOTE: To select all 7 days, hold the Day button for 3 seconds. This function is helpful if you want the same program every day. If you select all 7 days, the start time of the displayed period is the same for all 7 days. For example, if period 1 is displayed when you select all 7 days, period 1 will have the same start time for all 7 days. If all 7 days are displayed when you select the next period, the start time of that period will be the same for all 7 days. - If you wish to select another period, press Pgm repeatedly until the desired period is displayed.
- Press Hour and Min to set the period start time.
NOTE: If you want the thermostat to skip a period such as periods 2 and 3 in the preprogrammed schedule, press Clear. The thermostat will instead show –:– to indicate that the period will be skipped. - To program another period, go back to step 2.
- Press Mode/Return to exit.
NOTE: If no button is pressed for 60 seconds, the thermostat will save the changes and return to normal display.
Manual Mode![]()
In manual mode, the programmed schedule is not used. Use this mode if you wish to set the temperature manually or keep the same temperature all the time.
To use the manual mode:
Press the Mode button to display![]() .
.
Set the temperature using the ![]() buttons or select one of the preset temperatures by pressing the
buttons or select one of the preset temperatures by pressing the ![]() or
or ![]() button.
button.
Technical Specifications
- Power supply: Refer to the power base’s installation guide
- Ambient temperature setpoint range (A/AF models): 5 °C to 30 °C (40 °F to 86 °F) Floor temperature setpoint range (F model): 5 °C to 40 °C (40 °F to 104 °F) Floor temperature limit range (AF model): 5 °C to 40 °C (40 °F to 104 °F) Temperature display range: 0 °C to 70 °C (32 °F to 158 °F)
- Temperature display resolution: 0.5 °C (1 °F)
- Operating temperature: 0 °C to 50 °C (32 °F to 120 °F)
- Storage temperature: -20 °C to 50 °C (-4 °F to 120 °F)
- Heating cycle length: 15 minutes
- Software: Class A
- Automatic action: Type 1B and 1Y
- Protection index: IP21
- Power outage: All programs and temperature settings are saved during a power outage. The clock must be reprogrammed if the power outage lasts more than 4 hours. When power returns, the thermostat returns to the mode of operation preceding the outage.
- Size (H/W/D): 83 x 79 x 13 mm (3.3” x 3.1” x 0.5”)
Downloaded from www.Manualslib.com manuals search engine
Technical Assistance
BN Thermic Ltd
Address: 34 Stephenson Way, Three Bridges, Crawley West Sussex RH10 1TN England
Contact Us
For information, advice, prices, or technical assistance
Tel: +44 (0)1293 547361
Fax: +44 (0)1293 531432
Email: [email protected]
Reference
Download Manual:
bnthermic U16c PROGRAMMABLE THERMOSTAT User Guide