
EMOS P5601N Programmable Electronic indoor Thermostat
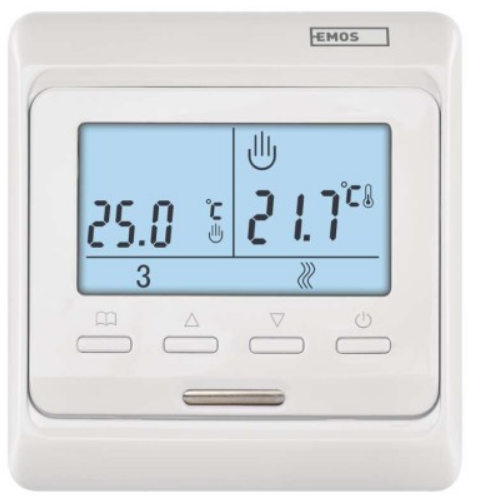
Thermostat
The T091 thermostat is designed to control heating and air-conditioning systems.
Important
- Before the first use, make sure to read carefully the Operating Manual for the thermostat, but also for the boiler or air-conditioning equipment.
- Turn off the power supply before installing the thermostat!
- Installation should be carried out by qualified personnel!
- During installation, observe the appropriate standards.
Specifications
- Switched load: max. 230 V AC; 5 A for resistive load; 3 A for inductive load
- Clock accuracy: ±60 seconds/month
- Temperature measurement: 0 °C to +40 °C with increments 0.2 °C accuracy ±1 °C at 20 °C
- Temperature setting: 5 °C to 30 °C in increments 0.2 °C
- Variance of set temperature: 0.2; 0.4; 0.8; 1.4; 1.8 °C
- Air-conditioning cycle time: 30 seconds
- Operating temperature: 0 °C to 40 °C
- Storage temperature: -20 °C to 60 °C
- Power supply: 2× 1.5 V battery type AA (LR6)
- Accessories: 2 screws, 2 dowels
- Dimensions and weight: 158 × 86 × 26 mm; 156 g
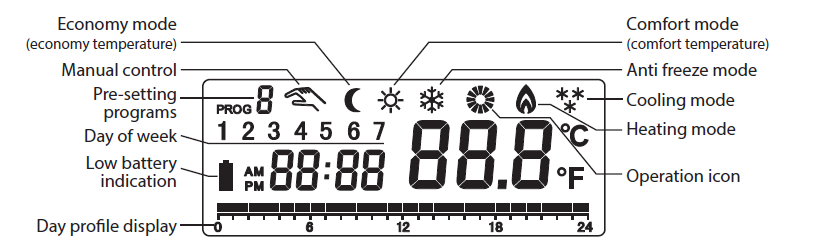
Display description
Thermostat setting buttons can be found under the front cover. Move the front cover right to see the buttons.
Thermostat buttons
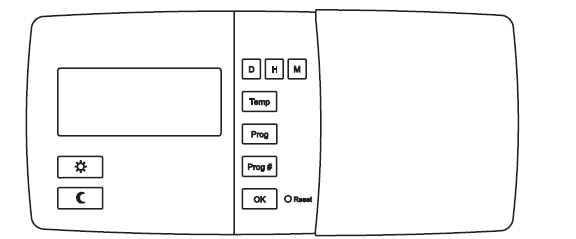
- Prog – display of program for the specific day
- Prog # – program selection
- OK – confirm the selection
- Reset – clearing defined values
- setting comfort temperature/navigation in the menu
- setting economy temperature/navigation in the menu
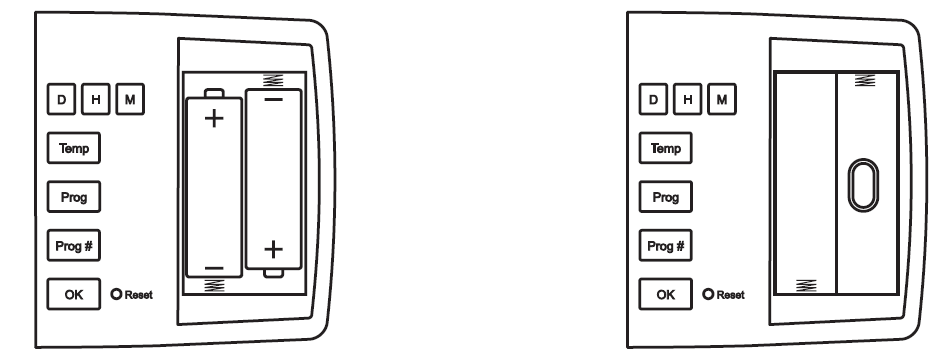
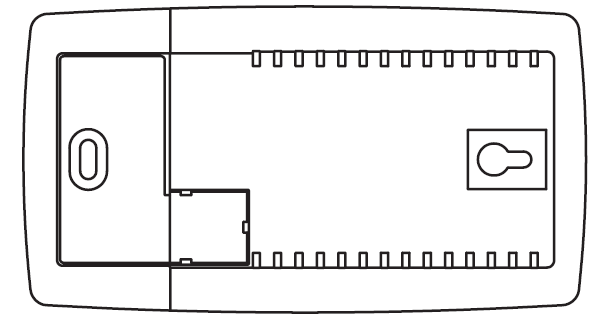
Thermostat battery compartment Hole to mount the thermostat on the wall
Display backlight
Pressing any button except Reset activates the display backlight for 20 seconds.
INSTALLATION
Note:
Before replacing the thermostat, disconnect the heating/air-conditioning system from the main power in your flat. This will prevent potential electrical accidents.
Thermostat location
Thermostat location significantly affects its function. Choose a location where members of the family spend most of their time, preferably on the inside wall where air circulates freely, with no direct sunshine. Do
not place the thermostat in the vicinity of heat sources (such as TV sets, radiators, and fridges), or close to a door (due to frequent shocks or vibrations). If you don’t comply with these recommendations, it will
not control room temperature correctly.
Thermostat installation
Mounting the thermoregulator directly onto the wall without mounting plate Openings for mounting the thermoregulator onto the wall (without mounting plate)
Drill two 6 mm holes into the wall
You can use a mounting template with marked-out openings for mounting. Insert wall plugs and tighten the left screw leaving a 3 mm distance. Fasten the thermoregulator by placing it on the screw head and moving it right (notice the keyhole-shaped opening at the back of the thermoregulator). Tighten the main screw and secure the thermoregulator in position.
Note: You don‘t need wall plugs for wooden walls. Drill two 2.7 mm holes instead of 6 mm holes.
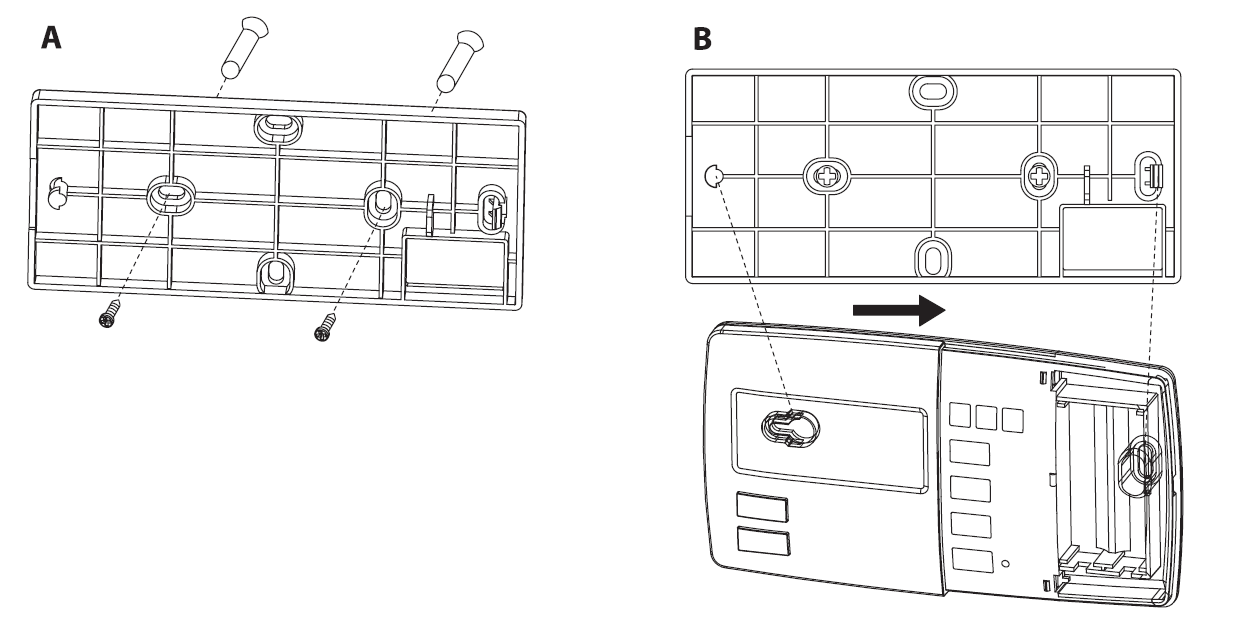
Mounting the thermoregulator with a mounting plate
Place the mounting plate onto the desired spot on the wall and mark two openings for mounting. Drill two holes 6 mm in diameter in these spots. Insert wall plugs and attach the mounting plate with two screws (figure A). Check that the plate is firmly fixed. Carefully mount the thermoregulator onto the mounting plate (figure B). Fasten the thermoregulator by placing the left opening in the shape of a keyhole onto the screw first, then moving the regulator right and pressing it in place. To remove the thermoregulator from the plate, use a screwdriver and carefully push into the right opening and remove the thermoregulator from the plate.
Note: You don‘t need wall plugs for wooden walls. Drill two 2.7 mm holes instead of the 6 mm ones.
Wiring Diagram

Diagram of power connection of thermostat T091FL to “NO” boilers
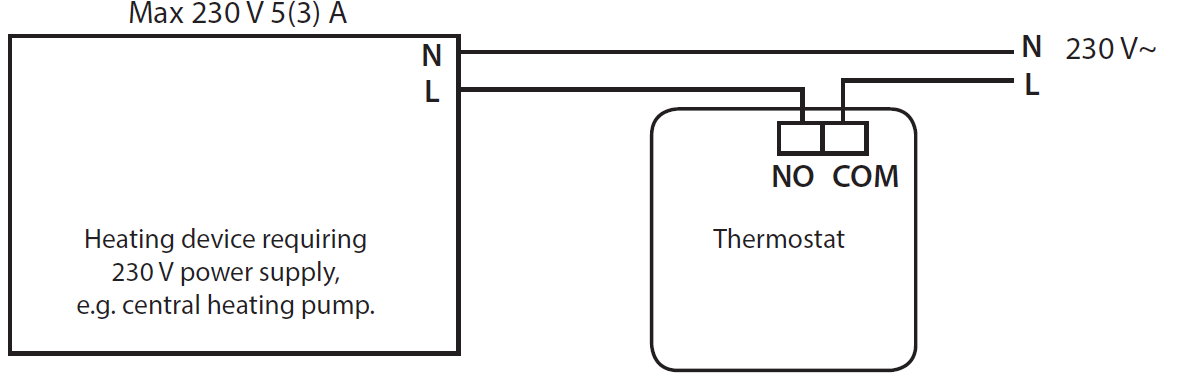
In the case of the NC boiler, the thermostat should be set to COOLING mode.
Diagram of voltage-free connection of thermostat T091FL to “NO” boilers
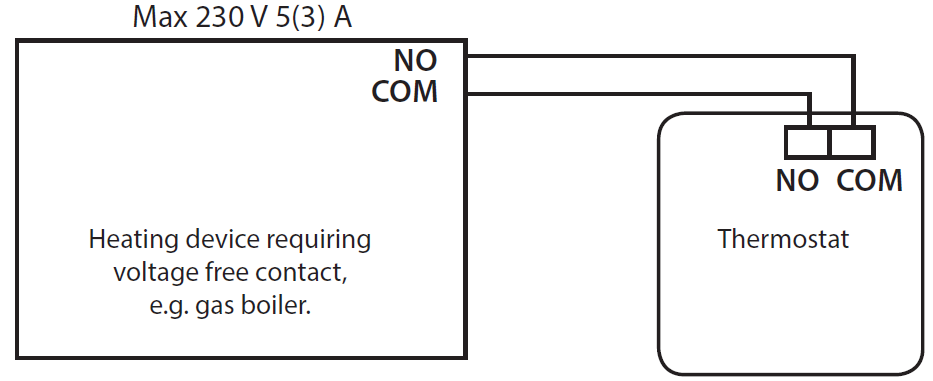
In the case of the NC boiler, te thermostat should be set to COOLING mode.
Putting into operation
Remove the front cover and insert 2× 1,5 V AA batteries. Only use alkaline batteries, not rechargeable ones. Insertion of batteries starts the thermostat and activates the display. If the thermostat is not working properly, please check the polarity of the batteries, and the charging state of the batteries, or press the Reset button.
Basic setting
Note: Remember that the first pressing of a button activates the display backlight, the next pressing sets values/functions.
Setting day/time
Set the current day by pressing the D button repeatedly (1–7 = Monday to Sunday). Set the current hour by pressing H repeatedly, set the current minute by pressing M repeatedly.
Note: When you press and hold a button for 2 seconds, the setting process is accelerated.
Displaying/setting comfort temperature and economy temperature
Press and hold Temp to go to the temperature display/change mode. The display will show the currently set value of temperature mode ( ![]() , or
, or ![]() icon). This value is flashing. Repeatedly press the
icon). This value is flashing. Repeatedly press the / button to change the temperature value.
Note: Anti-freeze mode temperature  cannot be changed. Press OK to return to the current operation mode.
Example:
If the thermostat is currently in the mode![]() and you want to change the
and you want to change the ![]() temperature, press
temperature, press  the button first and then the Temp button. If the thermostat is currently in the
  mode and you want to change the temperature, press th Temp button.
Note: Default temperature setting: = 19 °C, = 15 °C.
Manual setting of temperature
Press to choose comfort temperature. Press to choose the economy temperature. The current temperature mode will be stopped until the next change in the program. The hand icon is displayed. Press OK to cancel the manual temperature change.
Increase in the time of manual change of temperature
Press and hold for 4 seconds (increase comfort temperature time), or (increase economy temperature time). This displays the time setting value and hand ![]() icon. Repeatedly press / to change the time value.
icon. Repeatedly press / to change the time value.
You can set 1 to 24 hours, in 1-hour increments
Press OK to return to the current operation mode. The hand icon is not displayed. During the defined time, the temperature is not affected by the program. If the increased time mode is active, pressing the relevant button of temperature mode change (e.g., if comfort mode is defined) will show the remaining time. The remaining defined time can also be changed by pressing the same button repeatedly. If you press another temperature mode button (e.g. when the comfort mode is defined), the timer of the defined time is cleared.
Displaying/setting the temperature program
Press repeatedly Prog.
Each depression will show the temperature program for each day of the week and the number of days. E.g.: The displayed day number is 1 (Monday) and PROG 1 is shown above the number. To select the temperature program for a certain day, press the Prog button repeatedly (setting day) and the Prog # button repeatedly (setting program). Press OK to confirm the selection of the program. Factory setting of each temperature program:
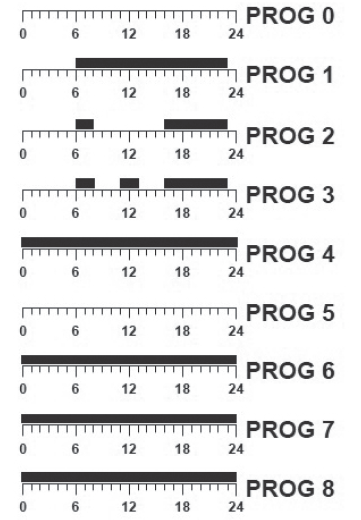
Black section = comfort temperature
Empty field = economy temperature
Programs 0 to 5 are factory pre-set, they cannot be changed.
Program 0 has an anti-freeze temperature of 7 °C defined for all day.
Users can change the settings of programs 6 to 8.
If you want to create your own program, proceed as follows. Press Prog repeatedly to select the required day (the day number is shown). Now press the Prog # button repeatedly and choose program 6, 7 or 8.
The display will show the program number, e.g. PROG 6. Now press the / button repeatedly to set the whole day’s temperature pattern. Each depression moves one hour forward, temperature section will be flashing with the hour being selected. To move forward, you can also use the H button. Press OK to return to the current operation mode.
Selecting the heating or cooling mode
Long press OK for approximately 8 seconds to enter settings. The heating icon![]() is flashing, press the OK button to confirm the heating mode or press the / button followed by OK to switch to the cooling mode. For heating, the comfort temperature is normally higher than the economy temperature while for cooling
is flashing, press the OK button to confirm the heating mode or press the / button followed by OK to switch to the cooling mode. For heating, the comfort temperature is normally higher than the economy temperature while for cooling![]() , the opposite is true, the comfort temperature is less than the economy. Differences in the cooling mode: Switching in the cooling function is reversed: The thermostat switches the system when the room temperature is higher than the set temperature. Anti-freeze temperature is not used. The flake
, the opposite is true, the comfort temperature is less than the economy. Differences in the cooling mode: Switching in the cooling function is reversed: The thermostat switches the system when the room temperature is higher than the set temperature. Anti-freeze temperature is not used. The flake ![]() icon and 7 °C is not displayed. If you choose program 0, the thermostat switches off cooling. The 30-second minimum cycle is switched on automatically.
icon and 7 °C is not displayed. If you choose program 0, the thermostat switches off cooling. The 30-second minimum cycle is switched on automatically.
5min delay (dLY)
Long press OK for approximately 8 seconds to enter settings. Release the OK button, then short press it again. “dLY” will be flashing on the display.Press OK to confirm delay mode (ON), or press the / button to switch off this function (OFF), then press OK. When this function is enabled, the external system is only switched on when it has been off for more than 5 min. If you select cooling, this function is enabled automatically.
Temperature variance (SPAN)
Variance (hysteresis) is a temperature difference between switching on and off. If for example you set the temperature in the heating mode to 20 °C and variance to 0.8 °C, the thermostat starts to act as soon
as the room temperature drops to 19.2 °C and is switched off when the temperature reaches 20.8 °C. Long press OK for approximately 8 seconds to enter settings. Release the OK button, then short press it again twice. SPAN will be flashing on the display. Use the / buttons to set the required value of variance. You can select 0.2; 0.4; 0.8; 1.4; 1.8 °C. Press OK to confirm.
Reset
If the thermostat is not working properly, you can switch it to default setting by pressing the Reset button. This procedure deletes all settings. To press the reset button, do not use a pencil, graphite remnants may cause a short circuit and damage the thermostat. Use e.g. a ballpoint pen.
Care and Maintenance
The product is designed to provide trouble-free service for many years if operated appropriately. Here is some advice for proper operation:
- Read carefully the manual before using this product.
- Do not expose the product to direct sunlight, extreme cold and moisture, and sudden changes in temperature. This would reduce accuracy of detection.
- Do not place the product in locations prone to vibration and shocks – these may cause damage.
- Do not expose the product to excessive force, impacts, dust, high temperatures or humidity – these may cause malfunction, shorter battery life, damage to batteries and deformation of plastic parts.
- Do not expose the product to rain or high humidity, dropping or splashing water.
- Do not place any open flame sources on the product, e.g. a lit candle, etc.
- Do not place the product to places with inadequate air flow.
- Do not insert any objects in the product vents.
- Do not tamper with the internal electric circuits of the product – you may damage it, which will automatically terminate the guarantee. The product should only be repaired by a qualified professional.
- To clean the product, use a slightly moistened soft cloth. Do not use solvents or cleaning agents – they could scratch the plastic parts and cause corrosion of the electric circuits.
- Do not immerse the product in water or other liquids.
- In the event of damage or defect of the product, do not perform any repairs by yourself. Have it repaired in the shop where you bought it.
This device is not intended for use by persons (including children) whose physical, sensory or mental disability or lack of experience and expertise prevents safe use, unless they are supervised or instructed in the use of the appliance by a person responsible for their safety. It is necessary to supervise children to ensure they do not play with the appliance. Do not dispose of the product or the batteries after the end of their life as unsorted municipal waste, use sorted waste collection points. Correct disposal of the product will prevent adverse effects on human health and the environment. Recycling of materials contributes to the protection of natural resources. For more information about recycling of this product, contact the municipal authority, the organization for processing household waste or the point of sale where you purchased the product.
NOTE: The contents of this manual may be changed without prior notice – because of limitations in the printing the symbols shown may differ slightly from the display – the content of this manual may not be
reproduced without the manufacturer’s permission. The product was issued a declaration of conformity. Detailed manual can be found at: http://www.emos.eu/download.
Reference
Download Manual:
EMOS P5601N Programmable Electronic indoor Thermostat Installational Guide
![]()
EMOS P5601N programmable electronic indoor thermostat Installational Guide
Leave a Reply