Vive Comfort TP-Z-955W Non-Programmable Thermostat
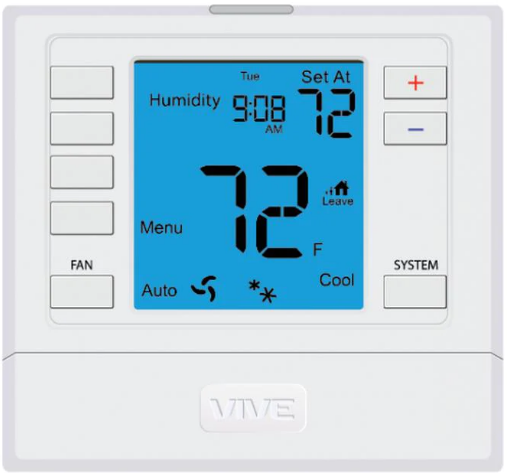
Getting to know your thermostat
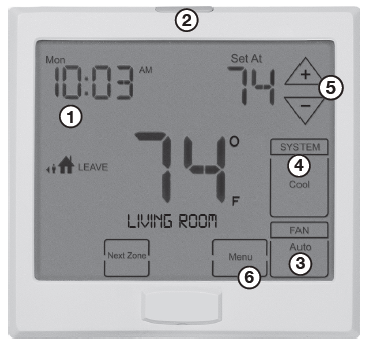
- LCD (right)
- Glow in the Dark Light Button
- Fan Button
- System Button
- Temperature Setpoint Buttons
- Menu Button
Overview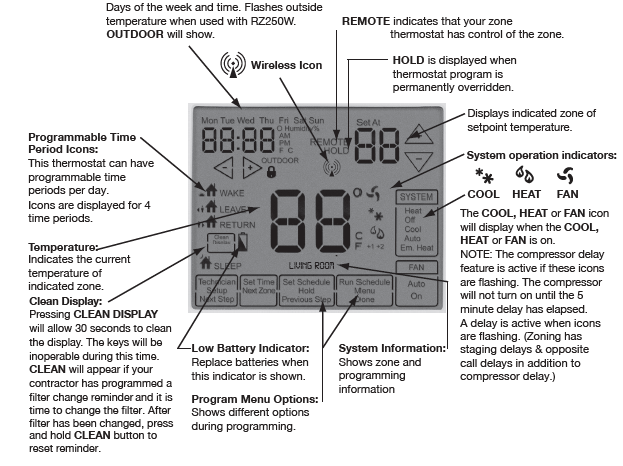
Battery information
- On the back of the thermostat insert 2 AA Alkaline batteries (included).
- Pull the thermostat directly away from the wall to access the batteries.
- A firm tug will be required to remove the thermostat from the subbase mounted on the wall.

Battery Tip
The Master Thermostat must be hardwired (R and C terminals connected to 24 VAC). Batteries may be used for clockbackup during power-outages, batteries are also recommended to simplify establishing communication process. This allows the installer to take the master thermostat to each zone they are connecting.
Easy-to-use controls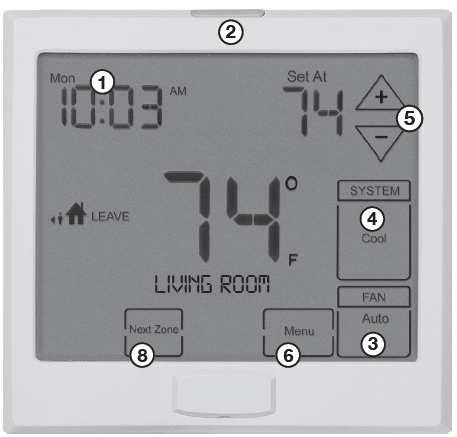
LCD Display:
See page 2 for details about this display readout and icons.
Glow in the Dark Light Button:
Press and release the light button to turn on the display light. The glow-in-the-dark light button will self-illuminate for several hours after exposure to ambient light. DO NOT hold down the light button for more then 10 seconds. This will break the communication link between the Z955W and the base module
Fan Key:
Select ON or AUTO . The ON key will run the fan continuously. The AUTO key will cycle the fan on only when the heating or cooling system is on.
A Note About Programmable Fan:
The programmable fan feature will run the fan continuously during any time period it is programmed to be on. This is the best way to keep the air circulated and to eliminate hot and cold spots in your building. The programmable fan is available for Zone 1, the Local (Master) zone.
System Key:
Selects the operation mode of your HVAC system. Selecting HEAT turns on the heat mode. Selecting COOL turns on the air conditioning mode. Selecting OFF turns both heating and cooling off
Temperature Setpoint Buttons:
Press the + or – buttons to select the desired room temperature
Menu Keys:
Use these keys to set up your programming options. Refer to the next page for instructions
Next Zone:
By selecting NEXT ZONE you can cycle through each of the zones set up during the initial installation.
Set Time
- Press MENU
- Press SET TIME
- Day of the week will be flashing.
- Use the
 key to select the current day of the week.
 - Press NEXT STEP
- The current hour is flashing.
- Use the
 key to select the current hour.
 - When using 12-hour time, make sure the correct a.m. or p.m. choice is selected.
- Press NEXT STEP
- Minutes are now flashing.
- Use the
 key to select current minutes.
 - Press DONE when completed
Set 5+1+1 Program Schedule
To customize your 5+1+1 program schedule, follow these steps
Weekday:
- Select HEAT or COOL using the SYSTEM key.
- Note: You have to program heat and cool each separately.
- Press MENU
- Press SET SCHED. Note: Monday-Friday is displayed and the WAKE icon is shown. You are now programming the WAKE time period for the weekday setting.
- The first zone to be programmed will be named LOCAL. Use the
 key to make your time selection for the weekday WAKE time period.
 - Note: If you want the fan to run continuously during this time period,
- select ON with the FAN key. This can only be done for your LOCAL ZONE 1.
- Use the
 key to make your setpoint selection for the weekday WAKE period.
 - Press NEXT ZONE. Repeat steps 4 and 5 for each remaining zone. Press NEXT ZONE to toggle zones.
- NOTE: Zones can have names such as LIVING ROOM, BEDROOM, etc
- Press NEXT STEP
- Repeat steps 4 through 7 for the weekday LEAVE time period, for the weekday RETURN time period, and for the weekday SLEEP time period.
Saturday:
- Repeat steps 4 through 7 for
- Saturday WAKE time period, for
- Saturday LEAVE time period, for
- Saturday RETURN time period, and
- for Saturday SLEEP time period
Sunday:
- Repeat steps 4 through 7 for
- Sunday WAKE time period, for
- Sunday LEAVE time period, for
- Sunday RETURN time period, and
- for Sunday SLEEP time period
Set 7-Day Program Schedule
- Select HEAT or COOL using the SYSTEM key.
- Note: You have to program heat and cool each separately.
- Press MENU
- Press SET SCHED. Note: Monday-Friday is displayed and the WAKE icon is shown. You are now programming the WAKE time period for the weekday setting
- The first zone to be programmed will be named LOCAL. Use the
 key to make your time selection for the weekday WAKE time period.
 - Note: If you want the fan to run continuously during this time period, select ON with the FAN key. This can only be done for your LOCAL ZONE 1
- Use the
 key to make your setpoint selection for the weekday WAKE period.
 - Press NEXT ZONE. Repeat steps 4 and 5 for each remaining zone. Press NEXT ZONE to toggle zones.
- NOTE: Zones can have names such as LIVING ROOM, BEDROOM, etc.
- Press NEXT STEP
Repeat steps 4 through 7 for the weekday LEAVE time period, for the weekday RETURN time period, and for the weekday SLEEP time period
Next Zone
- The NEXT ZONE key cycles through all zone thermostats connected to your wireless zoning system.
- LOCAL shows the ambient temperature of the Master Thermostat only.
- The name of each zone thermostat will show and the ambient temperature for that zone only will be displayed.
- For more information, see the Zone Thermostat User Guide.
Temporary and Permanent Hold Feature
Temporary hold: The thermostat will display HOLD and RUN SCHEDULE on the bottom of your screen when you press the or key. If you do nothing, the temperature will remain at this setpoint for four hours. Your program setpoint will then replace your temporary setpoint.
Permanent hold: If you press the HOLD key at the bottom of your screen, you will see HOLD appear next to the setpoint temperature in the display. The thermostat will now permanently stay at this setpoint and can be adjusted using the or keys.
To return to the program: Press the RUN SCHEDULE key at the bottom of your screen to exit either temporary or permanent hold.
Filter Change Reminder
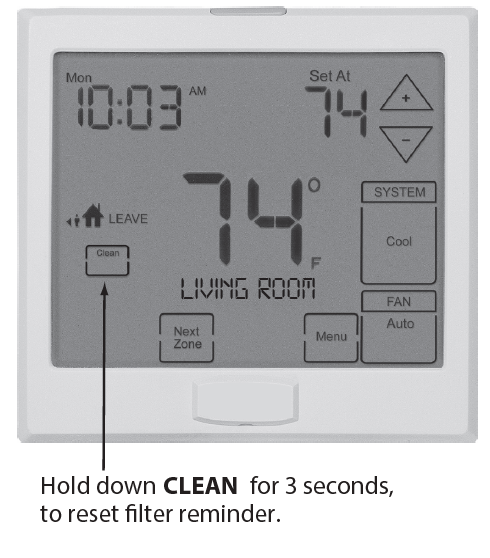
- If your installing contractor has configured the thermostat to remind you when the air filter needs to be changed, you will see FILT in the display when your air filter needs changed. FILT will be shown in the display after your system has run long enough to require an air filter change.
- Resetting the filter change reminder: When the FILT reminder is displayed, you should change your air filter and reset the reminder by pressing the CLEAN key for 3 seconds. FILT will leave the display when reset.
WARRANTY
CONTACT US AND WARRANTY INFORMATION
Warranty Registration:
Your new thermostat has a 5 year limited warranty. You must register your warranty within 60 days of installation. You can register your new thermostat in 2 ways. Go to our company website, select warranty registration, and fill out a short registration form. Complete the form below and mail it to the address shown.
VIVE Comfort
- P.O. Box 3377
- Springfield, MO 65804
Toll-Free: 1-800-776-1635 Web: www.vivecomfort.com
Hours of Operation: M-F 9 AM – 6 PM Eastern.
This manual covers
Z955W Master Zoning Thermostat
Congratulations on purchasing our Wireless Zoning System.
This Master Thermostat was designed to the highest reliability and ease of use standards. Thank you for choosing our quality products.
Reference
Download Manual:
Vive Comfort TP-Z-955W Non-Programmable Thermostat Operational Manual
OTHER MANUALS
Vive Comfort TP-Z-955W Non-Programmable Thermostat Installation Manual

Vive Comfort TP-Z-955W Non-Programmable Thermostat Operational Manual

Leave a Reply