

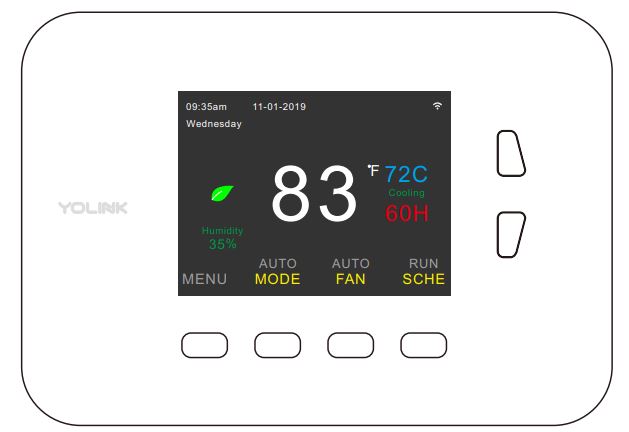
YoLink YS4002-UC Digital Smart Thermostat
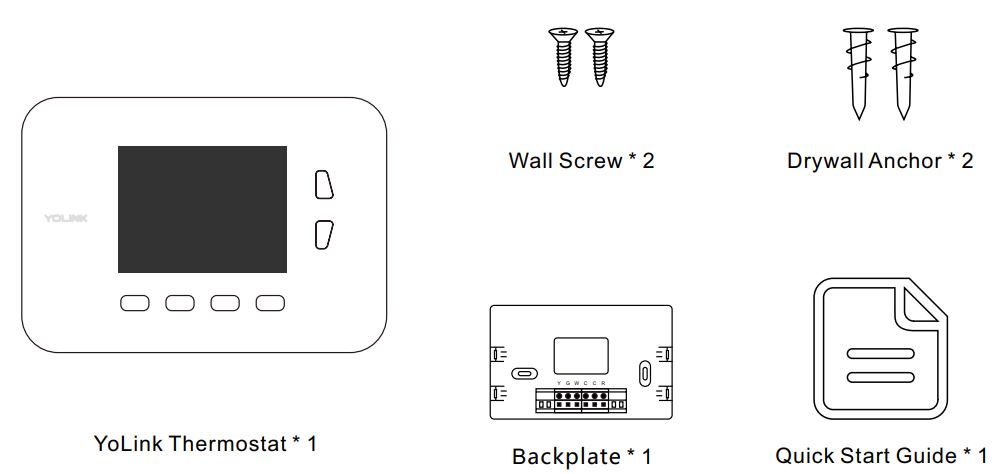
What’s In The Box
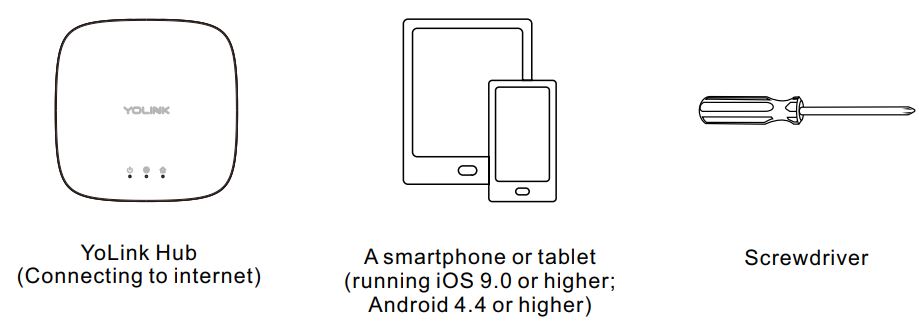
Product Required (not included)
Introduction
YoLink Thermostat replaces the old thermostat, just a tap of the button on the device or YoLink App lets you remotely access, change or set your temperatures at anytime anywhere. Designed to work with HVAC equipment in most homes (U.S. & Canada only).
Features
- Control from anywhere – Control your YoLink Thermostat remotely via YoLink App on your iOS or Android device.
- Schedule – Automatically keep your HVAC at a comfortable temperature at certain times.
- Voice Control – Use Alexa or Google Assistant to control your devices with voice commands.
- ECO – Automatically adjust your schedules according to ECO settings.
- Work with IFTTT – Set up rules for the “If This Then That” function via IFTTT App.
Set Up YoLink Thermostat
Follow the steps below to set up your YoLink Thermostat via YoLink App.
- Step 1: Set up YoLink App
Download the YoLink App from the Apple App Store or Google Play.
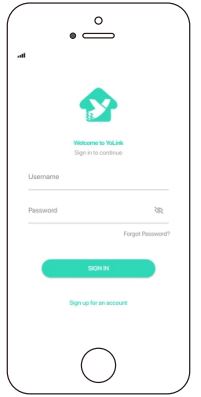
- Step 2: Log in or sign up with a YoLink account
- Open the App. Log in to your YoLink account.
- If you don’t have a YoLink account, tap Sign up for an account and follow the steps to sign up for an account.
- Step 3: Add the device to YoLink App
- Tap the “ ” in YoLink App. Scan the QR Code on the thermostat.
- You can customize the name, set the room, and add to/remove from your favorite.
- Name – Name YoLink Thermostat.
- Room – Choose a room for YoLink Thermostat.
- Favourite – Click the “ ” icon to add/remove from Favourite.
- Tap the “Bind Device” to add the device to your YoLink account.
Note
Please add your YoLink Thermostat to YoLink App first before you install it.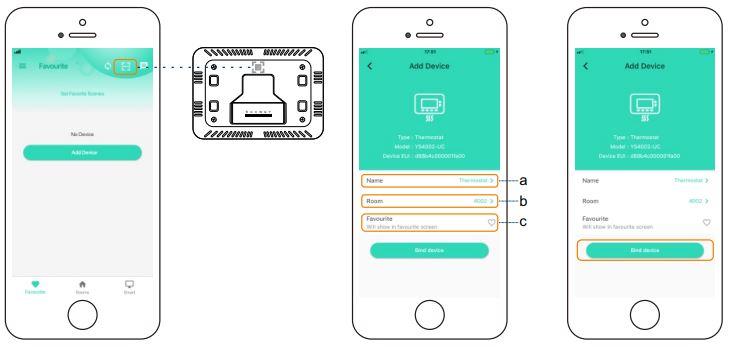
- Step 4: Set up a connection
Turn on YoLink Thermostat and the device will be ready to use.
Note
YoLink Hub is required to set up YoLink Thermostat. Please set up your YoLink Hub first.
Install the YoLink Thermostat
- Step 1: Turn off the power
This protects you and avoids blowing a fuse in your equipment. Press any button on your old thermostat to make sure your system is off.
- Step 2: Label wires
Remove the cover, peel off the labels below, and attach them to the thermostat’s matching wires.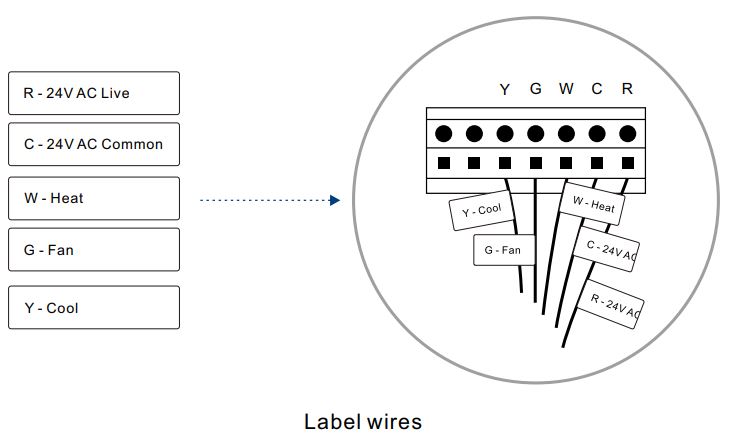
- Step 3: Mount the backplate
Mount the backplate by screwing it onto the wall using the provided screws. Wall anchors are included for drywall.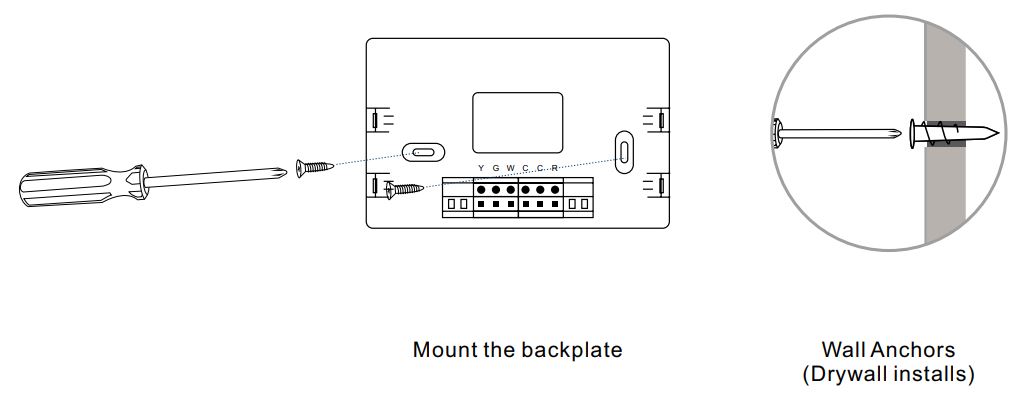
- Step 4: Connect your wires
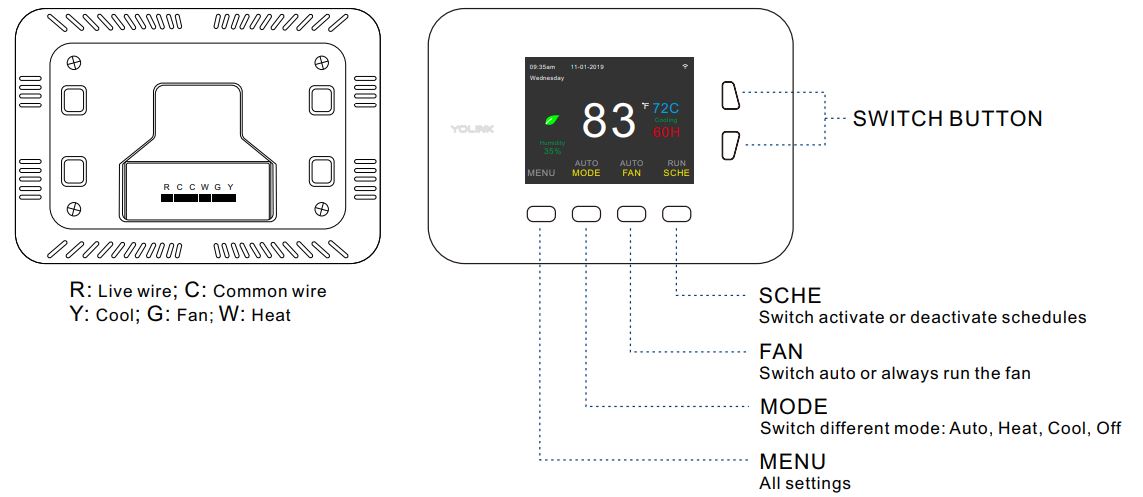
Connect the wires in order to make sure your controller works well.- C – Common Wires. Not all systems have a C wire. Common wires are often labeled “C” or “Com”. You can insert them into the “C” terminals.
- R – Live Wires. Live Wires are often labeled “R” or “Live”. You can insert them into any of the “R” terminals.
- G – Fan Wires. Fan wires are often green wires, wire it into the “G” terminal.
- W – Heat wires. Heat wires are often white wires, wire it into the “W” terminal.
- Y – Cool Wires. Cool wires are often yellow wires, wire it into the “Y” terminal.
Wiring diagram (C-wire needed)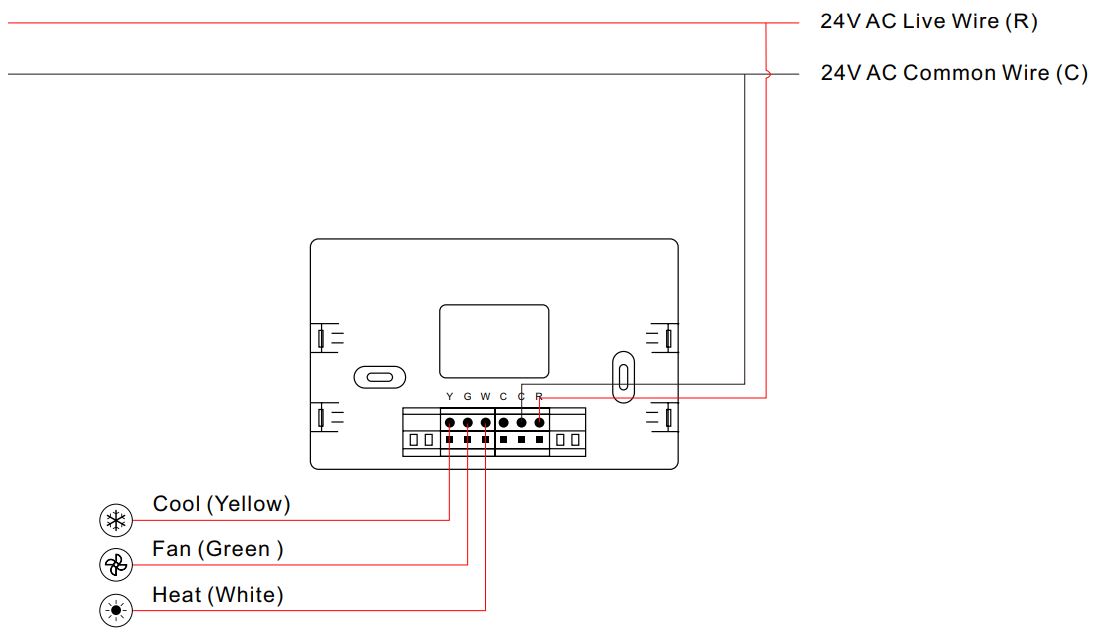
- Step 5: Install the new one and turn on the power
Gently push the new, wired thermostat back onto the backplate and turn the power on.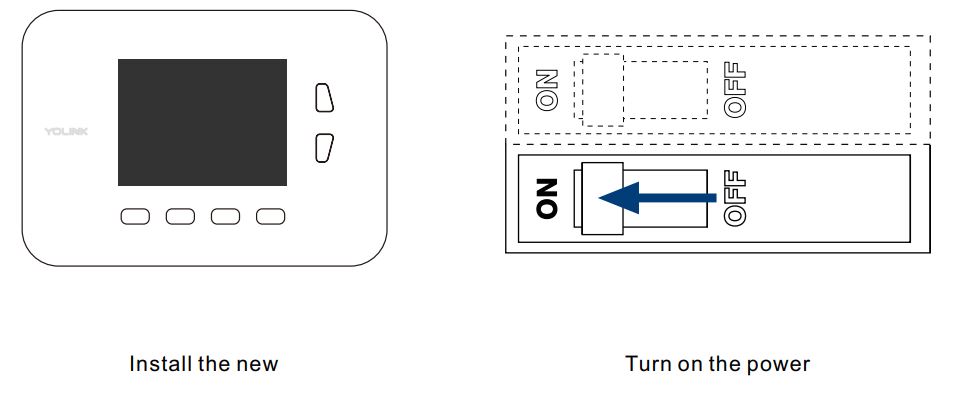
Using YoLink App with YoLink Thermostat
Controls
Show you the current running mode, temperature, and humidity. Also, you can adjust the set point for both the cool temperature and the heat temperature.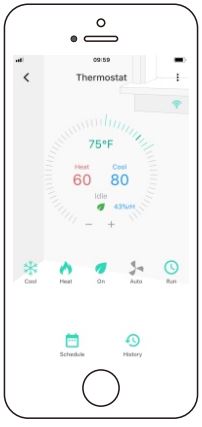
Mode
You can set running modes according to your need.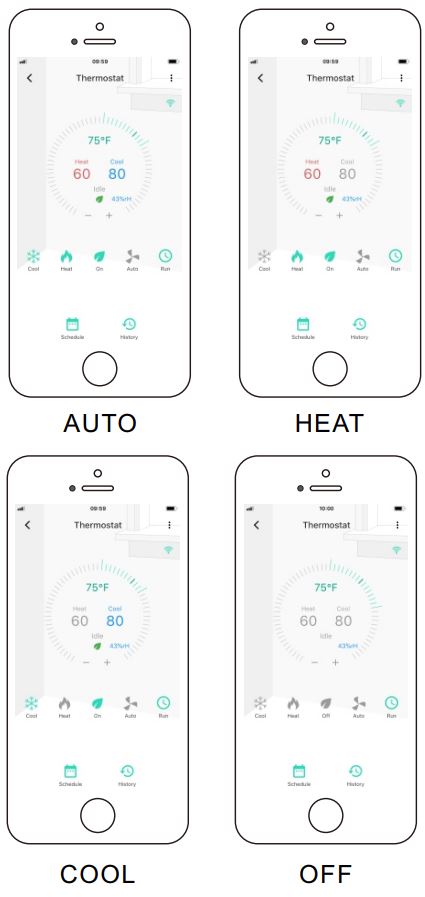
- Auto – Auto-run cooling or heating.
- Cool – Cooling only.
- Heat – Heating only.
- Off – Will not run cooling or heating.
Tap the “YoLink Thermostat” in App to go to its controls.
Tap the “ ![]() ” icon to enable/disable Cool mode, and tap the “
” icon to enable/disable Cool mode, and tap the “ ![]() ” icon to enable/disable Heat mode. Both Cool mode and Heat mode are enabled, the thermostat will run Auto mode. Neither Cool mode nor Heat mode is enabled, the thermostat will run Off mode.
” icon to enable/disable Heat mode. Both Cool mode and Heat mode are enabled, the thermostat will run Auto mode. Neither Cool mode nor Heat mode is enabled, the thermostat will run Off mode.
ECO
Under ECO mode, HVAC will automatically adjust the cool or heat temperature to a more cool or more heat temperature according to the ECO setting via YoLink App.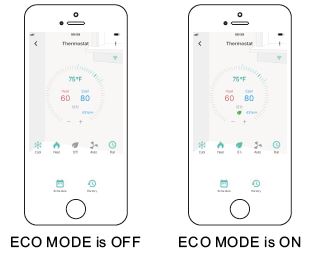
Tap the “YoLink Thermostat” in App to go to its controls.
Tap the “ ![]() ” icon to enable/disable ECO mode. There will be a green leaf on the Control screen when ECO mode is on.
” icon to enable/disable ECO mode. There will be a green leaf on the Control screen when ECO mode is on.
Note
Through the Detail screen, you can edit adjust the temperature and also you can enable/disable ECO mode.
FAN
You can switch auto or always run the fan.
- Auto – The thermostat will run the fan automatically when the thermostat is running cooling.
- ON- The thermostat will On always run the fan.
Tap the “YoLink Thermostat” in App to go to its controls.
Tap the “![]() ” icon to switch auto or always run the fan.
” icon to switch auto or always run the fan.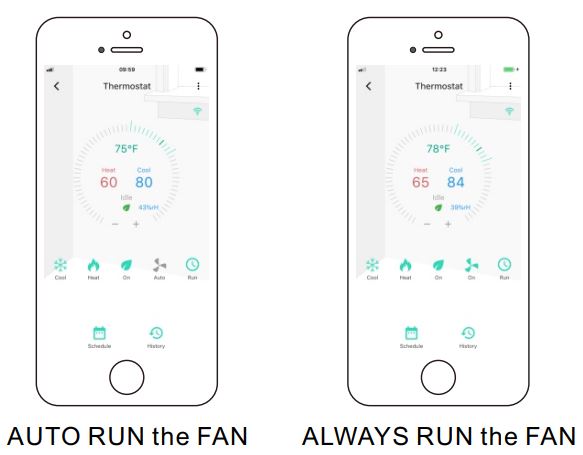
Schedule
- Tap the “YoLink Thermostat” in App to go to its controls.
- Tap the “
 ” icon to enable/disable auto schedule.
Run: Auto Schedule is on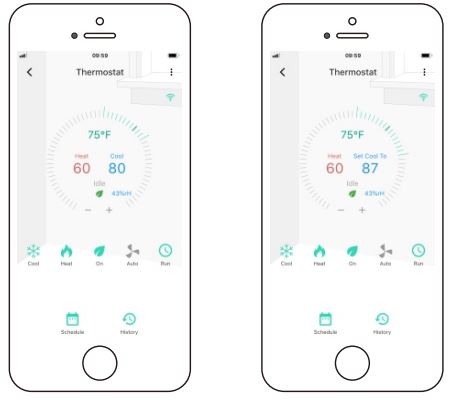
- The temperature adjust here will run only once till the next schedule time.
- The thermostat will run automatically according to the schedule.
- You can slide the line on the circle to set the cooling or heating temperature, and it will run only once during the corresponding schedule time and run the schedule again at the next schedule time.
Hold: Auto Schedule is off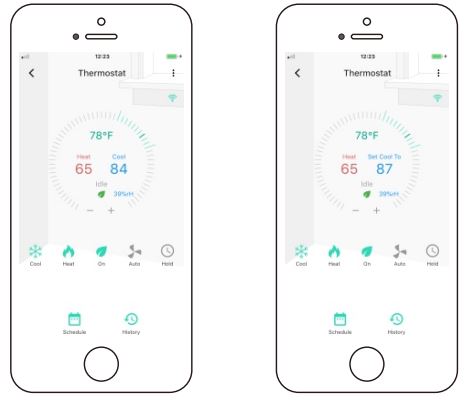
- You can slide the line on the circle to set the cooling or heating temperature. Thermostat will run according to the temperature you set manually.
- The temperature adjust here will run always unless you adjust the temperature once again.
Schedule settings
You can set 4 schedules per day for a week.
- Tap “Auto Schedule” to activate/deactivate the schedule.
- Tap “
 ” icon to open the schedule screen.
 - Tap each day to edit the schedule (time, cool temperature and heat temperature).
- Tap the “YoLink Thermostat” in App to go to its controls.
- Tap “Edit” to edit the schedule.
- Tap “Copy” to copy the current day’s schedule to any other days.
Note
All the schedules will be able to work without internet.
Details
You can customize the name, set the room or ECO mode, add to/remove from your favorite, and check device history.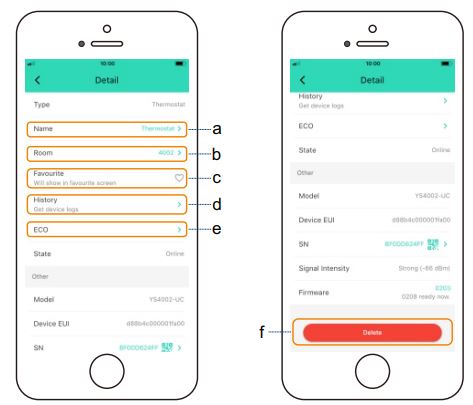
- a. Name – Name YoLink Thermostat
- b. Room – Choose a room for YoLink Thermostat.
- c. Favourite – Click “
 ” icon to add/remove from Favourite.
 - d. History – Check the history log for the YoLink Thermostat.
- e. ECO – Enable/disable ECO mode and set adjust the temperature.
- f. Delete – Current device will be removed from your YoLink account.
- Tap the “YoLink Thermostat” in App to go to its controls.
- Tap the “ ” icon at the top-right corner to go to details.
- Tap the icon for each of the settings you want to personalize.
Set the YoLink Thermostat
HOME
Display the date & time, network signal, current temperature and humidity, current running point and running status, and set the running points.
There will be a green leaf on the screen when ECO mode is on.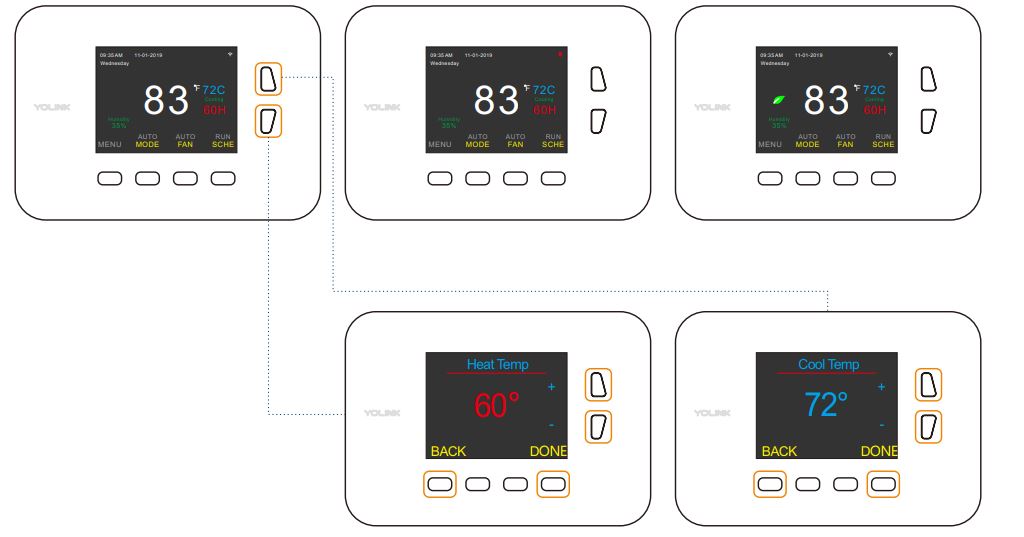
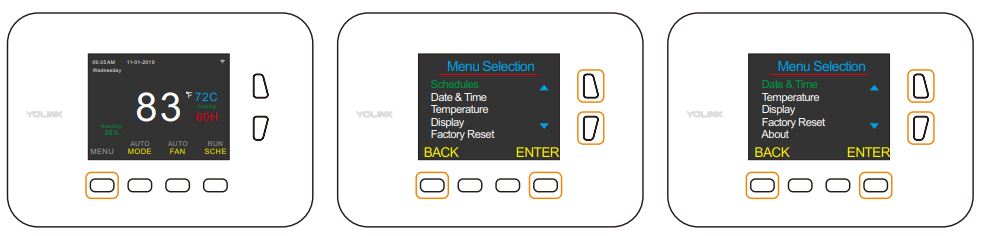
MENU
You can set schedule, date & time, temperature, display, factory reset, and check device information
- a. Schedule – View or edit schedules.
- b. Date & Time – Set time for your thermostat.
- c. Temperature – Activate/deactivate ECO, set the temperature mode or temperature calibration.
- d. Display – Set background color, brightness or backlight timeout.
- e. Factory Reset – Factory reset you , or reset the sprinkler controller network connection.
- f. About – View information about YoSmart Inc. and your sprinkler controller.
- Tap MENU to open MENU screen.
- Tap
 to switch menu.
 - Tap ENTER to enter the menu screen. Tap BACK to back to the HOME screen.
Schedule
Set the running times and temperature. You can copy the schedule to other days.
- Select Schedule, tap ENTER to enter the Schedule screen.
- Tap
 to switch settings.
 - Tap
 to adjust values.
 - Tap DONE to save the setting. Tap NEXT to switch days
Copy Schedule
- Tap to select “Copy to..”, tap COPY to enter the Copy Schedule screen.
- Tap “ Y” and “ N ” to adjust values.
- Tap DONE to save the setting. Tap BACK to cancel the setting.

Date & Time
You can set time for your . When auto update is on, thermostat date & time will update automatically. When auto-update is off, date & time will run according to your settings.
- Tap “ ” and “ ” to switch settings.
- Tap “ ” and “ ” to adjust values.
- Tap DONE to save the setting. Tap BACK to cancel the setting.
- Select Date & Time, tap ENTER to enter the Date & Time screen.
Note
Time and Date can be only set when Auto update is set to be NO.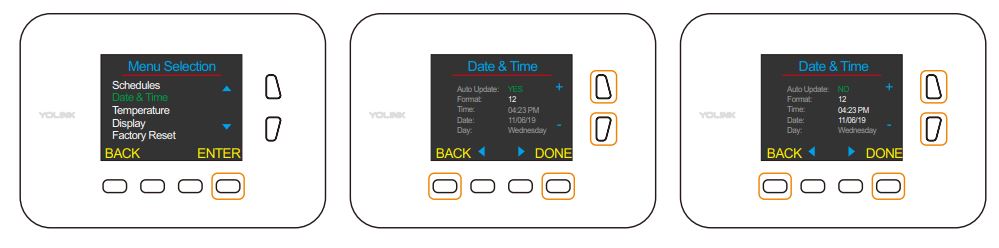
Temperature
You can set the ECO mode and running value, temperature mode and calibration.
- Select Temperature, tap ENTER to enter the Temperature screen.
- Tap to switch settings.
- Tap to adjust values.
- Tap DONE to save the setting. Tap BACK to cancel the setting.
Note
Calibration is used for correct the errors of the measurement and show you the correct value.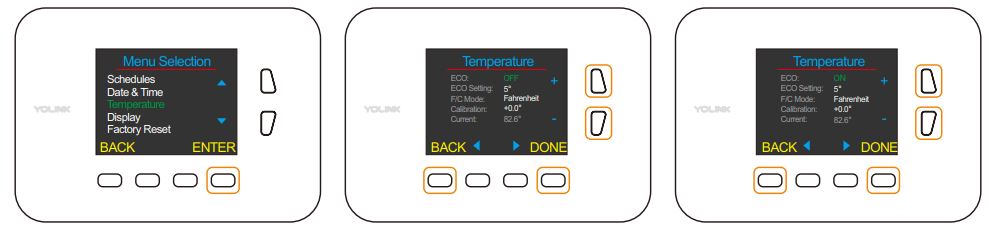
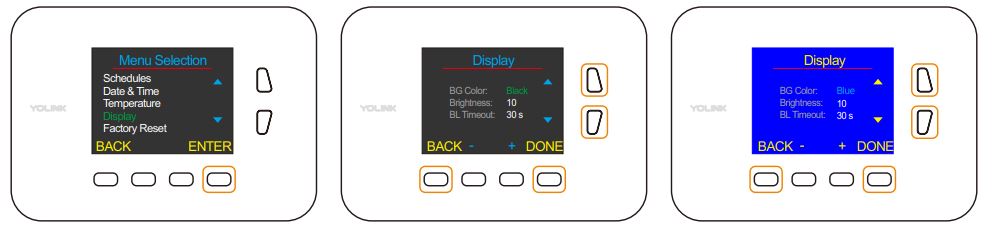
Display
You can set BG color, brightness or BL timeout.
- Select Display, tap ENTER to enter the Display screen.
- Tap “ ” and “ ” to switch settings.
- Tap “ ” and “ ” to adjust values.
- Tap DONE to save the setting. Tap BACK to cancel the setting.
Factory Reset
Factory reset will erase all your settings and bring it back to default. After the factory reset, your device will still in your Yolink account.
Network reset will manually let your device connect to the cloud.
- Select Factory Reset, tap ENTER to enter the Factory Reset screen.
- Tap to switch settings.
- Tap ENTER to enter Factory Reset.
- Tap DONE to confirm the setting. Tap BACK to cancel the setting.
About
Display information about YoSmart Inc. and your thermostat.
- Select About, and tap ENTER to enter the About screen.
- Tap “ ” and “ ” to switch settings.
- Tap BACK to back to MENU.
MODE
You can set running mode according to your need.
Tap MODE to switch to running mode.
- Cool – Cooling only.
- Auto – Auto-run cooling or heating.
- Off – Will not run cooling or heating.
- Heat – Heating only.

FAN
Switch auto/always run the fan.
- Auto – Auto-run the fan when the thermostat is running cooling.
- On – Always run the fan.
Tap FAN to switch to running mode.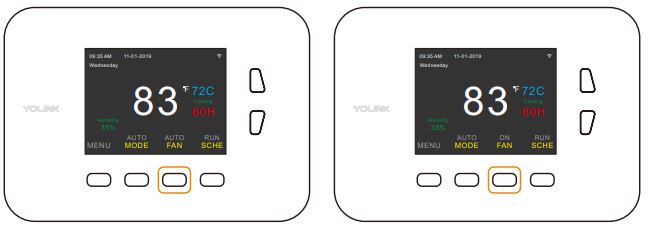
SCHE
Switch activate/disactivate schedule.
- On – The thermostat will run automatically according to the schedule.
- Hold – The thermostat will run according to the temperature you set manually.
Tap SCHE to auto-run/not run the schedule.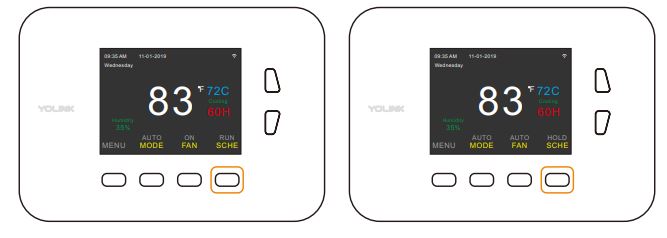
Maintaining the YoLink Thermostat
Firmware Update
To ensure our customers have the best user experience, we highly recommend you could update our newest version of the firmware.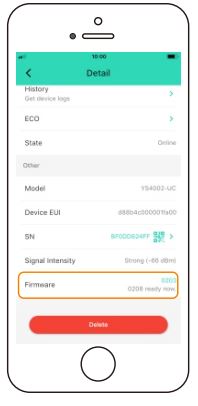
- Tap the “YoLink Thermostat” in App to go to its controls.
- Tap the “
 ” icon at the top-right corner to go to details.
 - Tap “Firmware”.
- You can check the firmware version for whether the YoLink Thermostat is updated.
Note
Only the YoLink Thermostat that is currently reachable and has an available update will be shown on the Details screen.
Specifications
- Voltage: 24V AC
- Temperature Range (Scheduled): +16°C ~ +32°C (+32°F ~ +90°F)
- Temperature Range (Detected): -10°C ~ +50°C, ±0.3°C (14°F ~ 122°F, ±0.54°F)
- Humidity Range (Detected): 0% ~ 100%, ±3%
- Environment: Working Temperature: -10°C~50°C (14°F~122°F)
- Working Humidity: 0%~100% non-condensing
Troubleshooting
| Problem | Possible Reason | Solution |
|
Remote/ Scene/ Automation control failed. |
The mobile signal is weak. | Please check after the phone signal is restored. |
| Hub is offline. | Please follow the “User Guide of YS1603-UC YoLink Hub” for troubleshooting. | |
| YoLink Thermostat does not power on. | Please power on the YoLink Thermostat. | |
| Out of communication range with hub. | Check the signal of YoLink Thermostat on YoLink App. | |
| Other problems. | Please contact customer service. | |
|
Device time is inconsistent with mobile phone time. |
Failed to auto update. | Click sync with the mobile via YoLink App. |
| There was a power blackout and the Thermostat is offline after powering on again. | Please refer to the Factory Reset to reset your network. The time will be updated automatically after the network reset. | |
| The time is set to not update automatically, and there was a power blackout. |
Please reset the time manually. |
|
| Other problems. | Please contact customer service. | |
WARNING
- This product is not waterproof, please keep it dry.
- Keep away from dusty, wet or dirty.
- Keep away from high temperature or fire.
- This product is powered by AC24V only. Please do not connect the product to the high or wrong voltage.
- To avoid dust entering the product and affect the usage of the product, do not use strong chemicals or cleaning agents to clean this product, please use a clean, dry cloth to wipe this product.
- Do not disassemble or modify this product by yourself. In case of equipment failure= please contact our customer service.
- Keep the product from strong shocking, so as not to damage the product.
- Keep away from screws or metals to avoid possible circuit result in damage of the product.
If you are unable to get your YoLink Thermostat working Please contact Our Customer Service during business hours US Live Tech Support: 1-949-825-5958 M-F 9am – 5pm PST
Email: [email protected]
YoSmart Inc. 17165 Von Karman Avenue, Suite 105, Irvine, CA 92614
WARRANTY
1 Year Limited Electrical Warranty
YoSmart warrants to the original residential user of this product that it will be free from defects in materials and workmanship, under normal use, for 1 year from the date of purchase. User must provide a copy of original purchase receipt. This warranty Does Not Cover abuse or misused products or products used in commercial applications. This warranty does not apply to thermostats that have been improperly installed, modified, put to a use other than designed, or subjected to acts of God (such as floods, lightning, earthquakes, etc.). This warranty is limited to repairing or replacing of this thermostat only at YoSmart’s sole discretion.
YoSmart will NOT be liable for the cost of installing, removing, nor reinstalling this product, nor direct, indirect, or consequential damages to persons or property resulting from the use of this product. This warranty only covers the cost of replacement parts or replacement units, it does not cover shipping & handling fees.
To implement this warranty please give us a call during business hours at 1-949-825-5958, or visit :www.yosmart.com.
REV1.0 Copyright 2020. YoSmart, Inc. All rights reserved.
FCC Statement
This equipment has been tested and found to comply with the limits for a Class B digital device, pursuant to part 15 of the FCC Rules. These limits are designed to provide reasonable protection against harmful interference in a residential installation. This equipment generates, uses and can radiate radio frequency energy and, if not installed and used in accordance with the instructions, may cause harmful interference to radio communications. However, there is no guarantee that interference will not occur in a particular installation. If this equipment does cause harmful interference to radio or television reception, which can be determined by turning the equipment off and on, the user is encouraged to try to correct the interference by one or more of the following measures:
- Reorient or relocate the receiving antenna.
- Increase the separation between the equipment and receiver.
- Connect the equipment into an outlet on a circuit different from that to which the receiver is connected.
- Consult the dealer or an experienced radio / TV technician for help.
This device complies with part 15 of the FCC Rules. Operation is subject to the following two conditions:
- This device may not cause harmful interference.
- This device must accept any interference received, including interference that may cause undesired operation. Any changes or modifications not expressly approved by the party responsible for compliance could void the user’s authority to operate the equipment.
Note: The manufacturer is not responsible for any radio or TV interference caused by unauthorized modifications to this equipment. Such modifications could void the user’s authority to operate the equipment.
FCC RF Radiation Exposure Statement
This equipment complies with FCC RF radiation exposure limits set forth for an uncontrolled environment. This device and its antenna must not be co-located or operating in conjunction with any other antenna or transmitter.
“To comply with FCC RF exposure compliance requirements, this grant is applicable to only Mobile Configurations. The antennas used for this transmitter must be installed to provide a separation distance of at least 20 cm from all persons and must not be co-located or operating in conjunction with any other antenna or transmitter.”
REFERENCE:
DOWNLOAD MANUAL:
YoLink YS4002-UC Digital Smart Thermostat User Guide
![]()
Leave a Reply