
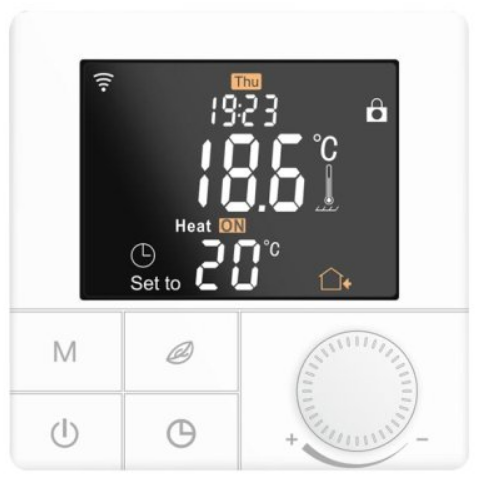
MI-HEAT WT8 Wifi Thermostat
Due to the continuous further development of the device software (firmware), the range of functions described here or the method of operation may differ. The current version of the manual can be downloaded from the shop under the Article Downloads Tab.
 Features
- Programmable/controllable via app
- Compatible with Amazon Alexa, Google Assistant and IFTTT
- Simple installation
- Weekly program 6 switching times (App: Monday to Friday and Saturday, Sunday)
- External sensor or room sensor
Technical data
- Operating voltage: 230V/AC
- Switching capacity: 3680W/16A (resistive load)
- Temperature sensor: internal or external sensor (NTC 10kOhm)
- Temperature limitation external sensor: 20 to 90°C / off (recommended max. 27°C)
- Operating temperature: +5 to +50°C
- Colour LCD display, illuminated
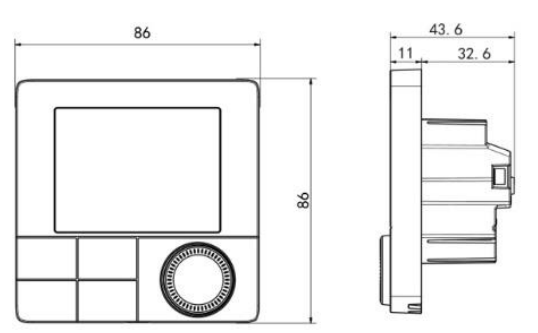
- Dimensions: 86mm x 86mm x 11/43,6mm
- Colour: white
- Protection class: IP20 (sensor IP44) / 2
- Certification: CE
Important notes before commissioning:
- Please read the complete instructions before you start installing the thermostat
- The thermostat must be installed by a qualified person
- Use the thermostat only as described in these instructions
- Always disconnect the power supply during installation work
Security:
When handling products that are supplied with electrical voltage, the applicable VDE regulations must be observed, in particular VDE 0100, VDE 0550/0551, VDE 0700, VDE 0711 and VDE 0860.
- Before opening the unit, make sure that it is de-energized.
- Tools may only be used on the unit if it has been disconnected from the power supply and any residual electrical charges stored in components have been discharged beforehand.
- Live cables or lines to which the unit is connected must always be inspected for insulation faults or breaks.
- If a fault is detected in the supply line, the unit must be taken out of operation immediately until the defective line has been replaced.
If it is not clear from these instructions for the non-commercial end user which electrical characteristic values apply to the unit, how external wiring is to be carried out, or which external components or additional devices may be connected and which connection values these external components may have, a specialist must always be consulted for information. Before commissioning the unit, it must be checked whether this unit is suitable for the intended application!
In case of doubt, it is essential to consult specialists, experts or the manufacturers of the assemblies used! Please note that operating and connection errors are beyond our control. Understandably, we cannot accept any liability for damage resulting from this.
Unit dimensions
Description Device keys/LEDs 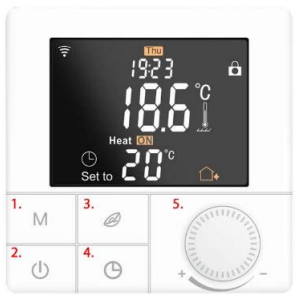
- Mode button, short button press Change operating mode, long button press (5 sec.) Programming weekly programme
- On/Off key, short keystroke switch on/off, long keystroke key lock on/off
- Eco button, short press activates or deactivates Eco mode, long press when switched off activates pairing mode to connect to the wifi
- Clock key, long keystroke calls up the menu for the time and day setting
- Dial for temperatures and values
Description Display symbols

Note: The Mi-Heat WT8 Wifi model does not have the fan/cooling functions, and the symbols on the unit buttons may be printed differently.
-
 Auto mode
Weekly programme, up to 6 heating events can be set per day. Heating events, time periods and temperature can be set separately according to personal routines.  Manual mode
Der Thermostat arbeitet auf der Grundlage der manuell eingestellten Temperatur und schaltet sich vom Automatikmodus ab. Temporary mode
The thermostat operates temporarily based on the manually set temperature and switches back to automatic mode at the next event.
Open the settings menu:
- With the unit switched off, press the Mode button (button 1) for 3 seconds to enter the advanced setting mode.
- Press the M key several times to change the menu item.
- The values can be changed by turning the dial.
- Press the power button to save and exit the advanced settings mode.
| Code | Function | Default setting |
| 01 | Temperature calibration (-9.9 – 9.9°C / 9-9°F) | Standard: -3°C |
| 02 | Hysterese (0,5-10°C / 1-10°F) | Standard: +-1°C |
| 03 | Upper temperature limit (5-95°C / 41-99°F) | Standard: 50°C |
| 04 | Lower temperature limit (5-47°C / 41-99°F) | Standard: 5°C |
| 05 | Frost protection function (ON/OFF) | Standard: OFF |
| 06 | Temperature Unit (°C / °F) | Standard: °C |
| 07 | Sensor mode (IN: internal sensor only, OUT:
external sensor only, ALL: both sensors) |
Standard: IN |
| 08 | Soil limiting temperature (20-90°C / 68-99°F) | Standard 35°C, for electric underfloor
heating we recommend max. 27°C |
| 09 | Setting for weekly programming 12345: 5/2 = Mon. – Fri. & Sat.+Sun.
123456: 6/1 = Mon. – Sat. & Sun. 1234567: 7/0 = Mon. – Sun. |
Standard: 12345 |
| 10 | Not relevant for heating operation | Standard: 00 |
| 11 | Not relevant for heating operation | Standard: 0 |
| 12 | Key lock (child lock):
00: Lock inactive when screen off / lock all when lock on. 01: Lock active when screen off / lock everything when lock on. 02: Lock active when screen off / lock all functions except fan, up and down when lock on 03: Lock active when screen off / lock all except On/Off when fuse on |
Standard: 00 |
| 13 | Behaviour on power recovery: 00: remains switched off
01: is switched on 02: restores the previous state |
Standard: 00 |
| 19 | Factory settings | Press the Eco button for 3 sec. |
Description Connection terminals
- 1 & 2 Input terminal for the 230V/AC supply voltage of the thermostat
- 3 & 4 Output terminal for connecting the consumer unit
- 5 is not used
- 6 & 7 Input terminal for connecting the external temperature sensor

Setting weekly programme (Auto mode)
Press the M button for 3 seconds to edit the Auto mode setting.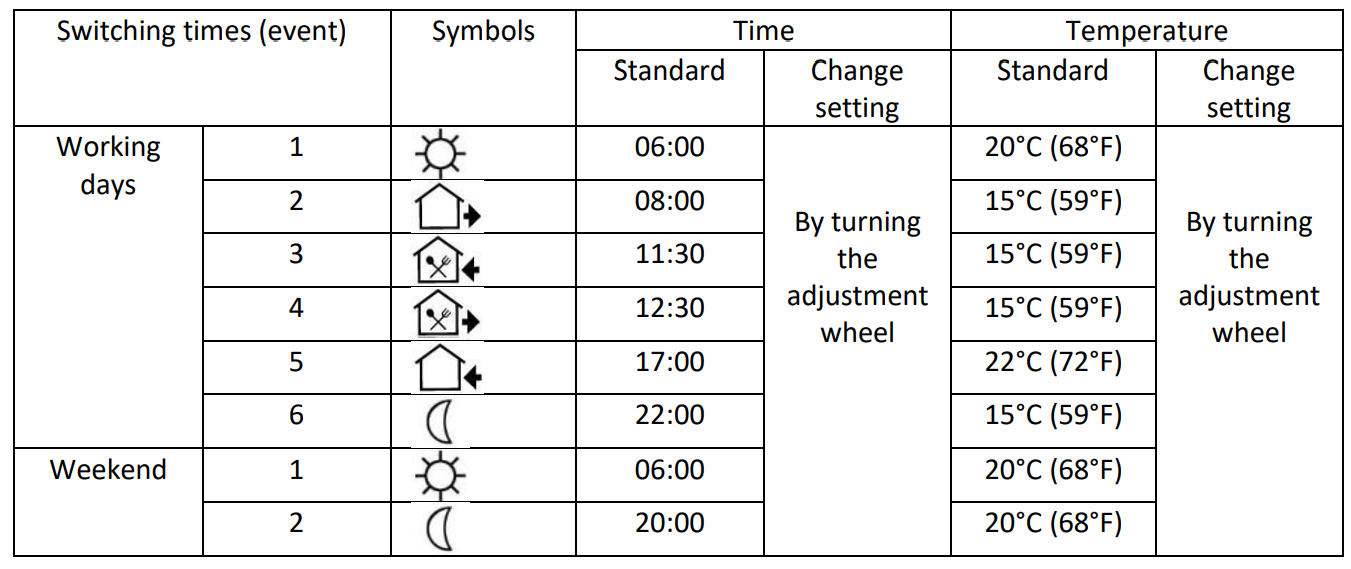
Sensor error
Please select the operating mode of the sensor correctly. If the error E0/E1 is displayed, the thermostat remains switched off until the error is corrected.
- E0: Built-in sensor is short-circuited or disconnected.
- E1: Floor sensor is short-circuited or disconnected
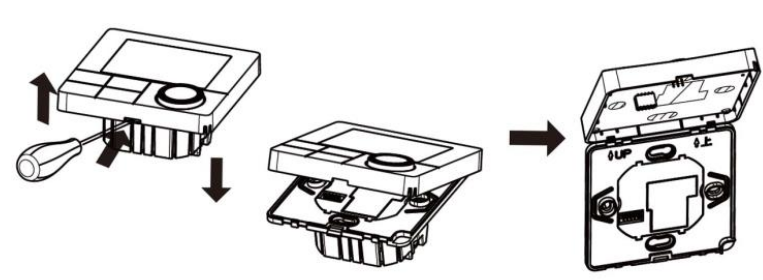
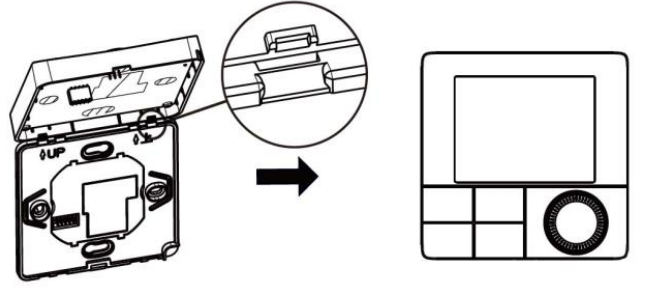
Assembly
The front unit of the thermostat has a snap-on mounting.
- Loosen the front cover by inserting a screwdriver into the recess at the bottom.
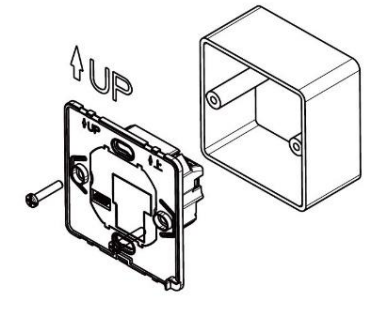
- Lay the connection wires for the unit supply, the consumer and, if applicable, the external sensor and screw them tight. Recommended stripping length is 7-9mm.
- Mount the mounting plate on the wall box, insert the screws and then fix the thermostat. Make sure that the thermostat is fixed without deformation.
- Snap the front cover back into place using the snap connection.
App integration and programming:
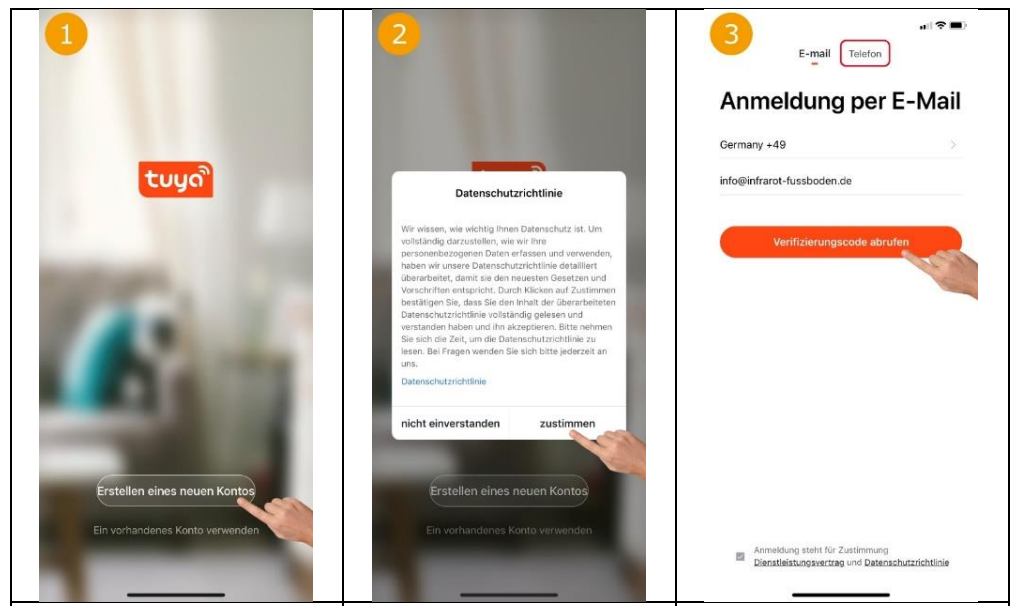
In order to be able to set up or programme the thermostat via smartphone app, the free TuyaSmart app must first be downloaded from the respective app store and installed.
Minimum smartphone requirements: iOS9 or newer, Android 4.1 or newer

The following steps show how to set up the TuyaSmart app and how to integrate and program the thermostat.
- The following steps show how to set up the TuyaSmart app and how to integrate and program the thermostat.
- Agree to privacy policy to continue.
- Select country, enter email address and then “Retrieve verification code”. Alternatively, the code can also be requested by SMS by tapping on “Phone” above.

- Enter the verification code received by email or SMS in the app.
- Set the password for the Tuya user account and tap “Finish”.
- Now the thermostat can be integrated by tapping on “Add device”.
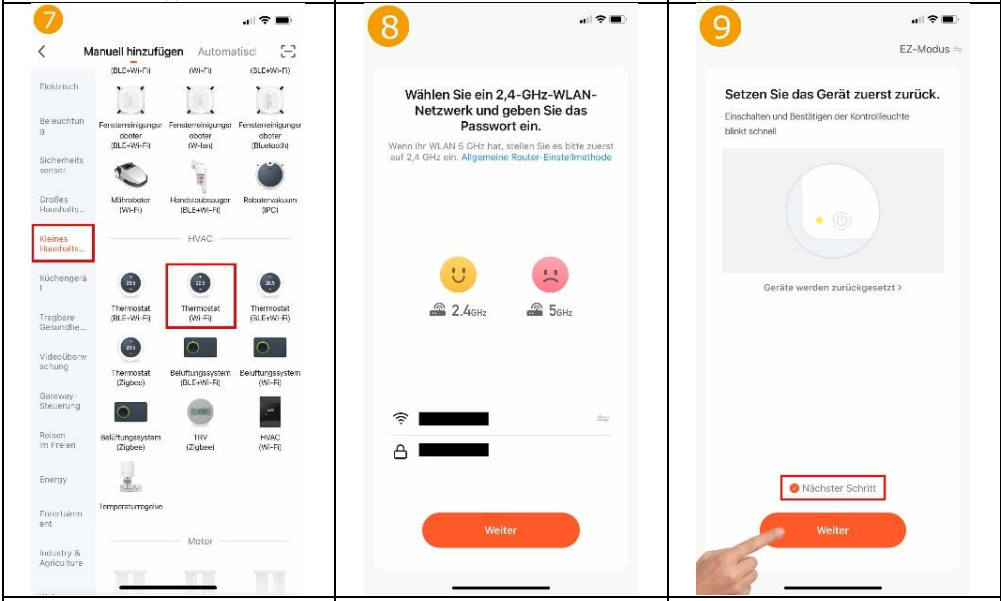
- To integrate a thermostat, tap on “Small household appliance” on the left and then select “Thermostat Wi-Fi” on the right.
Do not select Bluethooth, Zigbee, BLE+Wi-Fi! - Select the WLAN network (SSID) of the existing router and enter the corresponding WLAN password.
- Set the thermostat to teach-in mode: Switch off the thermostat and press the Eco button (button 3) for approx. 5 seconds until the Wifi symbol appears in the display.
Now tap on ‘Next step’ in the app and then on ‘Next’.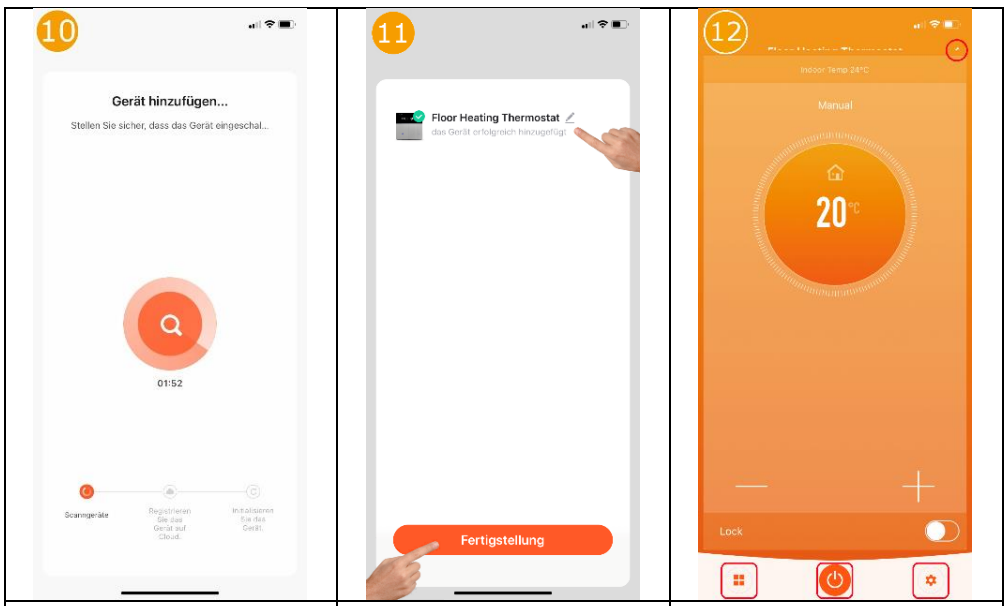
- The app now searches for available units and units that are in teach-in mode.
- If a device has been found, any name can now be assigned. After tapping on “Completion”, the integration is successfully completed.
- The setpoint temperature is displayed in the centre and the current room temperature (Indoor Temp) is displayed above it. The setpoint temperature can be adjusted using the plus/minus key. The
‘Lock’ button can be used to switch the key lock on/off. For the functions of the other buttons, see 13, 14, 15, 18.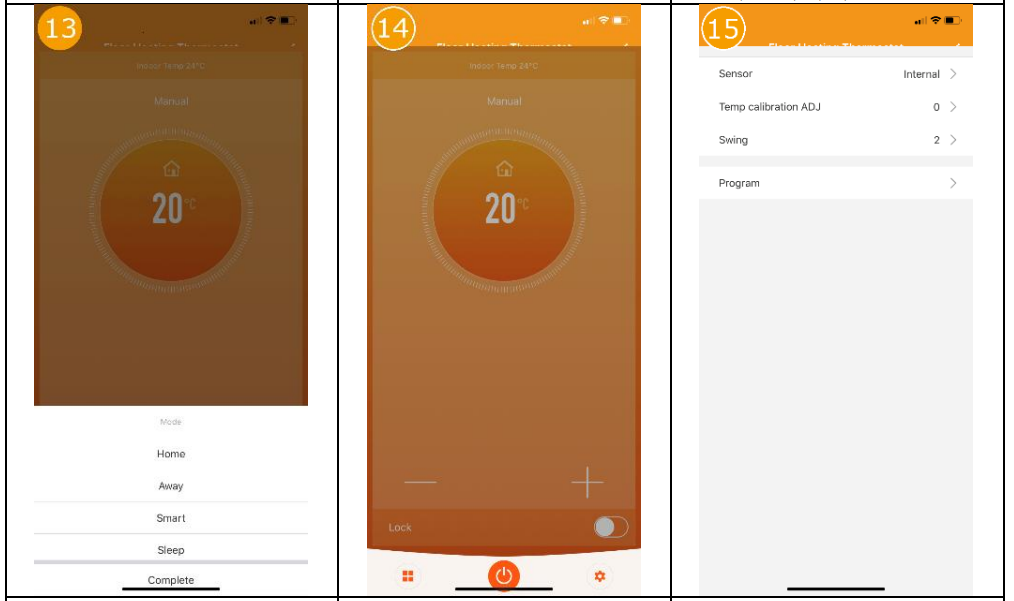
- By tapping the “Mode” icon at the bottom left of the main view of the thermostat, the operating mode of the thermostat can be changed (Home/Away/Smart/Sleep).
- The thermostat can be switched off or on by tapping the “switch” symbol at the bottom of the main view of the thermostat.
- By tapping on the “cogwheel” symbol at the bottom right of the main view, the following settings can be adjusted. Set the sensor to be used (Fig. 17), temperature calibration, hysteresis (swing) and the weekly programme (Fig. 16).

- An individual heating profile can be stored here.
- Here you can select whether only the internal or only the external sensor is to be used to determine the temperature. It is also possible to use both sensors in combination.
- By tapping the “pen” symbol in the top right-hand corner of the main view of the thermostat, you can access the further settings and integration options for the voice control systems Amazon Alexa and Google Assistant.
Disposal notes
Do not dispose of this device in household waste! Electronic devices must be disposed of at the local collection points for electronic waste in accordance with the Waste Electrical and Electronic Equipment Directive.
Note on conformity
The CE mark is a free trade mark that is exclusively addressed to the authorities and does not contain any assurance of properties.
Documentation © 2022 Mi-Heat Heizsysteme GmbH
All rights reserved. No part of this manual may be reproduced in any form or by any means without the written permission of the publisher. This manual may contain typographical defects or misprints. We assume no liability for technical or printing errors and their consequences. V1.2 (11/2022 – unit software: 3.0.12 / MCU 3.0.12)
Declaration of conformity
Mi-Heat Heizsysteme GmbH hereby declares that the product WT8 is in compliance with the RoHS Directive 2011/65/EU, the EMC Directive 2014/30/EU, the Low Voltage Directive 2014/35/EU and the Radio Equipment Directive 2014/53/EU.
The detailed declaration of conformity can be found under https://infrarot-fussboden.de/
Mi-Heat Heizsysteme GmbH
Ol Streek 39a
26607 Aurich
Germany
Internet: mi-heat.com
E-Mail: [email protected]
Reference
Download Manual:
MI-HEAT WT8 Wifi Thermostat INSTALLATION INSTRUCTION
Leave a Reply