
tado° Wireless Temperature Sensor thermostat

For the Starter Kit – Wireless Smart Thermostat V3+ English International

This manual is meant exclusively for professional installers. It includes generic instructions to install the Wireless Receiver and the Wireless Temperature Sensor. Manual version 3.2
DIY Installation
If you are not a professional installer, please download the tado˚ app. There you will find specific installation instructions.

Install the Internet-Bridge
- Connect the Internet Bridge to the router.
- If no free USB port is available on the router, use the included 5V power adapter
- Press and hold the pairing button until the pairing LED starts blinking.
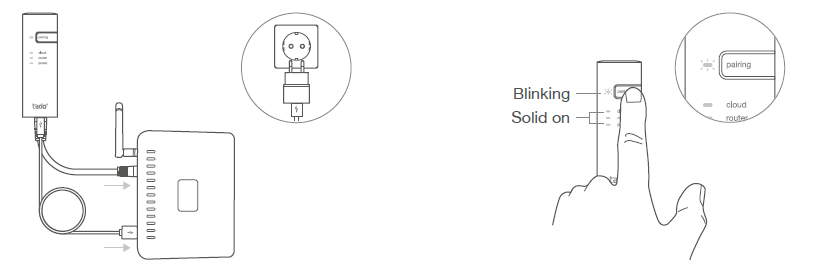
Pair the Wireless Temp. Sensor

If pairing fails (E0), make sure the distance between the devices is approximately 3 meters. Pair again by pressing the button for 3 sec.
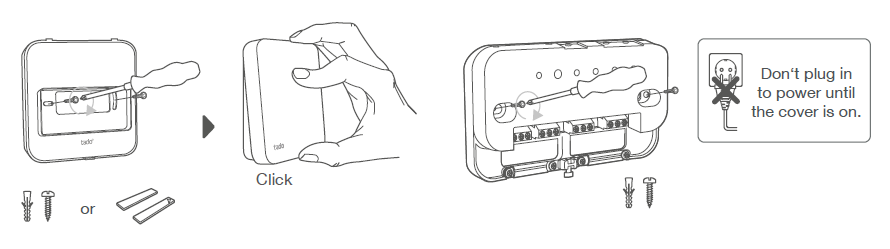
Mount tado˚ devices
- Mount the Wireless Temperature Sensor to the wall using the included screws or the adhesive pads.
- Mount the Wireless Receiver to the wall using the included screws.
Extra information: Wireless Receiver Symbols
 Unfold to check:
Step 4: Wire the Wireless Receiver Step 5: Pair the Wireless Receiver Step 6: Configuration
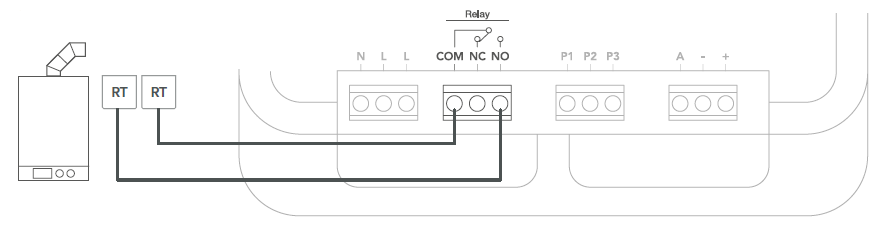
wire the Wireless Receiver
Caution!
Turn OFF the power before wiring! Always use the included strain reliefs and position them on the outer insulation layer of the cable.
Check the boiler manual before wiring
Identify the control interface and check if it is supported by trade ̊.
The factory default configuration is Relay. If the Wireless Receiver is wired via Relay, step 6 (configuration) can be skipped.
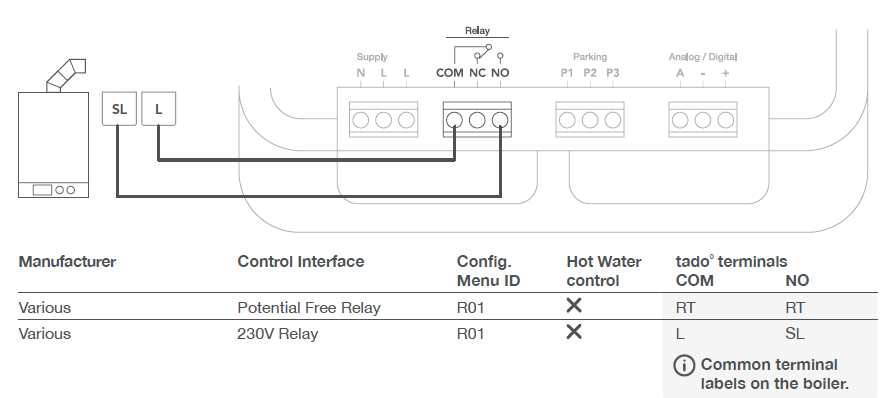
Potential Free Relay
230V Relay
Digital

VR33 OpenTherm translation module (in the Netherlands) should be removed. Only compatible with one heating circuit. Any existing fit-in controller should be removed. ***Special configuration is needed on the boiler for the KM-Bus interface, see table on back page
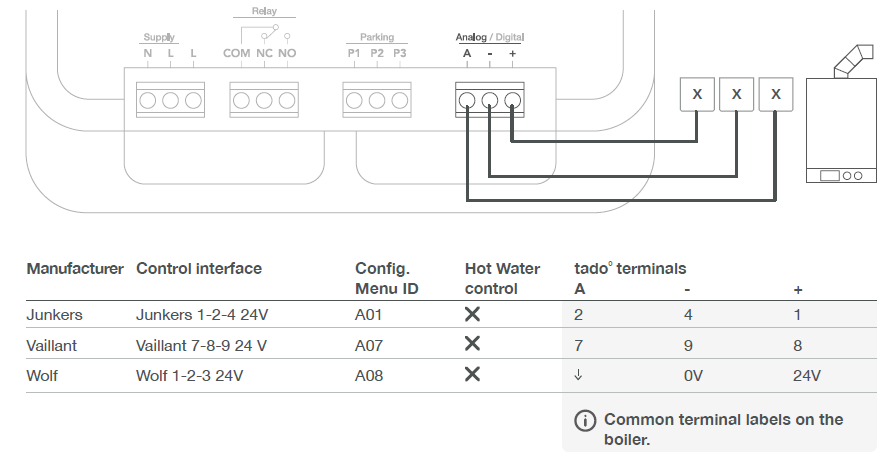
Analog
Pair the Wireless Receiver

- Put the cover on the device. Tight the housing screw to secure it.
- Plug in the power supply cable and turn the power back ON.
- Wait 30 sec, then press the button for 3 sec to start pairing.
- Solid on indicates successful pairing
Configuration
Use the Wireless Temperature Sensor to configure the Wireless Receiver interface according to the tables above (Hot Water control & Config. Menu ID).

Boiler Configuration ONLY for Viessmann KM-Bus

Test the system

Need help?

Get expert advice on our tado° installer hotline: +44 20 3893 2159
REFERENCE:
DOWNLOAD MANUALS:
tado° Wireless Temperature Sensor thermostat Installational Manual
![]()
tado° Wireless Temperature Sensor thermostat Installational Manual
Leave a Reply