
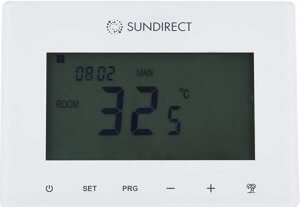
Sundirect Smart1.0Pro WiFi-Enabled Wireless Thermostat
General Introduction
The Smart1.0Pro is specifically designed to work together with Sundirect “Plus” range infrared panel heaters. Smart1.0Pro is a wireless thermostat remote control. The receiver that pairs to Smart1.0Pro has already been pre-assembled on the backside of the panel. One Smart1.0Pro can pair to more than one “Plus” heater, i.e. multiple heaters within one room can be controlled by the Smart1.0Pro thermostat. The Smart1.0Pro will operate the “Plus” range infrared heaters by turning them ON if the room temperature is lower than the desired room temperature and will turn them OFF if the room temperature is reached. Please read these instructions carefully and keep them safe for future use. Failure to comply with these instructions will void your warranty.
Key features
Open window detection
When the room temperature is above 14°C and our system detects a dramatic temperature drop in a short time period, it will recognize that a door/window was opened. To save energy Smart1.0Pro will power off and re-start heating after one hour. If you closed the window/door or you would like to start heating again you can manually turn on the heater again by pressing the power button. You can activate/deactivate this function by pressing the “SET” and “+” buttons together for 3 seconds.
Adaptive start technology
When in Smart mode, if the temperature is significantly lower 15 minutes before the next PRG period than the set temperature in that period, the system will self-learn to adjust and turn on the heater earlier if necessary.
This gives you a more comfortable temperature right from the start of the next PRG period. You can activate/deactivate this function by pressing the “SET” and “-” buttons together for 3 seconds.
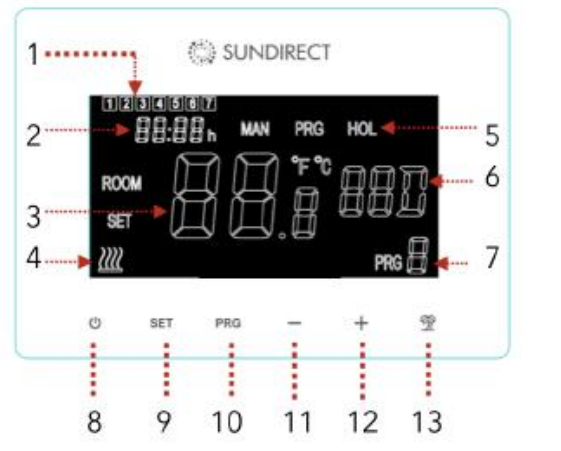
- Weekday
- Time
- Temperature
- Heat-on status
- Operation Modes
- Holiday dates
- PRG period
- Power button
- SET button
- PRG button
- – button
- + button
- Holiday button
Mounting instructions

Smart1.0Pro is designed to be installed in the standard electrical box. Follow the drawing to finish the mounting.
Pair to the receiver
All “Plus” range heaters have a built-in thermostat receiver-Receiver01 on the backside of the panel. On the right, see the drawing of the signal lights and button of Receiver01. The following is a detailed description of the buttons and signal lights:

- Pair status signal light (green light)
- Heating status signal light (red light)
- The “P” button
- Power switch
- Step 1: Plug your heater into an electrical outlet, switch the Power switch of Receiver01 on, double press the “P” button, and the “Pair signal light” will start to flash and is ready for pairing.
- Step 2: Power off the Smart1.0Pro, and long press the “SET” button. The “PAIR” signal will show on the screen of the remote control. Wait until the “Pair signal light” stops flashing and glows green to finish the pairing.
Note: Once Receiver01 and Smart1.0ProPro are paired, the pair signal light will always be on and the Receiver01 will be only commanded by the Smart1.0 Pro. One Receiver01 can only pair to one Smart1.0Pro, however, one Smart1.0Pro can be paired to several Receiver01 if they are in the same room.
Time settings and temperature calibration
Power on Smart1.0Pro. Press the “SET” button for 5 seconds to enter the settings. The screen on the thermostat will show as below and the minutes of the timer setting will start to flash.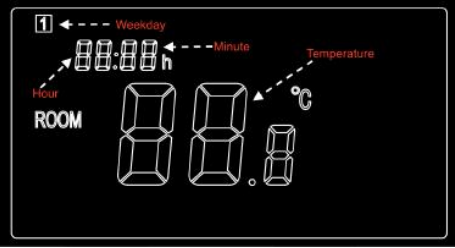
Modify the settings by pressing the “-” and “+” buttons. Continue by pressing “SET” to save the settings and to shift the settings from one menu to another. If you would like to leave the settings, press the “POWER” button to quit.
| Menu | Description |
| 1 | Timer setting- Minutes |
| 2 | Timer setting- Hours |
| 3 | Weekday settings |
| 4 | Temperature calibration (Range: -5℃ to +5℃) |
Brief introduction of operation modes
Smart1.0Pro has 3 different operation modes:
- Manual mode (MAN): Simple manual temperature control.
- Smart mode (PRG): Programmable temperature control- 7 days per week*4 time zones per day.
- Holiday mode (HOL): Holiday temperature control with a countdown timer of the holiday mode period.
Manual mode
To enter the manual mode, power on the thermostat, and press the “PRG” button until the “MAN” sign shows on the thermostat. Now the thermostat will operate in Manual mode. Adjust the desired temperature by pressing ”-” and “+“.
Entering Smart Mode
To enter Smart mode power on the thermostat, press the “PRG” button until the “PRG” sign shows on the thermostat. Now the thermostat will operate in Smart mode. Adjust the desired temperature by pressing ”-” and “+“, i.e you are adjusting the temperature setting of this current time zone for once. If you would like to permanently modify the setting, please follow the next paragraph (5.5.2 Smart mode program setting).
Smart mode program setting
- Long press “PRG” to start the program setting.
- Press the “-” or “+” button to set the time of the 1st period of the Monday Program (or weekday program under simple program setting-01).
- Press the “PRG” button again to confirm the time setting and the screen will shift to the temperature setting of the 1st period of the Program.
- Continue by pressing the “PRG” button to shift to the time setting of the 2nd period. Repeat the above procedure to finish the settings of the remaining 3 periods of the Program. And then move on to the setting of the next day till Sunday to finish.
To leave the settings in between, please press the “Power” button.
Holiday mode
The Holiday mode on Smart1.0Pro is a useful feature that you can use in order to avoid frozen or bursting water pipes during a prolonged leave. It has a countdown timer for your holiday date and the remaining days of your holiday will be shown on the thermostat. After the holiday period, the thermostat will switch back to Manual or Smart mode as per your previous settings.
Enter Holiday mode
Long press the “Holiday” button on the thermostat. The day setting of the holiday period will start to flash, and the screen on the thermostat will be as shown below.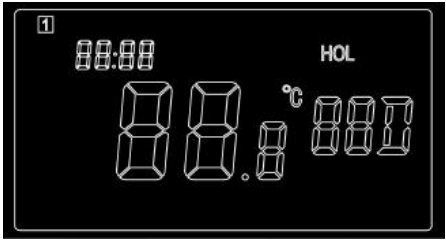
- Adjust how many days you will leave on holiday by pressing “-” or “+”.
- Press again the “Holiday button” to set the desired temperature during your leave.
- Press again the “Holiday button” to confirm the setting and enter holiday mode.
Quit the Holiday mode
The thermostat will automatically shift back to the previous settings after the set holiday period. However, if you need to shift back to your regular mode before the set holiday time is over, press the “PRG” button to quit Holiday mode.
Child lock
Press the “SET” and “Holiday” buttons at the same time for 3 seconds to activate child lock and the signal will show on the screen. Please press again “SET” and “Holiday” buttons for 3 seconds to deactivate child lock.
Wi-Fi and APP operation
How to download the Sundirect Smart APP
Scan the QR code on the right to start the download of the APP, or you can download the APP “Sundirect Smart” on the App Store or Google Play store. Open the APP and register with your phone number or Email address.
Connect to WiFi:
- Step1: Connect Smart1.0Pro to the electricity, and make sure the Wi-Fi signal on Smart1.0Pro is rapidly flashing (if not please power off Smart1.0Pro and long press the “PRG” button until the Wifi signal is flashing rapidly). Open the APP on your smartphone and add the device by pressing “+” on the top right of the APP.
- Step 2: Enter the Wi-Fi password of your home network. Please make sure your home Wi-Fi is working and keep the heater and smartphone/ tablet as close as possible to the Wi-Fi router. Please notice that our APP only works with 2.4GHz networks.
- Step 3: Wait until the connection status shows 100% to finish the setting.
The Wifi signal on the control box will stop flashing now. If you failed to connect, please power off Smart1.0Pro. Long press the “PRG” button on the thermostat until the Wi-Fi signal is flashing slowly and repeat the connection process.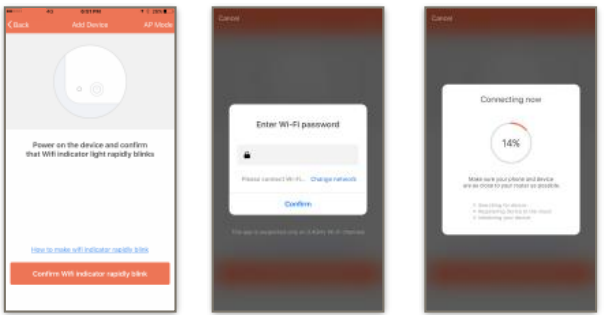
Technical specifications
| Menu | Description |
| 1 | Timer setting- Minutes |
| 2 | Timer setting- Hours |
| 3 | Weekday settings |
| 4 | Temperature calibration (Range: -5℃ to +5℃) |
Warranty
Sundirect offers a 2-year manufacturing warranty on Smart1.0Pro. Within the warranty period from the date of purchase, Sundirect will repair or replace your Smart1.0Pro where the fault is due to defects in workmanship or materials. Please contact your local Sundirect dealer in the event of a warranty claim and return the control box together with proof of purchase. The warranty covers the repair or replacement of the Smart1.0Pro only. The removal of the serial number on the back of Smart1.0Pro will also void this warranty. All labels shall not be removed. Any damages to Smart1.0Pro caused by the user are not covered by this warranty. This includes scratches on the surface. Sundirect is not responsible for any damages, losses, or injuries due to the ingress of water or moisture, accidental damage, mishandling, external impact, repairs, or adjustment by unauthorized persons.
REFERENCE
Download Manual:
Sundirect Smart1.0Pro WiFi-Enabled Wireless Thermostat Operation Instructions
Sundirect Smart1.0Pro WiFi-Enabled Wireless Thermostat Operation Instructions
Leave a Reply