
SIEMENS RDE100.1 RFS Programmable Room Thermostat

Operating Instructions
RDE100.1DHW is a room thermostat that allows you to set the ideal room temperature at the time you want.
In addition, it offers independent control of DHW. There are several switching patterns available that can be set to your specific needs.

- Display
 Indicating that batteries need to be replaced
 Frost protection (heating) is active
 Auto Timer mode View and set Auto Time switch
 Comfort mode
 Economy mode
 Escape
 Display of time
 Permanent setpoint setting
 Day and time setting
 Holiday mode setting View and set DHW
 Auto Time switch DHW Auto Time switch activated
 Morning: 12-hour format
 Afternoon: 12-hour format
 Confirmation
 Room temperature in degrees Fahrenheit
 Room temperature in degrees Celsius
 Button lock activated
 Display of room temperature, setpoint, etc.
 Heating ON
 Weekday 1 = Monday 7 = Sunday
 Timer bar
 The actual room temperature
- Change operating mode
- Set
- Ok
- Decrease value
- Increase value
- Battery holder
- Indication of data transmission and operating state (LED)
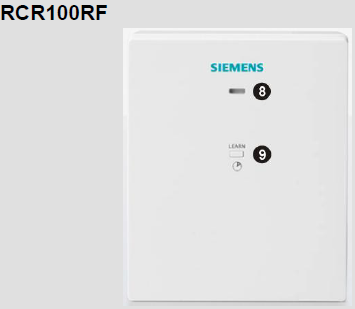
- Initialization of wireless communication with transmitter (LEARN button)
Do you want to set the time of day and the weekday?
You can set the current time of day.
| set ok
+ – mode |
Proceed as follows:
· Press set and select · Press ok and the time flashes for setting · Press + or – to adjust the time · Press ok to confirm · The weekday flashes, press + or – to select the desired day · Press ok to save the value · Press mode to exit or wait for the program to exit automatically |
Are your rooms too warm/too cold?
| +
– ok set mode |
Press + or – to increase or decrease the room temperature setpoint in increments of 0.5 °C / 1 °F. Proceed as follows:
· Press + or – to adjust the setpoint temporarily. This adjustment is reset as soon as the operating mode changes. · Press ok, set or mode to save the value or wait for the program to exit automatically · To lock the setpoints, use parameters P06 and P08.
|
Do you want to change the operating mode?
| mode
! |
The thermostat provides Comfort mode, Economy mode, and Auto mode. Changeover between the operating modes can be made manually by pressing mode.
Comfort mode is the permanent (24 h) selection of Comfort. Select this mode to maintain Comfort temperature permanently without any time switch. It is used during occupancy periods, for example. Economy mode is the permanent (24 h) selection of Economy. Select this mode to maintain the Economy temperature permanently without any time switch. It is used during non-occupancy periods, for example at night. AUTO In Auto timer mode, operating modes (Comfort, Economy) are changed automatically according to the time switch set.
Note: Frost protection is a function always active in the background. As soon the room temperature falls below 5 ºC, the unit automatically activates the heating . |
Do you want to set permanent temperature setpoints?
| set ok
+ – mode
! |
· Press set and select
· Press ok to confirm · Press mode to select an operating mode, Comfort or Economy · Press + or – to adjust the setpoint permanently. · Press ok to confirm · Press mode to exit or wait for the program to exit automatically Note: This permanent setpoint is used during Auto timer mode. |
Energy-saving tips without loss of comfort
- Select Auto timer mode during the heating period, and set the time switch according to your normal habits at home
- Select Economy mode or Holiday mode for long periods of non-occupancy and during summer period.
Do you want to set your Holiday mode?
| set ok
+ – mode
! |
Use the Holiday mode to set the thermostat to a constant temperature while absent.
· Press set and select · Press ok to confirm · Press + or – to adjust the temperature setpoint · Press ok to confirm · Press + or – to adjust the number of days for holidays (Note: 0 = Holiday mode OFF) · Press ok to save the value · When Holiday mode is activated, the remaining days are displayed on the screen Note: If you press mode while Holiday mode is active, the function is turned off and the symbol disappears. If the Comfort and Economy setpoint values are both locked, the lowest locked setpoint value is the Holiday mode setpoint value. You can adjust the setpoint temperature from 5 ºC up to the lowest locked setpoint value. |
Do you want to enter your own time switch?
Option 1: Time switch with individual day selection (P11=0)
set
ok
+
–
mode
You can select Comfort or Economy at 15-minute intervals throughout the day. The 0:00 to 24:00 hour time bar allows you to set the operating mode for the selected day(s).
Example:

- Visible bars: Control to Comfort temperature
- Invisible bars: Control to Economy temperature
When Auto timer mode is enabled, changeover between the operating modes is automatic after the settings are saved.
Proceed as follows:
- Press set and select AUTO.
- Press ok to confirm.
- Time switch for day Mon(1) is displayed.
- Press + or – to select the day, from Mon(1) to Sun(7).
- Press ok to confirm the selection and initiate time programming.
During programming step: - Press mode to select an operating mode, (Comfort or Economy) or
- Press + or – to adjust the time setpoint by 15 minutes for the selected mode.
- Press ok to save the time switch.
- Repeat steps 4-8 for all remaining days (if required);
or - Press mode or wait for the program to exit automatically.
Option 2: Time switch with the same 7 day selection (P11=1)
| set ok
+ – mode
|
You can set all the 7 day time switches at the same time.
Example: Visible bars: Control to Comfort temperature Invisible bars: Control to Economy temperature Proceed as follows: 1) Set the parameter (P11=1). Please refer to the section “Do you want to change parameters“. 2) Press set and select AUTO. 3) Press ok to confirm. 4) Time switch for period Mon (1) – Sun (7) is displayed. 5) Press ok to initiate time programming. During programming step: 6) Press mode to select an operating mode, (Comfort or Economy) or 7) Press + or – to adjust time setpoint by 15 minutes for the selected mode. 8) Press ok to save the time switch. 9) Press mode or wait for the program to exit automatically. |
Option 3: Time switch with 5-2 day selection (P11=2)
| set ok
+ – mode
|
You can set Monday – Friday time switch at once and Saturday – Sunday time switch at once.
Example: Visible bars: Control to Comfort temperature Invisible bars: Control to Economy temperature
Proceed as follows: 1) Set the parameter (P11=2). Please refer to the section “Do you want to change parameters“. 2) Press set and select AUTO. 3) Press ok to confirm. 4) Time switch for period Mon(1) – Fri(5) is displayed. 5) Press + or – to select the period, Mon (1) – Fri( 5) or Sat (6) – Sun (7). 6) Press ok to confirm the selected period and initiate time programming. During programming step: 7) Press mode to select an operating mode, (Comfort or Economy) or 8) Press + or – to adjust the time setpoint by 15 minutes for the selected mode. 9) Press ok to save the time switch. 10) Repeat the steps 5-9 for the other period if necessary; or 11) Press mode or wait for the program to exit automatically. |
Factory default for 7-day Time switch
| Default value | Day/s | Comfort mode | Economy mode |
| Mo (1) – Fr (5) | 6:00 – 8:00 hr
17:00 – 22:00 hr |
22:00 – 6:00 hr
8:00 – 17:00 hr |
|
| Sa (6) – Su (7) | 7:00 – 22:00 hr | 22:00 – 7:00 hr |
Do you want to pair transmitter and receiver?
| +
– Learn |
The RDE100.1RF communicates with the RCR100RF at a frequency of 433 MHz.
To pair transmitter and receiver, proceed as follows: |
|
| Mode | RCR100RF receiver setting: | |
| 1) Press and hold the LEARN button on the | ||
| RCR100RF for at least 3 seconds and | ||
| then release it. | ||
| 2) Red and green LEDs flash alternately to | ||
| indicate receiver is in learning mode. | ||
| RDE100.1/RF transmitter setting: | ||
| 3) On the transmitter, set the parameters | ||
| (refer to section “Do you want to change | ||
| parameters?”). | ||
| 4) Check to ensure that parameter P19 is not | ||
| 0, because this would mean that the | ||
| wireless function is disabled. By default, | ||
| parameter P19 is 1. | ||
| 5) Proceed to parameter P20. Press Mode | ||
| and parameter P20=0 (OFF) flashes. | ||
| Adjust the value by pressing + to change | ||
| to P20=1 (ON), then press Mode to | ||
| confirm. | ||
| 6) During the stages of wireless learning, the | ||
| LCD displays “rF” and “Lrn”. Wait for time | ||
| out, and the transmitter exits the | ||
| parameter setting mode. | ||
| Successful wireless learning: | ||
| 7) The green LED on the RCR100RF flashes | ||
| for 10 minutes to indicate that the receiver | ||
| has successfully completed wireless | ||
| learning. | ||
| Recommendation: | ||
| 8) Additional test to ensure the wireless | ||
| signal is fine: | ||
| On the RDE100.1/RF, change the | ||
| operating mode by pressing Mode or | ||
| change the setpoint by pressing + or –. | ||
| On the RCR100RF, the green LED should | ||
| flash for 3 seconds before changing to | ||
| constantly green. At the same time, | ||
| observe your radiator, boiler or heater | ||
| indication (if it has one) to ensure that it | ||
| changed the operating mode. | ||
| 9) If step 7 or 8 is working fine, this means | ||
| you have successfully paired the units. | ||
| Unsuccessful wireless learning: | ||
| 10) If the RCR100RF fails to receive wireless | ||
| data, the red LED starts to flash **. | ||
| Repeat steps 1 to 8 until pairing is | ||
| successful. | ||
| ! | Note:
Always start receiver learning before starting |
|
| pairing with the transmitter. | ||
| The units must be placed such that transmitter | ||
| and received signals have limited external | ||
| wireless interference. | ||
| **In normal operation, if a drop in wireless | ||
| communication occurs due to unforeseeable | ||
| noise, just leave the receiver and it will recover | ||
| automatically. | ||
| The pairs are saved even if there is a power | ||
| shut down. Communication restarts | ||
| automatically after several minutes without any | ||
| user action. |
Does symbol appear on the display?
Symbol![]() is displayed when the batteries are low. Replace them with 2 new alkaline batteries type AAA. Proceed as follows:
is displayed when the batteries are low. Replace them with 2 new alkaline batteries type AAA. Proceed as follows:
- Get 2 new alkaline batteries type AAA
- Remove the battery holder, then the batteries, insert the new batteries and, within 1.5 minutes, replace the battery holder
- Ensure the exhausted batteries are disposed of correctly, in compliance with environmental requirements
Do you want to activate DHW control?
- Press
 to switch on DHW heating
 - While DHW heating is switched on, thesymbol is displayed
- Pressagain
- DHW is in the auto status, the AUTO symbol is displayed. DHW switches according to the DHW time switch.
If you want to see the DHW time bar, press and holdfor 5 seconds. The time bar flashes to show the programmed DHW times. The timeout of the DHW timer bar is set with parameter P13 - Press again
- DHW heating is switched off and the symbol disappears
DHW can also be switched on/off while frost protection is active.
| mode | Press and hold mode for at least 7 seconds to activate a button lock. Repeat to unlock.
The unit operates normally when the buttons are locked, but no changes are possible while the buttons are locked. |
Receiver’s LED indication
| State of receiver | State of LED |
| Power up (or reset) | The red and green LEDs flash alternately for 5 seconds, then change to constantly red.
Note: If the receiver was previ- ously programmed, it shows immediately constantly red. |
| Learning mode | The red and green LEDs flash |
| alternatively. | |
| Successful learning | If RCR100RF learning is |
| mode | successful, the green LED will |
| flash for 10 minutes. | |
| Signal ok and output status change | The green LED is constantly lit, and if the output status changes, the green LED flashes for 3 seconds, then changes back to constantly green. |
| Fail to receive wireless data | If the RCR100RF fails to receive wireless data, the red LED will start to flash after 125 minutes.
If the RCR100RF signal is recovered, it will return to the previous LED state. |
Do you want to change the parameters?
| +
– ok mode |
If you want to change control parameters, proceed as follows:
· Press + and – simultaneously for 5 seconds · Release them and parameter “P01” is displayed on the bottom segment · Press + or – to scroll to the parameter that needs to be adjusted · Press ok to select this parameter · Press + or – to adjust the value · Press ok to confirm the adjusted value · Press mode to exit the parameters without saving or wait for the program to exit automatically |
Parameter list
| Parameter no. | Description | Setting range (default) |
| P01 | Time format | 1 = 24:00 hours (default)
2 = 12:00 AM/PM |
| P02 | Selection of °C or °F | 1 = °C (default)
2 = °F |
| P03 | Standard temperature display | 1 = room temperature (default)
2 = setpoint |
| P04 | Temperature sensor calibration | -3…3 °C
Step 0.5 °C (-6…6 °F, step 1 °F) Default: 0 °C |
| P06 | Comfort setpoint lock | 0 = OFF (default)
1 = ON à locked according to setting in permanent temperature setpoint |
| P08 | Economy setpoint lock | 0 = OFF (default)
1 = ON à locked according to setting in permanent temperature setpoint |
| P09 | Buzzer | 0 = OFF
1 = ON (default) |
| P10 | Show frost protection icon | 0 = OFF (default)
1 = ON |
| P11 | Time switch type for autotimer and DHW | 0 = individual Days (default) 1= all 7 days
2= 5/2 days |
| P12 | Periodic pump run | 0 = OFF (default)
1 = ON |
| P13 | DHW timer bar timeout | 0 = no DHW bar
1 = 1 minute (default) 2 = 2 minutes Adjustable range 0 to 15 minutes |
| P21 | Button scanning rate for the capacitive buttons
Note: a higher scanning rate means shorter battery life. |
0.2 = 0.25 s
0.5 = 0.5 s 1.0 = 1.0 s (default) 1.5 = 1.5 s |
| P22 | Reload factory settings | 0 = OFF (default)
1 = reload |
| P23 | Software version information | No adjustment possible |
| P78 | Control behavior | 0 = On/Off, 1.0K
1 = On/Off, 0.3K 2 = TPI fast 3 = TPI medium 4 = TPI slow (default) |
| P89 | Forward shift on max | 0, 0.5,…24 h
Default: 0 h |
| P90 | Early shutdown max | 0, 0.5,…6 h
Default: 0 h |
REFERENCE :
Download Manual:
SIEMENS RDE100.1 RFS Programmable Room Thermostat Operating Instruction
![]()
SIEMENS RDE100.1 RFS Programmable Room Thermostat Operating Instruction
Leave a Reply