
Saswell SAS908XWHB-7-RF Double Way Wireless Thermostat
Explanation of symbols
 Paper, paper, and plastic packaging, and electrical appliances should be delivered to dedicated recycling boxes after use
 A Class II or double-insulated electrical appliance is one which has been designed in such a way that it does not require a safety connection to the electrical earth (ground).
 The device is intended for indoor use only.
![]() A declaration of conformity is issued for the product
A declaration of conformity is issued for the product
 In accordance with the RoHS Directive
![]() It means that you can touch the product with your hand so that items of diameter 12.5 mm or more can not come in and damage it and that the product is protected against vertically falling water
It means that you can touch the product with your hand so that items of diameter 12.5 mm or more can not come in and damage it and that the product is protected against vertically falling water
 It’s very important to read the whole user manual. droplets
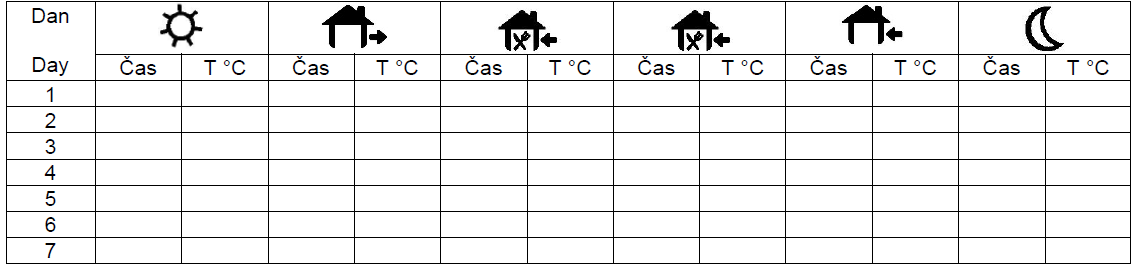
Default heating schedule


Your table
Copying of this user manual without the permission of Sen Controls
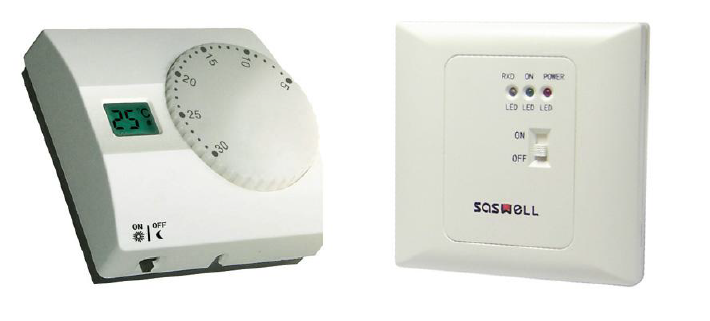
Wireless Thermostat SAS908XWHB-7-RF (SL1)
Next to the thermostat is a separate receiver (switch unit) Saswell SAS2010DE with which wireless communication is performed (868MHz). Both devices are part of the sales package SAS908XWHB-7-RF (SL1). The receiver manages the connection function and system switching, and the thermostat enables the temperature control and setting. The system provides wireless, simple, and comfortable use of your heating system. The system also allows the setting of the heating schedule program for 7, 5 + 2, 5 + 1 + 1 days, and 4 oz. 6 switches per day. The SAS908XWHB-7-RF (SL1) system can also be used with a combination of ON / OFF thermostat actuators. The kit is designed for indoor use. The device is of type “class 2”. As extra functions, the thermostat has the option to lock the keypad with a user set 4 number code and an automatic open window detection, which stops the heating to prevent energy loss, and an option to set the thermostat’s temperature refresh rate in seconds. The instructions for use and maintenance are part of the general terms and conditions of sale. We reserve the right to change the details, technology, and performance. The guarantee is valid only with the original invoice. We allow the possibility of errors in the text. The warranty and warranty statement is located at the end of this manual.
Environmental Protection
Do not place electronic products and batteries after the end of their life in mixed municipal waste, use collection points of separate waste. By properly removing the product, you will prevent negative effects on human health and the environment. Recycling of materials contributes to the protection of natural resources. More information on the recycling of this product is offered to you by administrative units, household waste treatment organizations or the point of sale where you purchased the product.
Important notes before first use, installation, and maintenance
Before use, carefully read the manual not only for the thermostat but also for the heating device (heat pump, etc.)
- Turn off the power supply before installing the thermostat!
- We recommend that the installation is done by a qualified electrician
- the electrical circuit must be secured with a fuse that does not exceed the current load of the wiring (max 16 A)
- Please note all safety instructions before installing
- Do not expose the product to direct sunlight, extreme cold, humidity, and sudden temperature changes. This would reduce the accuracy of the temperature measurement
- Do not place the product in places that are prone to vibrations and shocks – this can cause damage
- Do not expose the product to excessive pressure, shock, dust, high temperatures or moisture, as these can cause damage to one of the products of the function, shorter energy endurance, damage to batteries, and deformation of plastic parts.
- Do not expose the product to rain or moisture, dripping or spraying water.
- Do not place any sources of fire on the product, for example, spark plugs, etc.
- Do not place the product in places where there is insufficient air circulation.
- Do not insert any objects into the ventilation openings.
- Do not interfere with the internal electrical wiring of the product. It may be damaged and therefore terminate the warranty. The product must only be repaired by a trained specialist.
- Use a moderately moistened cloth for cleaning. Do not use solutions or cleaning products – may damage plastic parts and electrical wiring
- Do not immerse the product in water or other liquids. • Do not repair it yourself if the product is damaged or defective. Put it in the repair shop where you bought it
- The product should not be used by a person (including children) with a physical, sensory or mental disability or lack of experience and knowledge impeded by the safe use of the device if they are not controlled, or if they were not informed by the person responsible for their safety about the use of the device
- Children’s control is necessary to ensure that they do not play with the device.
- A declaration of conformity has been issued for the product. This and other documentation is available on the website www.sen-controls.eu and its subsites eg. https://en.sen-controls.eu under LEGAL or on demand via email [email protected]. The producer of this product is SASWELL CONTROLS (HONGKONG) LTD. 3/F Building A, East 8th Region, Shangxue Industry & Science Park, Buji town, Shenzhen City, Guangdong, China. Distributor and servis in EU for Saswell is Sen Controls d.o.o., Belokranjska cesta 29, 8340 Črnomelj, Slovenia
Features
- Portability of room thermostat and independence from wire connectivity
- Connectivity between the transmitter and the receiver via wireless radio frequency RF up to a range of 100 meters
- Large LCD display
- Simultaneous display of the current room temperature and the set heating temperature
- Preserving schedule and program settings despite losing power
- Temperature display in Celsius or Fahrenheit
- Holiday, temporary hold, and constant hold modes for power saving or greater comfort
- Program scheduling for each day (7 days) or separate working days (5 days) and weekends (2 days), with four or six different time and temperature settings
- Temperature calibration
- Battery replacement warning
- Automatic anti-freeze protection
- Option of manual / forced switch-on of the operation of the heating output (for example, pumps)
- Option of keypad lock with a code
- Automatic function of “Open window” detection
Specifications
- Power supply Thermostat: 2x AA (LR6) 1.5V batteries (included); Receiver: 100-240V, 50-60Hz
- Contacts on receiver Volt free (3A; COM,NC,NO) Power contact (16A; L1, N1)
- Connection Radio frequency, 868 MHz (FSK)
- Room temperature reading range 5°C ~ 35°C oz. (Accuracy 0.1°C)
- Room temperature setting range 5°C ~ 35°C (step 0.5°C)
- Ambient temperature 0°C ~ 50°C, humidity up to 90%
- Transport or warehouse temperature -10°C ~ +65°C, humidity up to 90%
- Dimensions 115 x 90 x 32mm
Quick start and tips
Temperature changing, programming heating schedules (at what hour the program starts), and all confirmations are done by short pressing button P, when the value is blinking. You can change the values, when they are blinking, by pressing buttons(decrease value) or (increase value) and again confirming the values by short pressing button P. To exit any editing just short press the button R. All values, and settings will be saved. Also if you are editing settings or configuring the device and you don’t press any button for 20 seconds, the device will exit the current editing and save its current values.
Button description
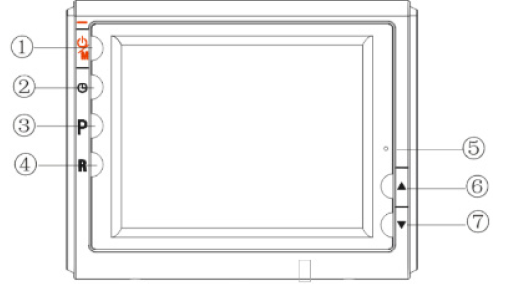
- On / Frost protection / Off (stand by)
- Setting the clock
- Setting the programs (short press/ Hold, constant temperature (long press)
- Confirm / Exit
- Reset button
- Up; Increase value
- Down; Reduce the value
Display description
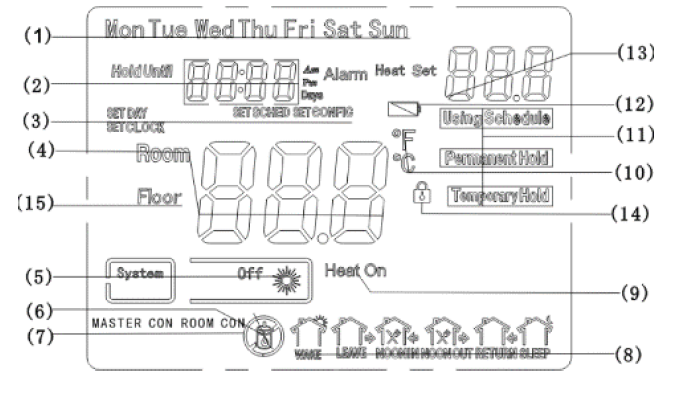 Date, day
- Hour
- Currently selected setting
- Heating
- Operation (Off or if turned on the sun symbol will be lit)
- “Open window detection” is active
- Control mode
- Program mode
- Heating operation (turns on only if the room is currently heating)
- Temperature unit
- Mode of operation (program, hold)
- Battery replacement warning
- The currently set heating temperature
- Keyboard lock
- Current room temperature
Installation
Battery installation
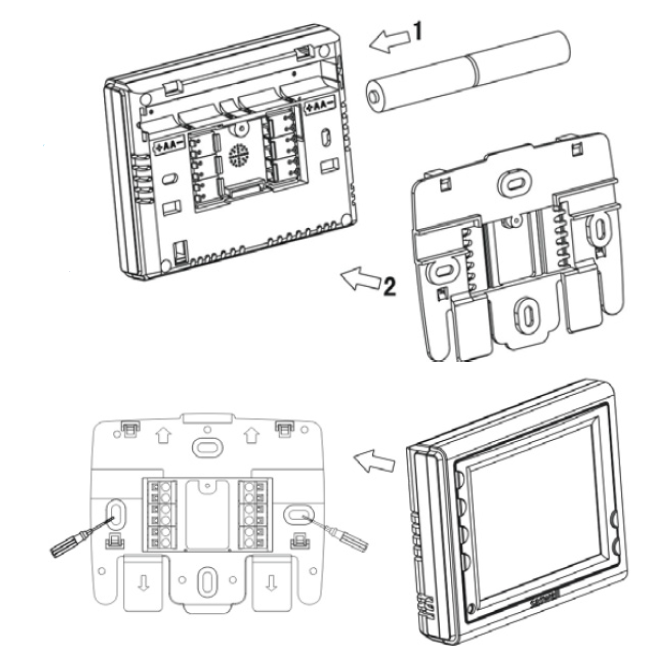
First, remove the rear cover from the room unit. Do this by carefully pulling the cover from the top and bottom of the cover and pulling it outwards. Then insert two AA (LR6) 1.5V batteries the correct polarity. After insert the unit’s back cover.
Installation of the room unit
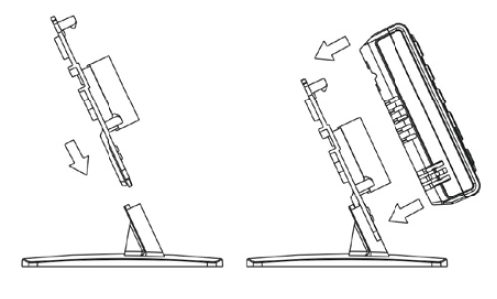
You can place the thermostat on the wall in the desired room or on the attached bracket, with which you can have the unit anywhere in the room. Perform the wall mounting by removing the back cover and marking where you will drill holes for it. Then, screw the cover into the designated, marked place and “attach” the room unit. Place the thermostat in a location where it is not directly exposed to a heat source or to sunlight (example in the picture). The receiver should not be mounted directly on the metal surface.In the case of using the bracket, just slide the unit into the bracket.
Advice on thermostat installation and position in the room
![]() In any case of the thermostat installation (on wall or portable), be careful not put it near sources of hot or cold air, direct sunlight, draught or other types of temperature influences. Also, make sure that the thermostat is placed at least 30cm away from metal parts and 1 meter from other electrical devices. If you mount the thermostat on a wall, the optimum height for mounting is 150cm and at least 20cm away from the door, windows, cupboards and similar objects. Also, install the thermostat on the inside wall of the house. If you don’t follow these recommendations, it can happen that the thermostat will not function correctly. Because of signal interference (electrical sources, metal parts, …) or due to incorrect reading of the temperature (drafts, sun, cold or the hot spot, …).
In any case of the thermostat installation (on wall or portable), be careful not put it near sources of hot or cold air, direct sunlight, draught or other types of temperature influences. Also, make sure that the thermostat is placed at least 30cm away from metal parts and 1 meter from other electrical devices. If you mount the thermostat on a wall, the optimum height for mounting is 150cm and at least 20cm away from the door, windows, cupboards and similar objects. Also, install the thermostat on the inside wall of the house. If you don’t follow these recommendations, it can happen that the thermostat will not function correctly. Because of signal interference (electrical sources, metal parts, …) or due to incorrect reading of the temperature (drafts, sun, cold or the hot spot, …).
Troubleshooting, errors
Short description of possible errors, the device might show on the display:
| Error shown on display | Description |
| Crossed battery |
Bad batteries – requires the replacement of batteries as soon as possible. |
| roomERR | Thermostat sensor failure. |
| No display or the display is malfunctioning | Temporary display malfunction. Press reset button softly. |
| Unable to unlock the thermostat, I forgot the code | Remove the batteries from the thermostat for a longer period of time (60 min +) or press the reset button with a clip or some thin object. The thermostat will restart unlocked. Go to the settings and set the code you want. |
| I changed the settings and now the thermostat is not working as it should. I want to reset them to factory defaults. | Go to the settings menu. Press and hold the R. key for 3 seconds. The display shows “def”. The settings will be reset to factory default values. |
| Er2 | Error in connection with the receiver. Check the connection. Check
that the receiver is turned on and that the devices are within range. Repeat pairing with the receiver. |
If the device is not in use for a long time and there is no need for heating, remove the batteries to prevent battery leakage and extend the battery life.
Basic thermostat setting
Setting the clock
Pressing the button enters the clock and day setting mode. When in editing mode, the current setting position will blink. First, you are setting the time – hours and minutes. You can change the value by pressing or buttons. When you are done setting the time, press the button and you will continue to set the current day. Again, you change the value by pressing \ buttons. When you are done setting the time/date values, press the R button to exit and save.
Programming the heating modes and schedules
By short-pressing the P key, you enter heating mode programming. For every program and schedule you can look up to the default tables on the next pages. When you are in editing mode, you can use the P button to switch between the settings (days, clock, temperature and timer) and keys to change the desired values (when the selected value flashes). We can choose the settings for 7, 5 + 2, 5 + 1 + 1 days and 4 or 6 time switches. As the default program schedule setting is set the 7-day program with 6-time programs. For changing these values, please refer to advanced settings. If you won’t change any of the schedules, the default settings will stay. For reference, check the tables in the next pages. If you are not happy with the settings you’ve made, you can always set them back to factory default by holding button R for 3 seconds. All changes made to the schedules will be lost and set to factory default! The display will show dEF. When editing, if you don’t press any button for about 15 seconds, the device will save any changes made until then. You can return to editing by going back with the same procedure.
Example of setting the default 7-day schedule with 6 switches. Use the tables at the start of this manual for reference.
- Enter the editing mode by briefly pressing the P button.
- The day flashes, then press to select the day you want to edit. Confirm the selection by briefly pressing the P button.
- The time is blinking now. Press key to select the desired time to start the time program. Confirm the selection by briefly pressing the P button.
- The temperature is now flashing. Press the button to select the desired temperature of the time program. Confirm the selection by briefly pressing the P button.
- Now you have finished editing the first of the six-time programs for the selected day, the clock is flashing, and the next time program (switch) editing is started. By briefly pressing the R key, you can finish editing the program/schedule or continue by briefly pressing P to edit another time program, following the same steps from 2-4. When you are finished with the sixth time program, you will switch to editing the next day after the same steps 2-4. Once you have finished editing the heating programs, just confirm with briefly pressing the R key. If you do not make any changes within 30 seconds all the settings are saved.
Advanced thermostat settings
To access advanced thermostat settings, turn off the device by briefly pressing ![]() the key. The device must be off or in standby. Then long press the P button (3 seconds) and enter the advanced setting. You can change the values using keys. Press the P button to move through the menu and save the settings with the R key (exit the settings).
the key. The device must be off or in standby. Then long press the P button (3 seconds) and enter the advanced setting. You can change the values using keys. Press the P button to move through the menu and save the settings with the R key (exit the settings).
Settings explanation
| Step | Setting name (default value) | Change option | Description |
| 1 | CL (0) | -4 do +4 | Temperature display correction |
| 2 | AH (35.0) | 20 – 35 (v
°C) |
Maximum output, operating temperature |
| 3 | AL (5.0) | 5 – 20 (v
°C) |
Lowest output, operating temperature |
| 4 | FC (C) | C / F | Temperature display in Celsius or Fahrenheit |
| 5 | bL (05) | 00 / 05 / 15 | Backlight duration in seconds |
|
6 |
db (0.5) |
0.2 – 5.0 |
Temperature range: temperature difference between switching on and off. If, for example, the temperature on the system is set at 22 ° C and the range at 0.5 ° C the heating system starts to operate if the room temperature drops to 21.5 ° C and switches off when the temperature reaches 22.5 ° C. A smaller set hysteresis can affect the life of the thermostat and the connected devices! |
| Settings continue on the next page | |||
| Step | Setting name
(default value) |
Change option | Description |
| 7 | P51 (7) | 0 / 2 / 3 / 7 | Programming option
7: Separate setting for each day 3: 5 days + 1 + 1 2: 5 days + 2 weekends 0: programs disabled |
| 8 | P52 (6) | 4 / 6 | Number of time programs:
In one day we can have 4 or 6 different hour and temperature regimes. (see the tables below) |
| 9 | OC(24) | 12 / 24 | 24 hours or 12 hours clock display |
| 10 | ES (OFF) | On / Off | Smart Adaption, Adjustment – If you have this feature turned on, the thermostat will start heating and functioning before the next heating program is switched on and will try to get to the desired temperature as comfortable as possible. If this function is turned on, the device is constantly learning and adjusting, and calculates how much sooner it has to
start with the heating. This is done by algorithm learning curve. |
| 11 | Ad (30) | 5 – 90 | Setting the room temperature refresh rate in seconds. Here you can adjust how quickly the sensor will refresh the room temperature display. Faster is more accurate but has more fluctuations. More seconds equals
more stable operation and room comfort. |
| 12 | Cod (0000) | 0000-9999 | Keypad unlock code setting. With P button you can move over different
code position setting. |
Additional modes
Temporary temperature change (Temporary hold)
The device has the option of temporarily changing the temperature with the option “temporary hold”. This option is simply activated by manually changing the temperature. If the option is activated, “TEMPORARY HOLD” appears on the screen (see display description, No. 11). The desired temperature remains active until the change of program schedule occurs. With the button, you can also cancel the activated option.
Constant temperature change (Permanent hold)
The device has the option of constant temperature change with the option “permanent hold”. The option allows you to keep a constant temperature every day and hour of the week, independent of the program settings as it overrides them. This option is simply activated with a long press (5 seconds). If the option is activated, “PERMANENT HOLD” appears on the screen (see display description, No. 11). Set the desired temperature using buttons. The “permanent hold” option remains active until it is canceled briefly.
Key Lock and unlock with code feature
This feature allows you to lock the thermostat, and when the function is turned on, any changes to the settings are disabled. Activate the function by holding down q and p buttons at the same time for three seconds. When the function is activated, the lock symbol is displayed (see display description – 14). You can switch off the function (unlock the thermostat) by again holding q and p keys for 3 seconds and then enter the unlock code you’ve set in the thermostat settings (default 0000). To set the next code, press the P. key. Change the number with q and p. Confirm the code with R. The code can be changed in the advanced thermostat settings. The lock symbol disappears on the screen. The lock symbol disappears on the screen.
Automatic OPEN WINDOW detection function
The thermostat has automatically turned on the function of detecting if there’s an open window nearby. The function turns on, when the room temperature suddenly falls for 1.5°C or more in the last 3 minutes and then the thermostat turns off the heating to prevent unnecessary energy loss. The function turns off when the room temperature increases or after 30 minutes after the function activates or if the user presses any of the thermostat’s buttons. The thermostat then returns to its previous working mode.
Smart adjustment
The thermostat has the option of activating the smart adjustment function, which allows the thermostat algorithm to learn the last 7 days of heating and to predict how long it takes to start heating to reach the desired set temperature
Connecting the thermostat with the receiver, connectivity test
The units of the transmitter (thermostat or room unit) and the receiver are connected (paired) by default. If not, follow the procedure below:
- Read the receiver’s instructions for connecting or connecting. mating. (Quick summary: Press the button to turn off the receiver so that the red LED is no longer lit. Then hold down the button for 3 seconds to turn on the yellow LED. Release the key)
- Turn off the thermostat so that off is displayed on the screen. Now hold button R for around 3 seconds. “- -“ should show up on the screen. The thermostat is ready to be paired.
- The devices should be now paired. “1” should appear on the screen.
The process is complete. Switch on both devices! Now test the communication by raising and lowering the heating temperature on the thermostat – the receiver should confirm the communication by briefly flashing the yellow indicator and turning it on or off. turning off the heating. If the process was unsuccessful, repeat the process from the beginning or get help on our website, youtube channel or contact us at [email protected].
WARRANTY CARD, STATEMENT
Warning: The contents of these instructions can be changed without prior warning – due to limited printing options, the symbols presented may vary slightly from the on-screen symbols – the contents of these instructions cannot be reproduced without the consent of the manufacturer. The device can be freely used in the EU. All statements of conformity (CE, RoHS) are freely available on the website www.sen-controls.eu and subsites eg. https://en.sen-controls.eu or other. The documents are also available on product subsites under or on request by email at [email protected].
- We declare that we guarantee the properties and faultless operation within the warranty period.
- The warranty period begins with the date of purchase and is valid for 24 months.
- Sen Controls d.o.o. guarantees to the buyer that during the warranty period, we will eliminate all defects on the device due to a factory failure in material or workmanship at our own expense.
- For the time of repair, the warranty period is extended.
- If the device is not repaired within 45 days from the date of the failure report, the affected party may request a new one.
- The guarantee is terminated if the defect occurred due to: – Unprofessional-unauthorized service, – Opening or modifying the device without the manufacturers, – Failure to comply with the user manual
- The guarantee does not exclude the rights of the consumer arising from the seller’s responsibility for defects in goods.
- The manufacturer provides repairs, and maintenance of goods, spare parts and couplings against payment for three years after the expiration of the warranty period.
- The natural wear of the device is excluded from the warranty. The same applies to damage due to improper use or overload.
- The limited warranty applies in the territory of the EU Member States and the Republic of Serbia, Bosnia and Herzegovina.
WARRANTY CARD AND INSTRUCTIONS FOR THE RECLAMATION PROCEDURE
The owner invokes a guarantee claim by declaring the impairment to an authorized workshop, repairer, point of sale, either in writing or orally. The buyer is responsible if he causes damage to the appliance by late notification. Upon expiration of the warranty period, the right to claim a warranty claim has expired. The validated warranty card with the original invoice must be attached. Sen Controls d.o.o. undertakes to replace the device with a new one if it fails to function properly in this warranty period.
Please add a detailed explanation of the error of the device, along with a properly completed warranty card.
| Type of the device | Wireless thermostat |
| Manufacturer | SASWELL |
| Model | SAS908XWHB-7-RF(SL1) |
| Date of purchase | |
|
SIGNATURE AND STAMP OF THE SELLER |
The distributor, import, and service for EU is Sen Controls d.o.o., Belokranjska cesta 29, 8340 Črnomelj, Slovenia, tel.: +386 40 299 299 www.sen-controls.eu
[email protected]
If you have any questions or problems with our products, contact us on [email protected].
Reference
Download Manual:
Saswell SAS908XWHB-7-RF Double Way Wireless Thermostat User Manual
![]()
Saswell SAS908XWHB-7-RF Double Way Wireless Thermostat User Manual
Leave a Reply