
Sangamo CHPRSTATDPRF Wireless Digital Programmable Thermostat

Features
CHPRSTATDPRF is an accurate and very easy to use wireless programmable room thermostat. It provides you with time and temperature control,so you remain comfortable but without wasting energy (and money)
- 24 hour or 7 day programmable
- 6 time/temperature events per day
- Default adjustable program
- Permanent hold temperature
- Timed hold temperature
- Temporary temperature override
- Automatic Summer/Winter time change
- Low battery voltage indication
- Button press back-light operation
- TPI control
- Optimum Start/Delay Start, Optimum Stop
Operation Guide
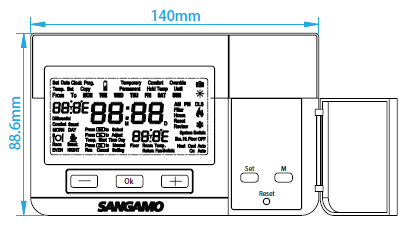
Open the front cover to show the hidden panel (as Fig. 1), and complete all the settings as per below operation guide.
SETTING THE TIME, DATE and PARAMETERS
- Before you set the thermostat, you should fix the time and date
- Press and hold Set for 6 seconds.
- Choose between °F and °C using+-and press Ok(°C asdefault).
- Choose between 24hr and 12hr clock using+-and press Ok.
- Set the Year using+-and press Ok.
- Set the Month using+-and press Ok.
- Set the Day using+-and press Ok.
- Set the Hour using+-and press Ok.
- Set the Minute using+-and press Ok.
- Choose between 0.5°C and 1.0°C switching differential using+- and press Ok.
- The display will show Cr(cycle rate), within the control proportional band, the output will be cycled several times per hour, to give precise temperature control. This can be set to 3, 6 or 12 cycles depending on the application, every cycle rate matches with different Minimum ON/OFF time.Recommended settings and Cycle rate vs. Minimum ON/OFF time are shown in the next table. The default cycle rate is 6 cycles/hour,set the Cycle Rate using+-and press Ok.
|
Specific Applications |
Setting | |
| Cycle Rate | Minimum ON/OFF(min) | |
| Gas Boiler(<30 kw) | 6 | 1 |
| Oil Boiler | 3 | 4 |
| Thermal actuator | 12 | 1 |
| Zone Valve | 6 | 1 |
| Heat pump | 3 | 4 |
| Air Conditioner | 3 | 4 |
- The display will show Pb(proportional band width),the default proportional band width is 1.5 °C , set the proportional band width using+-(from1.5 °C to 3.0 °C).
4 dashes appear on the display, this can be used to set a reminder to replace filters in an air conditioning system, press Ok to skip this. - Press Ok to return to Run Mode
DEFAULT PROGRAM
- The CHPRSTATDP comes preset with a default program so that you can get up and running straight away. Each day is split into 6 parts. Each one can have its time or temperature changed to suit you.
- When the DIP switch is set to Optimum Start, the default program is as the Chart 1 below.Chart 1 shows the target time and target temperature(i.e.when you require to be warm ).
- When The DIP switch is set to Delayed Start, the default program is as the Chart 2 below.Chart 2 shows the earliest start time and target temperature. If the temperature of the previous program is higher, the next program time means the target time. For example , the MORN temperature is 21°C, and the Day temperature is 15.5°C.
| Mo-Fr | Time | °C |
| 1:MORN | 6:00am | 21°C |
| 2:DAY | 8:30am | 15.5°C |
| 3:Noon | 12:00pm | 21°C |
| 4:Break | 2:00pm | 15.5°C |
| 5:EVEN | 4:30pm | 21°C |
| 6:NIGHT | 10:30pm | 18.5°C |
| Sa-Su | Time | °C |
| 1:MORN | 7:00am | 21°C |
| 2:DAY | 8:30am | 21°C |
| 3:Noon | 12:00pm | 21°C |
| 4:Break | 2:00pm | 21°C |
| 5:EVEN | 4:30pm | 21°C |
| 6:NIGHT | 10:30pm | 18.5°C |
| Mo-Fr | Time | °C |
| 1:MORN | 5:00am | 21°C |
| 2:DAY | 8:30am | 15.5°C |
| 3:Noon | 11:00am | 21°C |
| 4:Break | 2:00pm | 15.5°C |
| 5:EVEN | 3:30pm | 21°C |
| 6:NIGHT | 10:30pm | 18.5°C |
| Sa-Su | Time | °C |
| 1:MORN | 6:00am | 21°C |
| 2:DAY | 8:30am | 21°C |
| 3:Noon | 12:00pm | 21°C |
| 4:Break | 2:00pm | 21°C |
| 5:EVEN | 4:30pm | 21°C |
| 6:NIGHT | 10:30pm | 18.5°C |
PROGRAMMING
Within programming mode the thermostat will return to normal operation if no buttons are pressed for 30 seconds.To exit programming mode either wait 30 seconds or press Set x2 and Ok NB: Each day’s end time is 11:59 in 12hr or 23:59 in 24hr formats. P6 cannot be set for midnight.Each day of the week can be programmed separately, starting with Monday (Mo) .
- Press Set to enter programming mode.
- Set Mo MORN temperature using+-and press Ok.
- Set Mo MORN time using+-and press Ok.
- Set Mo DAY temperature using+-and press Ok.
- Set Mo DAY time using+-and press Ok.
- Repeat procedure for all 6 set points in the day and continue on to program each day of the week.
- At any point Press Set x2 then Ok to return to Run Mode
COPY/PASTE DAY
- To speed up the programming sequence you can copy one day into another, or several other days.
- Press Set x2 to enter copy mode.
- Choose the ‘Copy’ day using+and press Ok.
- Choose the ‘Paste’ day using+and press Ok.
- Repeat step as required for further ‘Paste’ days.
- At any point Press Ok x2 to return to Run Mode
CHANGE THE TEMPERATURE:
- To manually change the temperature temporarily you simply press the raise or lower buttons to the desired level, if left alone this will stay set until the next programmed change at which point it returns back to the original schedule.
- Choose desired temperature using+-and press Ok.
- To cancel setting early and return to normal operation press Ok.
CHANGE THE TEMPERATURE FOR A SET NUMBER OF HOURS:
- You can also set the thermostat to hold at the temperature you want for a defined number of hours.
- Press M to enter override mode then select temperature using+- and press Ok.
- Select number of hoursusing+-(max 23 hours) and press Ok.
- Comfort Override, Temp. Set & Hours, with the hours remaining,are shown on the display.
- To cancel setting and return to normal operation press Ok
HOLD TEMPERATURE PERMANENTLY
- Hold the thermostat at a desired temperature until manually cancelled by you.
- Press M x2 to enter permanent override mode then select temperature using+- and press Ok.
- Permanent Hold and Temp. Set are displayed.To cancel setting and return to normal operation press Ok
HOLIDAY MODE
- Hold the temperature at a desired set point until a specific date.
- Press M x3 to enter holiday mode then select temperature using+ -. and press Ok.
- Select the Month and Year using+-and press Ok.
- Select the Day using+-and press Ok.
- Hold Temp Until, Temp. Set & Hours are displayed.
- To cancel setting and return to normal operation press Ok
RESET UNIT
To erase all current settings and return to it’s factory default settings & programs. Press and hold Ok and-for 6 seconds. When Reset is displayed push in the Reset button. All segments on the display are shown to confirm reset has taken place
| Date Issued | Issue No | Description |
| J20 | A30-CHPRSTATDPRF-01-2 | Rev.1 |
Health & Safety
- This unit must be installed by a suitably qualified person in accordance with the latest IEE Wiring Regulations.
- Isolate mains supply before commencing installation. Please read all installation instructions before proceeding.
- Example circuit diagrams for typical installations are shown. These diagrams are schematic and should be used as a guide only.
- Please ensure that all installations comply with the current IEE regulations. For reasons of space and clarity not every system has been included and the diagrams have been simplified, for instance some Earth connections have been omitted. Other control components shown in the diagrams i.e. Valves, Room Stats etc. are general representations only.
- However, the wiring detail can be applied to the corresponding models of most manufacturers.
- Your product is not user serviceable. Do not dismantle this product.
- Due to our policy of continuous product improvement and development, the specifications in this guide may be subject to change without prior notice.
Sangamo
- Elite Security Products
- Unit 7, Target Park, Shawbank Road,
- Lakeside, Redditch, B98 8YN
- Tel: 01527 515150
- Fax: 01527 515143
- Email: [email protected]
- Web: www.espuk.com
Reference
Download Manual:
Sangamo CHPRSTATDPRF Wireless Digital Programmable Thermostat User Instructions
Other Manual:
Sangamo CHPRSTATDPRF Wireless Digital Programmable Thermostat Installation Instructions
Sangamo CHPRSTATDPRF Wireless Digital Programmable Thermostat Product Specification Guide
![]()
Sangamo CHPRSTATDPRF Wireless Digital Programmable Thermostat User Instructions
Leave a Reply