
![]()
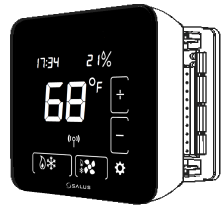
SALUS ST898ZB OPTIMA S THERMOSTAT

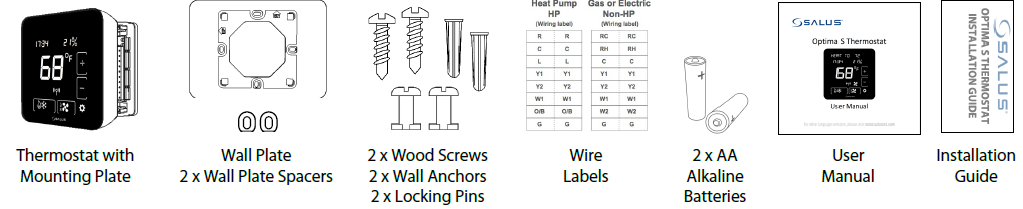
IN THE BOX
YOU WILL NEED THE FOLLOWING TOOLS
- 1 Phillips or flathead screwdriver
- Drill with 3/16” bit
- (only if you cannot mount the thermostat using the existing holes)
Optional Tools
- Smartphone or digital camera to take picture of wiring for later reference
- Screwdriver to disconnect wires from old thermostat
- Pencil
Installation
STEP 1 TURN OFF POWER TO THE HVAC SYSTEM
STEP 2 DETERMINE WIRING CONFIGURATION
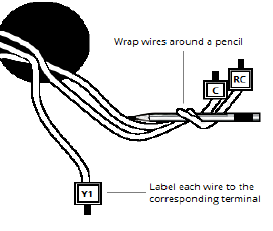
Use the Wire Labels and the following table to keep track of wire colors on the old thermostat or on the heat pump / furnace / air conditioner
| HP | NON-HP | Wire Color |
| R | R or RH | |
| — | RC | |
| C | ||
| Y or Y1 | ||
| Y2 | ||
| AUX | W or W1 | |
| O/B | W2 | |
| G | ||
| L | — | |
STEP 3 REMOVE OLD THERMOSTAT
Remove the old thermostat from the wall, taking care not to allow the wiring to fall inside the wall
STEP 4 INSTALL MOUNTING PLATE
If there is space on the wall that needs to be covered, insert the Wall Plate between the Mounting Plate and the wall, and mount both plates using the same screws. Make sure the wires run through the center opening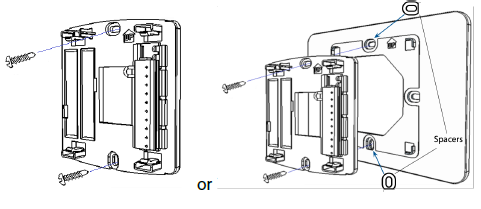
STEP 5 ATTACH WIRING
- Using the labels, match the wires to the appropriate terminal.
- For each wire, press the terminal button and fully insert the wire into the side hole.
- Release the terminal button to secure the wire.
- If you have RC and RH wires, remove the jumper betweeen RC and RJP.
- ST898ZBR works as a router and requires RH/RC and C-wire

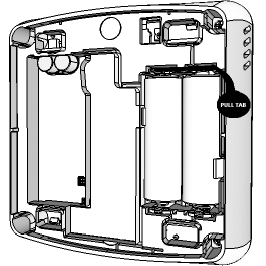
STEP 6 CONNECT THE BATTERIES
- Pull the battery tab from the back of the thermostat to activate the batteries.
- If the C wire is connected, the thermostat will draw power from the AC connection and use the batteries as backup.
- Battery-only operation typically lasts 18 months.
- ST898ZBR works as a router and cannot run on batteries.
STEP 7 ATTACH THERMOSTAT TO MOUNTING PLATE
- After the initial configuration, the home screen will be displayed, and the thermostat is ready to be attached to the Mounting Plate.
- Align the connector pins and the plastic retention posts, then push the thermostat onto the Mounting Plate.
- Make sure the connector pins are not bent and that the thermostat is fully seated on the Mounting Plate
STEP 8 TURN POWER BACK ON TO THE HVAC SYSTEM
STEP 9 INITIAL CONFIGURATION
- After initial power-up, the thermostat will attempt to pair with a network for 10 minutes. You may need to initiate scanning for devices in your connected home system.
- Once paired, canceled with the Down button ( X ), or timed out, the device will ask for the following initial settings.
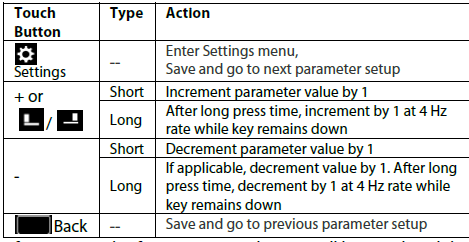
To move forward and back through the Settings menu and make any changes to the settings, the buttons function as follows:
Configuration Parameters
| EQPT TYP- | Choose HVAC Type |
| REVERS VALVE- | Set Reversing Valve |
| FAN CNTL- | Select fan control |
| AUX FUNC- | Auxiliary Relay function |
| AUX ACTIVE- | Auxiliary Relay operation |
| TEMP SEL- | Internal or remote temperature sensor |
| INT TEMP OFFST | Internal temperature sensor offset |
| RMT TEMP OFFST | Remote temperature sensor offset |
| DLTA 1ST STAGE | Heating differential 1st stage |
| DLTA 2ND STAGE | Heating differential 2nd stage |
| DLTA 1ST STAGE | Cooling differential 1st stage |
| DLTA 2ND STAGE | Cooling differential 2nd stage ° |
OPTIONAL STEP CONFIGURE THE NEW THERMOSTAT
| Y1Y2 MIN OFF T | Compressor protection. |
| FAN DELAY | Fan Delay after cooling stops. |
| HEAT MAX SETPT | Max Heating Set point |
| COOL MIN SETPT | Min Cooling Set point |
| DEAD BAND | Dead band value is used for Auto mode. |
| SET FROST TEMP | Frost setpoint |
| HEAT PROTECT | Heat Protect Setpoint |
| LOCK SRC- | Key Lock Source (Device+App or App Only) |
| LCK- | Key Lock Type (Mode / FAN / Set Pt / Param / Combinations) |
| DEGREE UNITS | C/F Selection |
| BRIGHTNESS | Set display brightness |
| DISPLAY ON- | Display On Time in seconds |
| LANGUAGE- | Language Selection |
| 24 HOUR CLOCK | Time Display Format |
| shOw HUMIDITY | Show or hide humidity reading |
| HUMIDITY SETPT | Humidity Set Point |
| TIME | Set Time and Date (see note) |
| DST ADJUST | Enable Day Light Saving (see note) |
| SET YEAR | Set Year (see note) |
| DATE M/D- | Set Month and Date (see note) |
| EDIT- | Display current schedule mode: |
| LOCK KEYS? | To lock and unlock the keypad |
| IDENTIFY? | Identify devices on the shared channel |
| JOIN NETWORK? | Initiate Join to available network |
| NEW NETWORK? | Delete network and Join new network |
| FACTORY RESET? | Reset to Factory default settings |
REFERENCE:
DOWNLOAD MANUALS:
SALUS ST898ZB OPTIMA S THERMOSTAT INSTALLATION GUIDE
OTHER MANUALS:
SALUS ST898ZB OPTIMA S Touchscreen Thermostat Product Specification Sheet
SALUS ST898ZB OPTIMA S Touchscreen Thermostat User Guide
![]()
Leave a Reply