

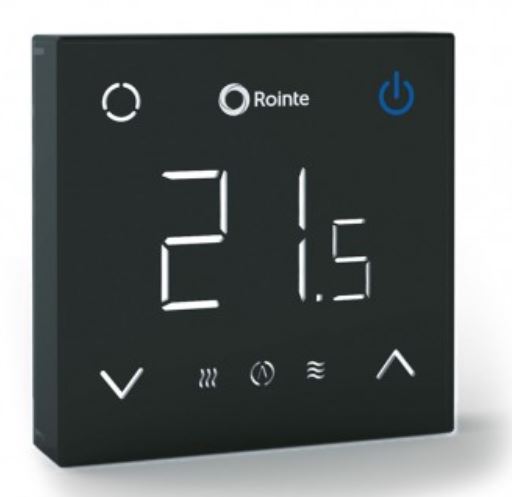
Rointe CT.2 Digital Programmable Wi-Fi Thermostat
INTRODUCTION
This thermostat is designed to improve the thermal comfort of your home by providing programming of your underfloor heating system. It is designed to receive temperature signals through the following sensors:
- Air sensor located inside the thermostat.
- Sensor installed on the floor (see underfloor heating instructions for more details). This thermostat is not a safety device and should only be used with Rointe heating products.
To avoid damaging the floor, you must select the correct floor type during the thermostat programming process. WARNING – important safety note.
This product uses mains voltage and its installation must be carried out by a qualified electrician. You should always disconnect the power supply before attempting to install or repair the thermostat. It should not be switched on unless you are sure that the entire heating installation complies with the current general requirements for electrical installations. The electrical installation must comply with the latest wiring regulations.
LOCATION
This thermostat must be installed inside an electric wall box that has a depth of at least 35mm. For optimum performance, this thermostat should be located in an area with good ventilation. It should not be positioned next to a window or door, in direct sunlight or near a heat source (e.g. a radiator or TV). This thermostat is designed to operate between 0ºC and 55ºC, with a relative humidity below 80%.
INSTALLATION
- Separate the front cover of the thermostat from the wall module.
- Place the front cover in a safe place to avoid damage.
- Pass all the cables to the wall box. Make sure you have included the following:
- Feed (phase and neutral).
- Heating element (phase and neutral or only phase of the switch).
- Floor sensor or air sensor.
- Pass the wires through the wall box and complete the wiring.
IMPORTANT: Make sure the cables are fully inserted into the terminals and tightened securely. All loose wires should be cut as they could cause a short circuit. If more heating elements are connected, an electrical bypass box will be required.
Note: Always make sure that the sensor cable is installed in a conduit separate from the power supply of the thermostat and the heating system.
ASSEMBLY
- Release the front cover.
- Remove the back plate.
- Screw the back plate to the wall box with a screwdriver.
- After connecting the cables (see connection diagram), mount the thermostat to the back.
CONNECTION DIAGRAM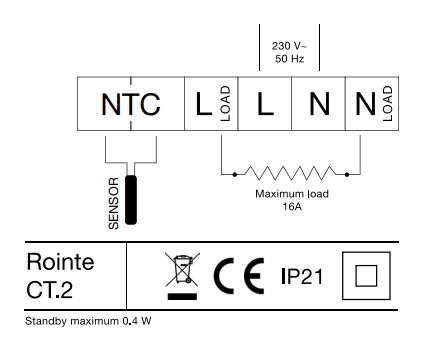
ELECTRICAL SPECIFICATION
- Supply voltage: 230V +/- 10% at 50Hz
- This thermostat is not designed to be used with an intermittent power supply.
- Maximum load: 16A resistance or 3,680W
- Insulation class: II
- IP21
- Wi-Fi connectivity
- Floor sensor: 10 KOhm
ICONS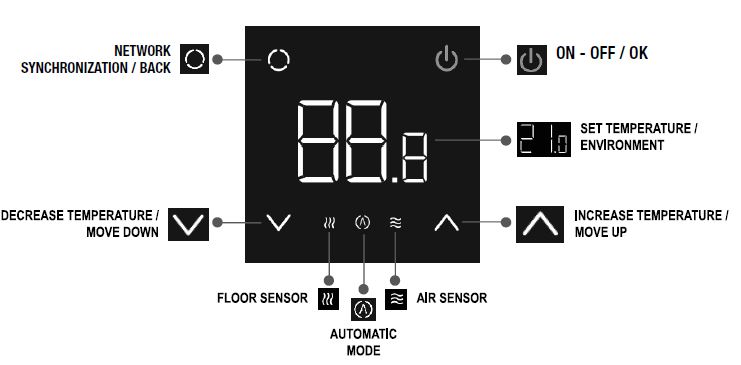
FUNCTIONS
After completing the initial configuration, the thermostat will display the setpoint temperature and the temperature read by the sensor.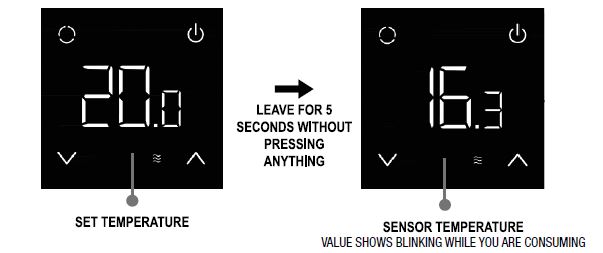
The initial configuration starts when the thermostat is switched on for the first time.
CONFIGURATION
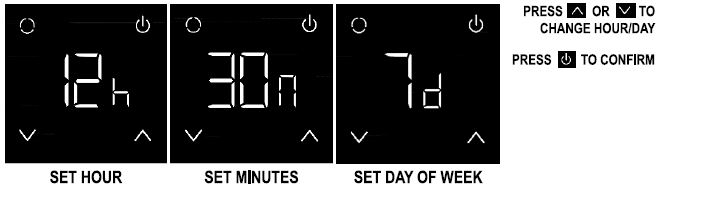
Time and date
Select sensor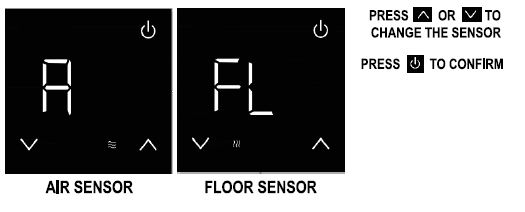
Wi-Fi synchronization
| 1 | Descargar la App Rointe Connect y registramos. |
| 2 | Cuando el símbolo de red del termostato aparezca parpadeando pulsar 3 segundos el icono. |
| 3 | Nuestro termostato genera una red Wi-Fi y nos muestra en pantalla los 3 últimos dígitos de la red generada. |
| 4 | Asegúrese de que nuestro smartphone está conectado a la red Wi-Fi a la que queremos conectar nuestro producto. |
|
5 |
Por último, conectamos nuestro smartphone con la red generada por el termostato (ej. ROH_0731). En el display se mostrarán los caracteres “PrO” parpadeando y a continuación se reiniciará. De este modo nuestro termostato quedará emparejado al router de la vivienda y conectado a internet. |
Press ![]() for 3 seconds to access the menu.
for 3 seconds to access the menu.
PROGRAMMING
To program the thermostat access the “programming” (Pr1) sub-menu and select ON. Next, you will see the 3 pre-programs (P1 – P2 – P3) and one editable by the user (Pu). To carry out your own programming, choose Pu and confirm with![]() . Then:
. Then: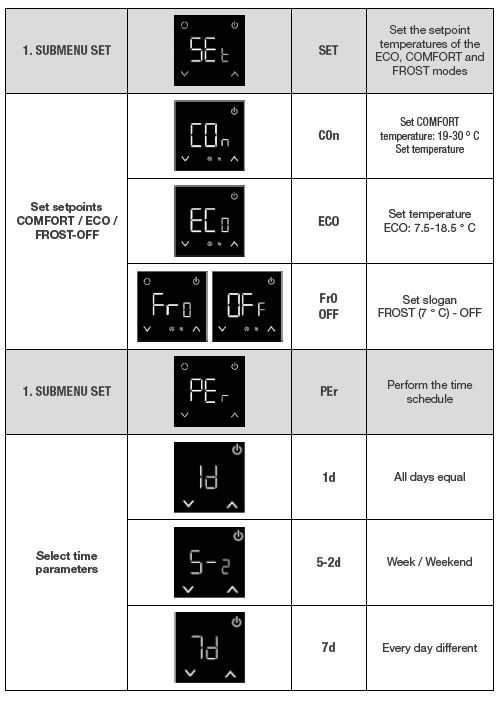
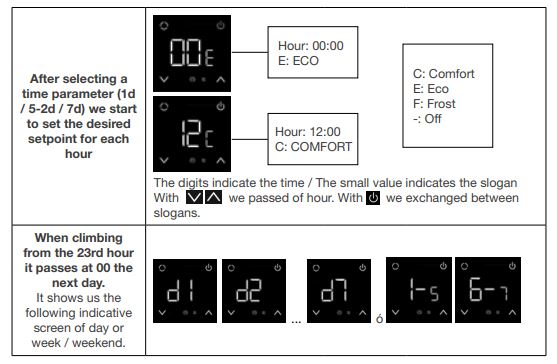
With ![]() we go backwards.
we go backwards.
PRE-PROGRAMME 1
| INICIO | FIN | TEMPERATURA | |
| PERIODO 1 | 6:00 | 8:00 | 21ºC |
| PERIODO 2 | 8:00 | 19:00 | 15ºC |
| PERIODO 3 | 19:00 | 23:00 | 21ºC |
| PERIODO 4 | 23:00 | 6:00 | 15ºC |
PRE-PROGRAMME 2
| INICIO | FIN | TEMPERATURA | |
| PERIODO 1 | 7:00 | 11:00 | 21ºC |
| PERIODO 2 | 11:00 | 18:00 | 15ºC |
| PERIODO 3 | 18:00 | 23:00 | 21ºC |
| PERIODO 4 | 23:00 | 7:00 | 15ºC |
PRE-PROGRAMME 3
| INICIO | FIN | TEMPERATURA | |
| PERIODO 1 | 8:00 | 21:00 | 21ºC |
| PERIODO 2 | 21:00 | 8:00 | 15ºC |
GUARANTEE
Rointe® guarantees this product will be free from defects in workmanship or materials, under normal use and service, for a period of two (2) years from the date of purchase by the consumer. If during the guarantee period the product is determined to be defective, Rointe® will assume responsibility for repair or replacement. If the product is defective, please:
– Return it, with a sales invoice or other dated proof of purchase, to the place from which it was purchasedContact Rointe®, who will determine if the product should be returned or replaced.
This guarantee does not cover the costs of removal or reinstallation, and will not apply if Rointe demonstrates that the defect or malfunction was caused by damage occurred whilst in the possession of the end user, by not following the installation or instructions in this manual or during installation. The sole responsibility of Rointe® will be to repair or replace the product within the terms set forth above. Rointe® will not be responsible for any loss or damage of any kind, including consequences that result, directly or indirectly, from any breach of any warranty, express or implied, or any other fault of this product. This guarantee is the only one expressed by Rointe on this product. The duration of any implied guarantee, including guarantees of merchantability and fitness for a particular purpose, is hereby limited to the two years duration of this guarantee as stated above. This Guarantee does not affect your statutory rights.
Please register your product at: www.rointe.co.uk.
REFERENCE
DOWNLOAD MANUAL:
Rointe CT.2 Digital Programmable Wi-Fi Thermostat User Manual
Rointe CT.2 Digital Programmable Wi-Fi Thermostat User Manual
Leave a Reply