
Pro1 Technologies T731WO Wireless Non-Programmable Thermostat
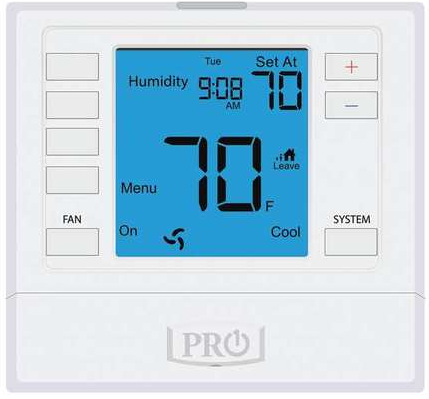
Thermostat Operation
- LCD Display
- See page 6 for details about this display read out.
- Fan Button
- AUTO will cycle the fan on only when the heating or cooling system is on. Select LOW, MEDIUM or HIGH for the fan to run continuously at the selected speed.
- System Switch
- Selects the operation mode on your HVAC system. Selecting HEAT turns on the heat mode. Selecting COOL turns on the cool mode. Selecting OFF turns both heating and cooling off.
- Temperature Setpoint Buttons
- Press the + or – buttons to select the desired room temperature.
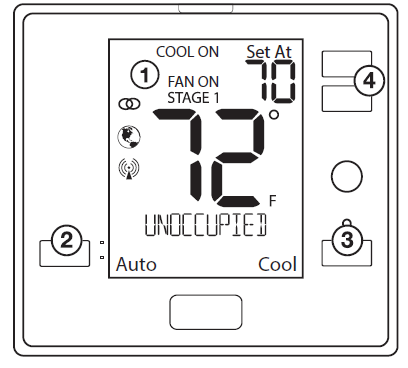
OVERVIEW
- Ambient Temperature:
- Displays the current room temperature
- Set At Temperature:
- Displays the selected desired room temperature.
- Staging Indicaators:
- If these or the fan indicators are flashing, it means that the system is in a delay of some type (compressor delay, cooling fan delay, or staging delay)
- Energy Efficient Globe:
- Indicates you are making an energy efficient set at
- Wireless Symbol:
- Indicates you have a wireless
- Low Battery Indicator:
- Replace batteries when this indicator appears.

- Replace batteries when this indicator appears.
Battery Installation
- Insert 2 AA Alkaline batteries (included) located in the back of the thermostat. High-quality Alkaline batteries are recommended.
- Battery installation is optional if the thermostat is hardwired (R and C terminal connected to 24V power).

Important:
The low battery indicator is displayed when the AA battery power is low. If the user fails to replace the battery within 21 days, the screen will only show the low battery indicator but maintain all functionality. If the user fails to replace the batteries after an additional 21 days (days 22-42 since first “low battery” display) the setpoints will change to 55˚F (Heating) and 85˚F
(Cooling). If the user adjusts the setpoint away from either of these, it will hold for 4 hours then return to either 55˚F or 85˚F. After day 63 the batteries must be replaced immediately to avoid freezing or overheating because the thermostat will shut the unit off until the batteries are changed..
Warranty Information
Warranty Registration
Your new thermostat has a 5 year limited warranty. You must register your thermostat within 60 days of installation. Without this registration, the warranty period will begin on date of manufacture. For warranty issues please contact the HVAC professional that installed this product. You can register your new thermostat in 2 ways:
Online
Go to the company website, select warranty registration and fill out a short registration form.
Mail
Complete the form below and mail it to the address shown.
Pro1 Technologies
- P.O. Box 3377
- Springfield, MO 65808-3377
- Toll Free : 888-776-1427
- Web: www.pro1iaq.com
- Hours of Operation: M-F 9 AM – 6PM Eastern
Reference
Download Manual:
Pro1 Technologies T731WO Wireless Non-Programmable Thermostat Operational Manual
OTHER MANUALS
Pro1 Technologies T731WO Wireless Non-Programmable Thermostat Installational Manual
Pro1 Technologies T731WO Wireless Non-Programmable Thermostat Product Specifications Guide
![]()
Pro1 Technologies T731WO Wireless Non-Programmable Thermostat Operational Manual
Leave a Reply