
PERRY 1CR-CR018BS Weekly Digital Programmable Thermostat
INTRODUCTION
The daily or weekly model of the Chronothermostat can control heating systems (wall boilers, burners, local solenoid valves, floor systems) and/or conditioning systems thanks to its HEATING (WINTER) and COOLING (SUMMER) functions. It comes with a calendar with a factory-set date and time. It automatically changes standard time to summer time and vice versa. This chronothermostat’s main feature is that it can be easily programmed. It was designed with the user’s needs in mind. Settings can be changed simply by pressing a specific key instead of multiple keys. There is a key for each weekday (weekly model), as there is a key for increasing or decreasing the temperature at any time during the day. The chrono thermostat is factory-set to differentially turn ON/OFF the temperature. Hysteresis can be set from 0.1°C to 0.9°C, thus adapting to the system’s thermal inertia. It can also operate in the modulating proportional mode with cycles whose durations can be set (7-10-15-20 minutes). This maintains a stable temperature increasing the user’s comfort level. The apparatus can also advance the starting and stopping of the connected device (economy and standard intelligent operation). This allows the desired temperature to be reached at the set time. The temperature scale is Celsius and it can be adjusted by setting a correction value. Special attention is paid to energy savings. The WEEKEND function, the pause for housekeeping, and the optional block of setpoint temperatures (MAX/MIN) save energy and therefore money (these and other functions are described in the following pages).
WARNINGS
- The instructions are valid for both the daily and weekend models (the figures shown are for the weekly model).
- Carefully read the instruction manual before using the product as it provides important guidelines regarding safety, installation, and use. The instruction manual must be preserved with care for future reference.
- The manufacturer reserves the right to introduce any technical and/or constructive changes deemed necessary, with no prior notice.
- The installation and electrical connection of the devices and appliances must be implemented by qualified personnel and in conformity with current laws and regulations.
- The Chrono thermostat is not intended for use by persons (including children) with reduced physical, sensory or mental capabilities, or by those with a lack of experience and knowledge of the instructions, unless they are supervised or have received the necessary instructions concerning the use of the device by a person responsible for their safety.
- Children should be supervised to ensure that they do not play with the device.
- Ensure the product is intact once it is removed from its packaging. Packaging components (any plastic bags, PVC suspensions, etc.) must be kept out of reach of children.
- Use only 1.5V type AAA (LR03) alkaline batteries; the use of unsuitable batteries may cause the loss of entered programming.
- Batteries not included. the product has been tested and its characteristics are guaranteed when alkaline DURACELL or ENERGIZER batteries are used.
- If a 0 °Cor+50 °Croomtemperature flashes on the display, the measured temperature is beyond the scale.
- A (steady) “Err” (fixed)message indicates a faulty sensor. All temperature control activities are stopped.
- The Chrono thermostat is factory programmed. When batteries are inserted, it shows the date, current hour, and minutes. If necessary, it can be set manually, following the procedure in paragraph. 6.1.
- If necessary, use a damp cloth to clean the Chrono thermostat.
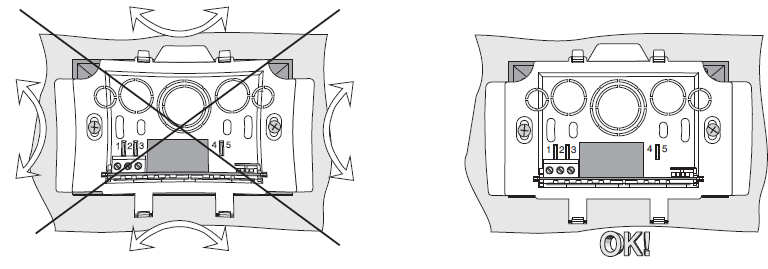
- The Chrono thermostat must be installed on a flat wall base (paragraph 2.4). In fact, it can be bent when fixing screws of the rectangular box embedded in the wall (see figure below), are excessively tightened.
TECHNICAL SPECIFICATIONS

INSTALLATION
OVERALL DIMENSIONS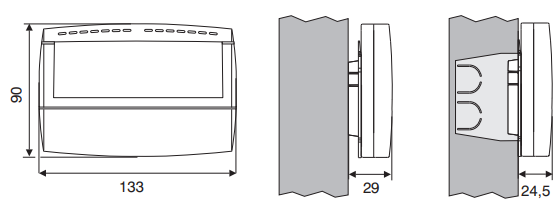
INSTALLATION GUIDELINES
Installation and electrical connections of devices and appliances ‘must be carried out by skilled people and in compliance with current regulations. The manufacturer declines any liability in connection with the use of products subject to special environmental and/or installation standards.
Installation of device: independent-fixed
- wall mounting – on the back round box – on the rectangular flush mounting box (3 modules)
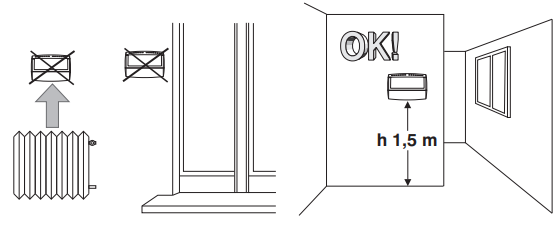
- Install the Chrono thermostat at a height of 1,5 ÷ 1,7 m from the floor, far from heat sources, windows and anything that might modify de standard operational mode.
EXAMPLES OF INSTALLATION
Heating systems with a chronic thermostat that controls:
- Wall-mounted boiler
- Burner or the Circulation pump
- Solenoid valve

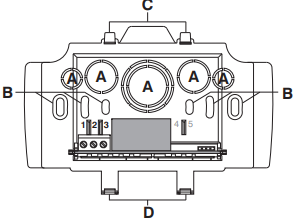
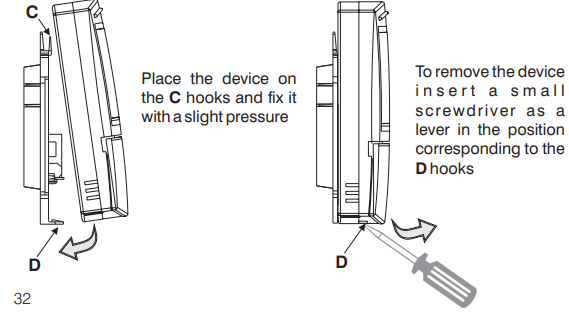
FIXING BASE AND DEVICE
- Isolate the controlled appliance from the electrical power supply.
- Using screws, fixing the base to the wall or to the back box using holes B provided. If the thermostat base is to be fastened onto a metal wall, apply the two special insulating washers to the two screws.
- Make the electrical connections and fix the device on the base, taking care to insert the contacts correctly, then exert light pressure until you hear the click of the attachment hooks.
WARNING: To ensure the thermostat is fitted correctly to the wall-mounted base, the latter must not be bent due to the screws being tightened too much to the rectangular recessed box.
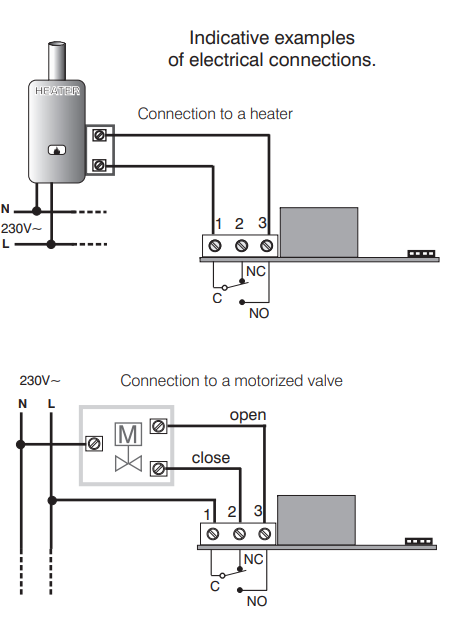
ELECTRICAL CONNECTIONS
Turn off the electrical power to the wiring. Connect the controlled device to the terminals:
- common
- normally closed contact
- normally open contact
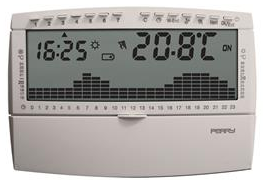
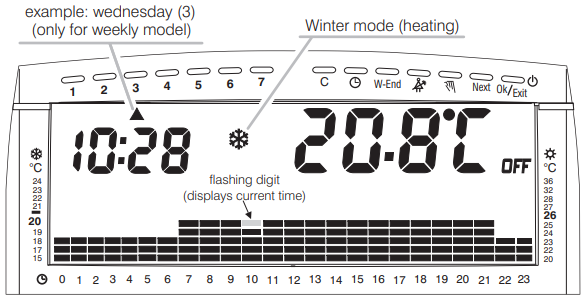
DISPLAY
DISPLAY AND KEY OPERATION DESCRIPTION
INSERTING AND REPLACING BATTERIES
When the ( symbol![]() appears the batteries are low; there are approximately 30 days left to replace them. steadily lit) If within this time the batteries are not replaced the display will not turn on. All temperature control activities will stop. The settings remain in the memory and will be restored when new batteries are inserted.
appears the batteries are low; there are approximately 30 days left to replace them. steadily lit) If within this time the batteries are not replaced the display will not turn on. All temperature control activities will stop. The settings remain in the memory and will be restored when new batteries are inserted.
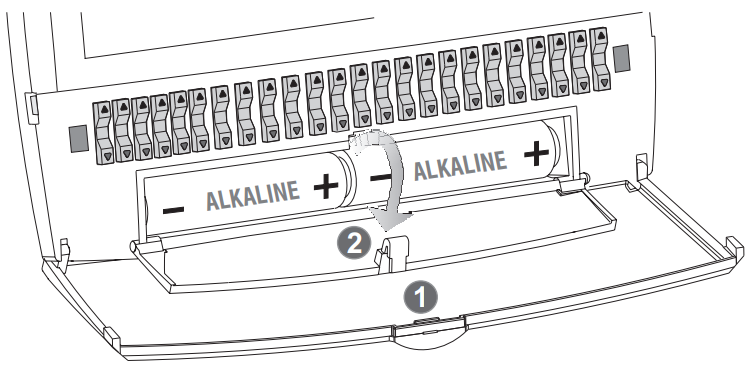
How to insert and replace batteries:
- open the front key cover
- open the battery cover 2
- Insert or replace the dead batteries with two ALKALINE 1.5 V type AAA (LR03) batteries, paying attention to their polarity
ONLY USE GOOD QUALITY ALKALINE BATTERIES (Duracell or Energizer batteries are recommended)
- close the battery cover 2
- close the front key cover 1
START THE CHRONOTHERMOSTAT
First start
- After the batteries are inserted, the Chrono thermostat carries out a lamp test on the display.
- After the test, the factory-programmed chrono thermostat is immediately operational, displaying
- current hour and minutes;
- current day (only for weekly model);
- Winter «heating» mode with temperature profile (from 00:00 to 6:59 set at 18°C, from 7:00 to 21:59 set at 20°C, from 22:00 to
Following starts
- The chrono thermostat will maintain, even without batteries, current time and weekday (weekly model), user program and the set POINT
- The current date and time can, however, be manually updated (see par. 6. 1).
PROGRAMMING THE CHRONOTHERMOSTAT
To simplify programming, the chronothermostat is factory-set. During the first start or when required, (only if the current day for the weekly model) are incorrect, use the change and time procedure described below.
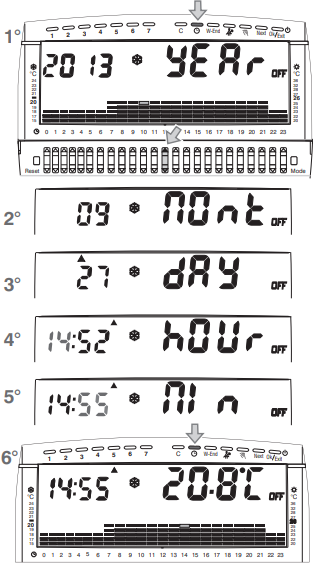
CHANGE: YEAR- MONTH -DAY -HOUR- MINUTE AND CURRENT
- Press the button: appears on the right and the actual “YEAr” year on the left. (from 2012 Change, if necessary, the current year to 2075 max) by repeatedly pressing one of the keys. UP/DOWN
- Press the button: appears. “MOnt” Change, if necessary, the current month UP/DOWN by repeatedly pressing one of the keys.
- Press the button: appears. “dAy” Change, if necessary, the current day UP/DOWN by repeatedly pressing one of the keys.
- Note: does the flag ( ) of the day of the only for the weekly model week (1÷7) automatically move.
- Press the button: appears. “hOUr” Change, if necessary, the current hour (first two digits to the left) by repeatedly pressing one of the keys. UP/DOWN
- Press the button: appears. “MIn” Change, if necessary, the current minutes UP/DOWN by repeatedly pressing one of the keys.
- Press the button to save the new settings and return to normal chronothermostat operation
SETTING THE DESIRED TEMPERATURE
The programmable choronothermostat allows setting the temperature for each hour of the day, and different programs for each day of the week (weekly model), ensuring the optimum room temperature for the user’s every need.
TEMPERATURE ADJUSTMENT
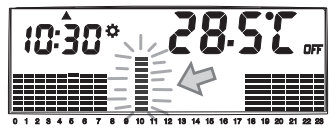
There is an key corresponding to every hour. Pressing the upper part of the key![]() (red), increases the temperature UP-DOWN setting; pressing the lower part
(red), increases the temperature UP-DOWN setting; pressing the lower part  (blue) decreases it. The device immediately displays the temperature change in the temperature indicator area and shows the level set on the ambient temperature display. 8 seconds after the last UP-DOWN key is released, the display returns to show the room temperature, 8 seconds after the last UP-DOWN button was pressed. Any setting changes will be memorised 60 seconds after the last button was pressed.
Winter «antifreeze» thermal protection
Decreasing the temperature in mode![]() until is reached (ex. in Winter fig. 1), when pressed again the antifreeze temperature will appear (ex. in fig. 2). If the antifreeze is switched off three dashes
until is reached (ex. in Winter fig. 1), when pressed again the antifreeze temperature will appear (ex. in fig. 2). If the antifreeze is switched off three dashes ![]() swill appear (see paragraph 8.9
swill appear (see paragraph 8.9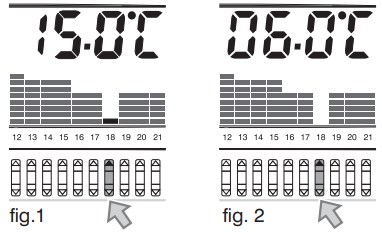
Summer «anti-heat» thermal protection
Increasing the temperature in Summer mode ![]() until 15.OC is reached (ex. in Summer fig. 3), when pressed again three dashes will appear (ex. in fig. 4), indicating that the summer (anti-heat) thermal protection is switched off. If the anti-heat is activated (see paragraph 8.10), will appear and the column with 10 (digit) temperature levels will disappear.
until 15.OC is reached (ex. in Summer fig. 3), when pressed again three dashes will appear (ex. in fig. 4), indicating that the summer (anti-heat) thermal protection is switched off. If the anti-heat is activated (see paragraph 8.10), will appear and the column with 10 (digit) temperature levels will disappear.
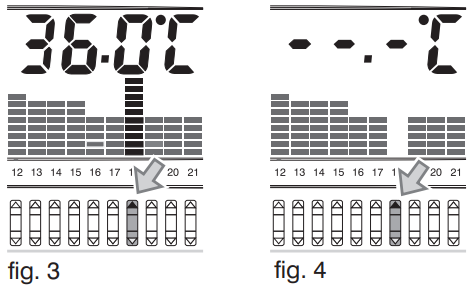
Note: 10 flashing simultaneously temperature levels (digits) indicate that the current time is in the program of an «anti-heat» thermal protection (activated or switched off).
SETTING THE DAILY DESIRED TEMPERATURE
set the desired temperature for each hour (24h) with the buttons as described in par. 6.2.1.
SETTING THE DESIRED WEEKLY TEMPERATURE (only for the weekly model)
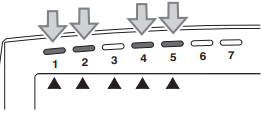
- Select the day of the week programmed by pressing the corresponding key: the indicator of the selected day flashes on the display and the set temperature profile appears.
- Newly set the desired temperature for each hour of the day (24h) with the buttons as described in paragraph 6.2.1 UP/DOWN 8 seconds after a set button is pressed the chronothermostat will go to the current day.
- Several days can be programmed at a time without waiting for the current day to be displayed. Simply press the button of the desired day
COPYING THE TEMPERATURE SETTING (weekly model only)
In the example shown at the side, the setting for day is copied to days . 3 1,2,4,5 From normal chronothermostat use:
- Select the day of the week that you wish to copy. The corresponding indicator will flash.
- Press the key C
- The previously selected day stops flashing.
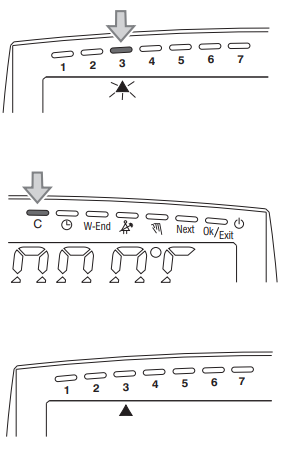
- Press buttons of days 1,2,4,5;
- Press the C to copy programming. The chronothermostat resumes normal operation.
USER AND ENERGY SAVING FUNCTIONS
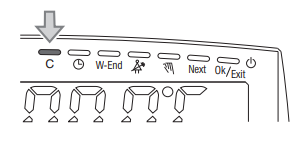
READING THE TEMPERATURE PROFILES (only for the weekly model)
At any time the set daily temperature profile of any day can be displayed by pressing the key (the indicator flashes). After 8 seconds the chronothermostat resumes normal operation displaying the current day and temperature profile.
MANUAL OPERATION
Two manual operating modes are possible. with a pause in the current program
TEMPORARY MANUAL OPERATION
From normal chronothermostat operation, press ![]() once for temporary manual override. The
once for temporary manual override. The  symbol flashes and the set temperature for the current hour is applied to the remaining hours of the current day. Temporary manual operation stops automatically at midnight ofthe current day. During this temporary manual override period, the desired temperature can be selected by pressing any UP-DOWN button. This increases or decreases all the digits from the current time to midnight. The temporary manual override period can be interrupted in advance by pressing once (flashing symbol disappears).
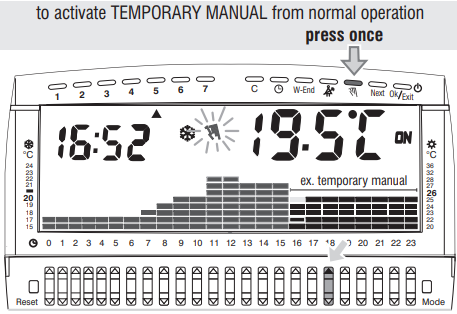
PERMANENT MANUAL OPERATION
From normal chronothermostat operation, press twice. The symbol is steadily lit on the display and the set temperature for the current hour is applied to all 24 hours of the day. During this permanent manual period the desired temperature can be selected by pressing any UP-DOWN button. This increases or decreases all the digits of the 24 hours. Permanent manual operation is activated indefinitely. To deactivate it and return to programmed operation press the button once (steady symbol disappears).

SUSPENDING THE SYSTEM FOR CLEANING
From normal chronothermostat operation, by pressing the A* key, the programmable thermostat will turn off the system for three hours, placing itself in the anti-freezing position (winter) or disabling the cooling (summer). This function has been designed to avoid wasting energy in all of those cases (such as household cleaning) when it is necessary to keep the windows open. The activation of the suspension program is displayed by the disappearance of the display segments corresponding to the three hours starting from the current hour. After 3 hours the chronothermostat returns to the interrupted program. To return to the interrupted program before 3 hours press * The missing digits will reappear on the display.
RESET
The chronothermostat is equipped with a «user» and «general» reset that restores the factory settings.

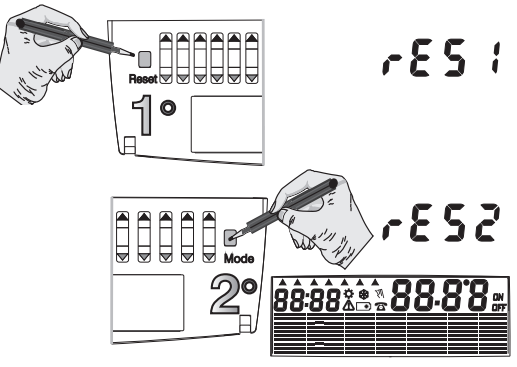
USER RESET
When there are display anomalies, faulty operation or to delete changes done in the last minute, gently press the button with a Reset pointed object. The display shows followed several seconds rES 1, later by a lamp-test, after which it is in the normal operation conditions.
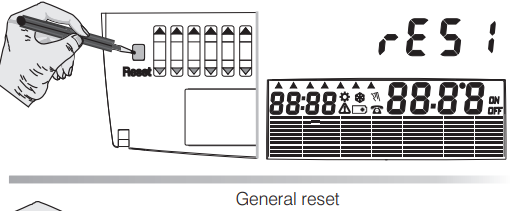
GENERAL RESET
Gently press the button and release it. When appears, press the Reset rES 1 Mode button. The display shows ; followed several seconds later by a lamp-test, after rES 2 which it is in normal operation conditions in the Winter (heating) mode and all factory settings are restored
WEEKEND PROGRAM
This function optimises consumption when no one is home for several days, without changing the program of the set temperature profile. From normal chronothermostat operation, to activate the WEEKEND program and set in terms of hours (from 1 to 999) do the following: ex. set 168 hours corresponding to 7 days of absence Press the key. The counter is displayed with the first digit W-End C001 (hundreds) flashing. Repeatedly press the button to set the value desired (from 0 to 9). Press the button to go to the second digit (tens). Next Repeatedly press the button to set the value desired (from 0 to 9). Press the button to go to the third digit (units). Next Repeatedly press the button to set the value desired (from 0 to 9). Note: in case or error, the entered numbers can be changed at any time. Repeatedly press the button to go to the desired field and change the Next number with the button. Enter the hours of absence desired (ex. C168) in order for the chronothermostat to start the countdown and the program to keep W-End the device deactivated. Once the countdown is completed, the chronothermostat will restore your normal temperature profile in order to reestablish the household temperature upon your return.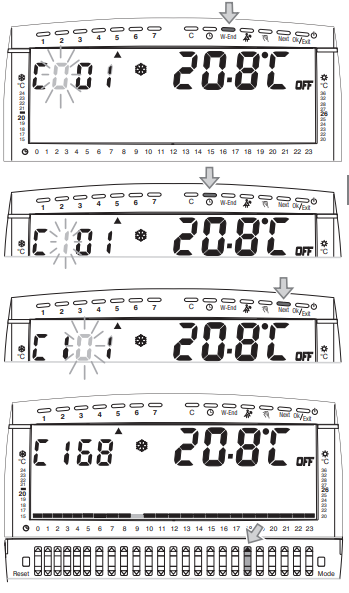
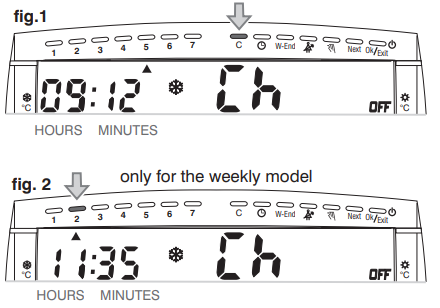
SYSTEM OPERATION HOURS
The chronothermostat shows the operating hours of the connected device in the current day, in each of the previous 6 days (only the weekly model), and the total of the entire season. From normal chronothermostat use:
- Ch Press the function button the display shows (hour counter) preceded by the number of operating hours and minutes of C the current day (fig.1). To display the number of operating hours and minutes of any day , press the (only for the weekly model) corresponding button (fig. 2).
- Press button (or Next) again, the display shows (total hour counter) preceded by the number of operating hours since C Cht the start of the season (fig. 3).
- Press (or Next) again, the display shows or press the button to reset the total C CANC Press to exit without deleting C hour counter of the season, current day and the other weekdays (only the weekly model) (fig. 4) and return to normal operation.

CHRONOTHERMOSTAT SWITCH-OFF (OFF)
From normal chronothermostat operation, press; appears OFF indicating that the chronothermostat is deactivated. In this state, all chronothermostat functions are deactivated. Only the current time and temperature are displayed. Press the button to return to the previously set thermal program.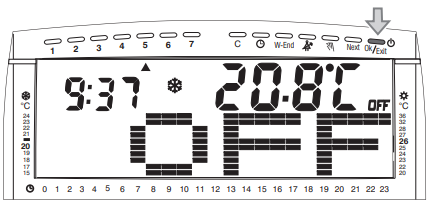
PROGRAMMABLE FUNCTIONS THAT ADAPT TO THE TYPE OF SYSTEM
ACCESS TO FUNCTION PROGRAMMING
It is recommended to give access to the programs to the installer or expert users since a change in some settings can compromise the proper functioning of the system. From the normal chronothermostat operating condition gently press the Mode button with a pointed object (ex. ballpoint pen). After an open lock appears, a programming menu for special functions can be accessed. In the first screen the chronothermostat operation mode (SEAS): can be selected: Winter or Summer. Alternatively: if a secret access code was previously entered, the screen to the side is shown: For each available field, (4), enter the number by repeatedly pressing one of the UP-DOWN buttons. Press the Next button to go to the next field. Note: exit the secret code setting by pressing Ok/Exit, or wait 12 seconds. After the 4th digit is pressed, £ Rd is briefly displayed when pressing the Next button. Following this, a program menu for special functions can be accessed. In the first screen the chronothermostat operation mode (SEAS can be selected: Winter or Summer.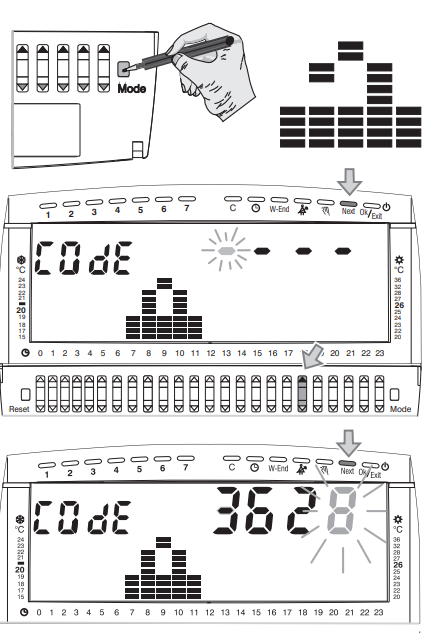
In the program menu (paragraph 8.1) the following programs can be set and/or modified (described in the same order in the upcoming paragraphs: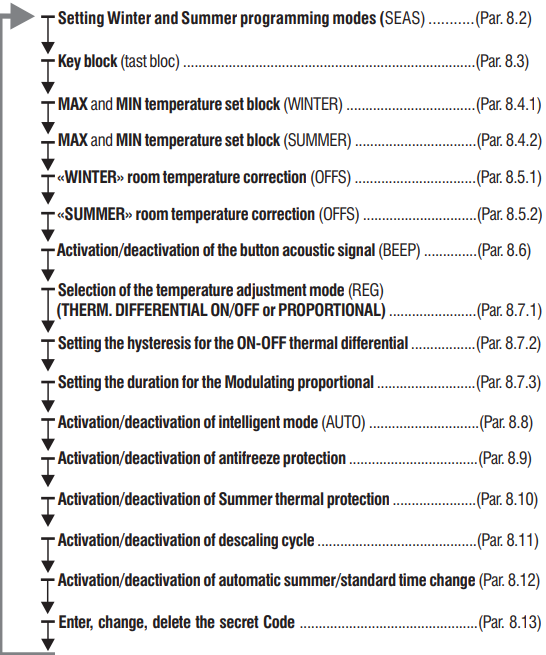
USE OF MENU KEYS: «Mode»
- Press the buttons to modify the UP-DOWN selected parameter.
- Press to go to the next function. “Next” To exit programming “ ” press the button.
WINTER ![]() OR SUMMER
OR SUMMER![]() MODE SETTING
MODE SETTING
The chronothermostat is factory-set to the Winter (heating); mode. The buttons switch UP-DOWN between the Winter and SUMMER (cooling) modes.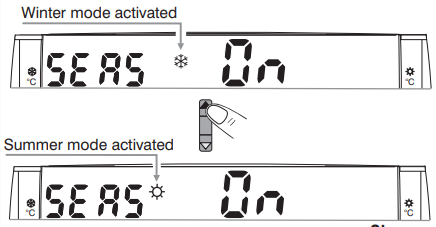
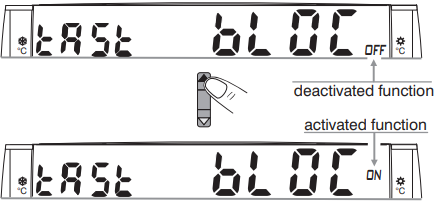
KEY BLOCK
This function allow to lock the keys prevents the chronothermostat from being used by unauthorized personnel as well as prevents children from playing with it. This factory setting is not activated. Pressing the buttons activates or deactivates the function. UP-DOWN
MAX and MIN TEMPERATURE SET BLOCK for Winter and Summer mode
In certain chronothermostat installations (public buildings, hotels, etc.) might be useful to limit the MAXIMUM and MINIMUM temperature sets (levels). This avoids incorrect settings by unauthorised personnel.
MAX and MIN TEMPERATURE SET BLOCK for mode
Repeatedly press the buttons to block the desired set temperature. UP-DOWN maximum
Press to go to the next setting ( set temperature block in ) or press to exit from the program menu. Repeatedly press the buttons to block the desired set temperature.

MAX and MIN TEMPERATURE SET BLOCK for mode
Repeatedly press the buttons to block the desired set temperature. UP-DOWN maximum
Press to go to the next setting ( set temperature block in ) or press to exit from the program menu. Repeatedly press the buttons to block the desired UP-DOWN minimum set temperature
CORRECTION (OFFSET) OF ROOM TEMPERATURE READING
The chronothermostat may be installed in a position from which the measured room temperature can be influenced (ex. perimeter wall that during the winter, on average, is colder and in the summer is warmer than the rest of the dwelling). The device has 2 separate parameters to adjust the temperature measured in the Winter and Summer modes.
CORRECTION OF ROOM TEMPERATURE READING in Winter mode
Repeatedly press the buttons to set the UP-DOWN measured room temperature to the desired value.
CORRECTION OF ROOM TEMPERATURE READING in mode
Repeatedly press the buttons to set the UP-DOWN measured room temperature to the desired value.

SETTING THE ACOUSTIC SIGNAL (Beep)
- This function activates/deactivates the acoustic signal.
- Pressing the it deactivates or activates . UP-DOWN It is activated in the factory setting.
- Press to go to the next setting or press to exit Next from the program menu.

TEMPERATURE ADJUSTMENT METHODS
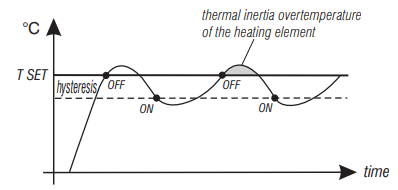
- The chronothermostat operates (factory set) in THERMAL DIFFERENTIAL MODE ON-OFF with a differential value (h steres s) factory-set to (adjustable from 0,1 °C to y i 0,3 °C 0,9 °C).
- The differential value must be set according to the system’s thermal inertia; a low value is recommended for systems with radiators (e.g. in cast iron) and a high value for systems with fan coils.
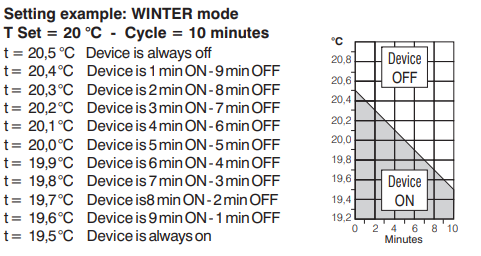
- As opposed to the thermal differential, the temperature can be adjusted ( ); MODULATING PROPORTIONAL PROP setting cycles from 7, 10, 15 20 minutes (factory set 10 minutes). This system maintains the desired temperature more stable by increasing the user’s sense of comfort and saving on energy consumption.
- Recommended: a long cycle for systems with high thermal inertia (cast iron radiators, floor systems); a short cycle for systems with low thermal inertia (fan-coils).
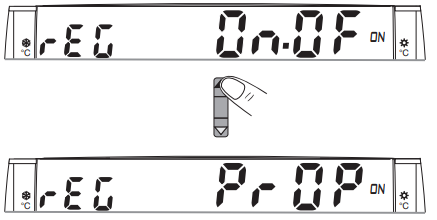
SELECTION OF THE TEMPERATURE ADJUSTMENT MODE (DIFFERENTIAL ON/OFF or MODULATING PROPORTIONAL)
- This procedure selects the temperature adjustment mode: Thermal differential Modulating proportional (factory setting) or .
- Press the buttons to select the desired temperature UP-DOWN adjustment mode.
- Press to go to the next setting or press to exit from the Next program menu.
SETTING THE HYSTERESIS FOR THE ON-OFF THERMAL DIFFERENTIAL
The hysteresis for the ON/OFF ( ) thermal differential adjustment mode is set based on the system’s thermal inertia. Low levels are recommended for radiator systems (cast-iron), while high levels for fan coil systems. Hysteresis can be set from 0.1 °C to 0.9 °C. It is factory-set at 0,3 °C. Repeatedly press the buttons to set the desired UP-DOWN hysteresis. Press to go to the next setting or press to exit from the Next program menu.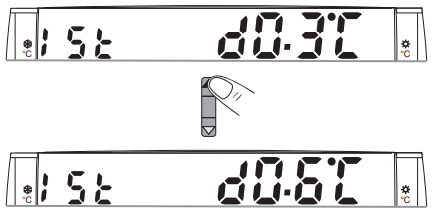
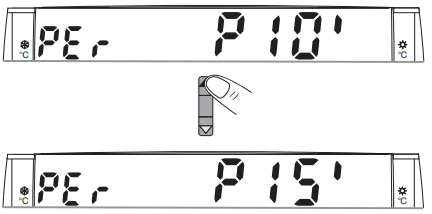
SETTING OF THE MODULATING PROPORTIONAL CYCLE DURATION
Control cycle (o period) duration for the MODULATING r PROPORTIONAL operating mode ( can be set at , ) 7 10, 15, 20 minutes. A long cycle is recommended for systems with high thermal inertia (cast-iron radiators, floor systems), while a brief cycle is recommended for systems with low thermal inertia (fan-coil). The factory setting is . 10 minutes Repeatedly press the buttons to set the desired cycle UP-DOWN duration.
SETTING INTELLIGENT OPERATION (AUTO)
°C OFF °C With ” ” the chronothermostat can the connected device in advance, to achieve the desired Intelligent operation switch-on or switch-off temperature at the desired time. Switch-on can start 2 hours in advance, at most. An early switch-off can achieve approximately compared -1° C to the set temperature. Both functions can automatically adjust based on system features.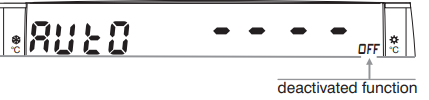
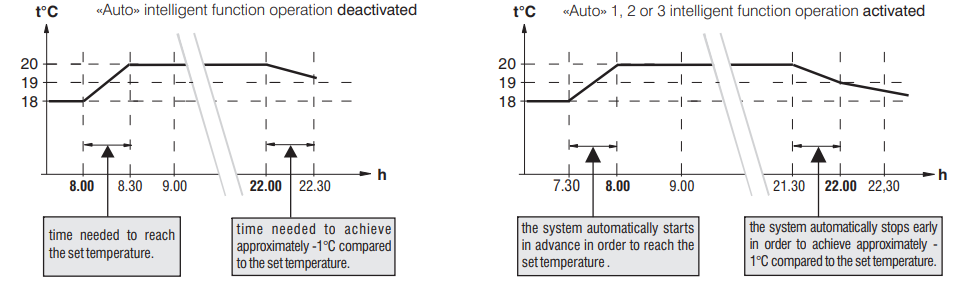
Repeatedly press the buttons to set the desired ( or or ) Auto function UP-DOWN 1 2 3
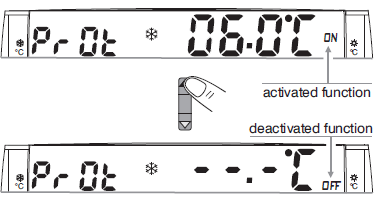
ANTIFREEZE PROTECTION
The chronothermostat is factory-set to protect the system against temperatures that drop below +6.0 °C. This function can be switched off, in which case the system can be damaged by freezing temperatures. Repeatedly press the buttons to deactivate or activate the UP-DOWN antifreeze protection. Press to go to the next setting or press to exit from the Next program menu.
SUMMER THERMAL PROTECTION
The chronothermostat is provided with thermal protection for the Summer operation mode. It activates the cooling system if the temperature exceeds +40 ° C. Is factory-set to deactivated (conditioner always off). Repeatedly press the buttons to activate or deactivate the UP-DOWN summer thermal protection. Press to go to the next setting or press to exit from the Next program menu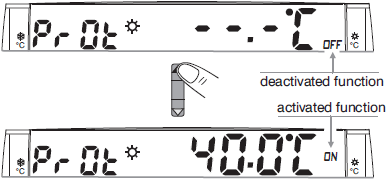
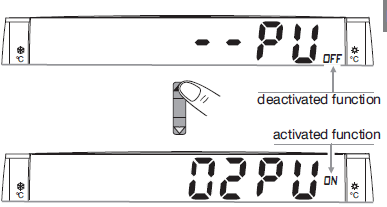
DESCALING CYCLE
If the function is activated, the chronothermostat activates every day of the year at 12:00, for 2 minutes. It activates the controlled device (pump, valve) to prevent encrustations or blocks caused by prolonged inactivity.
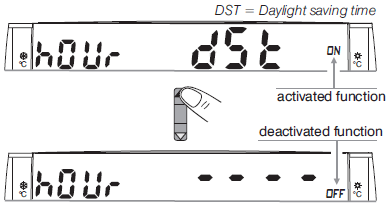
AUTOMATIC SUMMER/STANDARD TIME CHANGE
The chronothermostat automatically changes the standard/summer time in compliance with the protocol that regulates time in Europe (UTC+1)
- On the last Sunday in October, time automatically changes from 3:00 to 2:00
- On the last Sunday in March, time changes from 2:00 to 3:00
ENTER/CHANGE/DELETE THE SECRET CODE (4 digits)
Access to Mode menu programming can be protected by a secret code enabled by the expert user, installer or system manager. No code is set in the basic configuration.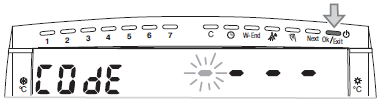
No secret code
To avoid entering a password press the button to exit the Mode programming menu. (In this condition it is also possible to press the button 5 times to Next avoid memorising a secret code and to return to the Winter/Summer operation setting mode)
Entering the secret code
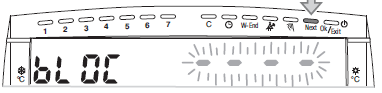
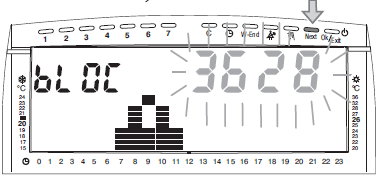
Enter the 4 digits of the desired secret code. For each available field, repeatedly press the buttons to UP-DOWN enter a number from (not including the dash). Confirm each 0 to 9 digit by pressing the button. Next When all 4 digits are entered press : appears on the Next bLOC display . and flashing the entered codePress again to memorise and return to the Winter/Summer Next (SEAS) operation mode setting. Then press , to exit from the Mode programming menu.
Change or delete the secret code
To modify To instead a previously memorised code simply change it. delete it and enter dashes in all 4 fields ( ). In both cases follow the above procedure.
REFERENCE:
DOWNLOAD MANUALS:
PERRY 1CR-CR018BS Weekly Digital Programmable Thermostat User Manual

PERRY 1CR-CR018BS Weekly Digital Programmable Thermostat User Manual
Leave a Reply