
Peco T8168 Programable Thermostat
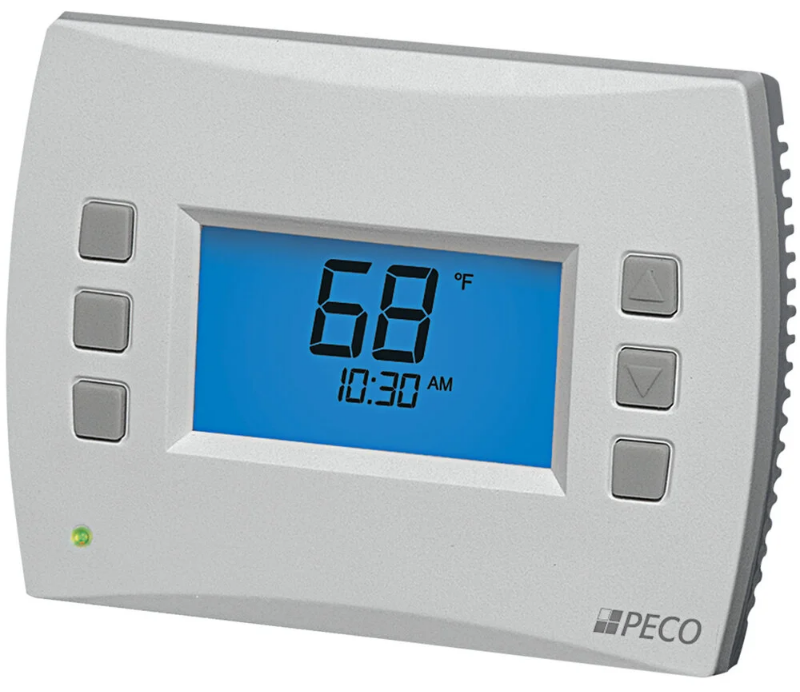
THE PECO PERFORMANCE PRO TW180
Thank you for choosing a PECO® Performance PRO™ thermostat. This thermostat is intended for use in residential and commercial environments. It is designed for and can support up to 2-HEAT/ 1-COOL conventional, fan coil, or PTAC applications.
The Performance PRO™ TW180 is configurable to meet different operational requirements, including settings for programmable or non-programmable operation. Features include an 8 square-inch blue backlit display with dynamic menus accessed using soft keys, auto-changeover, optional remote sensors, occupancy sensors, three levels of keypad lockout, a PIN access code, and a heat/cool demand indicator. When set up for programmable mode the system provides two or four scheduled events per day, a 365-day calendar, 20 holidays, holiday override, and temporary override.
The TW180 can be powered by either 120-277 VAC or 24 VAC depending on the wiring. See the installation instructions for more information. This thermostat includes memory for permanent storage of user settings in the event of a power failure.
CAUTION!
- READ THE INSTRUCTIONS CAREFULLY BEFORE ATTEMPTING TO OPERATE THIS THERMOSTAT.
- FOLLOW THE PERFORMANCE PRO INSTALLATION INSTRUCTIONS BEFORE PROCEEDING.
- Failure to observe safety information and comply with instructions could result in PERSONAL INJURY, DEATH, AND/OR PROPERTY DAMAGE.
- Use this thermostat only as described in this manual.
- This is a 24-277 VAC low-voltage thermostat. Disconnect the Power before removing the cover.
- Contact a qualified service person if at any time the thermostat does not operate properly.
- Use care to avoid static discharge to the thermostat.
- To avoid electrical shock or damage to equipment, disconnect power before installing or servicing and use only wiring with insulation rated for full thermostat operating voltage.
- To avoid potential fire and/or explosion, do not use in potentially flammable or explosive atmospheres.
- This product, when installed, will be part of an engineered system whose specifications and performance characteristics are not designed nor controlled by PECO.
- All wiring and applications must conform to local and national building codes and ordinances Applications and national codes must be reviewed prior to installation to assure the installation is functional and safe.
IMPORTANT NOTE: This thermostat was shipped with factory default settings. The thermostat’s installer may have configured the thermostat differently from the factory-default settings and may have modified or disabled certain features. Contact the installer or a service technician if there are questions about the thermostat’s configuration.
QUICK REFERENCE: DEFAULT DISPLAY MODE
Default Display
The factory-programmed settings show the time, temperature, and setpoint. This is called the Default Display. The Default Display appears after a short period of inactivity. The Default The display can be custom configured to show user-selected items only (see Service Menu 520 in Installation Guide”).
Note: Indicator notifications may appear in the digital display if user action is required.
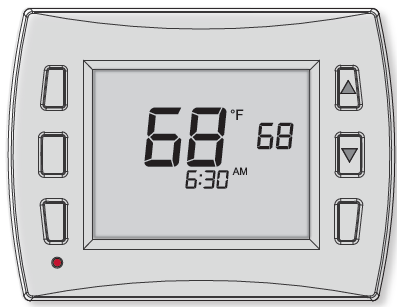
Home Display
The Performance PRO™ TW180 has two ▲/ ▼(Up and Down) keys and four soft keys (1-3; 6 below). Press any key to enter Home Display from Default Display. Press soft keys to enter the submenus. Soft keys have multiple functions; available submenus depend on menu navigation.
Navigate submenu options to customize thermostat settings. Available options are:
- Next – Advances to the next menu item in the sequence.
- Go Back – Returns back one step in menu sequence or reverts to Home Display.
- Done – Saves settings and reverts to the Home Display.
- Cancel – Discards set point override and reverts to the Home Display.
- Exit- Discards changes and reverts to the Home Display.
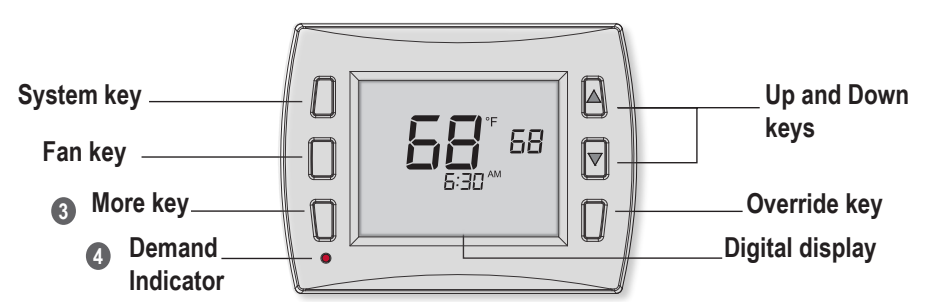
QUICK REFERENCE: TW180 HOME DISPLAY SCREEN

KEY OPERATION
System Key (ON|OFF)
Used to control the operating mode of the thermostats. The options available are dependent on System Type selected in Service Menu 110 (see the Installation Guide). System modes are:
- HEAT – Select for the system to operate in heating mode only.
- COOL – Select for system to operate in cooling mode only.
- AUTO – Allows the system to automatically changeover between heating and cooling modes as room temperature varies. Changeover requires the thermostat to transition through the deadband. The user selected set point is the control point unless the system is running to a schedule.
- OFF – Turns all outputs off; only zone temperature and time are displayed.
Note: Deadband is set in the service menu and is used when scheduling events (see Service Menu 380).
Fan key
- ON – Continuous fan operation.
- AUTO – Cycled Fan operation. Fan cycles off when the set point is satisfied.
- HI-MED-LO – Selectable speeds based on the system.
In fan-staged operation, the user does not have access to speed selection.
More key
Used to view more menu options. From the Home Display, press “More” to show more menu options that may be accessed by pressing the soft keys.
Demand Indicator
An indicator light on lower left front panel will display red when heating and green when cooling.
Up and Down keys (▲/▼)
Used in menus to increase or decrease set point or for menu navigation.
Note: Pressing ▲/▼ keys show the Override display unless Holiday mode is set.
Override key
Used to create a temporary override of current setpoint temperature. Pressing “Override” will display the “Next” and “Done” options and the setpoint will begin flashing.
Additional Key Operation
- Cancel – Used ot Cancel a user Override. The thermostat will resume normal operation.
- Exit – Discards changes and returns to the Home display.
- Setback – The thermostat is operating at Setback values. (See Service Menus 310 & 320)
Display Messages
This thermostat can be set to display the following codes:
- Fdd – Indicates an economizer fault*, thermostat continues normal operation.
- Dor – Indicates a door/window is open, all outputs are turned off until the door/window is closed.
- Err – Indicates a contact closure at TB1-3 and TB1-7*. All outputs are turned off.
* Indicates that your system may require service.
SET THE CLOCK, MONTH, AND DAY
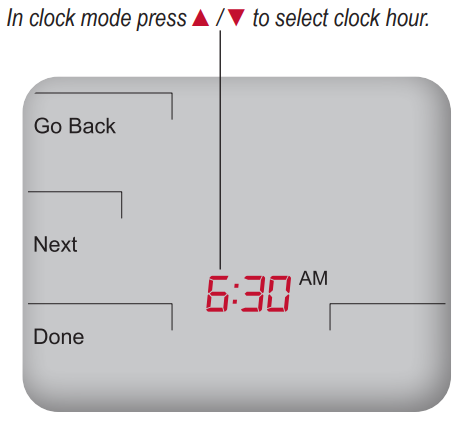
Note: At any time, press Go Back to return to the previous menu, Next to advance and view more options, or Done to save changes and return home.
PRESS ANY KEY TO BEGIN
- Press More to view menu options.
- Press Clock to access menu options.
- Press ▲/ ▼ to select 12 or 24 HR format, then press Next.
- Press ▲/ ▼to select clock hour, then press Next.
- Press ▲/ ▼to select clock minutes, then press Next.
- Press ▲/ ▼to select clock year, then press Next.
- Press ▲/ ▼to select current month, then press Next.
- Press ▲/ ▼to select current date. Days and Mo (month) appears.
- Press Done to finish clock mode.
SELECT FAHRENHEIT OR CELSIUS TEMPERATURE

Note: To custom configure thermostat settings, access more Service Menus see the TW180 Installation Guide.
- Press the lower left and lower right keys simultaneously for about five seconds.
Go Back, Next, and Done appear. - Press Next continuously until menu “260” appears.
- In Service Menu 260, Press ▲/ ▼to select the desired temperature display:
- “1” for Fahrenheit (default)
- “0” for Celsius
- Press Done when you have completed your selection.
Note: After you complete your selection, the Home Display will appear with the temperature in the format selected.
SELECT THE FAN MODE
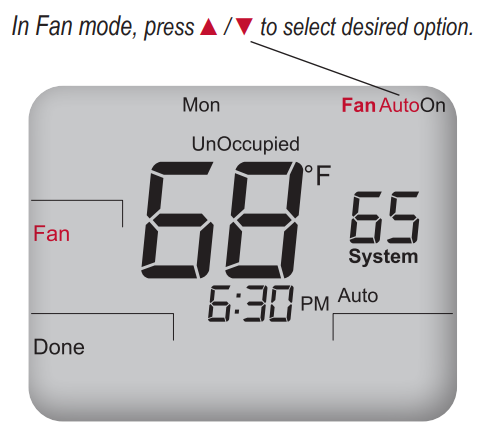
- Press Fan to set fan operation.
- Press ▲/ ▼ to select “Fan On”, “Fan Auto” , may also include selections of “HI”, “MED”, “LO.” Fan speeds may be disabled or visable but not selectable. Access depends on fan setup at installation.
- Note: Selected option flashes.
- Select Done to save changes.
Note: “On” mode indicates continuous output. “Auto” mode indicates that fan is activated only when there is demand for heat or cooling.
SELECT SYSTEM MODE
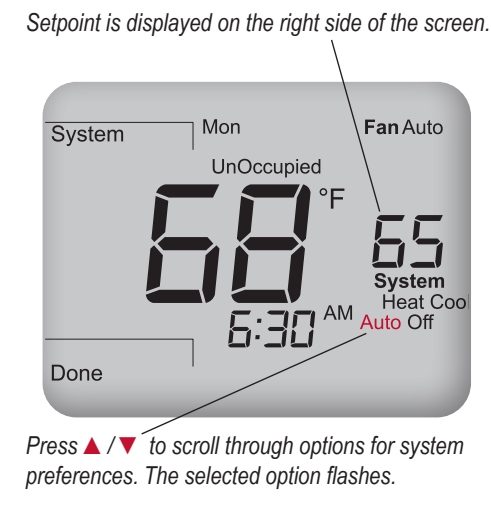
Note: System modes available depend upon which system type is selected in Service Menus.
- Press System to select system preferences.
Note: Selected option flashes. - Press ▲/ ▼ to select Heat, Cool, Auto, or Off.
- Press Done to save changes.
The current setpoint is displayed and only the selected mode (e.g.,Heat) is applied. “Auto” mode switches automatically between Heat and Cool. Auto mode controls the room’s temperature to the programmed Heat and Cool Setpoints or user selected set point. “Off” mode disables all thermostat outputs; and only the zone temperature and clock are displayed.
PROGRAM THE THERMOSTAT
Each day has two or four scheduled events (Occupied1, Occupied2, Unocc1, and Unocc2) per day. Each event can be programmed with a start time, along with a Heat and Cool Setpoints.The preprogrammed factory daily default settings are as follows:
2-Event Default Schedule
| Time Period | Start Time | Heat Setpoint | Cool Setpoint |
| Occupied1 | 6:00 am | 70° F (21° C) | 78° F (24.0° C) |
| Unocc1 | 8:00 am | 62° F (10° C) | 82° F (29.5° C) |
4-Event Default Schedule
| Time Period | Start Time | Heat Setpoint | Cool Setpoint |
| Occupied1 | 6:00 am | 70° F (21° C) | 78° F (24.0° C) |
| Unocc1 | 8:00 am | 62° F (10° C) | 85° F (29.5° C) |
| Occupied2 | 6:00 pm | 70° F (21° C) | 78° F (24.0° C) |
| Unocc2 | 10:00 pm | 62° F (10° C) | 82° F (29.5° C) |
Note: To change the preprogrammed times and/or setpoint temperatures, follow the instructions under “Program scheduled events.”
Note: See Service Menu 240 to enable two or four scheduled events per day.
PROGRAM SCHEDULED EVENTS
Note: At any time, press Go Back to return to the previous menu, Next to advance and view more options, or Done to save changes and return home.
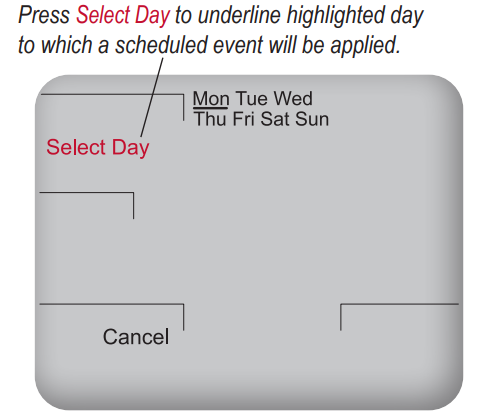
Schedule two or four events per day in the following order: Occupied1, Unocc1, Occupied2, and Unocc2.
- Press More to view options.
- Press Schedule to enter the main menu.
- Press ▲/ ▼to highlight the day.
Note: Selected day flashes. - Press Edit to apply scheduled events for the selected day(s).
- Press Select Day. Note: Selected day flashes. (Continue pressing ▲/ ▼then press Select Day for multiple days.)
- Press ▲/ ▼to highlight the day(s) to be programmed. Note: Selected day(s) for scheduled events must be underlined.
- Press Next to advance to event.
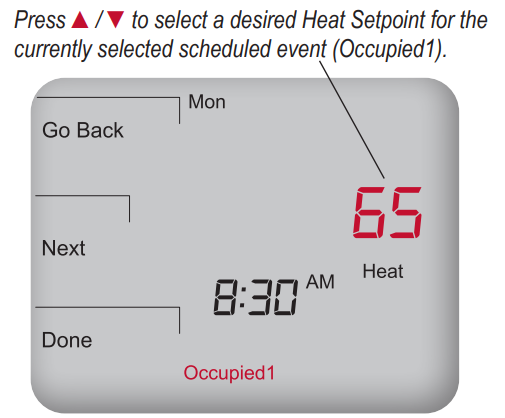
- Press ▲/ ▼ to select a scheduled event (e.g, Occupied1, etc.), then Next.
- Press ▲/ ▼to schedule start time for event (in 15-minute periods), then Next.
Now select a Heat Setpoint and/ or Cool Setpoint for the scheduled event (available options depend upon system type selected). - Press ▲/ ▼to select desired Heat Setpoint, then press Next.
- Press ▲/ ▼to select desired Cool Setpoint, then press Next.
Note: The next event (e.g., Unocc1) begins flashing after Next is selected. Complete steps 3-11 for each scheduled event. - Press Done to exit schedule mode.
Note: Pressing Go Back after step 11 will show Select Day on display.
Note: To return to the menu of scheduled events and continue programming, select Next after Step 11.
Note: To program 5-1-1 days or 5-2 days, see Service Menu 100 (See the Installation Guide). Block-programmed days flash as a group.
PROGRAM OVERRIDE
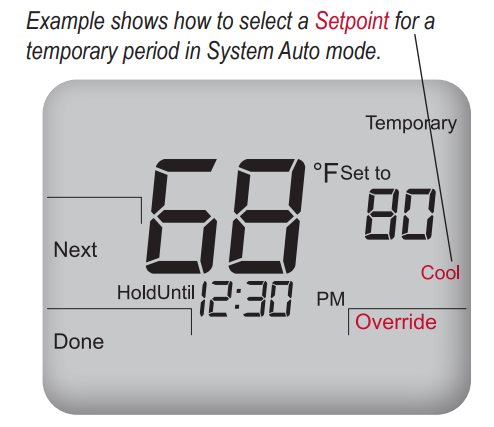
Note: The installer setup can limit the length of time for an override to 1, 2, 3, or 4 hours beyond the current time
An override allows the application of a temporary setpoint setting. (Example uses System Auto.)
PRESS ANY KEY TO BEGIN
- Press Override, or ▲/ ▼key.
Note: Setpoint flashes. “Hold until” time appears and is changed to show the length of override (up to the maximum hold time specified in Service Menu 395). - Press ▲/ ▼to select the Setpoint, then press Next.
- Press ▲/ ▼to adjust the time (in 15-minute periods) until override remains in effect.
- Press Done to save changes and exit.
Note: Override remains (flashing) in effect until the time period ends.
Note: Press Cancel to exit Override.
PROGRAM A HOLIDAY
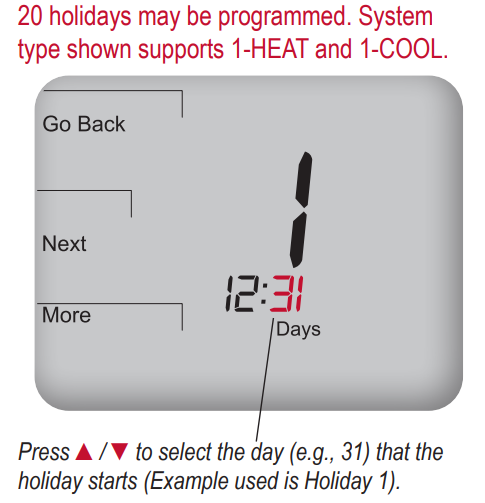
20 holidays may be programmed. The system type shown supports 1-HEAT and 1-COOL.
Note: The TW180 supports 20 holidays, leap years, and daylight-saving time. The setback is from Midnight to Midnight.
- Press More to view more options.
- Press Holiday to enter the menu.
- Press ▲/ ▼to select holiday number (1-20).
Note: Month number and day of the month appear below in the clock area. - Press Edit to select the holiday month (the “Mo” icon will appear).
- Press ▲/ ▼to select a month (numerical), then press Next.
- Press ▲/ ▼ to select the day (numerical) that the holiday starts (The day’s icon will appear), then press Next.
- Press ▲/ ▼ to select holiday length, which is the number of days that the holiday period lasts (1-99), then press Next.
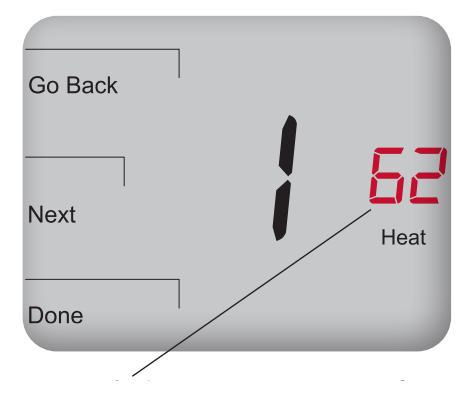
Now select the Heat and Cool Setpoints for the same holiday number (e.g., “1”). - Press ▲/ ▼to select the Heat Setpoint, then Next.
- Press ▲/ ▼to select the Cool Setpoint, then Next.
Optional: To program multiple holidays, wait for the Holiday number to flash (after step 9). Press ▲/ ▼to select a new Holiday number; repeat steps 3-9. - Press DONE to complete the holiday display mode.
Note: Set the Heat and Cool Setpoint after selecting the number of days the holiday period lasts.
Note: The Holiday is not retained and is deleted after being activated.
Note: There is a forced separation between heat and cool, equal to the dead band value; the opposing Heat or Cool Setpoints will be automatically adjusted (for an explanation of deadband value, see Key operation).
THERMOSTAT FEATURES
This thermostat offers special features to support advanced control requirements.
- Fan Control – up to three 24 VAC ON/OFF outputs that can be staged.
- Heat Outputs – Up to two Stages of ON/OFF.
- Fault Detection – For an indication of an Economizer fault, Door open, or user-defined Error.
- Keypad Lockout – Three levels of lockout with an optional PIN requirement.
- WiFi – Some models feature Wi-Fi operation.
- BACnet – Some models feature BACnet communication over IP or MSTP.
TW180 SERIES PRODUCT SPECIFICATIONS
- Temperature Control Range: 50° to 90° F (10° to 32° C)
- Differential: 1° F (0.5°C)
- Input Power: 24 or 120-277 VAC at 50/60Hz (+/-10% ) 5mm terminals accept 12-18 AWG stranded/solid wire.
- Ratings: See Installation Instruction
- Operational Temperature: 0° to 120° F (-17° to 48°C)
- Shipping Temperature: -20° to 130°F (-29°to 54°C)
- Operating Humidity: 5% to 95% RH, non-condensing
- Physical dimensions: TW180 Thermostat: 4.3” H x 5.7” W x 1.3”D
11241 SE Highway 212 Clackamas, OR 97015 USA
Phone: 503-387-6410
E-mail: [email protected]
www.pecomanufacturing.com
REFERENCE:
DOWNLOAD MANUALS:
Peco T8168 Programable Thermostat Operational Manual
![]()
Leave a Reply