
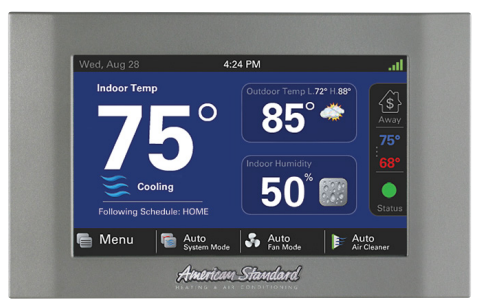
Nexia 1050 Thermostat
Introduction
If you have never installed a Nexia-compatible connected control before, the idea of working with Z-Wave modules and Wi-Fi routers may sound intimidating. The fact is, it’s a lot simpler than you think. You just have to be familiar with all of the steps involved and make sure you have everything you will need on hand before you start the job. This handy guide will walk you through every step, from start to finish. It will tell you what to do and what to avoid. Once you’ve completed a few successful installs using this guide, you can keep it in your toolbox just as a reference. You might eventually discover you don’t need it anymore. As we said, it’s a lot simpler than you think.
Be Prepared
There are few things worse than discovering halfway through an installation that you don’t have everything you need to get the job done. It adds unnecessary time to the job and doesn’t send the right message to the homeowner about your business. That’s why we strongly suggest that you make sure you have the following items in your truck or toolbox before every installation.
- (RJ-45) Ethernet cable
This is the cable that connects the Nexia Home Bridge to the customer’s router.
Although a 3-foot cable is included with the Nexia Bridge and should work for the average installation, it’s not a bad idea to have a 10 or 12-foot cable on hand, just in case you need the extra length. No Ethernet cable is necessary for the Gold XV/ Platinum XV, which have Nexia Home Bridge Inside.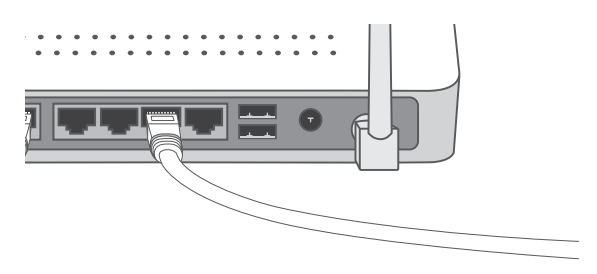
- Fresh 9V battery
You will need this to enroll Nexia modules and repeaters with the Nexia Home Bridge. New, unused batteries last for several years, so it pays to have one or two spares on hand.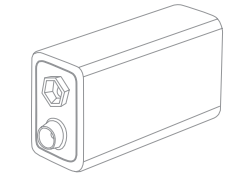
- Power strip with surge protection
This comes in handy if the homeowner does not have enough AC outlets available to accommodate the Nexia Home Bridge, AC power adapter, router, and other essentials. The surge protector also helps protect delicate electronics against power surges.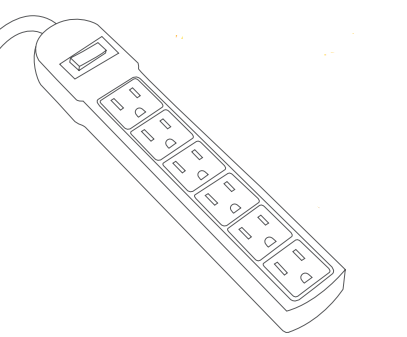
- Two or three Z-Wave appliance modules
Depending on the size and construction of the home, you may need to add a few appliance modules to act as repeaters—modules that expand and strengthen the Z-Wave network inside the customer’s home.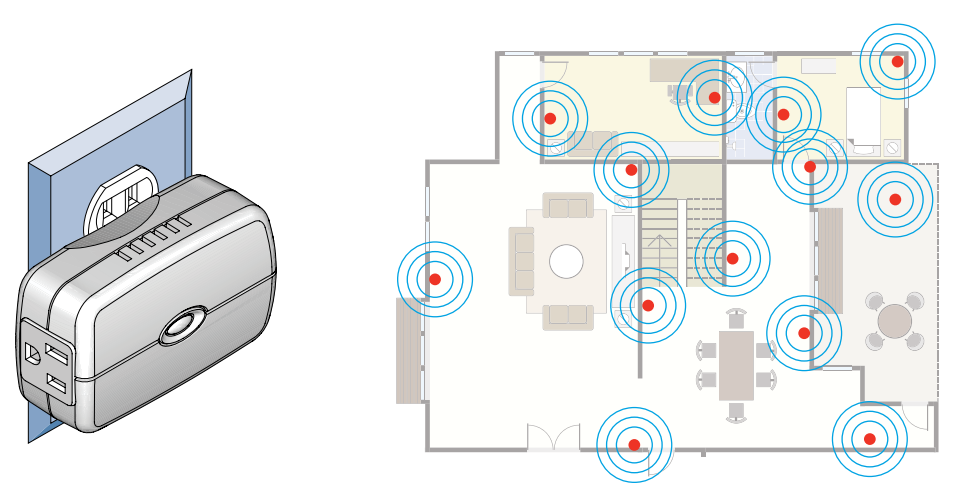
- Smartphone or tablet
A Wi-Fi-compatible mobile device is handy for verifying the name of the homeowner’s Wi-Fi network (SSID) and that the customer’s router is actually sending and receiving messages over the Internet. It’s also a great way to demo your own home and show the homeowner how you use Nexia Home Intelligence.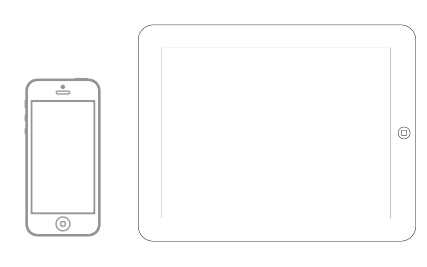
- Ethernet switch
You may discover that the homeowner’s router has no free RJ-45 ports available.
If so, you will need to connect an Ethernet switch that adds more ports.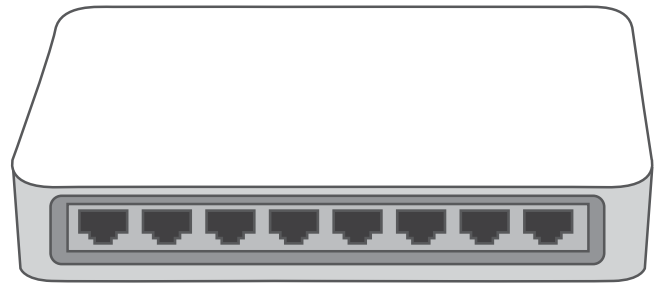
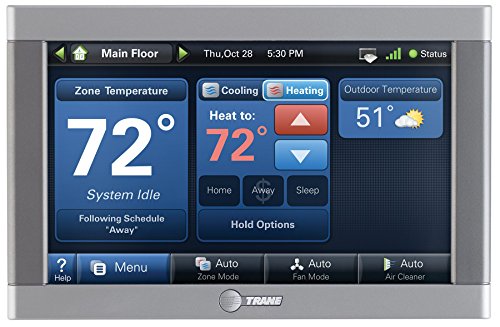
Install Silver XM Control
PHYSICALLY INSTALL AND SET UP THE CONTROL.
- install and wire new control. Please refer to the printed Silver XM installation guide packaged with the control if you need specific instructions.
- perform a basic manual setup.
Set basic menu settings on the control, such as time, temperature range, etc. Refer to the printed Silver XM installation guide if you need specific instructions.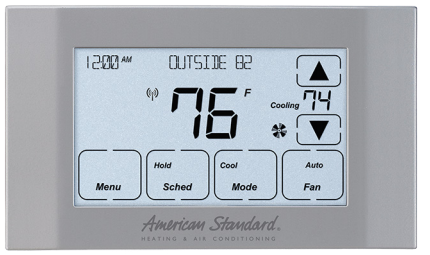
SET UP NEXIA HOME INTELLIGENCE HOMEOWNER ACCOUNT
We recommend that the homeowner complete these simple steps with your help and guidance to confirm that each step is done correctly.
Note: You must set up the user account before you connect the Nexia Home Bridge. If you have already done so, move on to Step 3.
- step 1: create a Nexia home intelligence account.
Visit www.nexiahome.com on the homeowner’s computer.
Click Get started here.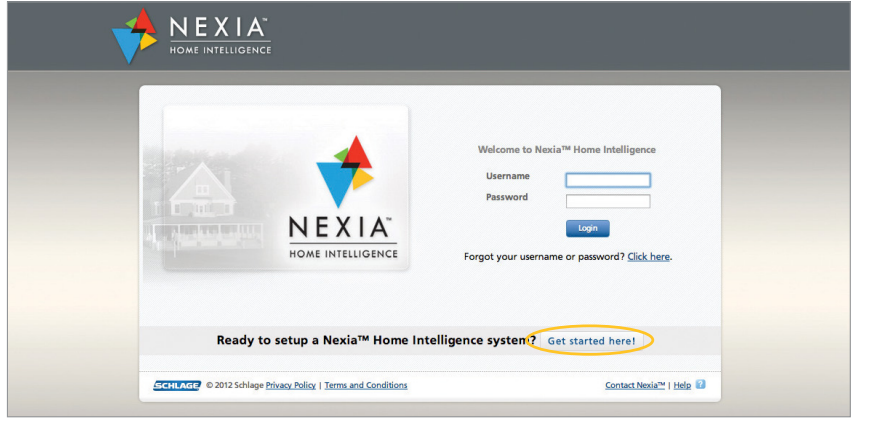
- step 2: accept the terms and conditions.
Have the homeowner accept the terms and conditions.
Note: This is a legal requirement. Do not accept the terms and conditions on the homeowner’s behalf.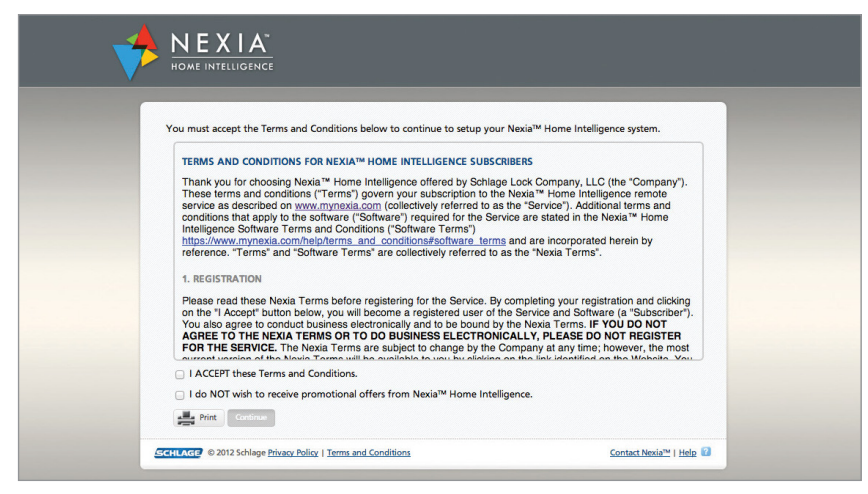
- step 3: fill in the count/purchase information screen.
Enter the required information on the account setup page. Be sure to enter the homeowner’s e-mail address. The Nexia portal will send a confirmation e-mail to this account. The customer must acknowledge receiving this confirmation to complete the account setup.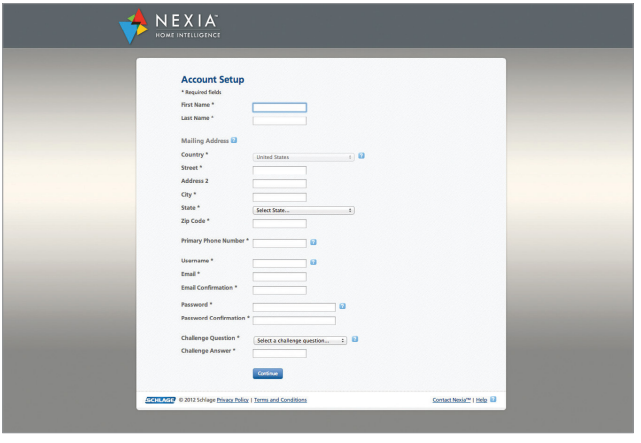
- step 4: confirm receipt of the confirmation e-mail.
Ask the homeowner to log into their e-mail account to retrieve the confirmation e-mail. Open the confirmation e-mail and click the link inside the e-mail to confirm the account setup.
- step 5: log in to the homeowner’s Nexia account.
The e-mail link will take the homeowner back to the account login page. The homeowner must enter the username and password they chose during account setup.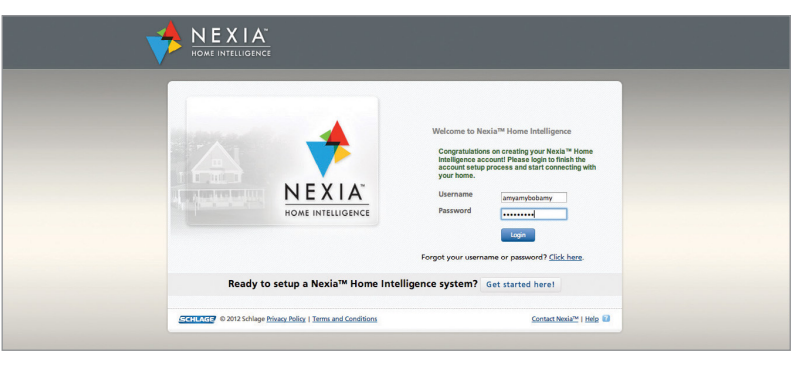
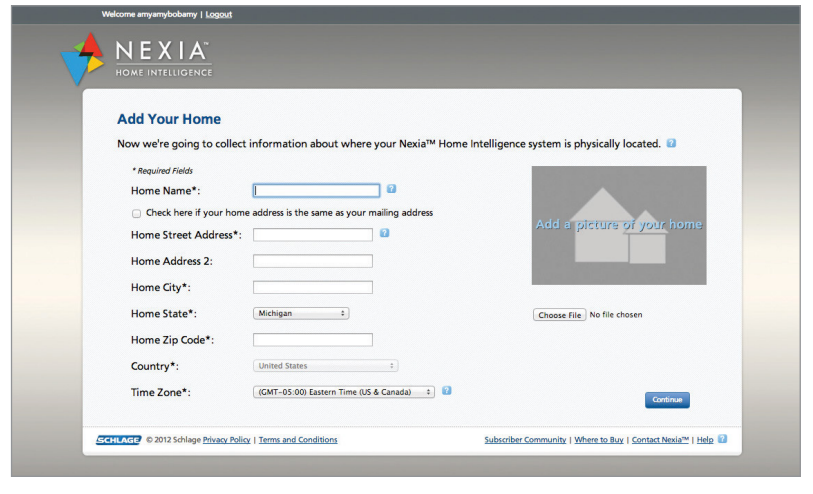
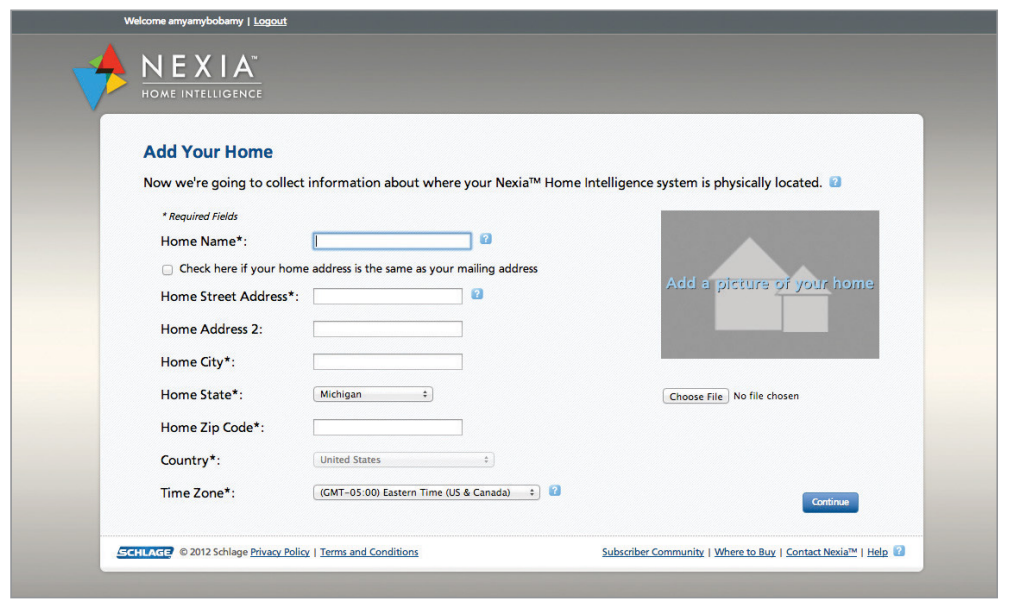
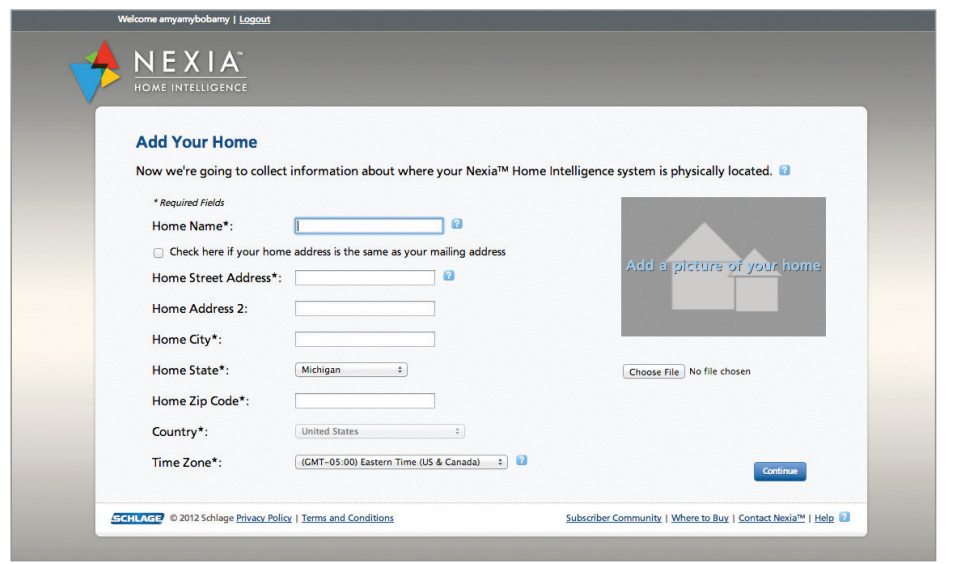
- step 6: enter the account information.
- Create a name for the home. This is what will appear when the homeowner logs in to their account. If the homeowner has multiple properties on their Nexia account, give each property a different name. The homeowner can then switch between properties based on their names.
- Enter the home address. This information will be securely stored and is only to help customize the Nexia system based on the homeowner’s location. For example, the homeowner can schedule activities triggered by sunrise and sunset based on their home’s location.
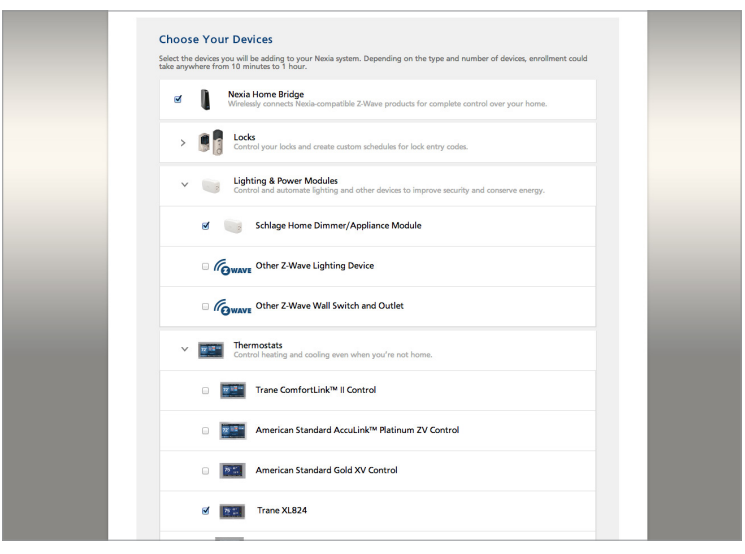
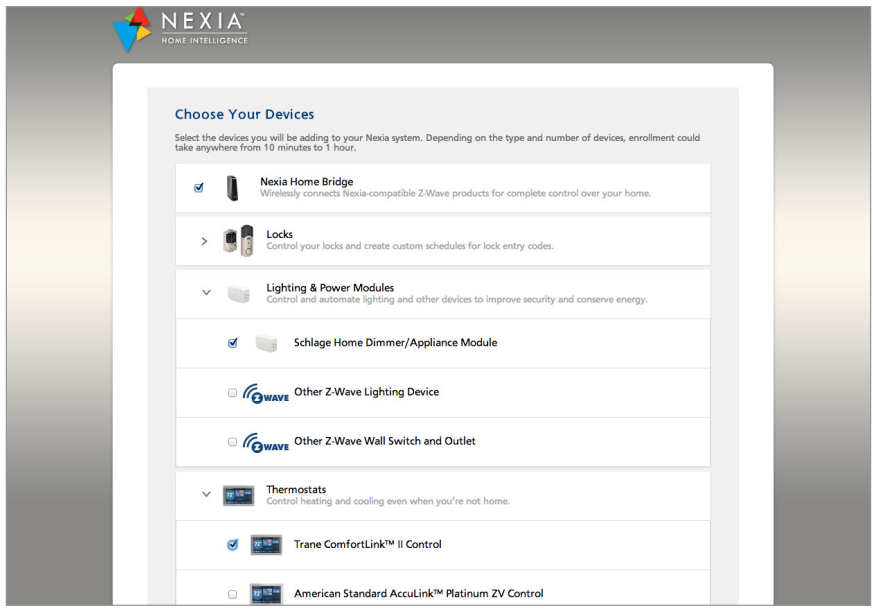
ADD PRODUCTS TO THE HOMEOWNER’S ACCOUNT.
enroll devices in the enrollment cart.
The enrollment cart shows the device that can be added to the Nexia system.
Hover the mouse over the blue question mark boxes for more information.
Select the appropriate products to enroll:
- Select the Bridge.
- Select the Silver XM control.
- Select any other devices you wish to add at this time. (We strongly recommend that you include an appliance module with all systems.
This strengthens communications from the Bridge to the control by repeating the signal.) - Click Continue.

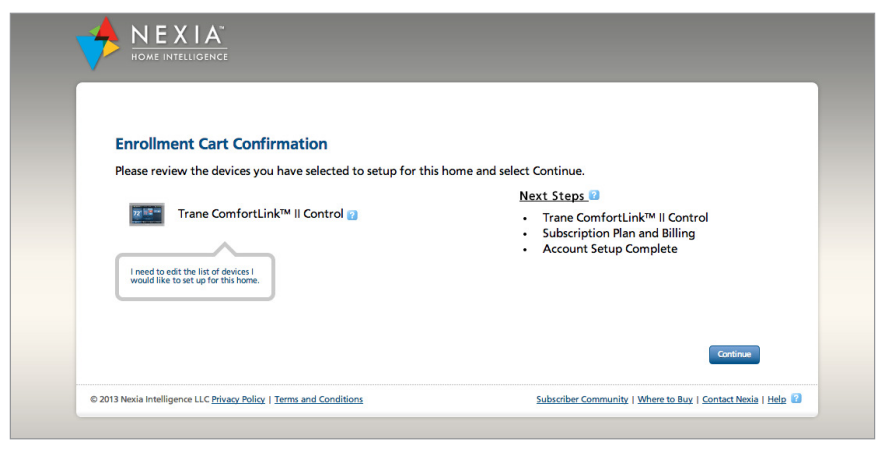
confirm enrollment.
- Review the list of items you have selected in the enrollment cart.
- Confirm that the list is correct.
- Click Continue.
- Review the “Getting Started” overview list.
- Click Continue.
ADD THE NEXIA HOME BRIDGE.
add the Nexia home bridge to the homeowner’s nexia account.
- Follow the on-screen instructions provided on the Nexia setup screen.
- Enter the Nexia Home Bridge’s MAC ID, which is located on a sticker in the battery compartment on the bottom of the Bridge.
- Click Continue.

connect the bridge to the wireless router.
- Use an (RJ-45) Ethernet cable to connect the Bridge to the router, then plug the Bridge power supply into an AC outlet. (Note: If all LAN ports on the router are full, you will need to add a switch. Please refer to the Glossary for more details.)
- Watch the status on screen as the Bridge connects to the Nexia server.
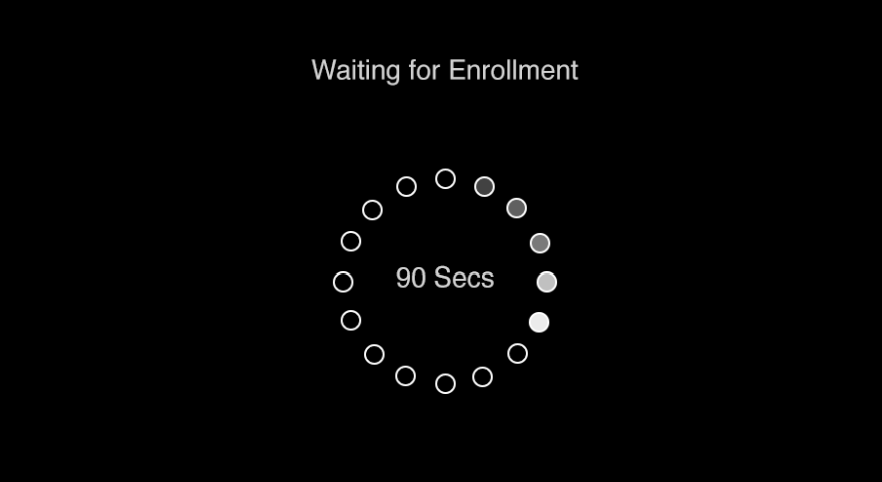
SUCCESSFUL ENROLLMENT
View the “Congratulations” screen that shows check mark by Bridge. Select Continue and follow on-screen prompts to enroll the control and appliance module.
UNSUCCESSFUL ENROLLMENT
Watch the green indicator light on the Bridge.
- If you see a 3-blink pattern it is probably because the MAC address was entered incorrectly. Re-enter the MAC address and repeat the Bridge enrollment process.
- If the green indicator does NOT blink, try the Bridge enrollment process again, after making sure the Ethernet cable is plugged securely into the router and Bridge. If this does not solve the issue, contact Technical Support at 877-288-7707.
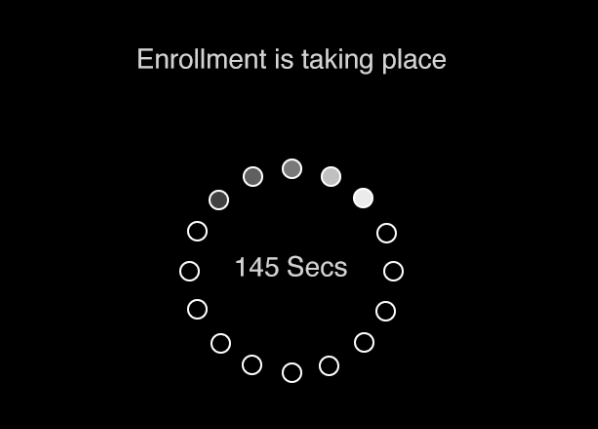
Verify that the green indicator light on the Bridge glows continuously (does not blink). A steady green light indicates successful communication with the Nexia server. A steady orange light indicates successful communication with Z-Wave modules.
If the green light does not glow continuously: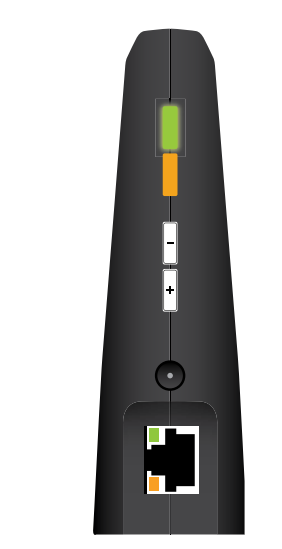
- 2X green blink: An Ethernet cable is connected but the router is not connected to the Internet. Confirm whether the Internet service provider is providing service.
- 3X green blink: An Ethernet cable is connected and the router is connected to the Internet, but the Bridge cannot connect with the Nexia server. Verify that the MAC address is correct. If this is not successful, try resetting or replacing the Bridge.
Local enrollment option
step 1: enroll the thermos tat into the bridge.
- Disconnect the Nexia Home Bridge from the router and AC power.
- Insert a fresh 9V battery to power the Bridge during local enrollment.
- Carry the Bridge over to the thermostat module. Hold the Bridge within 6 feet (1.8 meters) of the thermostat during the following enrollment process.
- Press and release the + button on the Bridge.
- Press Menu on the thermostat.
- Scroll down to [Z-Wave Install].
- Press [Yes].
- Observe the indicator lights on the Bridge. The orange Z-Wave light will blink during enrollment. Enrollment is complete when the orange light stops blinking and glows continuously.
step 2: reconnect the bridge to the internet.
- Reconnect the Bridge to AC power and the router. The Bridge will automatically update the Nexia server.
- Return to the Nexia account setup screen to verify successful enrollment, as indicated by a checkmark next to the name of the thermostat, a confirmation message, and a prompt to assign a new name.
Note: Browser feedback is not immediate. The online display may take up to 1 minute to change. Be sure to allow time for the browser to update. If you experience problems with the standard enrollment process described above, you have the option to use local enrollment. This involves moving the Nexia Home Bridge to within 6 feet of each device you want to enroll. Once you’ve enrolled every device, you would then return the Nexia Home Bridge to wherever you originally placed it. We have listed the specific steps below.
step 3: rename the thermostat.
- Select the new thermostat.
- Change the thermostat’s name to something descriptive of its location and/or function; for example, “Living Room Thermostat.”
The homeowner can change the name later if s/he wishes.
step 4: plug an appliance module into a live ac outlet.
Choose an AC outlet located approximately halfway between the Bridge and thermostat and not blocked by large metal objects such as a refrigerator, stove, or filing cabinet. Make sure the outlet you use is always on, meaning that it can not be turned off from a wall switch.
Optional: Plug a lamp or small appliance into the module.
This option will depend on whether the appliance module’s primary purpose is to serve as a repeater or also to control a lamp or small appliance. An appliance or dimmer module has two outlets: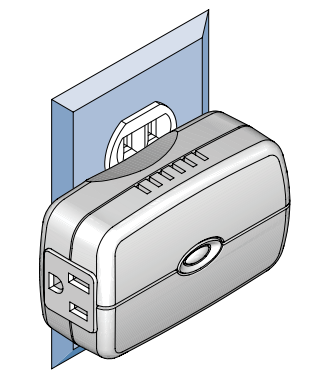
- The outlet with the Z-Wave logo can be controlled via Nexia Home Intelligence.
- The outlet without the Z-Wave logo is a standard pass-through outlet, independent of Nexia Home Intelligence.
step 5: enroll the appliance module into the bridge.
- Disconnect the Bridge from the router and AC power.
- Insert a fresh 9V battery to power the Bridge during enrollment.
- Carry the Bridge over to the appliance module. Hold the Bridge within 6 feet (1.8 meters) of the module you want to enroll during the following enrollment process.
- Press and release the + button on the Bridge.
- Press the enroll button on the appliance module.
- Observe the indicator lights on the Bridge. The orange Z-Wave light will blink during enrollment. Enrollment is complete when the orange light stops blinking and glows continuously.
step 6: confirm that the appliance module was enrolled into the bridge.
- Reconnect the Bridge to AC power and the router. (Remove the battery only after you have completed enrolling all devices and thermostats.) The Bridge will automatically update the Nexia server about the new module.
- Log into the homeowner’s Nexia account. Verify successful enrollment, as indicated by a checkmark next to the name of the new module, a confirmation message, and a prompt to assign a new name.
Note: Browser feedback is not immediate. The online display may take up to 1 minute to change. Be sure to allow time for the browser to update. Also remember to stay logged into the homeowner’s Nexia account until you have enrolled all devices you have installed, including the thermostat.
step 7: rename the appliance module.
- Select the new module.
- Change the name to something descriptive of its location and/or function; for example, “Kitchen Counter Repeater.”
The homeowner can change the name later if s/he wishes.
Optional: Repeat Steps 4 – 7 to enroll any additional appliance modules or repeaters as necessary.
step 8: log out of the customer’s nexia account and remove the 9-volt battery.
The battery is for local enrollment only. It is not for “battery backup.”
Install Gold XV/Acculink™ Platinum XV Control
Introduction
If you have never installed a Nexia-compatible connected thermostat before, the idea of working with Z-Wave modules and Wi-Fi routers may sound intimidating. The fact is, it’s easier than ever before and a lot simpler than you may think. You just have to be familiar with the steps involved and make sure you have everything you need on hand before you start the job.
This handy guide will walk you through each step, from start to finish. It will tell you what to do and what to avoid. Once you’ve completed a few successful installs using this guide, you can keep it in your toolbox just as a reference. You’ll probably discover you don’t need it anymore. As we said, it’s a lot easier than you may think.
Please note that, unlike Silver XM and Platinum ZV thermostats, the Gold XV/ Platinum XV have Nexia Home Bridge Inside. You, therefore, do not need to install a separate, standalone Nexia Home Bridge.
Your installation will match one of the following conditions:
- Add a Gold XV/Platinum XV to a new Nexia account
- Add a Gold XV/Platinum XV to an existing Nexia account
- Enroll Z-Wave devices into an existing Gold XV/Platinum XV thermostat
Determine which condition above applies to your installation, then go to the appropriate section below.
PHYSICALLY INSTALL AND SET UP THE CONTROL
install and wire new control.
Please refer to the printed Gold XV/Platinum XV installation guide packaged with the thermostat if you need specific instructions.
manually set up the basic settings.
Set basic menu settings on the thermostat, such as time, temperature range, etc. Refer to the printed Gold XV/Platinum XV installation guide if you need specific instructions.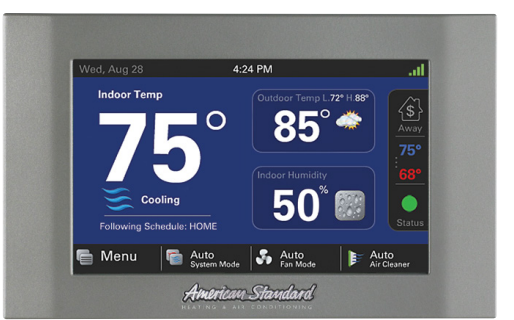
Internet connection.
Verify that the customer has Wi-Fi and that the Wi-Fi signal is available at this location. If not, the Gold XV/Platinum XV has an Ethernet port you can use to hardwire the thermostat to the customer’s router. If Wi-Fi is available, follow the Gold XV/Platinum XV wizard to connect the thermostat to Wi-Fi.
SET UP A NEXIA HOME INTELLIGENCE HOMEOWNER ACCOUNT
We recommend that the homeowner complete these simple steps with your help to confirm that each step is done correctly.
Note: You or the homeowner must set up an active Nexia Home Intelligence account before you connect the Gold XV/Platinum XV to Nexia. If you have already created an account, move on to Step 3: Enroll Products.
- step 1: create a Nexia home intelligence acount.
Visit www.nexiahome.com on the homeowner’s computer.
Click Get started here.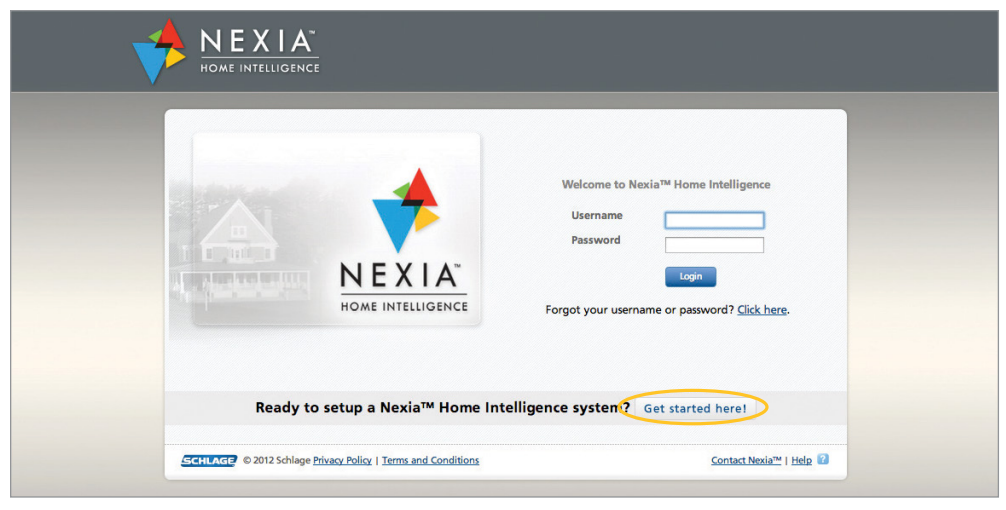
- step 2: accept the terms and conditions.
Have the homeowner accept the terms and conditions.
Note: This is a legal requirement. You must not accept the terms and conditions on the homeowner’s behalf.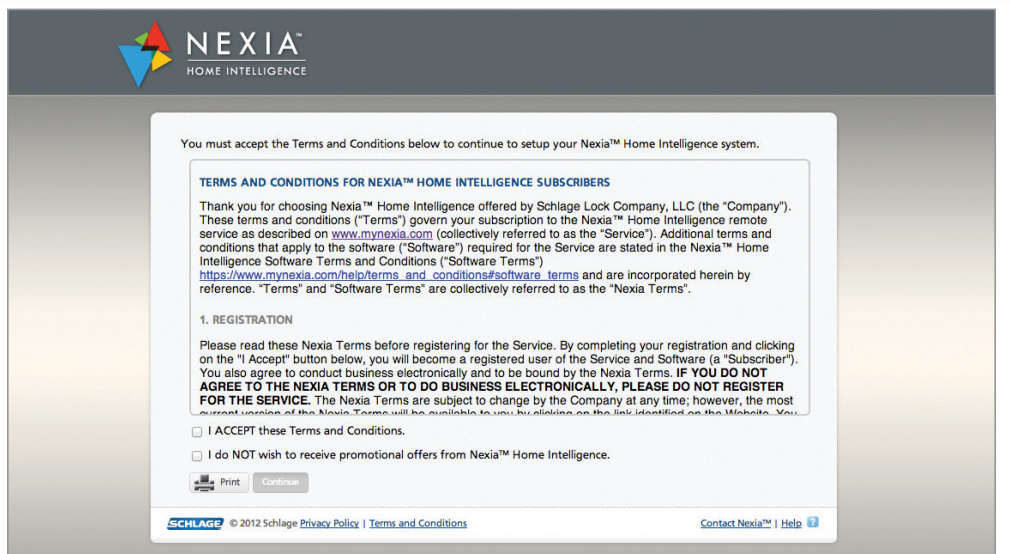
- step 3: fill in the Account/purchase information screen.
Enter the required information on the account setup page. Be sure to enter the homeowner’s e-mail address. The Nexia portal will send a confirmation e-mail to this account. The customer must acknowledge receiving this confirmation to complete the account setup.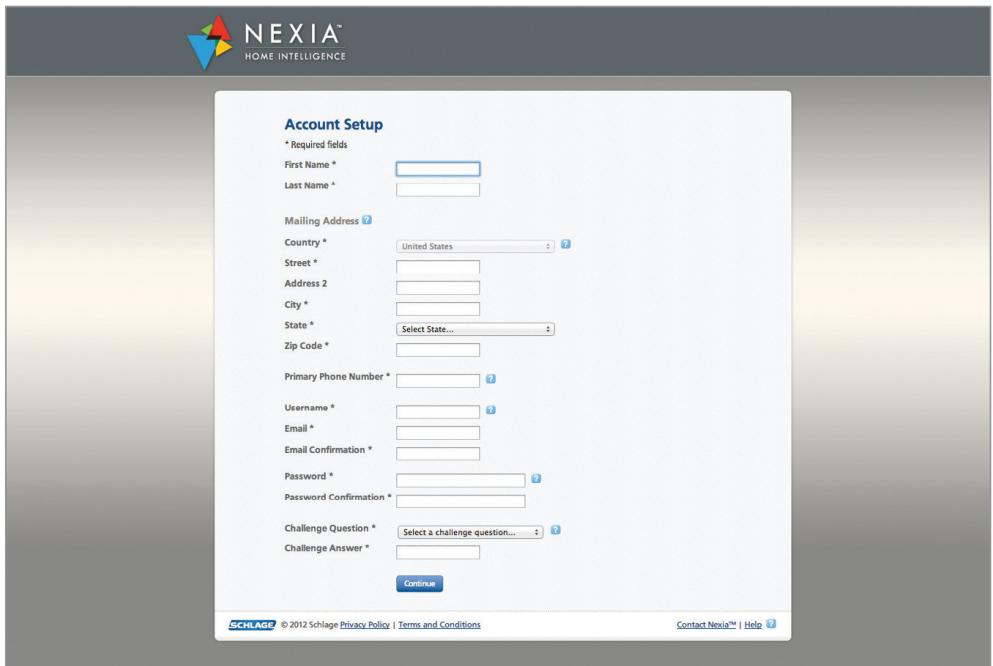
- step 4: confirm receipt of the confirmation e-mail.
Ask the homeowner to log into their e-mail account to retrieve the confirmation e-mail. Open the confirmation e-mail and click the link inside the e-mail to confirm the account setup.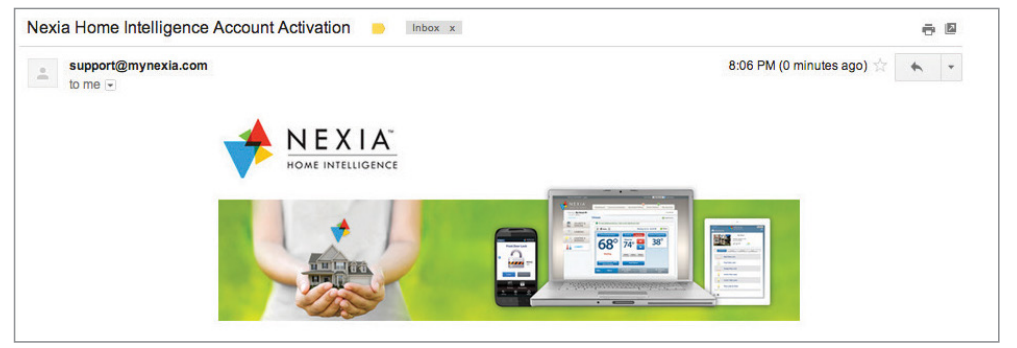
- step 5: log in to the homeowner’s nexia account.
The e-mail link will take the homeowner back to the account login page. The homeowner must enter the username and password they chose during account setup.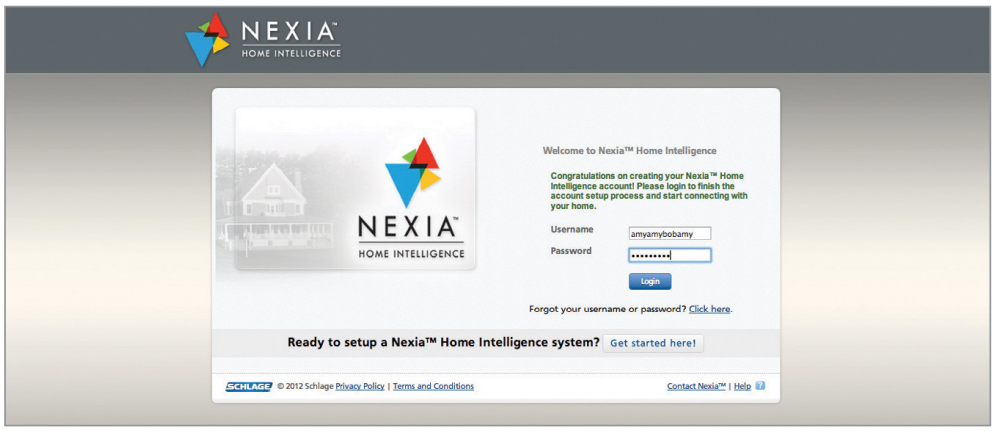
- step 6: enter the a ccount information.
- Create a name for the home. This is what will appear when the homeowner logs in to their account. If the homeowner has multiple properties on their Nexia account, give each property a different name. The homeowner can then switch between properties based on their names.
- Enter the home address. This information will be securely stored and is only to help customize the Nexia system based on the homeowner’s location. For example, the homeowner can schedule activities triggered by sunrise and sunset based on their home’s location.
ENROLL THE GOLD XV/PLATINUM XV IN THE HOMEOWNER’S ACCOUNT
on the “choose your devices” page, select gold xv/platinum xv.
On the “Choose Your Devices” page:
Select the appropriate products to enroll:
- Click the Thermostats icon to view the list of thermostats.
- Click the box next to the thermostat model you are installing (Gold XV or Platinum XV).
- Click Continue.
confirm enrollment.
- Review the thermostat you have selected in the enrollment cart.
- Verify that the selection is correct.
- Click Continue.
- The Getting Started page is a reminder that the thermostat should be installed, powered, and connected to Wi-Fi at this time.
- Click Continue.

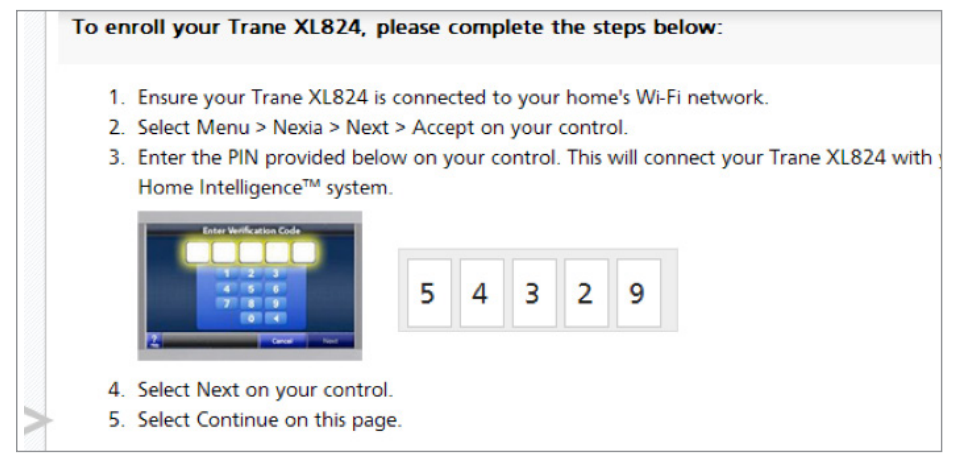
ENROLL IN THE GOLD XV/PLATINUM XV
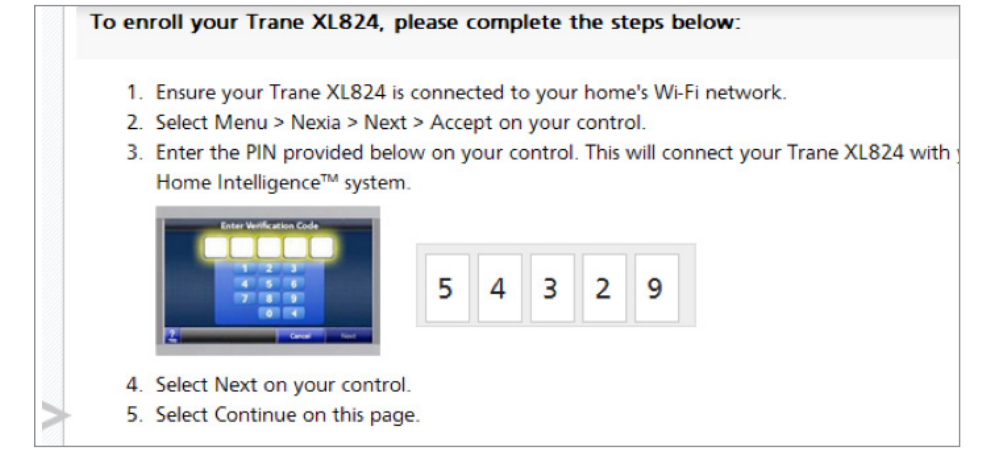
- The device enrollment page will display a 5-digit PIN. Write down the PIN.
- Take this PIN to your installed Gold XV/Platinum XV.
- On the thermostat, select Menu > Nexia > Accept.
- Enter the PIN into the thermostat.
- Select Next on the thermostat.
- Allow a moment for the thermostat to contact Nexia and confirm it has successfully been added to the account.
- Click Continue in Nexia.
COMPLETE SETUP AND TEST
- Continue to click through the setup wizard withthe customer.
- Enter any additional information requested until the Nexia dashboard page is shown.
- Click the Climate tab.
- View the new thermostat. Verify that changes made using Nexia are reflected on the thermostat itself.
Optional: If you are comfortable setting up the Nexia mobile app, assist the customer with this step. The process normally takes about 5 minutes.
Add a Gold XV/Platinum XV to an Existing Nexia Account
PHYSICALLY INSTALL AND SET UP THE THERMOSTAT.
- install and wire new thermostat.
Please refer to the printed Gold XV/Platinum XV installation guide packaged with the thermostat if you need specific instructions. - manually set up the basic settings.
Set basic menu settings on the thermostat, such as time, temperature range, etc. Refer to the printed Gold XV/Platinum XV installation guide if you need specific instructions. - internet connection.
Verify that the customer has Wi-Fi and that the Wi-Fi signal is available at this location. If not, the Gold XV/Platinum XV has an Ethernet port you can use to hardwire the thermostat to the customer’s router. If Wi-Fi is available, follow the Gold XV/Platinum XV wizard to connect the thermostat to Wi-Fi.
LOGIN TO THE CUSTOMER ACCOUNT.
- Have customer log in to their Nexia account at www.mynexia.com
- Click on the Climate tab.
- Click Add Device.
Select the model of thermostat you are adding.
- The device enrollment page will display a 5-digit PIN.
Write down the PIN. - Take this PIN to your installed Gold XV/Platinum XV.
- On the thermostat, select Menu > Nexia > Accept.
- Enter the PIN into the thermostat.
- Select Next on the thermostat.
- Allow a moment for the thermostat to contact Nexia and confirm it has successfully been added to the account.
- Click Continue in Nexia.
COMPLETE SETUP AND TEST.
- Click the Climate tab.
- View the new thermostat. Confirm that any changes made using Nexia are reflected on the thermostat itself.
Optional: If you are comfortable setting up the Nexia mobile app, assist the customer with this step. The process normally takes about 5 minutes.
Enroll Z-Wave Devices Into an Existing Gold XV/Platinum XV Thermostat
The Gold XV/Platinum XV include a Z-Wave Home Bridge Inside which allows these thermostats to support the full set of Nexia home automation features when used with additional Z-Wave hardware (lights, locks, sensors, etc.). If a customer has Z-Wave devices, use the following steps to enroll the devices into the Home Bridge Inside.
Note: In some cases, you might be enrolling an Gold XV/Platinum XV into an account that has an existing Nexia Bridge. In this case, the Z-Wave devices will enroll into the existing Nexia Bridge and the Gold XV/Platinum XV will be configured automatically as a Z-Wave repeater. If you encounter this condition and are not sure what to do, please contact Customer Care at 877-288-7707.
How to Enroll Z-Wave Devices into Home Bridge Inside
Note: Before starting, verify that Gold XV/Platinum XV is successfully connected to a Nexia account. See the two conditions listed earlier in this document. See the process earlier in this section on page 10 to confirm.
- From the Home menu screen, press the Nexia button.
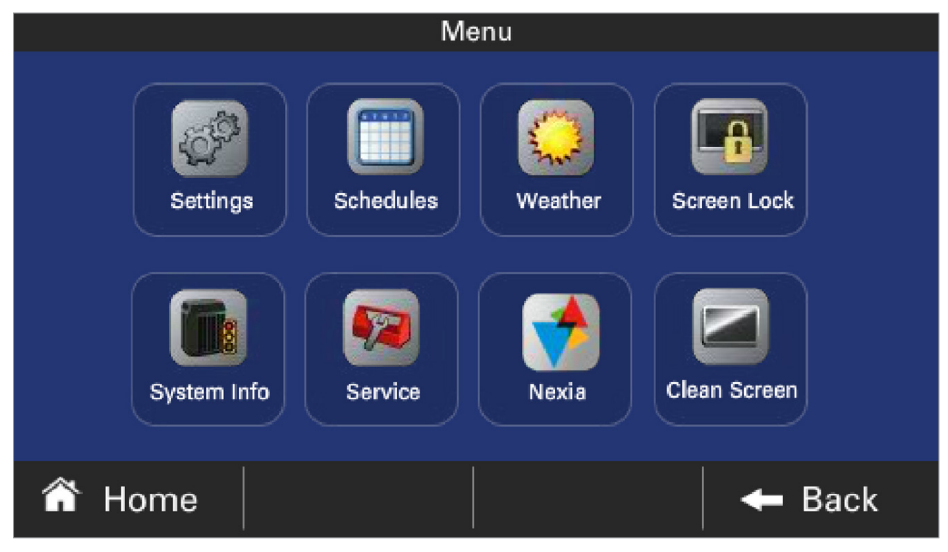
- Press the Z-Wave Enroll Device button on the Nexia menu. In the accompanying example menu, the Z-Wave network is active but no devices other than the Home Bridge Inside have been enrolled.
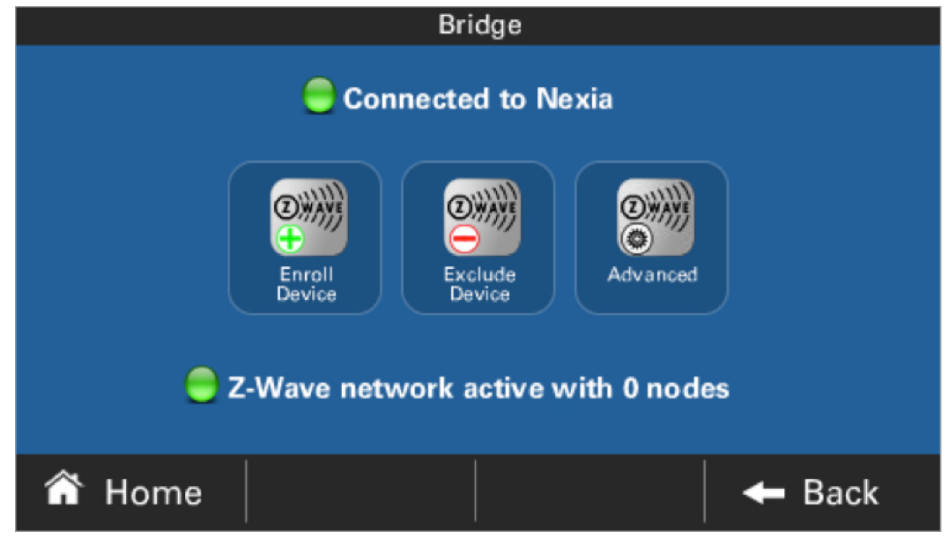
- The Bridge inside the thermostat will begin searching for new devices to enroll. It will continue searching for up to 4 minutes or until it finds a ne w device, whichever comes first.
- Follow the enrollment process (normally a button push or similar action on the device you want to enroll).
- The thermostat will indicate when it begins actively enrolling new devices.
- As soon as all new devices have been enrolled, the thermostat will update the Nexia menu to reflect the current number of active devices (nodes).
- Ask the customer to log in to their account at www.mynexia.com
- Click on the appropriate tab for the new device.
Verify the device can be controlled successfully using Nexia.
The thermostat will provide onscreen messages during and after enrollment, as indicated below. We have provided a cross-reference to the Nexia Home Bridge status lights for your convenience.
| nexia home bridge indicator lights | gold xv/platinum xv message on nexia screen |
| Orange slow blink | Enrolling Devices |
| Orange fast blink | Z-Wave Device Enrolled as node [_]! or Z-Wave node [_] removed from network! |
| Orange Solid | Z-Wave Network Active with [_] nodes |
| Orange flicker | Orange dot blinks for each Z-Wave message received or transmitted |
| Orange 20 flash | Z-Wave network is busy, please try again in a moment |
| Green Solid | Connected to Nexia with green dot |
| Green flicker | N/A |
| Green 2 blink | Unable to obtain IP address with red dot |
| Green 3 blink | Unable to connect to Nexia with red dot |
| Green dark | Unable to open TCP/IP socket with red dot |
Troubleshooting
If the Gold XV/Platinum XV you install has intermittent Wi-Fi connectivity and/ or fluctuating signal strength, try one of the following:
- Improve the Wi-Fi signal with one of these options:
- Move the Wi-Fi router to a more central location.
- Add a Wi-Fi repeater.
- Add a power line Ethernet adapter to bring an Internet port near the thermostat. Then add a new Wi-Fi router.
- Hardwire the Gold XV/Platinum XV to the router. The thermostat has an Ethernet port on the back. Use a standard Ethernet cable to connect the thermostat to an open Ethernet port on the router for assured connectivity.
If the Gold XV/Platinum XV fails to connect to Wi-Fi:- Verify you are choosing the correct Wi-Fi network
- Verify that you are using the correct wireless password. This can be confirmed by using a mobile device to connect to the same network, and then verifying Internet access is available. (For this test, disable mobile data so that only Wi-Fi is being used on the mobile device.)
- Verify Internet access is available. Connect another device or computer to the local router using Wi-Fi or Ethernet cable and verify that a website can be accessed.
Install Acculink™ Platinum ZV Control
PHYSICALLY INSTALL AND SET UP THE THERMOSTAT
- install and wire new thermostat.
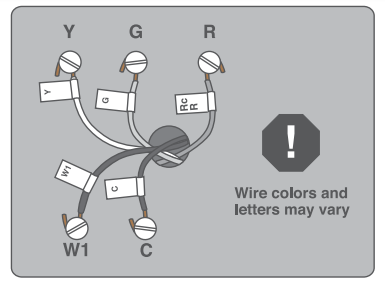
Please refer to the printed Platinum ZV installation guide packaged with the thermostat if you need specific instructions. - manually set up the thermostat.
Set basic menu settings on the thermostat, such as time, temperature range, etc. Refer to the printed Platinum ZV installation guide if you need specific instructions.
SET UP A WI-FI CONNECTION WITH THE ROUTER.
Here are the basic steps:
- Enter the Wireless Network Setup Menu.
- Press Wireless On/Off to enable the wireless radio.
- Press the Connect to a Network button to choose from the list of available wireless networks.
- Select the name assigned to the homeowner’s wireless router, then press Connect.
- Enter the router’s network key or password using the soft keypad on the Platinum ZV.
- When the thermostat has successfully joined the wireless network, the name of the network will be displayed with a green dot to the left and a signal strength indicator to the right.
Refer to the Platinum ZV Users Guide for detailed, step-by-step instructions on how to set up a Wi-Fi connection and how to use Advanced Settings if necessary.
REGISTER THE THERMOSTAT ONLINE
Registration is required for Weather, Software Updates and linking two or more thermostats together. Here are the basic steps:
- In the Network Setup screen, select Register Now.
- Read and accept the License Agreement.
- Enter the customer’s e-mail address into the E-mail Registration screen, then click Apply. The thermostat will connect to a remote server, which will send a confirmation e-mail with a 5-digit verification code.
- Enter the 5-digit verification code. This will only need to be done once.
- Upon receiving the correct code, the Nexia system will enable wireless remote thermostat features.
UPGRADE SOFTWARE/FIRMWARE.
This step is essential to ensure that the thermostat is running the most up-to-date version of the software, with the most current features and functions.
- Navigate to Menu > Settings > Network.
- Select Software Upgrades.
- Click the Next button on the Software Upgrade screen. (Note that the upgrade can take up to 20 minutes.)
- Choose an upgrade option:
- Check for updates on the Internet is the default option.
- choose Check for upgrades on SD card only if you have previously downloaded the latest upgrade from the americanstandardair.com website and copied the upgrade file onto an SD card that you have inserted into the thermostat.
SET THE HOMEOWNER’S ZIP CODE ON THE THERMOSTAT.
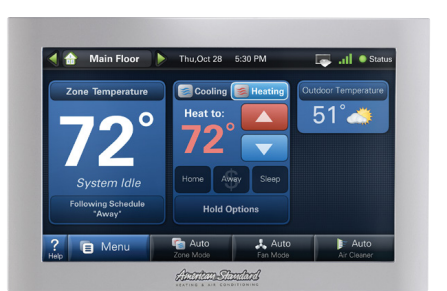
Go to the Weather tab on Platinum ZV and enter the homeowner’s zip code. This will enable the thermostat to display local weather conditions and local time.
SET UP THE NEXIA HOME INTELLIGENCE
HOMEOWNER ACCOUNT.
If you have already completed this step, move ahead to Step 7.
- step 1: create a Nexia home intelligence account.
Visit www.nexiahome.com on the homeowner’s computer.
Click Get started here.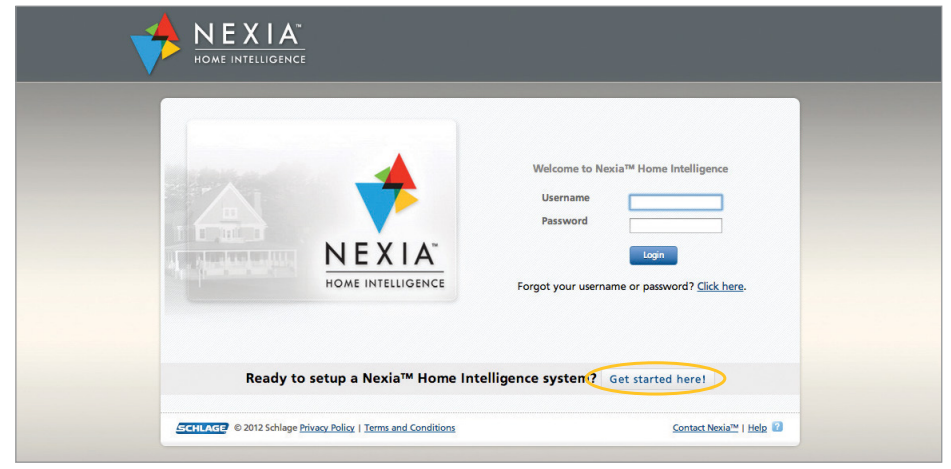
- step 2: accept the terms and conditions.
Have the homeowner accept the terms and conditions.
Note:
This is a legal requirement. You must not accept the terms and conditions on the homeowner’s behalf.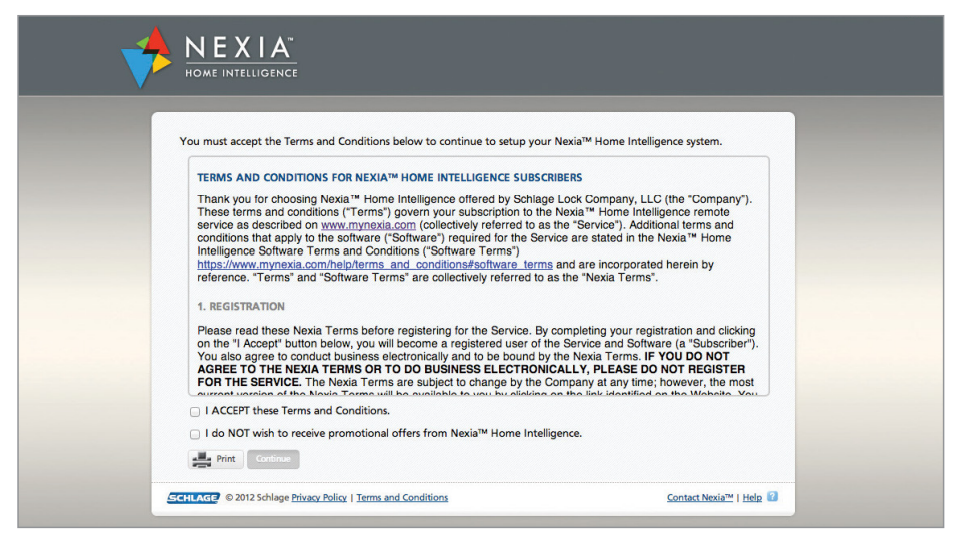
- step 3: fill in the acount/purchase information screen.
Enter the required information on the account setup page. Be sure to enter the homeowner’s e-mail address. The Nexia portal will send a confirmation e-mail to this account. The customer must acknowledge receiving this confirmation to complete the account setup.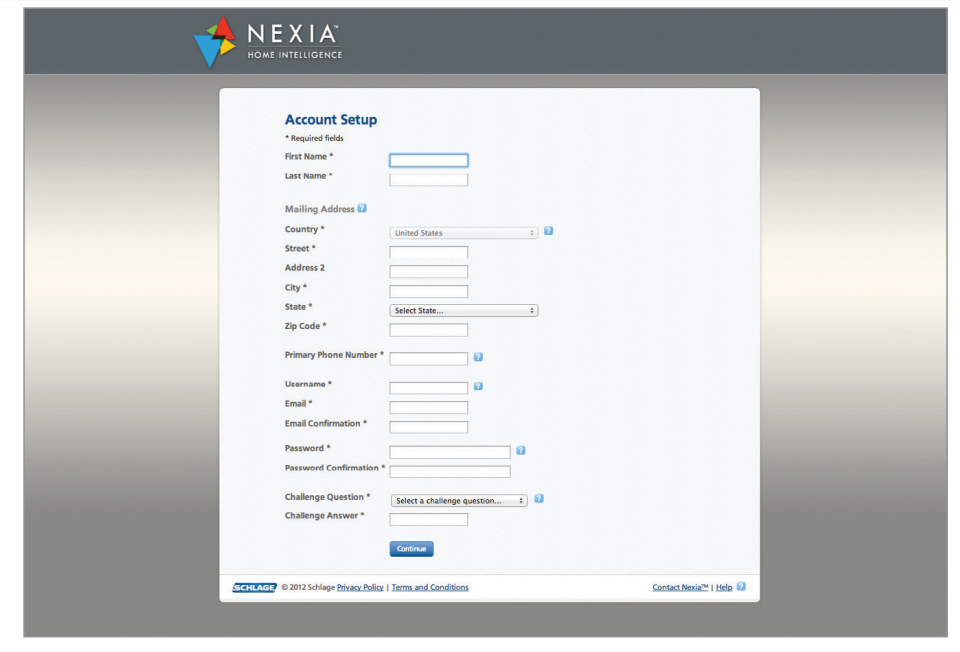
- step 4: confirm receipt of the confirmation e-mail.
Ask the homeowner to log into their e-mail account to retrieve the confirmation e-mail. Open the confirmation e-mail and click the link inside the e-mail to confirm the account setup.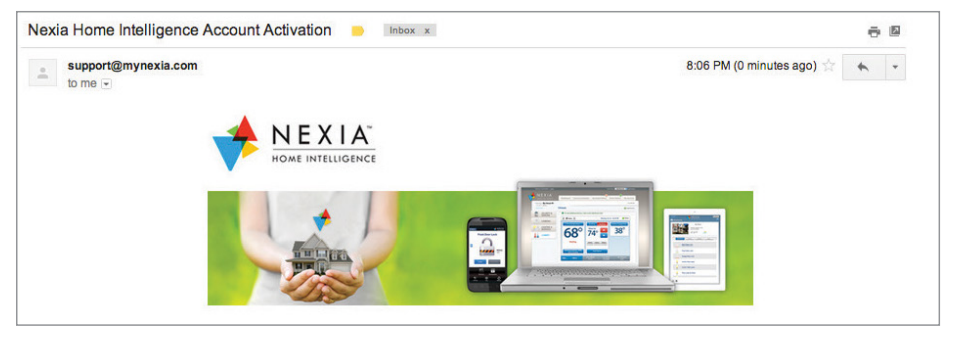
- step 5: log in to the homeowner’s nexia account.
The e-mail link will take the homeowner back to the account login page. The homeowner must enter the username and password they chose during account setup.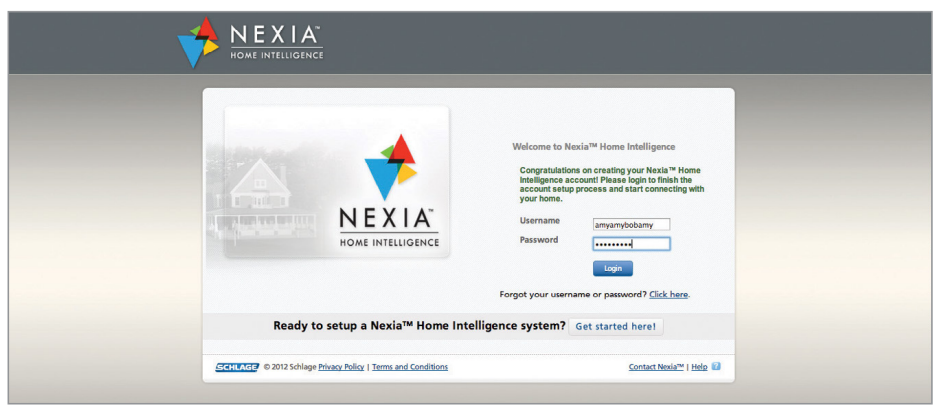
- step 6: enter the a ccount information.
- Create a name for the home. This is what will appear when the homeowner logs in to their account. If the homeowner has multiple properties on their Nexia account, give each property a different name. The homeowner can then switch between properties based on their names.
- Enter the home address. This information will be securely stored and is only to help customize the Nexia system based on the homeowner’s location. For example, the homeowner can schedule activities triggered by sunrise and sunset based on their home’s location.
ADD THE PLATINUM ZV TO THE HOMEOWNER’S NEXIA ACCOUNT.
The enrollment cart shows the device that can be added to the Nexia system. Hover the mouse over the blue question mark boxes for more information.
select the appropriate products to enroll.
- Select the Platinum ZV thermostat.
- Select any other devices you wish to add at this time. If you are adding Z-Wave devices to your account in addition to the Platinum ZV you will need to add the Nexia Home Bridge into the account to thermostat them remotely.
- Click Continue
to confirm enrollment.
- Review the thermostat you have selected in the enrollment cart.
- Verify that the selection is correct.
- Click Continue.
- The Getting Started page is a reminder that the thermostat should be installed, powered, and connected to Wi-Fi at this time.
- Click Continue.
- step 1: enroll the thermostat.
- Make sure the thermostat is connected to the home’s Wi-Fi network and that the firmware has been upgraded to version 2.0.3 or higher.
- On the thermostat screen, navigate to Menu > Settings > Network > Enroll Nexia Home Intelligence.
- Enter the PIN provided on the Nexia account screen into the thermostat.
- Select Next on the thermostat.
- Select Next on the computer screen to continue.
- Click Continue on the computer screen. Watch the screen as Nexia enrolls devices.
- step 2: name the thermostat.
If the device was successfully enrolled and added to the homeowner’s Nexia account you will see a Congratulations screen and a prompt to assign a name. The homeowner can change the name later if s/he wishes.
Note: Use a name that is short and descriptive as to location and function; for example Living Room Lamp Module or Master Bedroom Therm.
To change the name of the thermostats and zones shown in the portal, the names must be changed on the hardware itself. To do so on the thermostat, tap Help > About. - step 3: optional: enroll additional thermostats.
If the home requires more than one thermostat, repeat Steps 1 and 2 above to enroll additional thermostats.
FINALIZE ACCOUNT SETUP
Click Continue on the account setup screen to finalize the account setup. promo code and billing
Continue the online setup process.
- Click Continue on the Nexia setup screen.
- If you have a promotion code, enter it and click Apply. If you do not have a promotion code, select I do not have a promotion code.
- Select a subscription plan for the thermostat.
- Check the box to Agree to billing terms. The homeowner will not be billed if s/he meets the requirements for a free account.
CONFIRM THAT THE DEVICES ARE WORKING CORRECTLY. test thermostat(s).
Test using the thermostat buttons, then test using the mobile app/web portal.
Make the following remote changes:
- Temp
- Run Mode
- Fan
- Schedules
Confirm all changes on the thermostat itself.
HAND OFF THE INSTALLED NEXIA SYSTEM TO THE HOMEOWNER.
demonstrate successful installation.
Sit down with the homeowner to walk them through how to:
- Log into the Nexia portal using either their computer browser or a mobile app on the homeowner’s smartphone or tablet.
- Demonstrate that you are able to identify the thermostat and any additional Nexia modules you installed.
- invite the homeowner to do the same. Answer any questions the homeowner may have.
- Leave the homeowner with a simple list of instructions, tips, and a number to call for questions or assistance.
American Standard is a brand of Ingersoll Rand. Ingersoll Rand (NYSE: IR) advances the quality of life by creating and sustaining safe, comfortable, and efficient environments. Our people and our family of brands work together to enhance the quality and comfort of air in homes and buildings; transport and protect food and perishables; secure homes and commercial properties; and increase industrial productivity and efficiency. American Standard Heating & Air Conditioning offers air conditioning systems and services for residential and light commercial applications to help families feel more comfortable and breathe easier in their homes. We are a $14 billion global business committed to a world of sustainable progress and enduring results. ingersollrand.com americanstandardair.com nexiahome.com
Pub No. 15-4175-02
Copyright 2014 American Standard Heating & Air Conditioning All Rights Reserved
REFERENCE
Download Manual
Nexia 1050 Thermostat Installation Manual
![]()
Leave a Reply