
Moes WHT-NV-GA-BK-MS WiFi Water Floor Heating Thermostat

For Water Heating/Boiler/Electric Heating
Welcome
Thank you for your purchase. Your new thermostat will provide uniform and comfortable temperature control throughout every room on your property We combine the technology. craftsmanship and the highest quality materials together to provide you with a safe, reliable product with a sleek and contemporary design. Please read this installation/ programming manual for comprehensive instructions on installing and operating your thermostat. Please also ensure a suitably qualified person installs your thermostat and complies with all local regulations.
Thermostat Colors
- 002FB: full black
- 002BW: black and white
- 002FW: full white
- 002WB: white and black
In the box, you will find
- 2pc 1pc
- pc Screwrs 1pc
- Thermostat 1pc
- User Guide
(This accessory is suitable for GB, not included in the package, and needs to be purchased separately) Floor Sensor (2.5m) QC Passed
ABOUT YOUR THERMOSTATS
The 002 series range has been developed to control electric underfloor, water heating or water/gas boiler systems. These units are designed for use in commercial, industrial, civil, and domestic properties
MODEL DEFINITION
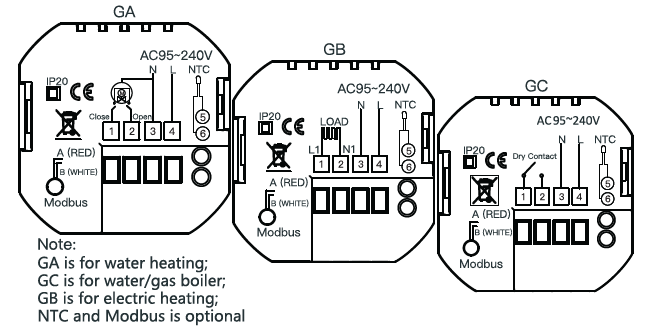
- GA: Water heating. SA GC: Water/Gas Boiler, 5A
- GB: Electric floor heating, 16A
- L: Backlight
- P: Weekly Programmable
- W: Wifi
- N: Modbus Communication
- S2: Both the internal sensor and floor external sensor
- For example 002 GCLP
FEATURES
On Appearance
- The convenient operation creates convenient life.
- Options of black and white housing.
- Fashion design blends in with any decor
- Touch Screen display with backlight is easy to read, even in the dar
- Bright buttons always remind you the world truly exists.
- Easy Ul interface could be used even by children.
On Functionality
- 0.5C Accuracy keeps the temperature within the level you set
- Powerful functions are available such as Modbus/WiFl etc.
- Data memory when power is off.
- 5+1+1 six periods programmable maximize comfort and economy.
- Create a thermostat group to Centralized control
- Integrated with Amazon Echo, Google Home, and Tmall Genie.
- All setting languages synchronize your time zone, address, and language
- No limit to adding rooms and supporting Smart Scene.
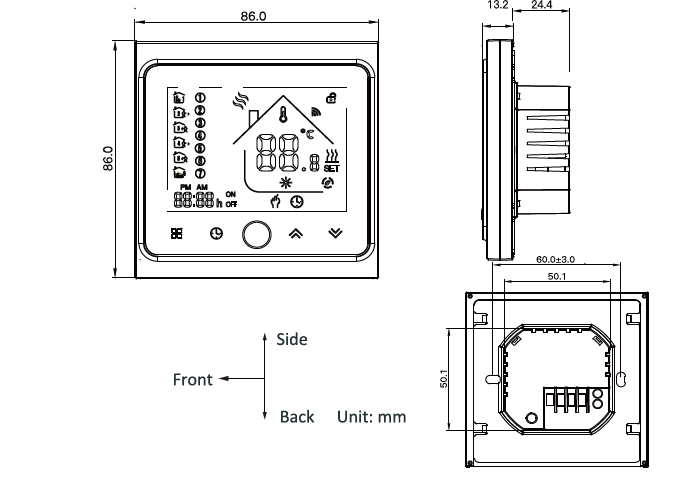
DIMENSION
TECHNICAL DATA
- Power Supply: 95 240 VAC, 5060HZ
- Current Load: 5A (water heating/water boiler/gas boiler)
- 16A (electric heating)
- Sensor NTC3950, 10K
- Accuracy: +0.5C
- Set Temp. Range: 5-35’C
- Display Temp. Range: 5 99C
- Ambient Temp: 0- 45 “C
- Ambient Humidity: 5-95 % RH (Non-Condensing)
- Storage Temp..-5-45 C
- Power Consumption <1.5W
- Timing Emor: « 1 %
- Shell Material: PC ABS ( flame retardant)
- Installation Box: 86 86mm Square or European 60mm Round Box
- Wire Terminals: Wire 2x 1.5 mm or 1 x 2.5 mm
- Protection Class: IP 20
- Buttons: Capacitive Touch Buttons
BEFORE WIRING AND INSTALLING…
- Read these instructions carefully. Failure to follow them could damage the product or cause a hazardous condition
- Check the ratings given in the instructions and on the product to make sure the product is suitable for your application.
- Installer must be a trained, experienced service technician
- After installation is complete, check out product operation as provided in these instructions.
CAUTION
Electrical Shock or Equipment Damage Hazard. can shock individuals or short equipment circuitry. Disconnect the power supply before installation.
Wiring
INSTALLATION
Your thermostat is suitable for installation with a standard 86mm pattress box or a European 60mm pattress box
Step 1. Keep the power off. See Fig 1.
Sten 2 Slide the LCD assembly down to remove the mounting plate
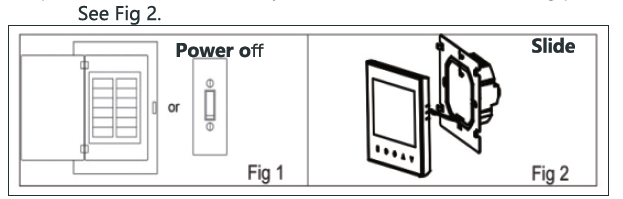
Step 3. Connect the power supply, and load it into the appropriate terminal (see “Wiring your thermostat” for details and Fig 3)
Step 4. Fix the mounting plate into the wall with screws in the box
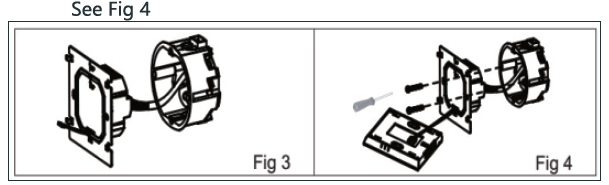
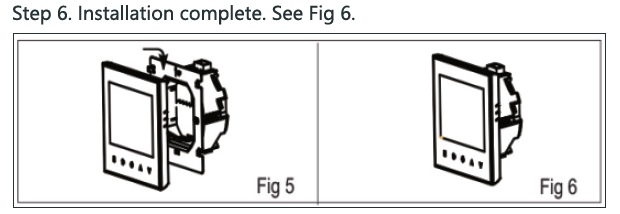
Step 5. Fasten body of thermostat and the mounting plate through rotating. See Fig 5.
HOME SCREEN QUICK REFERENCE

OPERATION
During Power On
- Power On/off: Press
 to turn the thermostat on/off.
 - Manual & Programmable Touch
 to change between manual mode and programmable mode. In manual mode, will show in the bottom left of the screen In programmable mode, the period icon
 will show in the right
  side.
side. - Setting Temperature In the programmable mode time and set-point could not be adjusted gPdsE yo anua mode or In the mode of manual, press
 to set the desired temperature.
 - Adjusting/Setting the Clock Touch the
 icon Oto set minute, hour and weekday (1= Monday. 2= Tuesday etc) by using the arrows. pressonce more to contirm and ext
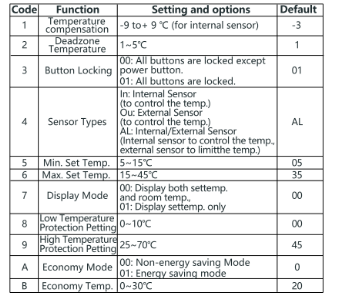
 - Locking your Thermostat Press and hold thefor 5 seconds to lock/unlock your thermostat In item 3 of high sensor options, you can select full lock or half lock.
- Adjusting/Setting the Program Scheduie at will automatically When Wi-Fi cor accept the program schedule made via the APP on your device (see below tor detailed instructions.lf you want to set the program Schedules through your thermostat, simply follow the the program schedule through you themostat can only be carried out when there is no WiFI connection between your thermostat and smartphone/ tablet.
- Checking the Temperature of Floor Sensor Press and hold thearrow for 5 seconds to display the temp. of floor sensor. Setting the Functions and Options In order to reach system function, turn the thermostat off. Press and hold and at the same time for 5 secs. Then press to scroll through the available functions. Use the andarrows
Touch to change between manual mode and programme mode. In the manual mode. will display in the bottom of the screen In programabl mode, touch and hold the icon Quntil the weekday schedule setting appear(12345will show along the left of the screen). Press the icon and use the and arrows to set the time 1st penod).Press againanduse and arrows to set the temp. Press tne icon and ues tne A andarows to ser the time and adule settings Pro et (6 will shOw along the left ot the screen Repeat the above process to set the penod, temp. and Sunday schedule. Press once more to contirm and exit. Default setings for program schedule
ABOUT WIFI
WI-FI CONNECTION
When first time using Wi-Fi thermostat.you must configure the Wi-Fi signal and settings on your smartphone or tablet. This will allow communication of your connected devices.
Step 1. Download MOES App on
App store or scan the QR code MOES App is upgraded as much more compatbility than Tuya Smart/Smart Life App, functional well for scene controlled by Siri, widget and scene recommendations as the fully new customized service. (Note: Tuya Smart/Smart ife App still works, but MOES App is highly recommended ed)
Step 2. Registration or Log in
Download “MOES” Application. Enter the Register/Login interface; tap “Register” to create an account by entering your phone number to get verification code and”Set password”. Choose “Log in” if you already have a MOES account.
Step 3. Connect the thermostat
Check the tutorial below to complete the connection and setup. auide Method (Eie : Scan the 23 QR code to configure the network
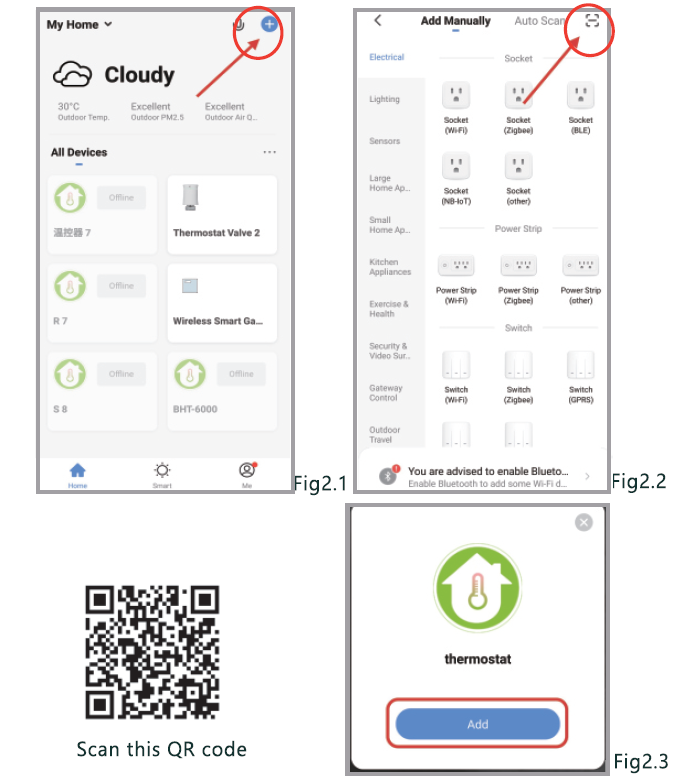
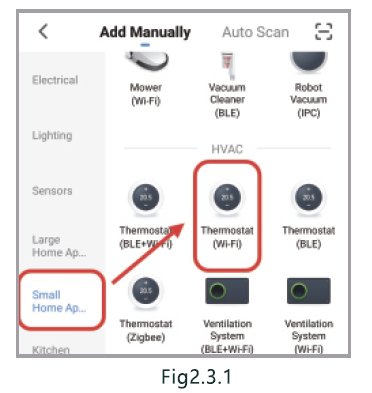
Method 2: Ordinary distribution network guidance (Fig. 2. 18&Fig. 2.3.1)
Network distribution mode:
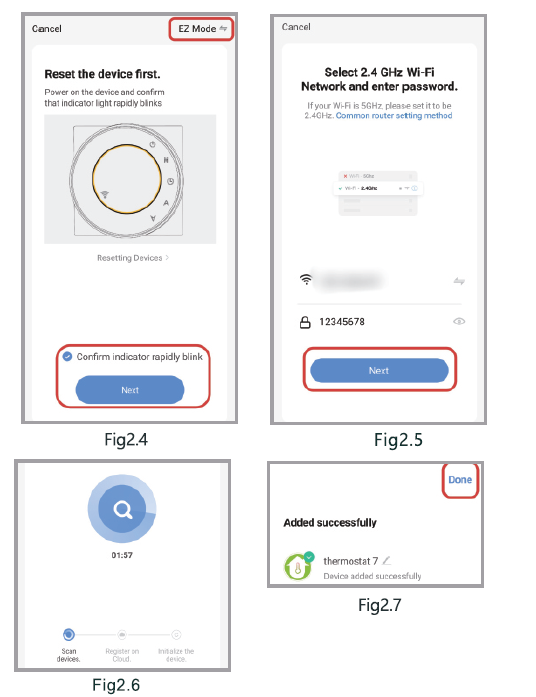
EZ Mode
When the thermostat is off, press and hold the ‘V until the thermostat screen flashes quickly and displays the icon, and then operate according to the following figure (Fig 2.4-Fig 2.7).
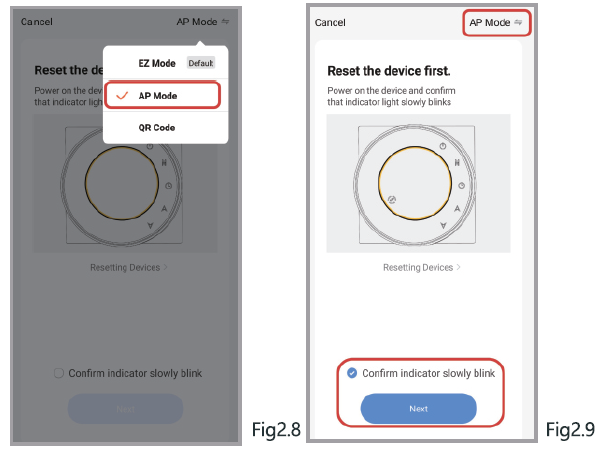
AP Mode
When the thermostat is off, press and hold the”![]() until the thermostat screen flashes slowly and the “icon
until the thermostat screen flashes slowly and the “icon ![]() appears.the ” icon
appears.the ” icon ![]() appears, continue to press the
appears, continue to press the  until the thermostat screen Flashes slowly and displays the icon
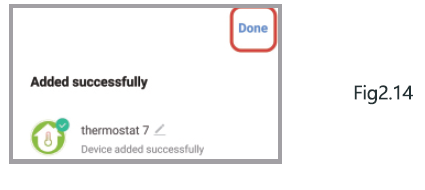
 ), and then operate according to the following figure (Fig 28-Fig 2.14)
APP OPERATION INTERFACE DESCRIPTION
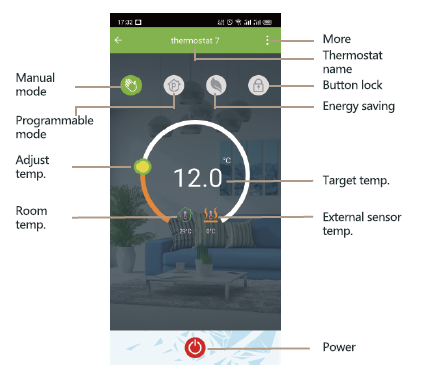
More Setting

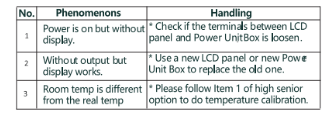
SIMPLE EXCEPTION HANDLING
SERVICE
24-month warranty since the date of purchase Service beyond the warranty period may need a charge. For more details, please contact us. Thank you for your support and purchase at we Moes, we are always here for your complete satisfaction, just feel free to share your great shopping experience with us. f you have any other needs, please do not hesitate to contact us first, and we will try to meet your demand.
FOLLOW Us MOES.Official moessmart moes_smart moes_smart moes_smartewww.moes.net
UN EVATOST CONSULTING LTD
- Address: Suite 11, First Floor, Moy Road Business Centre,
- Taffs Well, Cardiff, Wales, CF15 7QR
- Tel: +44-292-1680945
- Email:[email protected]
- EGAMZAB GmbH
- Laubenhof 23, 45326 Essen
- Made In China
- Manufacturer:
WENZHOU NOVA NEW ENERGY CO, LTD
- Address: Power Science and Technology Innovation
- Center, NO.238, Wei 11 Road, Yueqing Economic
- Development Zone, Yueqing, Zhejiang, China
- Tel:+86-577-57186815
- After-sale Service: [email protected]
Reference
Download Manual:
Moes WHT-NV-GA-BK-MS WiFi Water Floor Heating Thermostat User Guide

Moes WHT-NV-GA-BK-MS WiFi Water Floor Heating Thermostat User Guide
Leave a Reply