
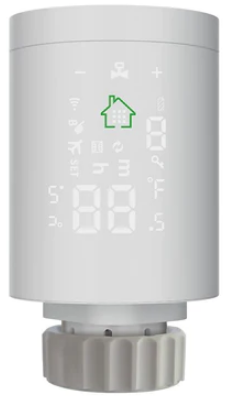
 MOES TS0601 Smart Radiator Thermostat
Many thanks for your selection of our products and services, and also for your trust and support to us.
earch for “Smart Life” Download the Wifi App with the following icon
For other languages, please scan the QR code above.
Support:[email protected]
- Add your gateway to the App, then add your radiator actuator to your gateway in the App.
- After the actuator has completed the self-test, long press
 access to the interface, short press +to choose icon
 ,short press to confirm this option, long press , flashing to add a thermostat to APP.
Note: Cellphone and gateway must connect under the same WIFI router.
Product Specifications
- Power: 2*2 AA* 1.5V alkaline batteries
- Display accuracy::0.5℃
- Probe sensor::NTC(10k)1%
- Maximum route:4.5mm
- The default range of temperature adjustment:5~35°C
- Working environment temperature::-10~60°C
- Insulating condition: Normal environment
- Running program: Set per 1 week as a cycle
- Size(mm):53*89.5
- Range of temperature display::1~70°C
- Maximum current:90mA
- Thread size:M30*1.5
Displays & Buttons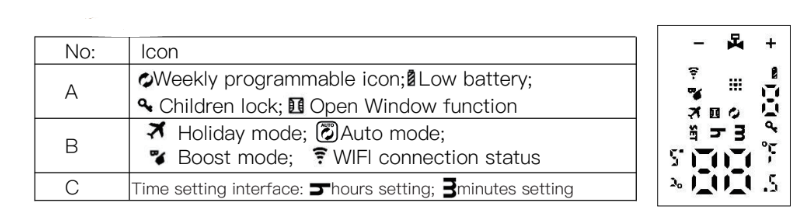
| No: | keys | Represent |
| D | |
1.Short press to switch manual mode and auto mode 2.Long press to access setting interface3.Confirm key |
| E | – | 1. Decrease key 2. Long press to lock/unlock keys |
| F | + | 1. Increase Key2. Long press access Boost function setting |
Installation and initial commissioning
Install the actuator with the valve and power-on, all of the icons appear, and 3s later display program version NO.
Time setting
![]()
![]() flashing, press iii display
flashing, press iii display![]() hour setting,press -or+ to adjust the value,press iii again display
hour setting,press -or+ to adjust the value,press iii again display ![]() the minutes setting,press-or+ to adjust the value,press again to set week,press -or+ to adjust the value,press
the minutes setting,press-or+ to adjust the value,press again to set week,press -or+ to adjust the value,press ![]() to confirm setting and remember the time.
to confirm setting and remember the time.
Note: after actuator self-testing, under normal working status,if need to modify time, please choose ![]() and
and![]() press access to setting.the same as above method(it will the same as network time after wifi connection)
press access to setting.the same as above method(it will the same as network time after wifi connection)
Continuous click ![]() until “Ad” appears, press again, actuator begins self-testing, self-testing is finished, the working interface appears
until “Ad” appears, press again, actuator begins self-testing, self-testing is finished, the working interface appears
Malfunction
| Error Code | Description |
| E1 | Route is too short: in the adjustment process, the pin
was stuck before it reach the destination of 2mm |
| E2 | The temperature sensor is opened or damaged |
| Flashing indicates low battery | |
| Display version No. After power on,long displays means mould works,flashing means mould error. |
Note: After malfunction is solved press to self-testing again
Function description
Holiday mode: press 3s access to the setting interface, press -or+ until flashing,then press to confirm and enter temperature setting, press -or+ to adjust the value, press confirm and enter days setting press or to adjust the value. If you want to cancel holiday mode, press ![]() to choose manual or auto mode then exit.
to choose manual or auto mode then exit.
Ventilation and energy saving: ventilation and energy saving function is defaulted off, if you want to open this function, please set in advanced options(The default settings will be restored when the battery is replaced )
BOOST: Press and hold+ access to BOOST, pressing any key to cancel BOOST mode
Programming mode setting
Press![]() about 3s access to the setting interface, short press+ switch to, selected option flashing, short press access to programming, press-or+to choose the mode you want flashing (5 means 5+2 days, 6 means 6+1 days, 7 means 7 days), press to access to first-period hour setting, press-or+ to adjust the value, press iii to access to minute setting, press -or+ to adjust the value, press access to temperature setting(the first-period temperature is 15°C), press-or+to adjust value, press to set second time period, third time period…… After finishing all time periods, press save and exit. If you exit before finishing all of the settings, don’t operate, after 5s it will automatically save and return to the working interface.
about 3s access to the setting interface, short press+ switch to, selected option flashing, short press access to programming, press-or+to choose the mode you want flashing (5 means 5+2 days, 6 means 6+1 days, 7 means 7 days), press to access to first-period hour setting, press-or+ to adjust the value, press iii to access to minute setting, press -or+ to adjust the value, press access to temperature setting(the first-period temperature is 15°C), press-or+to adjust value, press to set second time period, third time period…… After finishing all time periods, press save and exit. If you exit before finishing all of the settings, don’t operate, after 5s it will automatically save and return to the working interface.
| period | Default period | Default temperature |
| 1 | 6:00-8:00 | 20℃ |
| 2 | 8:00-11:30 | 15℃ |
| 3 | 11:30-12:30 | 15℃ |
| 4 | 12:30-17:30 | 15℃ |
| 5 | 17:30-22:00 | 20℃ |
| 6 | 22:00-6:00 | 15℃ |
Advanced options
Press IIIabout 3-5s to access to setting interface, press -or+ until flashing, ![]() press to access to advanced options press -or+to change value, and press to set next option, after finishing all , don’t operate, after 10s it will automatically save and exit.
press to access to advanced options press -or+to change value, and press to set next option, after finishing all , don’t operate, after 10s it will automatically save and exit.
| Symbol | Setting item | Parameter | default |
| A1 | Measuring temperature correction | -9-+9°C | 1°C accuracy correction |
|
A2 |
Window ventilation function |
1:display means close window ventilation function close,presskey display 5°C means this function open(tempera- ture setting range:
5-25°C) |
1.default of power on is means close 2.:display 0:15 means valve closing time 15 minutes |
| 2:Valve closing time:0:05-1:00,timing starts when the valve is fully closed | |||
|
A3 |
Automatic lock if no operation more than 10 minutes |
0:close 1:open |
0 |
|
A4 |
The minimum limit of the setting temperature |
1-16°C |
5°C |
|
A5 |
The maximum limit of the setting temperature |
16-70° |
35°C |
|
A6 |
Extend BOOST running time, increase 100s for press+ every time |
100s-900s |
300(display 30) |
|
A7 |
Check valve opening |
99 mean valve open 100%
5 mean valve open 5% Each increment is 5% |
|
|
A8 |
Heating start/stop Temperature hysteresis |
0.5-1.5 |
1 |
| A9 | Display mode | 0:vertical display 1:horizontal display | 0 |
|
AA |
Reset | Display 88, using -or+ to change to 00, press iii to reset, all of the icons appear means reset successfully. |
REFERENCE
DOWNLOAD MANUALS:
MOES TS0601 Smart Radiator Thermostat User Manual
![]()
Leave a Reply