
Midea THP-1000ALN(W) Wired Remote Thermostat
Introduction
Welcome
Thank you for your purchase. Your new thermostat will provide uniform and comfortable temperature control throughout every room in your property. We bring together technology, craftsmanship and the highest quality materials to provide you with a safe, reliable product combined with sleek, contemporary design. Please read this installation/ programming manual for comprehensive instructions on installing and operating your thermostat. Please ensure a suitably qualified person installs your thermostat and complies with all local regulations.
FEATURES
- The convenient operation creates convenient life.
- Options of black and white housing.
- Manage your home temp. even when you are in any place around the world at any time.
- Fashion design blends in with any décor.
- Zero service fee.
- Remote is controlled by a mobile APP or computer (WIFI).
- Touch Screen display with backlight is easy to read- even in the dark.
- An accuracy of 0.5 °C keeps your comfortable temperature within the level you set.
- Bright buttons always remind you the world truly exists.
- Lovely price helps you save not only energy.
- Easy Ul interface could be used even by a child
Service
Your thermostat carries an 18-month warranty from date of purchase. Service outwith the warranty period may incur a charge.
In the box
- Thermostat 1pc
- User Guide 1pc
- Screws 1pc
- Wall plate 2pc
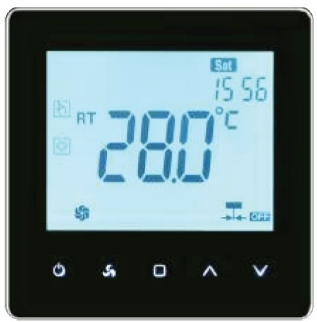
Display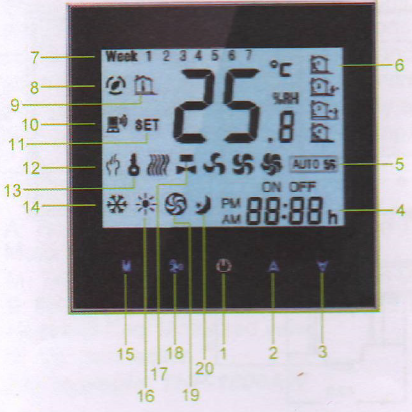
ABOUT YOUR THERMOSTATS
THP-1000 series Modern Touch Screen Room Thermostats are designed to on/off control the fans and valves in air conditioner applications via comparison of the room temperature and setting temp. as reaching the aim of comfort and saving energy by your mobile phone. No matter you stay at home or abroad, you can control your room temp. easily.
MODEL DEFINITION
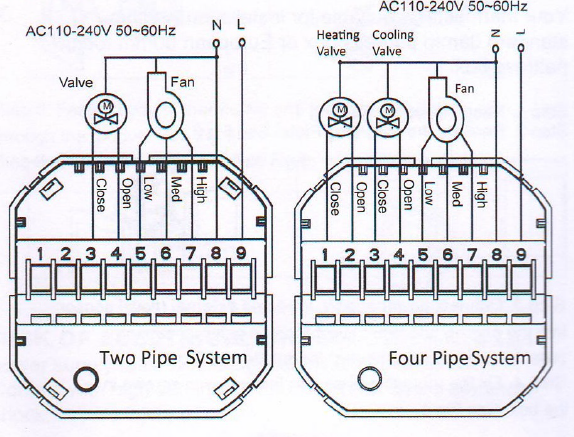
- A: Two pipe; Control Fan Coil Unit and Two Wired Motorized Valve.
- M: Two pipe; Control 0-10V Motorized Valve(Pending)
- E: Four pipe; Control Fan Coil Unit and Two Wired
- Heat and Cool Motorized valve.
- W: Wifi connection
- N: RS485/MODBUS RTU communication
- For example: THP-1000AW
Dimension
TECHNICAL DATA
- Sensor: NTC
- Accuracy: ‡0.5 C
- Temp. Range: 5-35 C
- Power Consumption: <1.5W
- Timing error: <1%
- Power Supply: 110~240V, 50 ~60Hz
- Current Load: 3A for valve and 5A for fan
- Shell Material: PC+ABS (Fireproof)
- Dimension: 86×86×13.3mm
- Installation: 86*86mm or European 60mm round box
- Ambient Temp.: 0 – 45 C,5 ~ 95% RH(Non condensing)
- Storage Temp: -5~ 55 C
- Housing Color: White/Black
WirinG
Installation
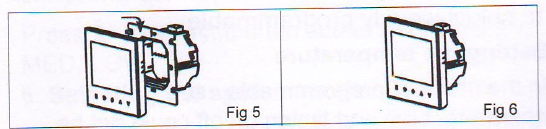
INSTALLING YOUR THERMOSTAT
Your thermostat is suitable for installation within a standard 86mm pattress box or European 60mm round pattress box.
- Step 1. Keep power off.
- Step 2. Remove the mounting Plate.

- Step 3. Connect power supply, load and external (floor) sensor into the appropriate terminals if there is external sensor. (see “Wiring your thermostat” for details).
- Step 4. Fix the mounting plate into the wall with screws in the box.
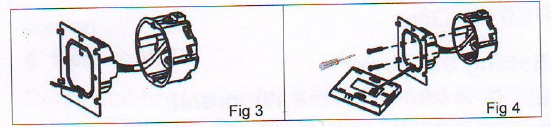
- Step 5. Fasten body of thermostat and the mounting plate through the groove.
- Step 6. Installation complete.
RISK OF ELECTRICAL SHOCK.
Disconnect/isolate power supply prior to making electrical connections. Contact with high voltage components can cause electrical shock, severe injury or death.
OPERATION
- Setting the power
- Press
 to turn on/off the thermostat.
- Press
- Selecting manual and programmable
- Press and hold M,
 will flash. Press M again
 , (” will flash. Press
  to select manual and press
  to select weekly programmable.
- Press and hold M,
- Setting the temperature
- In the mode of programmable, set temperature, time and timing on/off could not be adjusted. If the user want to change, please go to manual mode or programmable setting.
- In the mode of manual, press
 to set temperature. will display in the left corner of screen.
- Setting WIFI
- Press and holdfor 8 sec. to begin the WIFI setting. The icon
 will display on the screen.
 - Press and holdagain for 8 sec. back to factory setting.
- Press and hold
- Setting the fan
- Press
 to select the fan speed AUTO, HIGH, MED, LOW.
- Press
- Selecting the system mode
- Press M to change the system mode HEATING, COOLING, and VENTILATION. In the mode of VENTILATION, the valve is off but the fan runs.
- Setting the sleeping (Customized Function)
- Press and Hold M to set the sleeping ) will flash.
- Press A to confirm.
- When sleeping is selected, the set temp. will be 1 C lower or higher than the original every 30 min.
- 8 hours later, the sleeping will cancel automatically.
- For example, in cooling mode, setpoint is 26 C,
- 30 mins later, the setpoint will become 25 C;
- 1 hour later, the setpoint will become 24 C;
- 1.5 hour later, the setpoint will become 23 C;
- 2 hour later, the setpoint will become 22 C;
- Then 22 C will keep for another 6 hours. Totally 4C could be different. Press and Hold M to set the sleeping. will flash. Press to cancel.
- Press and Hold M to set the sleeping )
- Setting the clock
- Press and hold M, will flash. Press M again,) will flash.
- Press M to set minutes of the time;
- Press M to set hours of the time;
- Press M to set week of the time;
- Then the time will save automatically several sec. later.
- Press and hold M
- Setting lock
- Press to lock/unlock the screen. Go to the item 3 of setting functions and options to select the locking mode.
- Press
- Adjusting the weekly programmable
- Press and hold M, will flash. Press M again,will flash.
- Press and hold M,
- Adjusting the weekly programmable
- Press and hold M, will flash. Press M again, will flash.
- Press M to set minutes of the time;
- Press M to set hours of the time;
- Press M to set week of the time;
- Press M into the adjustment of programmable.
- Then press M to change the different items.
- Press to set the relative values.
- The order is Minute adjusting-* Hour adjusting -> Week adjusting – Minute timing-on -+ Hour timing-on- Minute timing-off-› Hour timing-off-
- Temperature adjusting (“12345”, “67”, is “5+2” programmable mode, every mode has two times zones and a time temperature setting).
- Press and hold M,
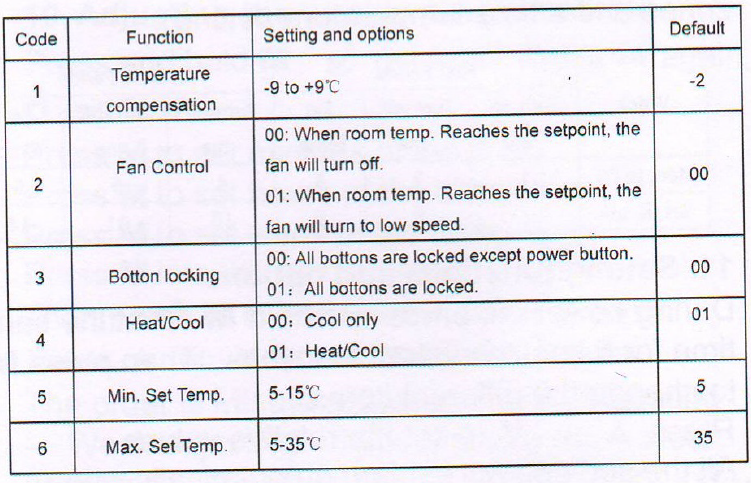
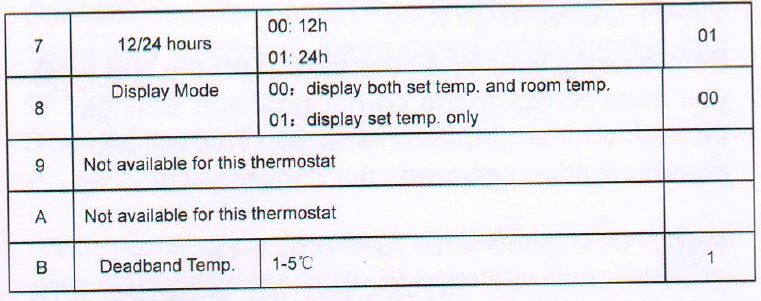
- Setting functions and options
- During power off, press and hold M at the same time for 5 sec. to system functions. Then press M to change the different items.
- Press A or Y to set the relative values.
- All the settings will confirm automatically when the power is on.
- During power off, press and hold M
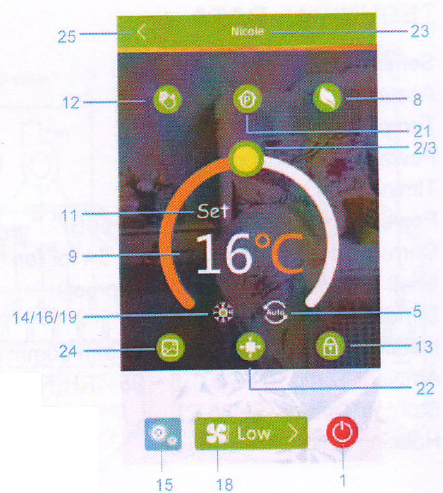
WI-FI CONNECTION
Before using your Wi-Fi thermostat for the first time, you must configure the Wi-Fi signal and settings through your smartphone or tablet. This will allow communication between your connected devices.
Step 1 Download your APP 
- For ANDROID devices, search for TOUPWELL in Google Play and download. Alternatively, scan the relevant QR code here.
- For IOS devices, search for TOUPWELL in Apple Store and download it. Alternatively, scan the relevant QR code here.
Step 2 Connect your Wi-Fi signal
On your thermostat
With power on, press and hold the ![]() simultaneously for eight (8) seconds. The icon
simultaneously for eight (8) seconds. The icon![]() will flash.
will flash.
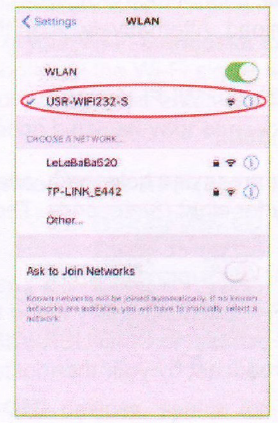
Then, on your smartphone/tablet
- Open the Wi-Fi networks (usually found in “Settings”) and connect to the SSID USR-WIF1232-S signal being broadcast by your thermostat
- Open the App and you will be taken to the first settings page

- The first setting page is used to select your server address. Please choose the default server directly.
- If your thermostat is customized, contact us. We will help you to do the server configuration setting.
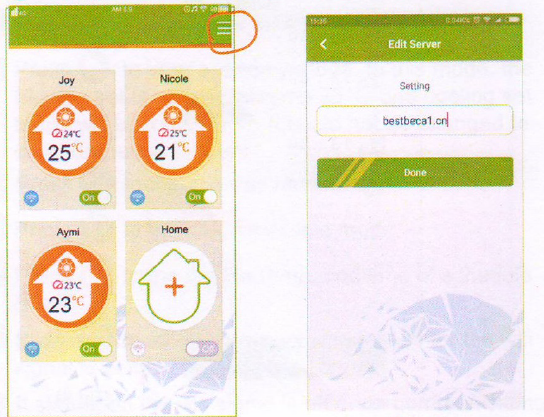
- Go to the home page. Press + of the small house to add your room
Note 1:
- You can add 12 rooms total. If you want to increase the quantity, please contact us.
- Set temp., room temp., fan speed, room’s name, wifi signal, and power button will display in the round room.
- Orange round stands for heating mode;
- Blue stands for cooling mode;
- Green stands for ventilation mode;
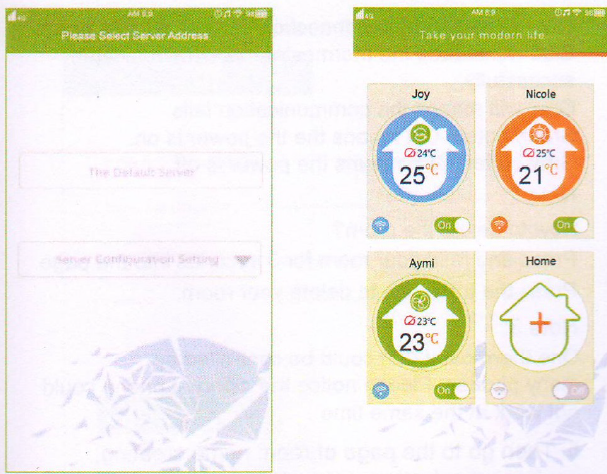
- Grey stands for non-connection.
- Blue wifi means the thermostat has communicated sucessfully.
- Grey wifi means the communication fails.
- Green button ON means the the power is on.
- Grey button OFF means the power is off.
Note 2:
How to delete the room?
- Press and hold your room for 3 seconds into the page.
- Press the trash can to delete your room.
Note 3:
- One thermostat (ID) could be controlled by many phones. Please notice the different phone could not work at the same time.
- Then go to the page of room name creating, equinment selecting. network searching and password entering. press enter to finish setting
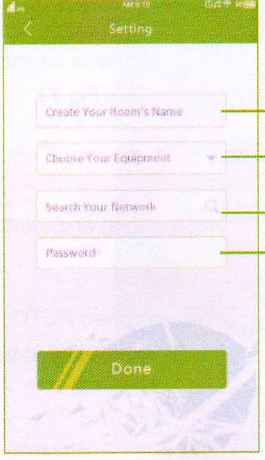
Note 1:
When pressing Done, you should wait about 5-60s for ID searching then your thermostat will match with your phone. Also 5-60 seconds network searching time is normal.
Enter your room and begin operation
 to turn off the power.
 to turn on the power.
 to change cooling, heating, and ventilation.
 will display in the screen.
 Press it to select the fan speed AUTO, HIGH, MED and LOW
  will display in the screen.
 to unlock the screen.
 to lock the screen.
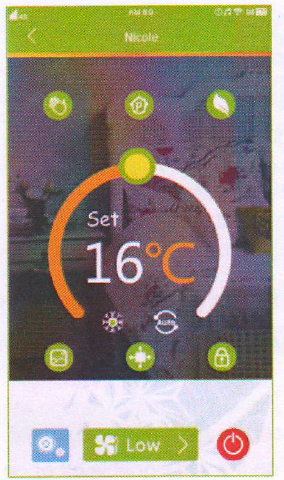
 to select the internal sensor or external sensor. It is a customized function.
 to choose or take a photo for your room.
 to your economy mode. In this mode, the heating set temp. will become 26 C and cooling set temp. will become 20 C. It could not be changed to another degree at present.
 the manual mode.
 ( to the programmable mode.
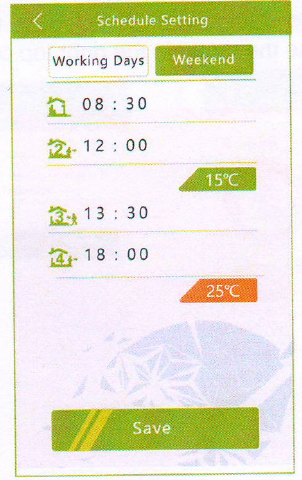
 to set the temp. and time of schedule (Fig 8)
 to set the temp. It also stands for the wifi signal communicated successfully.
 It stands on whether the wifi signal is off or on communicating.
- If you want to change your server, go to the home\ page and press the menu in the right top corner.
REFERENCE:
DOWNLOAD MANUALS:
Midea THP-1000ALN(W) Wired Remote Thermostat User Manual
![]()
Leave a Reply