
Midea A3920 SENDER Wireless Thermostat

A3920
A3920 series thermostat is a luxurious wireless thermostat to control fan coil unit and controller. The unit is designed with a nice and unique appearance. It is widely used for room temperature control in residential, industrial and business premises. According to difference between the set-point temperature and room temperature, each thermostat will decide on the switch of corresponding fan coil unit at the end of air conditioning, motorized valves, ball valves and damper to reach at a comfortable environment and energy saving purpose.
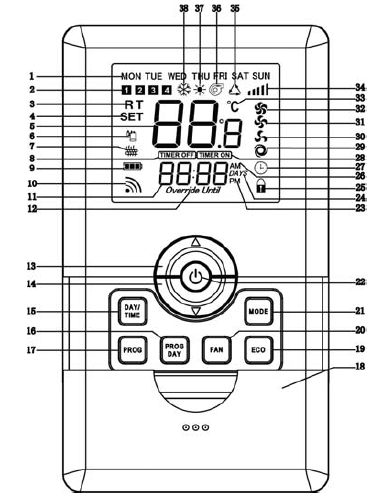
Structure of thermostat and explanation for the keypads
| S/N | Description |
| 1 | Week display symbol: Display from Mon to Sun. |
| 2 | Comfort level symbol: Indicate 1-4 comfort levels. |
| 3 | Room temperature display symbol: Indicate the room temperature |
| 4 | Set temperature display symbol: Indicate the set temperature |
| 5 | Temperature display: Display the room temperature and set temperature. |
| 6 | Cooling on the symbol: Indicate the present cooling device is on. |
| 7 | Heating on the symbol: Indicate the present heating device is on. |
| 8 | Off-time setting symbol: It comes on when setting off time. |
| 9 | Battery icon: Remind the recharging or low power warning. |
| 10 | Wireless sending icon: It comes on when sending wireless data. |
| 11 | Time display: It displays the current time and setting time. It indicates the parameter options when setting the parameter. It indicates the days when being on hold mode. |
| 12 | Indicate the days under hold-on mode.( not available) |
| 13 | Up arrow: Setting temperature and parameters button. |
| 14 | Down arrow: Setting temperature and parameters button. |
| 15 | Time/week button: Press the button to program the time and week |
| 16 | Program button: Press the button to program the comfort levels. |
| 17 | Program button: A long press on the button to program the comfort levels. |
| 18 | Slid cover: Open the slide cover to press the buttons. |
|
19 |
Energy saving button: Press this button to make running according to the economical setting temperature. |
| 20 | Fan speed selecting button: Press this button to select “auto”, “low”, “medium” and “high” speed. |
| 21 | Mode shift: when power on, to shift heating/cooling/ventilating mode. |
| 22 | ON/OFF: Press this button to select on/off mode. |
| 23 | PM: 12-hour clock system |
| 24 | Indicate the days unit under hold-on mode. |
| 25 | Keypad lock icon: The current keypad is under lock status. |
| 26 | AM: 12-hour clock system |
| 27 | Timer icon: Indicate the current status is a timer on/off. |
| 28 | ON time setting symbol: It displays on LCD when setting on time. |
| 29 | Auto-speed icon: Indicate the current FCU operating mode is an auto shift. |
| 30 | Low-speed fan icon: Indicate the current fan speed of FCU is low. |
| 31 | Medium-speed fan icon: Indicate the current fan speed of FCU is medium. |
| 32 | High-speed fan icon: Indicate the current fan speed of FCU is high |
| 33 | Temperature unit display: °C=Celsius |
| 34 | Wireless Signal strength indication |
| 35 | Auto mode icon: The current working mode is auto mode. |
| 36 | Ventilating mode icon: The current working mode is ventilating. |
| 37 | Heating mode icon: The current working status is heating. |
| 38 | Cooling mode icon: The current working status is cooling. |
BASIC FEATURES
- ON/OFF
- Room temperature setting
- Programmable and timer optional
- 5+2 and 7 days 4 comfort levels programmable optional
- Keypad lock
- 12/24 hour clock systems optional
- Real-time clock
- Low-temperature protection
- EEPROM
- Power failure restore
- Manual or Auto 3-speed changeover
- Celsius and Fahrenheit display optional
- Pre-heat function optional
- Auto, Cool, Heat, and Ventilation mode optional
- Card Key function
- ECO function
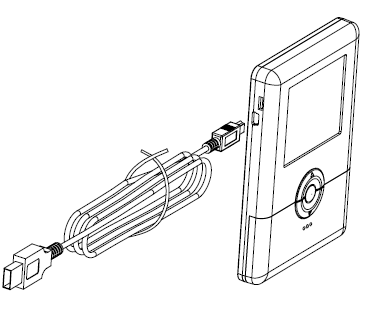
POWER SUPPLY
- The thermostat is supplied with a Li battery. You can charge the Lithium battery through a USB cable (included) connected to a PC. During the charge process, the battery icon will flash on and off.
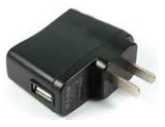
- 100-240VAC power supply.
- Plug USB cable into power supply to charge battery. No need for computer.
- After initial battery charging, recharge the battery every 4 – 6 months for best operation. Frequency of charging depends on changes that require a sending signal to receiver
OPERATION
- Thermostat on/off: To turn the thermostat off completely, press “
 ” Button. The display will be turned off. To turn the thermostat back on, press the “ ” button.
 - Temperature Set: Press “ ”to turn on the thermostat, and touch the Up and Down keys to adjust the set temperature. The change value is 1°C for each touch.
- Note: When being in auto mode, it allows you separately to adjust the set temperature for heating and cooling. Only need to press the Up and Down keys to enter the temperature setting interface, press “MODE” button to choose the heating and cooling temperature set. Then use the Up and Down keys to allow you to adjust the set temperature. When the comfort levels function is enabled, above set temperature will keep a period of time in the current level. When the next level is coming, the thermostat will shift to run the set temperature of current level automatically.
- ECO function: when there is nobody in the room, this function is to increase the cooling setpoint and decrease heating setpoint to save energy, Please note there are cooling and heating economy temperature setting.
- ECO temperature setting: press “ECO” to entry economy mode to run the economy temperature, LCD will show “ECO”, if your current mode is heating, press UP/DOWN key to set the heating ecomony temperature, press “MODE” to change to cooling, press UP/DOWN key to set the cooling economy temperature, and then press “ECO” to save and exit setting.
- Locking the Keypad: The keyboard can be locked to prevent unauthorized changes to the thermostat. To lock or unlock the keyboard, press and hold the “ECO” key for 3 seconds. When activated, you will see the lock symbol. To cancel, repeat the steps above.
- Mode set: Press “MODE” key to shift the working mode. “
 ”indicates AUTO mode, “
 ”indicates COOL mode, “
 ”indicates HEAT mode, “
  ”indicates VENTILATE mode.
 - Fan speed set: Press “FAN” to set fan speed. “
 ”(Auto)、“
 ”(Low)、“
  ” (Med)、“
 ”(High)
 - In the “Auto” mode, the fan speed will shift automatically. It means when the room temperature has 1°C difference with the set-point, it will shift the Low speed. When it has 2°C difference, it goes to run Med speed automatically, When it has 3°C difference, it will run the High speed automatically.
Control FCU Valve under 4-pipe configuration
- In cooling, when the room temperature is 1°C higher than the set-point, the cool valve will be opened. When the room temp is lower to the set-point, the cooling valve will be closed. Heating valve is always closed.
- In heating, when the room temperature is 1°C lower than the set-point, the heat valve will be opened. Otherwise, it will be closed. Cooling valve is always closed.
Control Motorized Valve under 2-pipe configuration
Under cooling/heating mode, if the difference between room temperature and set-point exceed 1°C, FCU valve will be open, if room temperature and set-point are equal, DA/DA2 will close the FCU valve with the fan still running, DB/DB2 will close the FCU valve and Fan both.
Control ventilating mode
In ventilating, Motorized Valve will be closed with the fan still running. Users can manually select HIGHT/MED/LOW fan speed as per their need.
Low temperature protection
When the thermostat turns off and the room temperature is lower than 5°C,it will be turned on automatically in heating mode with “ ” flashing, when room temperature is higher than 7°C,the thermostat will turn off heating devices.
Pre-Heat Function
It is only available for DB/DB2/AFCV2B thermostats in heating mode. When the system switches from OFF to ON or switches from the other modes to HEATING, and the heating device is on firstly, there is a time delay by selecting among 0/10/20/30/40/50/60 seconds for FCU to be opened.
Card Key function:
When the card is inserted, the thermostat will control the receiver. If the card is pulled out, the output of receiver will be override closed. The thermostat can check if the receiver with/without the card. The “NOCA” flashes on the thermostat if it is without the card.
Note: this display can only be refreshed after sending the wireless data successfully
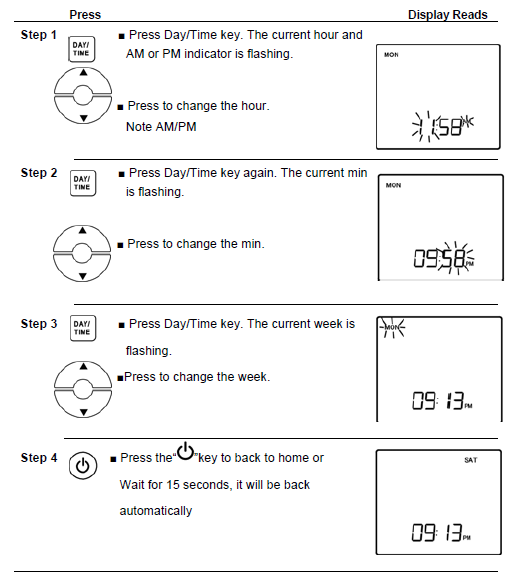
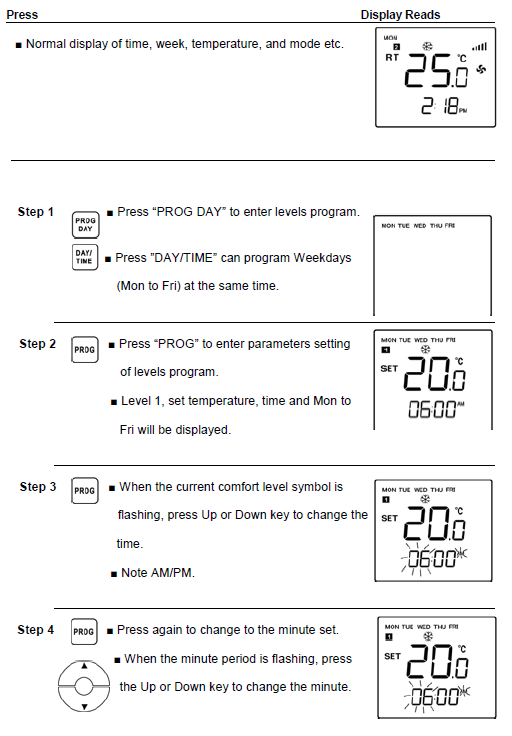
Setting time and day
Events (comfort levels) default programmable
The thermostat will conduct a 7-day programmable according to the table below under the default set.
| Comfort Level No. | Start time | Setting temp in
Cooling |
Setting temp in
Heating |
| 1 | 6:00AM | 26 | 20 |
| 2 | 8:00AM | 28 | 16 |
| 3 | 4:00PM | 26 | 20 |
| 4 | 10:00PM | 28 | 16 |
Manual Programming
- Your thermostat can be programmed for weekdays and weekends, or have unique programs for all 7 days. Use Weekday / Weekend Programs or 7-day Programming to enter or revise programs to match your Personal Program Schedule. The same steps are used when entering programs for the first time, or revising programs entered during Auto Programming.
- Familiarize yourself with Manual Programming, so that you can easily modify your programs as your comfort needs change. The example below demonstrates the Manual Programming method.
NOTE
- This programming function can be used only on the type of PI and P2 thermostats.
- Using 5/2 Day Programming or 7 Day Programming depends on your schedule.
- When setting the program time, note the AM/PM indicator.
- The program time can be set in 10-minute increments.
Weekday/Weekend Programming
Weekday Programs
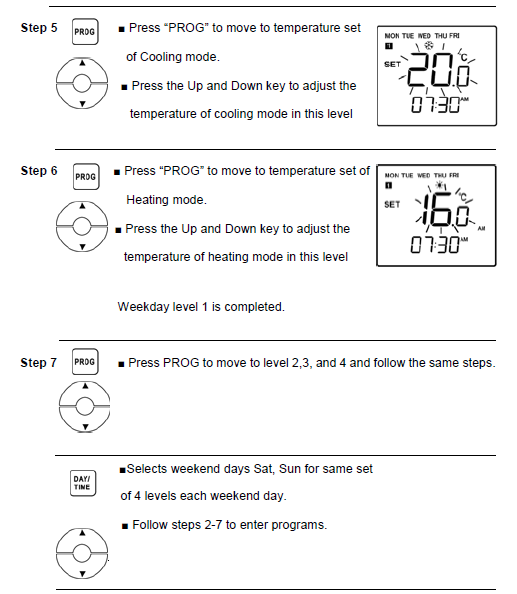
7day programming set
If you want to set different program for each day, you should program day by day. And program the time and temperature you desired for each day.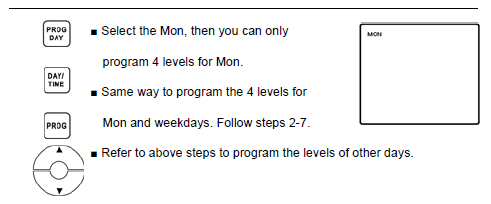
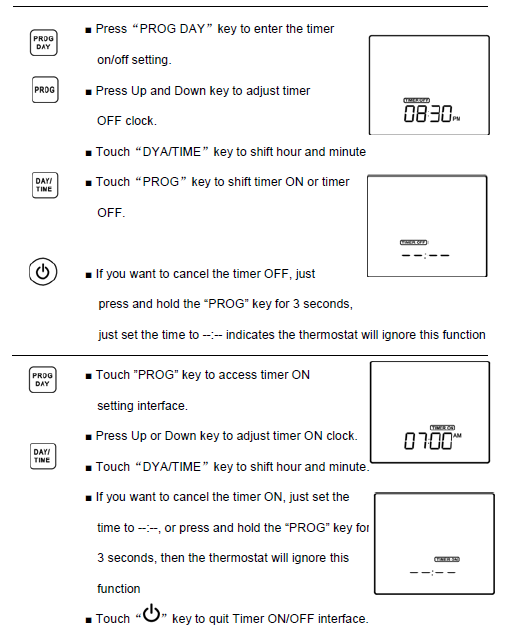
ON/OFF Timer set
Note: This function is available for P3 type thermostat only.
Error Mode
- E1:Sensor error
- E2:Memory chip malfunction alert.
- E4: Channel changed without matching with the receiver
- HI: The room temperature is higher than 55℃.
- LO: The room temperature is lower than 0℃.
If the thermostat is unable to control your system due to an unexpected problem, the thermostat will enter Error Mode. In this condition, the thermostat flashes “E1”, “E2” on the LCD display, and shuts off your system. When the thermostat wireless channel address is changed without registration, the display will show “E4” to warn, it must re-register, and “E4” will disappear after registration succeeds. Or you may set your thermostat back to the original channel to avoid re-registration.
Caution
Be sure to connect all the wires as the wiring diagrams and keep it away from water, mud, and other materials to prevent the unit to be spoiled.
REFERENCE:
DOWNLOAD MANUALS:
Midea A3920 SENDER Wireless Thermostat Owners Manual
OTHER MANUALS:
Midea A3920 Wireless Thermostat Installation Manual
![]()
Leave a Reply