
MI-HEAT TH213 Wifi Thermostat
Features
- Programmable/operatable by app
- Compatible with Amazon Alexa, Google Assistant and IFTTT
- Easy to install
- Weekly program 4 switching times (App: Monday to Friday and Saturday, Sunday)
- External sensor or room sensor
Technical data
- Operating voltage: 230V/AC
- Switching capacity: 3680W/16A (resistive load)
- Temperature sensor: internal or external sensor (NTC 10kOhm)
- Temperature limitation external sensor: 20 – 95°C / off (recommended max. 27°C)
- Frost protection: 5 – 30°C (1°C steps)
- Operating temperature: +5 ~ 30°C
- Accuracy: +/- 1°C
- LCD-display, illuminated
- Dimensions: 86mm x 86mm x 13mm
- Colour: Silver/Black
- Protection class: 2
- Protection Type: IP21 (sensor IP44).
- Certification: CE, ROHS, WEEE
Important information before commissioning:
- Please read the complete instructions before starting to install the thermostat.
- The thermostat must be installed by a qualified person.
- Only use the thermostat as described in this manual.
- Always disconnect the power supply during installation work.
Safety notes:
When handling products which are supplied with electrical voltage, the applicable VDE regulations must be observed, in particular VDE 0100, VDE 0550/0551, VDE 0700, VDE 0711 and VDE 0860.
- Before opening the device, make sure that it is de-energized.
- Tools may only be used on the device if it has been ensured that it is disconnected from the supply voltage and that any residual electrical charges stored in components have been discharged beforehand.
- Live cables or lines to which the device is connected must always be checked for insulation faults or breakages.
- If a fault is detected in the supply line, the device must be taken out of operation immediately until the defective line has been replaced.
If these instructions is not clearly state for non-commercial end users in regard to, which electrical characteristic values apply to the device, how external wiring is to be carried out, or which external components or accessories may be connected and what connected loads these external components may have, a specialist must always be requested for information. Before commissioning the device, check whether it is suitable for the planned application!
In case of doubt, it is absolutely necessary to consult experts or the manufacturers of the modules used! Please note that operating and connection errors are beyond our control. We assume no liability for any damage resulting therefrom.
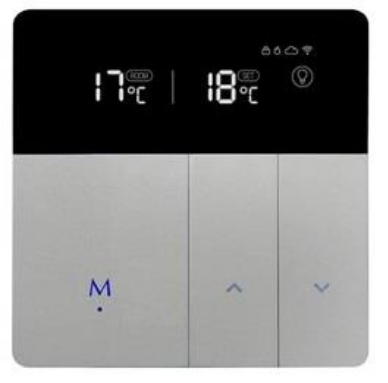
Description of Device keys and LEDs
- Mode & on/off key, short key press change operating mode, long key press (3 sec.) on/off.
- Increase temperature
- Short keystroke reduce temperature, long keystroke (3 sec.) activates pairing mode for connection to Wlan
Press buttons 1 and 3 for 3 seconds to activate or deactivate the key lock.
Description Display symbols
| Heating symbol: | – Lights up permanently when heating is in progress and disappears when the target temperature has been reached.
– Flashes if the set limiting temperature of the external sensor is reached. |
|
| Key lock: | – Is displayed if the key lock has been activated. | |
| Cloud connection: | – Shown if the thermostat has been connected to the cloud via the
app or if there is a connection to the cloud server. |
|
| Wlan connection: | – Lights up permanently if the thermostat is connected via Wlan (see “App integration and programming”).
– Flashes if the thermostat has been set to teach-in mode (see “App integration and programming” point 8). |
|
| Manual operation: | – Displayed when the temperature has been adjusted manually
with the arrow keys. This exits the Away-/Home- or Auto-Mode (weekly program). |
|
| Auto-Mode: | – Is displayed if the week program was activated via the app (Mode: Smart). | |
| Away-Mode: | – Is displayed if the Away mode has been activated via the mode button on the device or via the app. The temperature set for the Away-Mode is used. | |
| Home-Mode: | – Is displayed if the home mode has been activated via the mode
button on the device or via the app. The temperature set for the Home-Mode is used. |
|
| Temperature display:
Left: Current room temperature or temperature of the external sensor (for settings, see manual operation) Middle: Arrow flashes if the target temperature has not yet been reached, or if the set limiting temperature of the external sensor is reached. Right: shows the desired temperature (set / target temperature) |
||
Manual operation
The following thermostat functions can also be set without the App.
| Function | Key operation | |
| Change the showing ACTUAL temperature in the display (internal/external sensor) | Press the “M” key and ▲ for 3 seconds, the display will show ROOM to the right of the ACTUAL temperature (left display side) when the value of the internal temperature sensor is displayed. If ROOM is not displayed, the value of the external temperature
sensor is displayed. |
|
| Open the settings menu | Press the ▲ and ▼ button for 3 seconds. Tham press the “M” key several times to switch between the following settings. The value
of each setting can be changed with the ▲ and ▼ button. |
|
| 1 | Sensor Type | 00: internal sensor, 01: external sensor, 02 internal and external
sensor, standard value 00 |
| 2 | Temperature limitation
external sensor |
20 – 95°C / off, standard 35°C, for electric underfloor heating we
recommend 27°C |
| 3 | Hysteresis | 1 – 9°C, standard 2°C |
| 4 | Temperature Calibration | -9 – +9°C, standard 0°C |
| 5 | Temperature limitation
internal sensor |
35 – 90°C, standard 35°C |
| 6 | Frost protection | 0 – 30, standard 5°C |
| 7 | Home-Mode Temperature | 5 – 35°C, standard 22°C |
| 8 | Away-Mode Temperature | 5 – 35°C, standard 15°C |
| 9 | AUTO-Mode Temperature | standard 20°C, weekly program only adjustable via App |
| 10 | Restart device | Press ▲ or ▼, display changes from “–” to “==”, wait 5 seconds. |
| 11 | Factory settings | Press ▲ or ▼, display changes from “–” to “==”, wait 5 seconds. |
Description of terminals
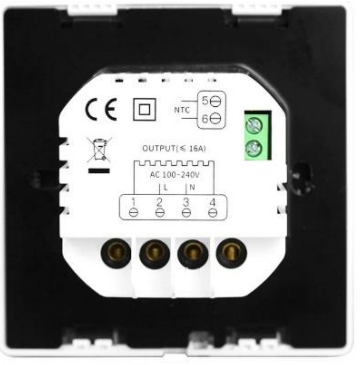
- 1 & 4 Output terminal for connecting the load
- 2 & 3 Input terminal for the 230V/AC supply voltage of the thermostat
- 5 & 6 Input terminal to connect the external temperature sensor
App integration and programming:
In order to setup or program the thermostat via Smartphone App, the free TuyaSmart App must first be downloaded and installed from the respective App Store.
Minimum Smartphone requirements: iOS9 or newer, Android 4.1 or newer

The following steps show the setup of the TuyaSmart App as well as the integration and programming of the thermostat. 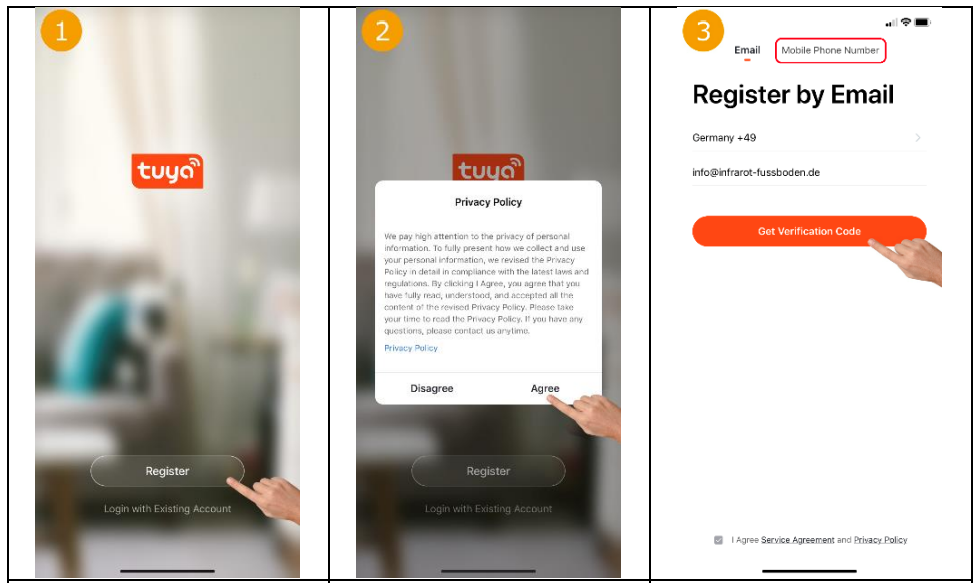
- When starting the app for the first time, you have to create a Tuya user account.
- Agree to privacy policy to continue.
- Select your country, enter your email address, and then tapping on “Get Verification Code”. Alternatively, the code can also be requested by SMS by tapping on “Mobile Phone Number” at the top.
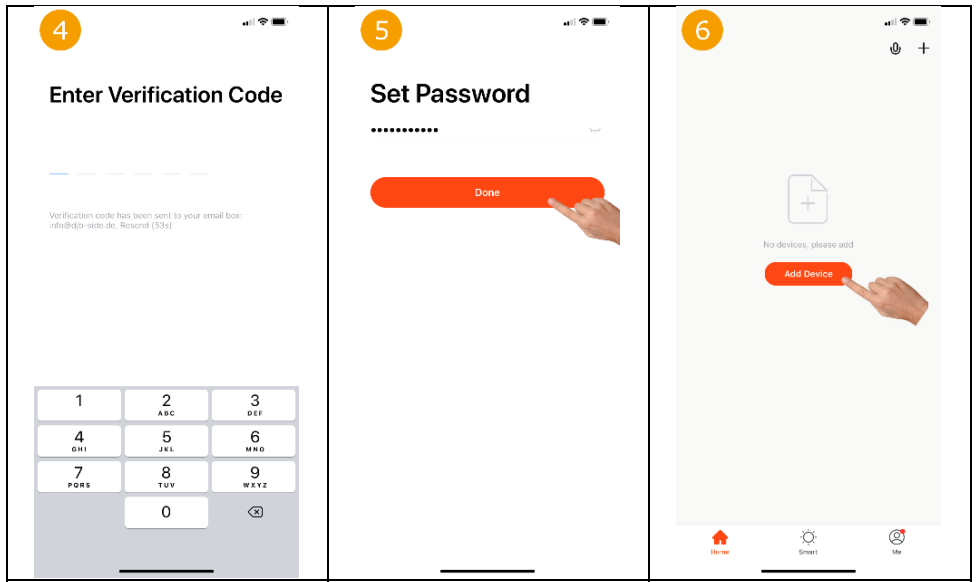
- Enter the verification code you received by e-mail or SMS.
- Set the password for the Tuya user account and press “Finish”.
- Now the thermostat can be integrated by touching “Add device”.
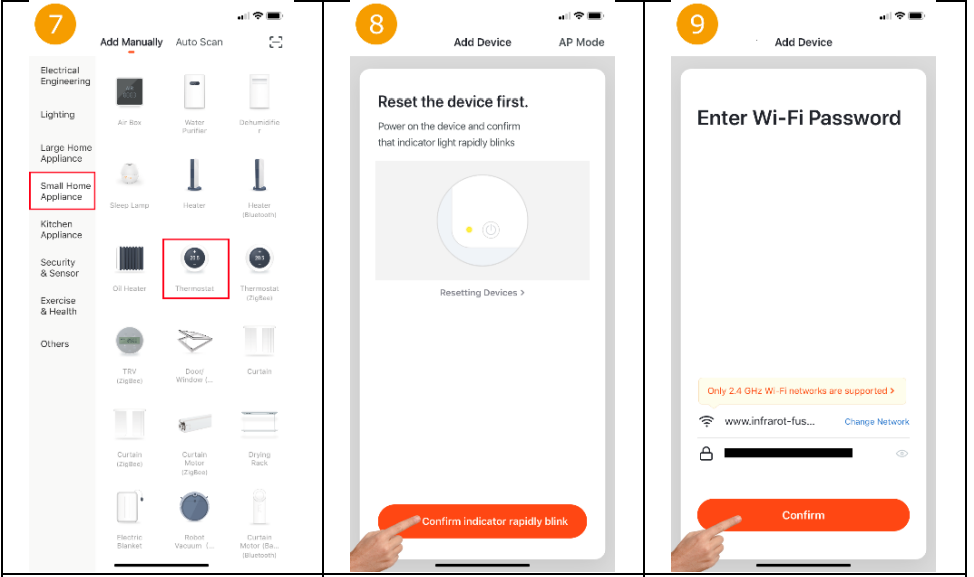
- To integrate a thermostat, tap on “Small Home Appliance” on the left and then select “Thermostat” on the right.
- Set the thermostat to teach-in mode: Press the down arrow button on the right of the thermostat for approx. 3 seconds until the Wlan symbol flashes quickly in the upper right corner of the display.
- Select the WLAN network (SSID) of the existing router and enter the corresponding WLAN password.

- The app now searches for devices that are in learning mode.
- If a device was found, a name can now be assigned. After touching “Done”, the integration of the thermostat is successfully completed.
- Main view: The setpoint temperature is displayed in the middle and the current room temperature (Indoor Temp) above it. The setpoint temperature can be adjusted manually using the Plus/Minus button. The key lock can be switched on/off using the “Lock” key. Functions of the other buttons see 13, 14, 15, 18.
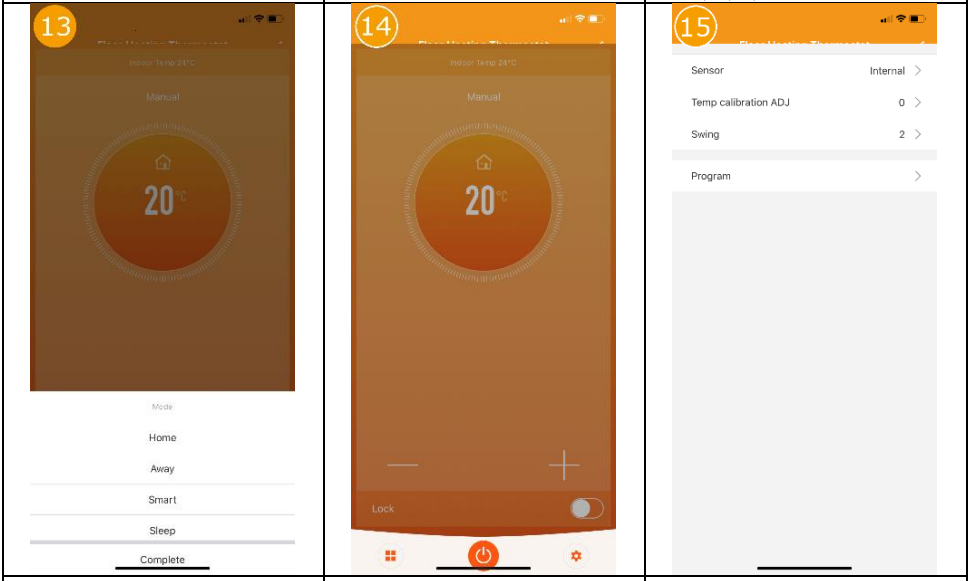
- Tap the “Mode” icon in the lower left corner of the main thermostat display to change the thermostat operating mode (Home/Away/Smart/Sleep).
- The thermostat can be switched off or on by touching the “switch” symbol in the middle at the bottom of the main thermostat display.
- The following settings can be adjusted by tapping the “Gear” symbol in the lower right corner of the main view. Set the sensor to be used (Fig. 17), temperature calibration, hysteresis (Swing) and the weekly program (Fig. 16).
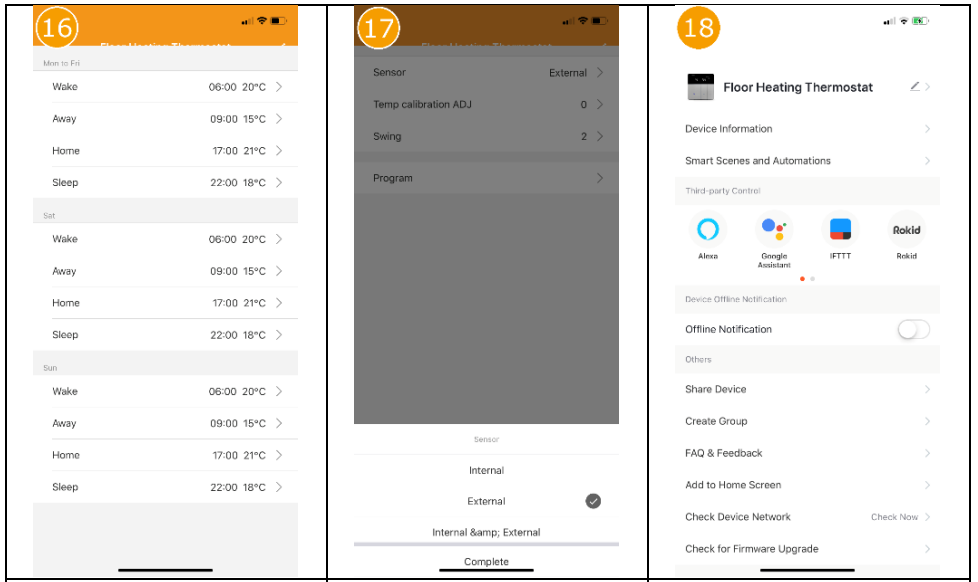
- An individual heating profile can be stored here.
- Here you can select whether only the internal or only the external sensor is to be used for temperature determination. It is also possible to use both sensors in combination.
- By touching the “pen” symbol in the upper right corner of the main view of the thermostat, further settings and integration options in the voice control systems Amazon Alexa and Google Assistant can be called up.
Disposal notes
Do not dispose of this device in household waste! Electronic devices must be disposed of at the local collection points for electronic waste in accordance with the Waste Electrical and Electronic Equipment Directive.
Note on conformity
The CE mark is a free trade mark that is exclusively addressed to the authorities and does not contain any assurance of properties.
Documentation © 2019 Mi-Heat Heizsysteme GmbH
All rights reserved. No part of this manual may be reproduced in any form or by any means without the written permission of the publisher. This manual may contain typographical defects or misprints. We assume no liability for technical or printing errors and their consequences.
V1.2 (04/2020)
Mi-Heat Heizsysteme GmbH
Ol Streek 39a
26607 Aurich
Germany
Internet: mi-heat.com
E-Mail: [email protected]
Reference
Download Manual:
MI-HEAT TH213 Wifi Thermostat User Manual
Leave a Reply