
MI-HEAT E91 Programmable Thermostat

Range of application
The E91 thermostat can be used to control floor heating systems such as electric heating mats or heating foils, as well as for NC control valves (normally closed) for water-guided floor heating systems. Via the weekly programme, the thermostat ensures that the desired temperature is available at the desired time.
Important Notes
- We recommend leaving the installation of the temperature controller and the heating system to specialists.
- Only qualified electricians should carry out the electrical connections and the mains connection of the appliance.
- Disconnect the cables from the power supply before installing, checking or replacing a thermostat.
- The wiring diagram and installation instructions for the unit can be found in this manual.
- The manufacturer’s warranty does not cover malfunctions of the appliance that occur as a result of mechanical damage, faulty installation, improper handling and use for purposes or under conditions not specified in these instructions for installation and use.
Safety instructions
Disconnect the cables from the power supply before installing, checking or replacing a thermostat. Work on electrical connections and the mains connection of the appliance may only be carried out by qualified electricians. Failure to do so will invalidate the warranty. Only plastic flush-mounted boxes may be used for thermostat installation. During installation of the corrugated pipe and again before laying the screed, make sure that the sensor can be placed in the corrugated pipe and removed again.
Attention!
The floor sensor functions as a temperature limiter. The soil limiter temperature must be set in the “3LIT” settings.
Recommended settings
- Max. Temperature tile floor: + 45 ° C
- Max. Temperature wood, laminate floor: + 27 ° C
- Max. Temperature vinyl, PVC flooring: the maximum temperature specified by the flooring manufacturer must be set.
Display symbols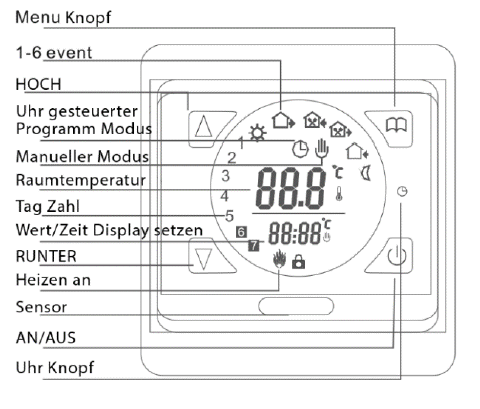
Technical data
Circuit diagram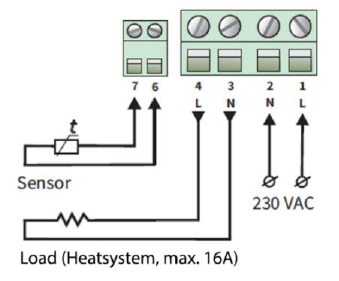
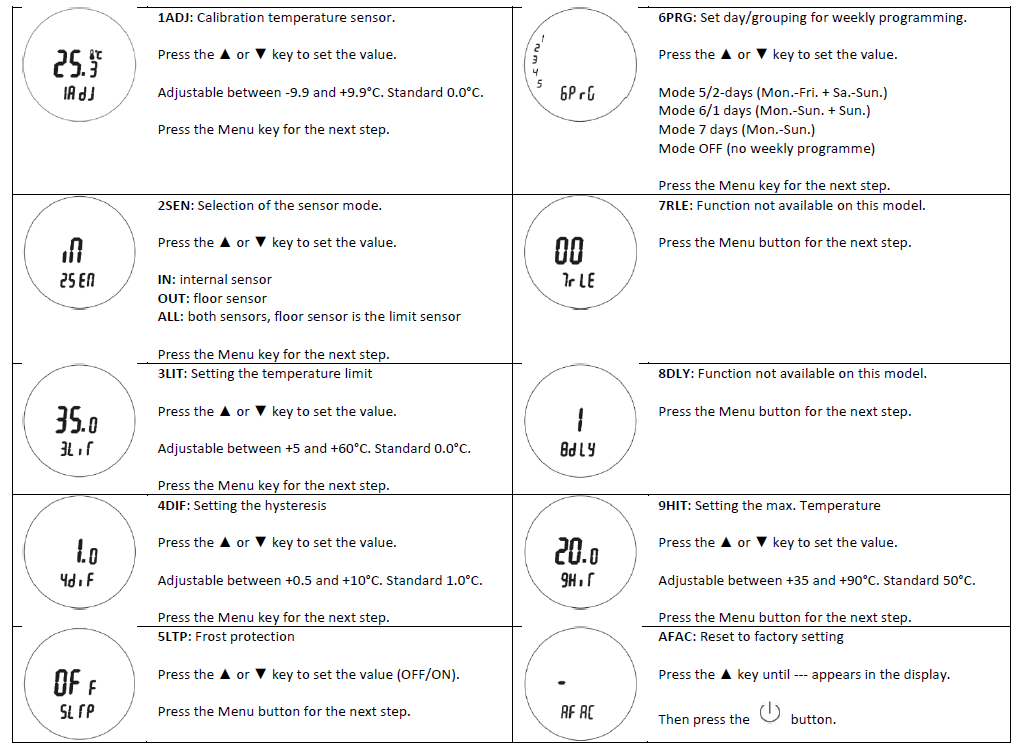
Programming
Press the Menu button for 5 seconds to start programming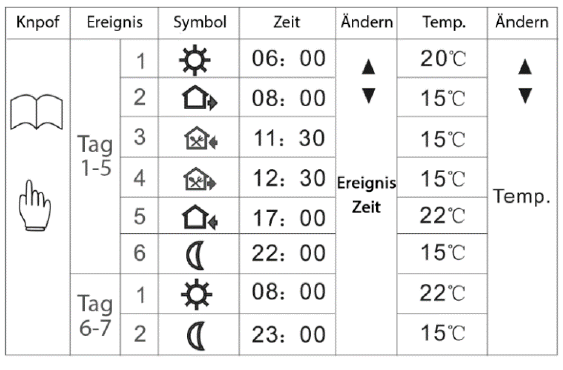
Dimensions (mm)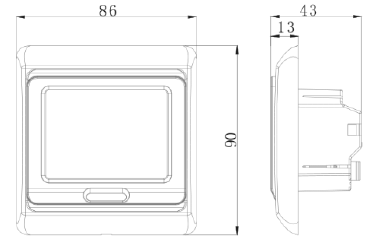
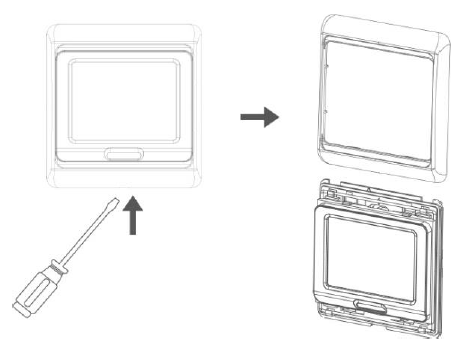
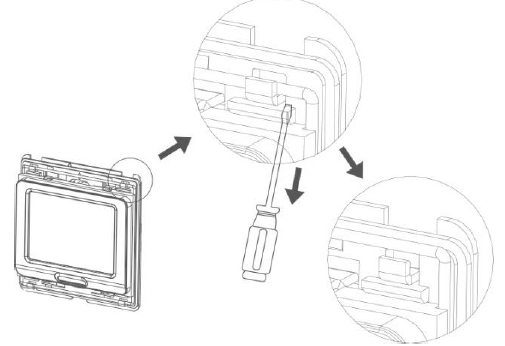
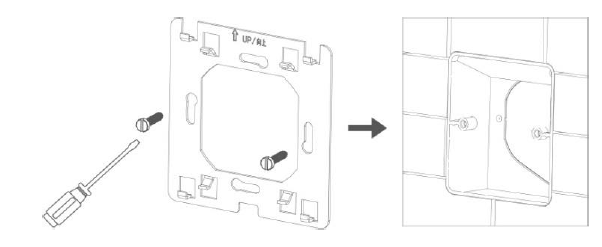
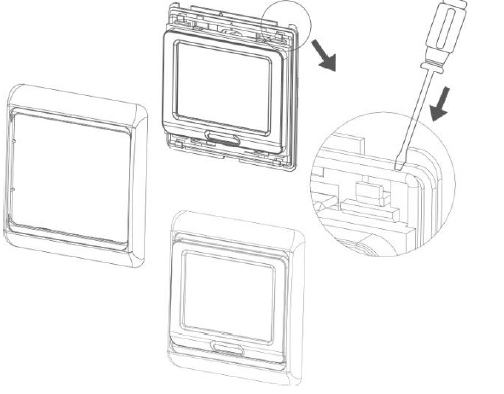
Assembly steps
- Loosen the front cover by inserting a screwdriver into the lower slot.
- Dismantle the mounting plate according to the following diagram
- Secure the mounting plate in the wall mounting box/cavity wall box using a screwdriver
- After connecting the wires (see circuit diagram), the thermostat is mounted on the mounting plate and the frame is put back on.
Operation
- Switch the thermostat on or off

- Press the ▲ or ▼ button in the weekly programme mode to activate the temporary control.
- Use the UP ▲ or DOWN ▼ buttons to set the temperature value.
- Press the button
 for 5 seconds to set the day and time. Set the minutes with the ▲ / ▼ keys, pressing the to reach the hour setting, set it with the ▲ / ▼ keys. Press to set the current day (1-7 / Mon.-Sun.) with the ▲ / ▼ keys and press again to save the setting.
 - Press the button, to select the mode (manual / weekly programme).
- In the weekly programme mode, the SET temperature and time are shown alternately at the bottom of the display. The ACTUAL room temperature can be read directly from the centre of the display.
- To activate or deactivate the key lock, press the ▲ and ▼ key simultaneously for 5 seconds. When the key lock is active, the
 -symbol appears in the display.
Advanced settings:
To access the advanced settings, first switch off the unit (OFF appears in the display). Then press the![]() and key at the same time.
and key at the same time.
Sensor installation:
We recommend installing the floor sensor in a corrugated tube (Ø 16mm – see picture). in order to be able to replace it easily in the event of a fault. For information on how to install the floor sensor on your heater, please read the installation and operating instructions for your heating mat.
Sensor error:
- E0: internal sensor short-circuited or disconnected.
- E1: external sensor short-circuited or disconnected.
- If error E0/E1 is displayed, you should check the thermostat and eliminate the error

Disposal note
Do not dispose of this appliance in household waste! Electronic devices must be disposed of in accordance with the Waste Electrical and Electronic Equipment Directive via the local collection points for waste electronic equipment.
Note on conformity
The CE mark is an over-the-counter mark that is addressed exclusively to the authorities and does not imply any assurance of properties.
Documentation © 2022 Mi-Heat Heizsysteme GmbH
All rights reserved. No part of this manual may be reproduced or duplicated in any form without the written consent of the publisher. It is possible that this manual contains typographical defects or printing errors. We accept no liability for errors of a technical or printing nature and their consequences.
Mi-Heat Heizsysteme GmbH
- Ol Streek 39a
- 26607 Aurich
- Germany
- Internet: mi-heat.com
- E-Mail: [email protected]
Reference
Download Manual:
MI-HEAT E91 Programmable Thermostat Operating Instruction
![]()
Leave a Reply