
MClimate RG2I Wireless Thermostat
What’s inside the box?

Technical specifications
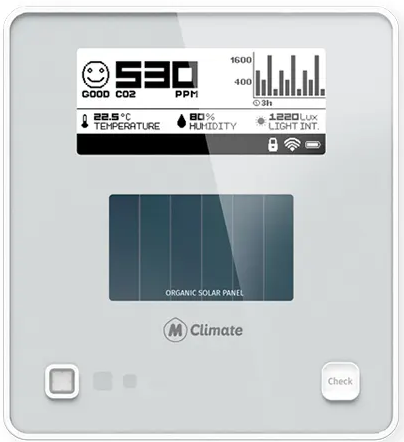
Description: MClimate Wireless Thermostat is a stand-alone thermostat entirely by solar energy using an organic solar panel. The device features a 2.9″ e-ink screen, sensor for movement (PIR), temperature and humidity sensor, LUX sensor, and 3 buttons. The user can change the target temperature and see current indoor conditions. The device sends an uplink after any event as well as periodically. The data from the Wireless Thermostat can be used in any LoRaWAN-compatible system, incl. Building Management Systems to control different appliances in the building.
Created by MClimate™
- SKU: MC-LW-WT-01
- Dimensions: 105 x 115 x 23mm
- Weight: 170gr
- Materials: ABS, Stainless steel, tempered glass
- Frequency range: 863÷870MHz
- Power supply: Solar-powered Lithium-ion capacitor (LIC) AND/OR 4xAA 1.5VDC batteries AND/OR USB-C
- Sensors: Temperature, humidity, PIR, LUX, CO2 (optional)
- Working temperature: 0°С to +50°С
Environmental conditions, in which the device is intended to operate:
- Indoor use only;
- for altitude up to 2000m;
- for an ambient temperature:0°С to +50°С;
- for maximum relative humidity of 80% for temperatures up to 31°С, decreasing linearly to 25% relative humidity at temperature 50°С;
- for an environment with a degree of contamination 2 (PD2).
Storage and transportation conditions:
- for an ambient temperature : -40°С to +85°С;
- for relative humidity 5% to 90% without condensation
Manufacturer
- MClimate Jsc
- 1729 Sofia 31, Alexander Malinov Blvd
- Building 2, Floor 2
Compliance with the WEEE Directive
The appliance marked with this symbol should not be disposed of with other household waste. It must be handed over to the relevant collection point for the recycling of electrical and electronic equipment.
Safety Instructions
Please read the safety instructions before installing the device! Failure to follow the recommended instructions in this manual may be dangerous or in violation of the law. The manufacturer MClimate Jsc., is not responsible for any loss or damage caused by failure to follow the instructions in the operating manual
Legal Notices
All information, including but not limited to, features, functionality, and/or other product specifications are subject to change without notice. MClimate retains all rights to review or update its products, software or documentation without being required to notify any natural or legal person The MClimate and MClimate logo are trademarks of MClimate Jsc. All other brands and product names mentioned herein are trademarks of their respective owners.
EU Declaration of Conformity
This device complies with the essential requirements and other applicable provisions of the following EU directives
Compatibility
In order to operate MClimate Wireless Thermostat LoRaWAN®, you will need: LoRaWAN® network
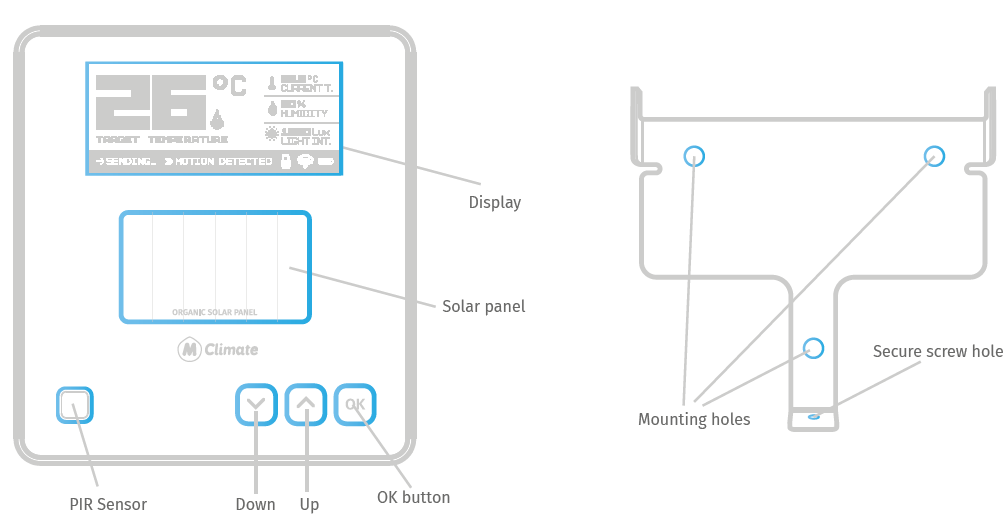
Device Parts
Placement guidelines
Display’s content
The image below has all visible elements of the display activated.
- Target temperature
- Sensor temperature
- LUX reading
- Humidity reading
- Shown when movement is detected by the PIR
- Shows when the sensor is transmitting an uplink Power source indicator – solar, battery, USB
- Fire icon – showing automatically by default when target temperature is higher than sensor temperature. Automatic showing of the icon can be disabled and status of the Fire icon can be controlled through downlinks.
- Child lock icon – indicates that the thermostat is locked
- Spreading factor indicator

Buttons
Behavior
Start-up behavior
The device starts when you expose it to light or press the Reset button on the back. At startup, the device measures the voltage of the supercapacitor, which is storing the energy harvested by the solar panel. If the voltage is within the working range of the device, the device will initiate a LoRaWAN Join-Request procedure on SF9.
Collecting and storing energy
The energy harvested by the Organic Solar Panel is stored in a supercapacitor. If the supercapacitor is discharged for some reason, the device will wake up again when it has harvested enough power so that the voltage of the supercapacitor is within the working voltage of the device. Example reasons for preliminary discharge can be:
- A device installed, but not provisioned in a LoRaWAN Network Server.
- Gateway is not present.
- The device has been stored in packaging for too long
If you want to get started quickly, you can use the USB-C port to charge the capacitor from a 5VDC power supply, which takes approx 20 minutes. The time it takes to recharge will depend on the lighting conditions, but in a brightly lit office with 1000 lux, it should take around 12 hours.
Using multiple energy
The Wireless Thermostat has three options for power supply:
- Organic Solar Panel
- USB-C
- 2 or 4 AA Batteries (1.5VDC each)
You can use both solar and USB-C or AA batteries at the same time. If you use USB-C or AA batteries, the supercapacitor will be charged and the solar harvesting will always be with the highest priority.
Data transmissions
Once joined, the device will execute two types of transmissions:
- Periodic, as configured
- Immediate, when something changed – e.g. target temperature changed or movement detected in the room.
All transmissions are subject to complying with the duty-cycle limitations of LoRaWAN end devices.
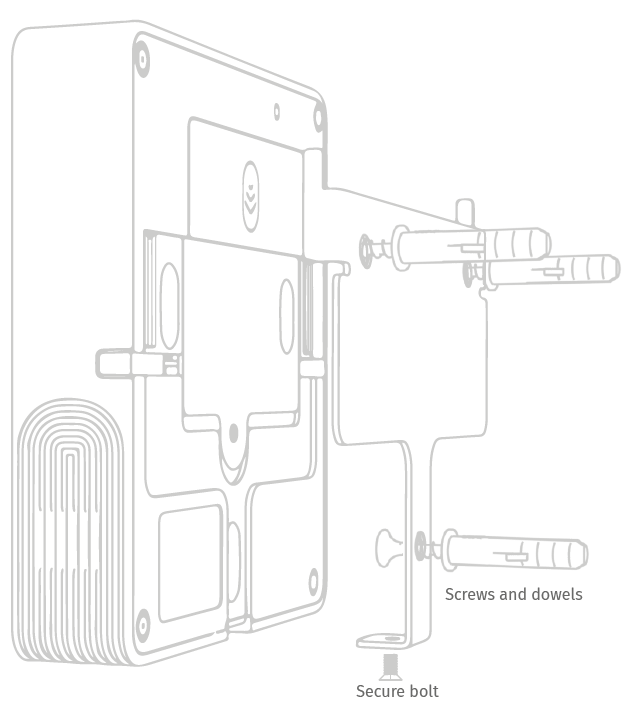
Installation
We recommend installing the device in an open environment (e.g. not in a recess) at 1.5m height. Do not install the device near big metal items as it will worsen the RF performance. Use double-sided tape to attach it to the surface or screws and dowels to attach the anti-theft bracket in a more permanent manner. Once you’ve attached the anti-theft bracket, place the device on top so the two mounting points on the bracket correspond with the device’s plastic. Slide down and secure with the security bolt on the bottom. If you decide to insert AA 1.5VDC batteries into the device, you can use either 2 or 4 batteries. We recommend using Energizer Ultimate Lithium AA L91. You can insert 4 batteries as shown on the device’s plastic or 2 batteries as shown in the picture below. When using 2 or 4 AA batteries, please make sure that all batteries are new. If one of the batteries has lower voltage, it’s not possible to use the full energy capacitance. That challenge is valid for all devices operated by multiple battery cells, e.g. your TV remote.
Commissioning
-
- Open your LoRaWAN® Network provider access panel and add the device using the supplied Serial Number, DevEUI, AppEUI (JoinEUI) and AppKey
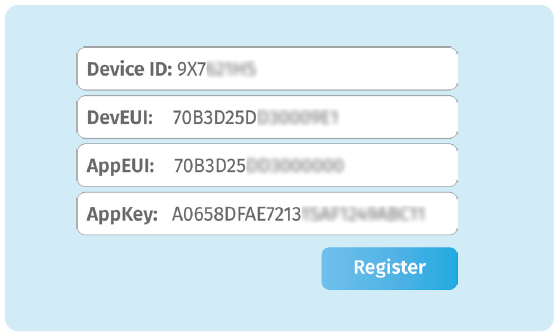
Continue the Installation with the instructions of your LoRaWAN® Network provider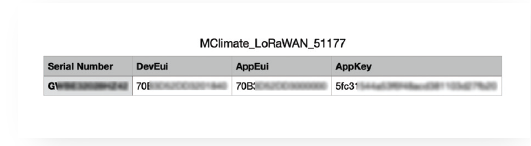
Reference:
DOWNLOAD MANUALS:
MClimate RG2I Wireless Thermostat User manual
OTHER MANUALS:
MClimate RG2I Wireless Thermostat Product Specification Guide
![]()
Leave a Reply