
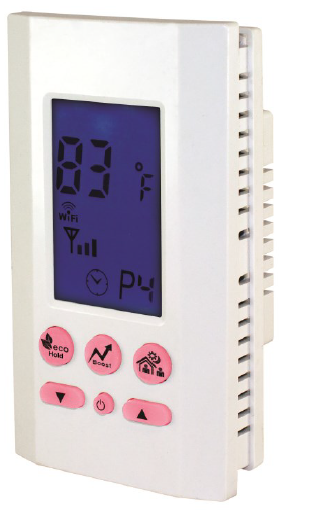
King ATMOZ1-240-WIFI Programmable Thermostat
Specifications
Thermostat is suitable for electric heating systems.
- Power Supply: ATMOZ-1 P: 208/240 VAC
- ATMOZ-2P: 208/240 VAC
- Maximum Power: 3328W@ 208VAC (16A)
- 3840W@ 240VAC (16A)
- Power Consumption: ?VA
- Temperature Display Range: 32°F-122°F
- Temperature Display Resolution: 1 °F
- Temperature Control Range: 41 °F-95°F
- Temperature Adjustment Scale: 1 °F
- Selectable Switching Differential: 1 °F~2°F (Default 1 °F)
- Anti-Freeze Protection: 41 °F
- Temperature Sensor: NTC 1 OK Ohm @ 77°F
- Listing: C ETL us
DANGER
ELECTRIC SHOCK OR FIRE HAZARD
READ ALL WIRE SIZING, VOLTAGE REQUIREMENTS AND SAFETY DATA TO AVOID PROPERTY DAMAGE AND PERSONAL INJURY
WARNING
READ CAREFULLY – These instructions will help prevent difficulties that might arise during thermostat installation. Studying the instructionsfirst may save considerable time and money later. Observing the following procedures will keep installation time to a minimum. Save these instructions for future use.
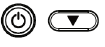
- Standby Button
- Up Button
- Time Button
- Down Button
- ECO Button
- Hold Button
- Period Indicator
- Standby Indicator
- Key Lock Indicator
- Vacation Indicator
- Differential Indicator
- Heating ON Indicator
- Programming & Time Indicator
- Boost Indicator
- Boost Indicator
- Bluetooth On Indicator
- Battery Low Indicator
- Temperature or Time Display
- Manual Indicator
- Override setting Icon
- Eco Mode Indicatorilluminates when set temp is under 62°F.
Product Overview
The ATMOZ series thermostats are designed to provide the highest level of accurate temperature control for residential line voltage electric heating in 208/240 VAC. Almost all electric heaters installed as original equipment in a residential application will be 208 or 240 Volt. It is very rare that a home, apartment or condominium would be wired with all 120 Volt heaters. Check your voltage to make sure you have the right thermostat for your heater voltage. A 2-pole or double wide circuit breaker, at the panel would indicate you should use the 240 Volt model. A 1-pole or single wide breaker, would indicate a 120 Volt circuit. There are some exceptions to this rule, so checking with a voltmeter is the only way to know for sure.
Be safe and smart, electricity can cause severe injury or death. If you are uncomfortable hire an electrician for the project. The ATMOZ thermostat will provide years of comfort control for your family for small fan driven electric heaters, baseboards, radiant ceiling, wall panel heaters, cove heaters, or any line voltage resistance heating systems that do not have an electric motor over 1/3 hp. The thermostat will be warm to the touch on top. This is normal operation and also provides air currents across the face of the thermostat that better help it sense
room temperature
WIRING INSTRUCTIONS
DANGER
ELECTRIC SHOCK OR FIRE HAZARD
READ ALL WIRE SIZING, VOLTAGE REQUIREMENTS AND SAFETY DATA TO AVOID PROPERTY DAMAGE AND PERSONAL INJURY The installation of the thermostat must comply with the applicable local and/or national electrical code and utility requirements. This installation should be performed by a qualified electrician where required by law. Ensure that all wiring connections to the thermostat are correct and tight to prevent electrical shorts. Use the appropriate wire to meet local and national electrical codes for rated power consumption
INSTALLATION AND WIRING INSTRUCTIONS
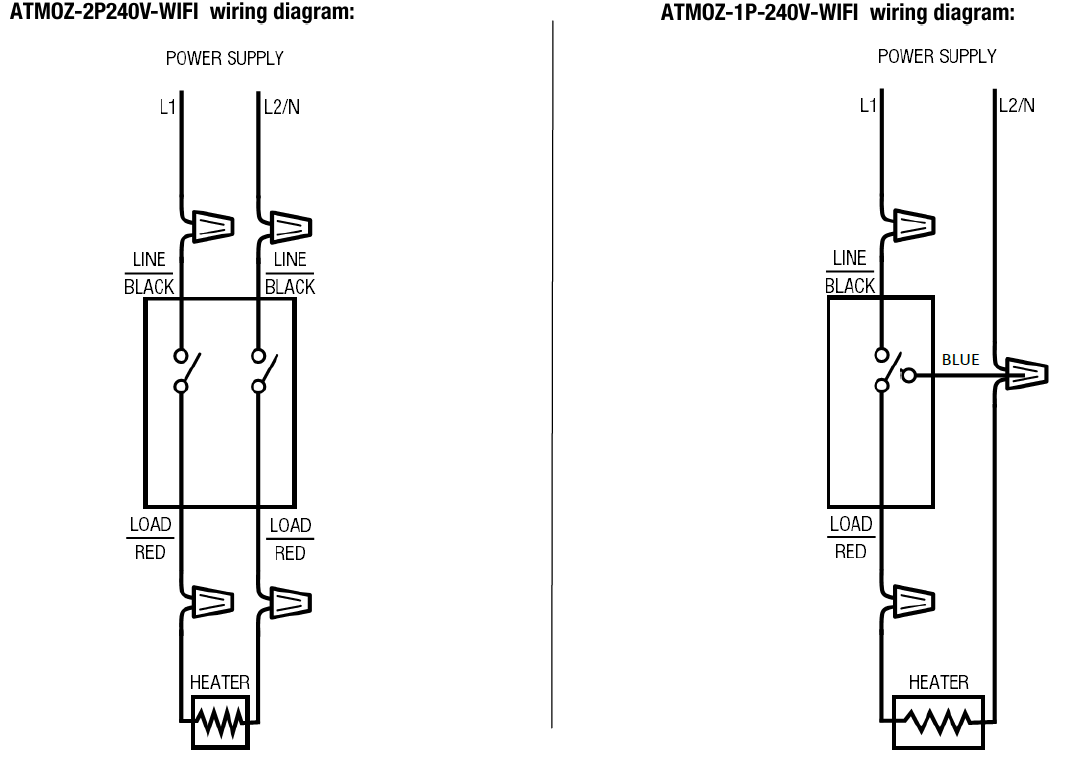
Warning: Turn OFF the power at the circuit breaker before Installing. Installation should be performed by a qualified electrician. Refer to thermostat and heater load specifications before installation of the thermostat to see if it can handle the amp load. The maximum this thermostat can run is 3840 Watts at 240 Volts, 3328 Watts at 208 Volts.
WIRING INSTRUCTIONS
Caution: Turn off power at the circuit breaker before performing any work on the electrical connections. None of the electrical connections must be live until the installation has
been completed and the housing is closed. Only a qualified electrician or authorized technician are permitted to open the terminal box. Wiring requires a Phillips screwdriver
- Disconnect power supply to prevent electrical shock or damage to the product.
- Run line voltage wiring to the location of thermostat.
- Connect output terminals to heating system in accordance with instructions from the heating system.
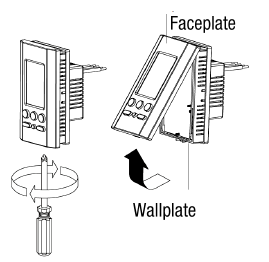
- Make sure your ATMOZ thermostat is COMPLETELY RECEDED into the metal junction box in the wall and NO WIRES SHOULD BE EXPOSED outside the metal or plastic junction box.
ATMOZ-2P24OV-WIFI wiring diagram: ATMOZ-1P-24OV-WIFI wiring diagram:
DOWNLOAD APP
Smartphone App Installation
Downloading ATMOZ Smartphone App for IPhone and IPad
In order for the ATMOZ Thermostat to work with your iOS device, download and install the APP from the AppStore:
Visit: https://itunes.apple.com and search for ATMOZ by King.
Downloading ATMOZ Smartphone App for Android Devices
In order for the ATMOZ Thermostat to work with an Android device, download and install the APP from the Google Play Store:
Visit: https://play.google.com and search for ATMOZ by King.

REGISTRATION & INITIAL SETUP
Launch WiFi Application
- Find the ATMOZ App on your iOS/Android device
- Launch ATMOZ App

Registration Process
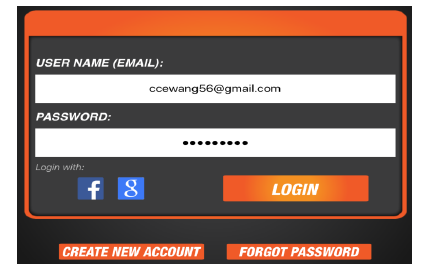
- If you have already registered, enter the account number and password.

- If accessing the first time, click “Create New Account” to start the process.

- Enter your email address as your Account No and enter your preferred password. Press “Create” icon to finish the account setup.You will see a message that states an email was sent to
verify the account. Open the email, then click the link that says “Open Your Mobile App Here”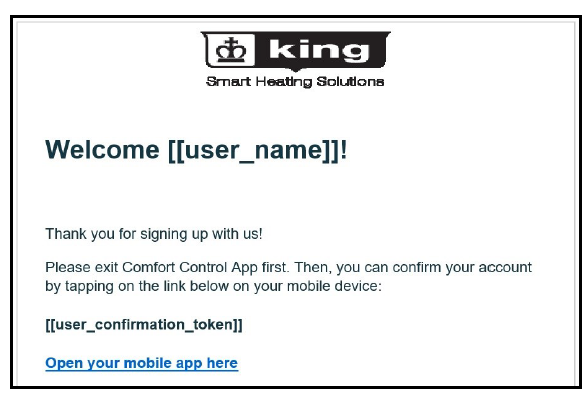
- The login screen appears. Sign in with your new account
- Click the [house with
 icon] icon to add a thermostat. The App will search for available thermostats
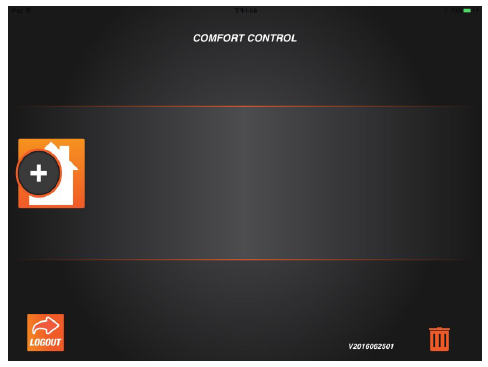
- The “Found Devices” screen will appear
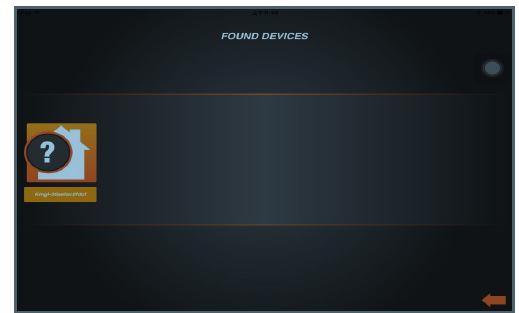
- Click the [house with
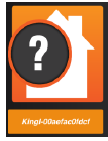 icon] to select the thermostat you would like to program.
If “No Device Found” message appears. Click “OK”. You will need to first exit the App and select your thermostat ID from your WIFI network list before proceeding: REFER TO NEXT PAGE FOR COMPLETE INSTRUCTIONS
REGISTRATION & INITIAL SETUP
If “No Device Found” message appears, Click “OK”. You will need to first exit the App and select your thermostat ID from your WIFI network list before proceeding: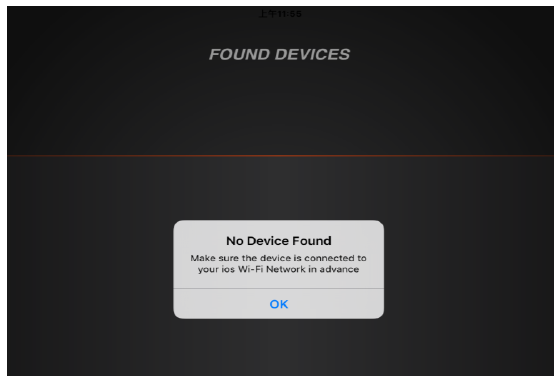
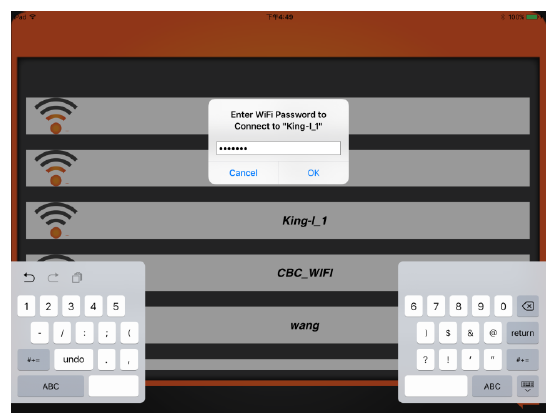
Enter Phone Settings > WIFI Settings > Select Thermostat ID
The below message will temporarily appear while redirecting.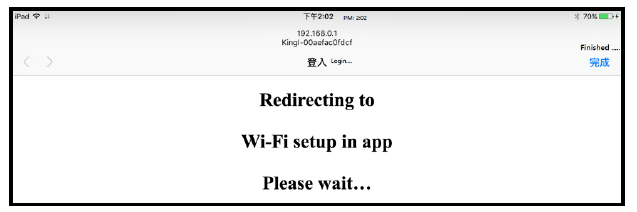
- REPEAT Step E and F to add your thermostat. The system will then show a list of available WIFI Networks
- Select your desired network and enter password as shown below and press OK
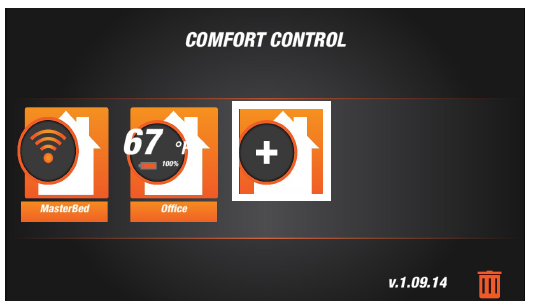
- Once registration is complete you will see Registration Success. Press OK

- The Comfort Control home screen appears which shows available thermostats with temperature display. Click on the [house with temp icon]
 to program your stat.
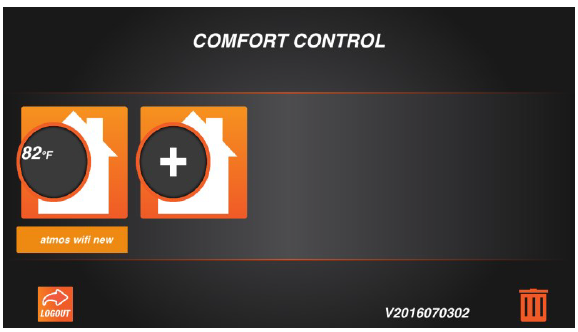
PROGRAMMING AND SETTINGS
Launch Application
- Open the ATMOZ Mobile app on your iOS or Android device
- Select the thermostat you would like to program
Programming the Thermostat
Select the Program icon to begin the program configuration
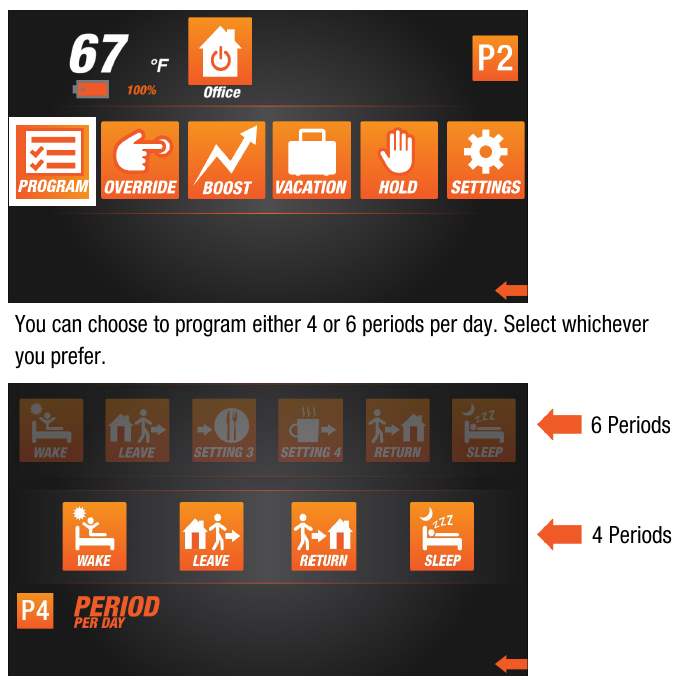
Periods per day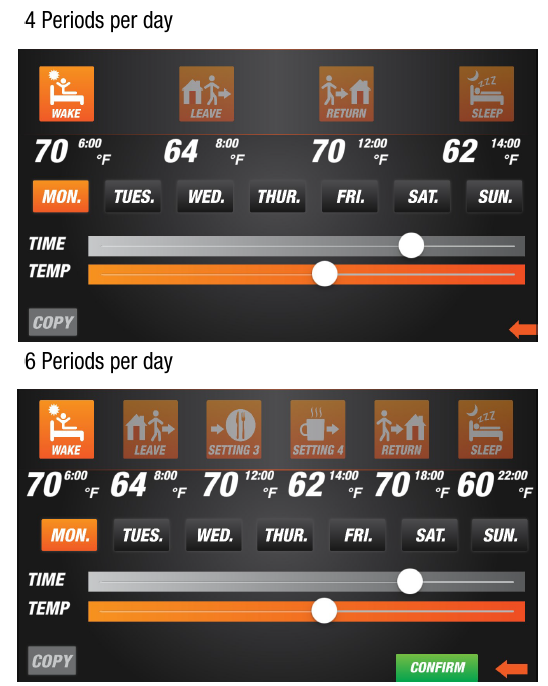
Copying Program Feature
![]() is a small function that is built-in to the ATMOZ Mobile to allow users to easily transfer settings between the weekdays. You can locate the Copy command in the lower left-hand corner. Select the period to configure
is a small function that is built-in to the ATMOZ Mobile to allow users to easily transfer settings between the weekdays. You can locate the Copy command in the lower left-hand corner. Select the period to configure
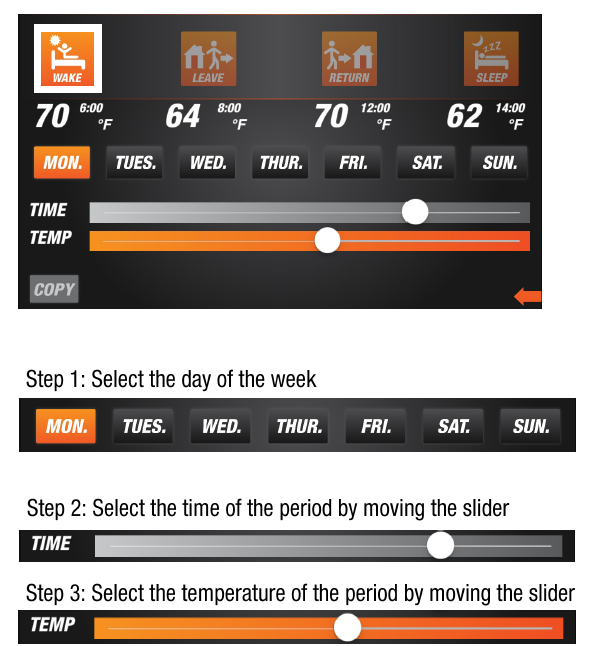
Step 1 : Press the 
Step 2: Select the day of the week that you wish to copy the setting from:
Step 3: Select the days of the week you wish to copy the settings to: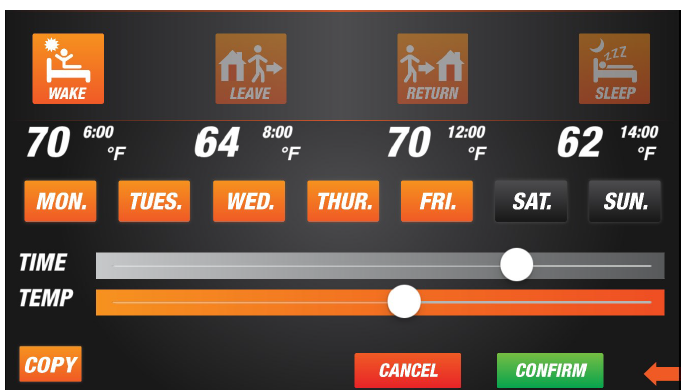
PRODUCT SETUP AND SETTINGS
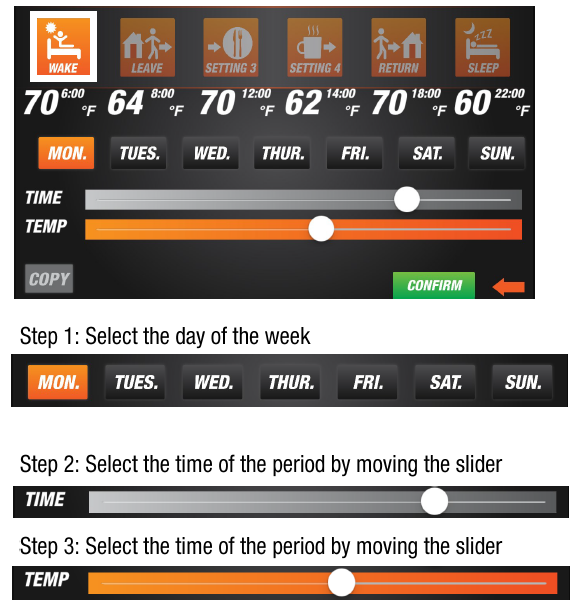
Programming your weekly schedule
Option 1
4 Periods per day configuration
- Wake Return
- Leave Sleep
- Select the period to configure
Option 2
6 Periods per day configuration
- Wake
- Leave
- Lunch
Select the period to configure
- press
 cancel to revert back to original settings
 - Press
 to exit
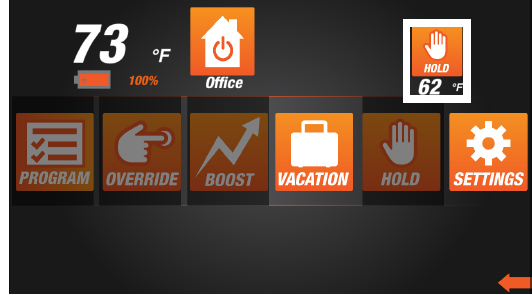
Vacation Mode
This thermostat offers a vacation setting where you can schedule in advance days you are out of the house. Thermostat can be set to turn off or run in Freeze protection mode during that time.
Step 1 : Select the Vacation Mode icon
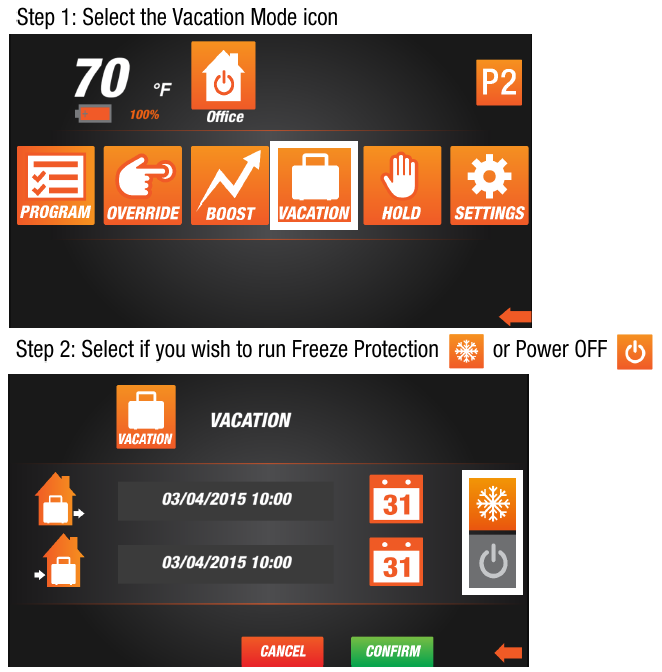
Note:
- Freeze Protection mode
 offers 41 ° F freeze protection. This means the system is still on and when the room temperature drops below 41 °F, heating will come on to provide minimum heating.
 - Power Off mode
 offers complete system shutdown.
Step 3: Select the calendar icon to set vacation starting time and date.
Step 3: Select the calendar icon to set vacation starting time and date.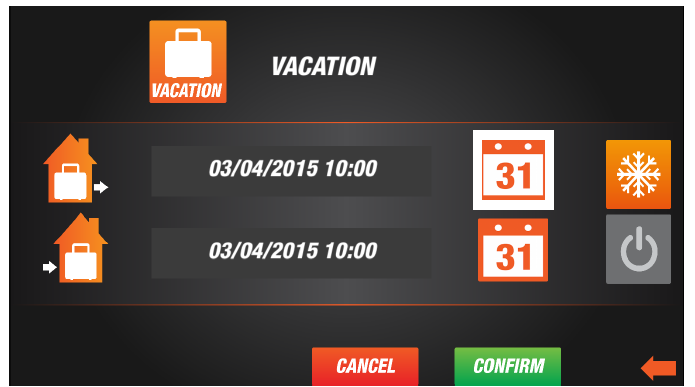
Step 4: Select the calendar icon to set vacation ending time and date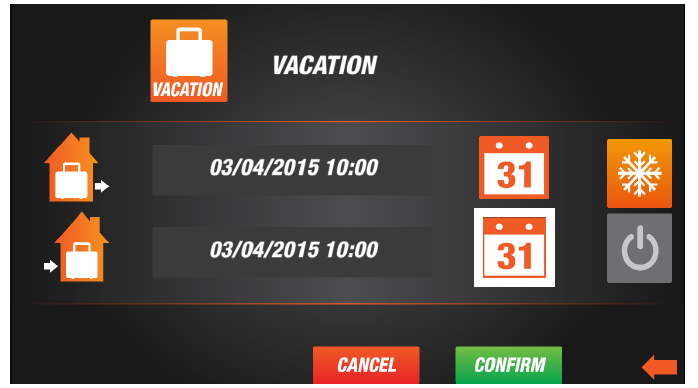
Note: End date must be later than the start date.
Step 5: Select ![]() save changes to thermostat or pres
save changes to thermostat or pres![]() to exist.
to exist.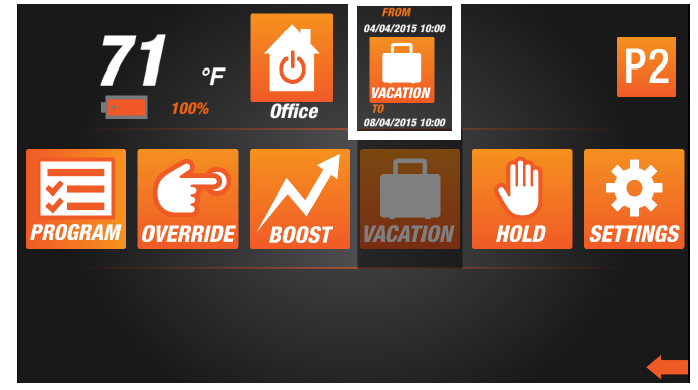
Step 6: Pressing the top right hand Vacation icon will cancel the Vacation function and return to programmed schedules.
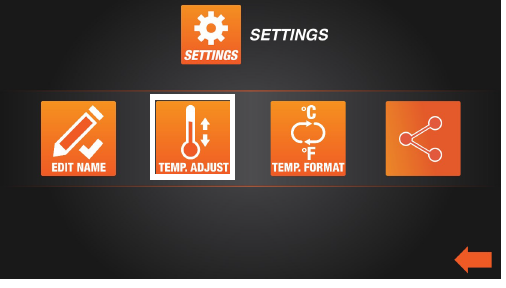
Settings Mode
Settings Mode allows you to change the following:
- Change the name of the thermostat
- Adjusting Temperature Compensation
- Temperature scale change
- Share Device
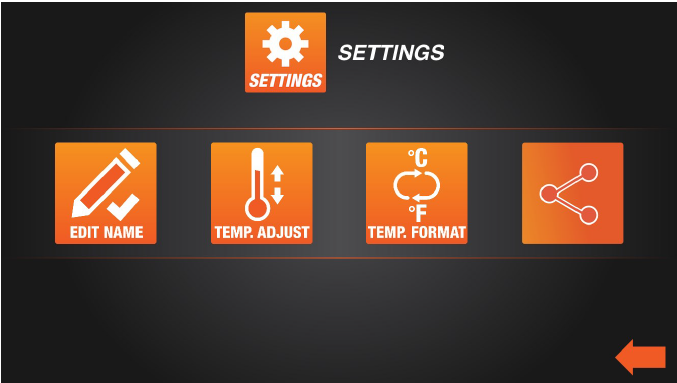
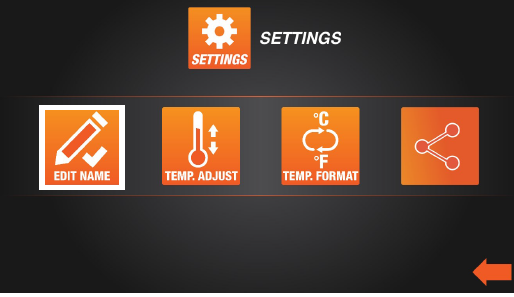
PRODUCT SETUP AND SETTINGS
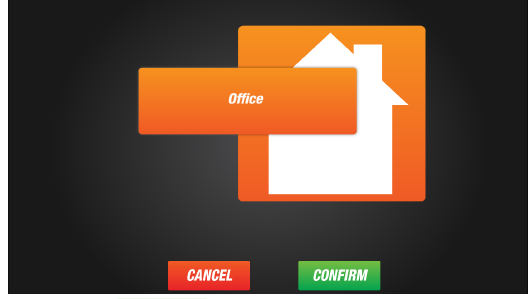
Name Your Thermostat
- Select (Edit Name) icon
- Rename the thermostat with the name you prefer
- Press the text box
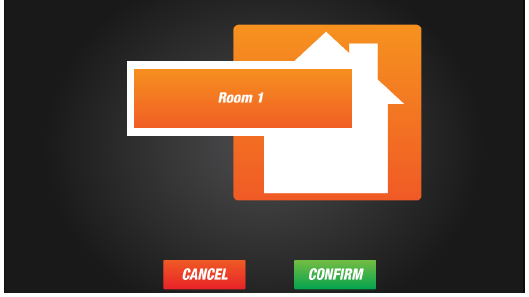
- Change the name
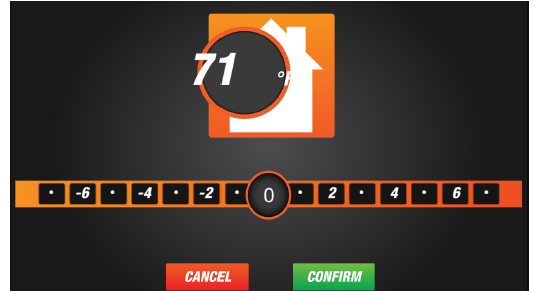
Temperature Compensation of the Thermostat
- Select (Temp. Adjust) icon below
- Select how many degrees you wish to compensate against by sliding the white tab in the following screen
Temperature Scale of the Thermostat
- Select icon below

- Tap °F to change to Fahrenheit and tap °C to change to Celsius and you will see the temperature changes to:

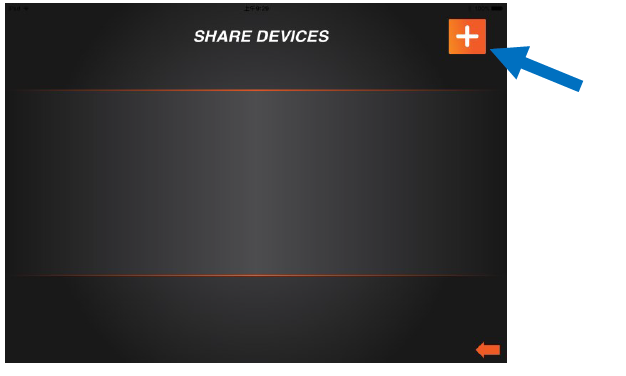
Share Thermostat
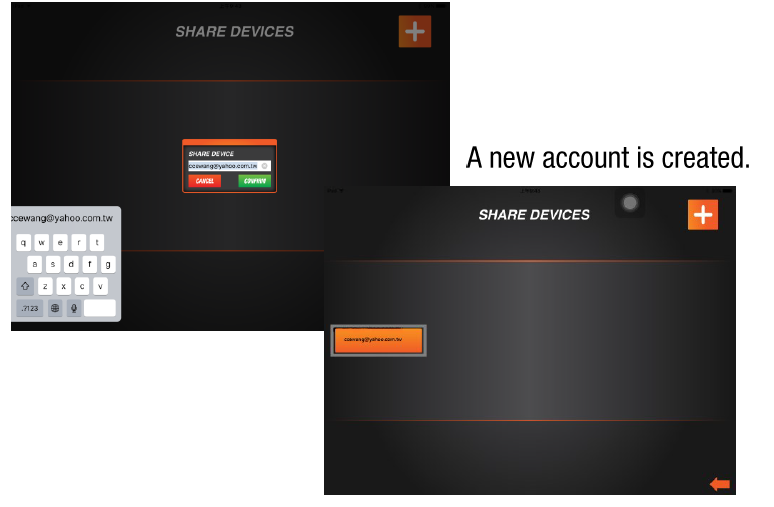
- Select the Share Device icon below to grant access to others.
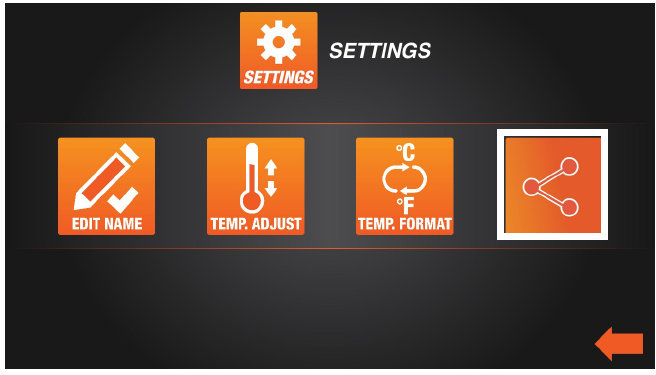
- Click the [ + icon] to add other account
- To create share thermostat, enter user’s email address you would like to share with.
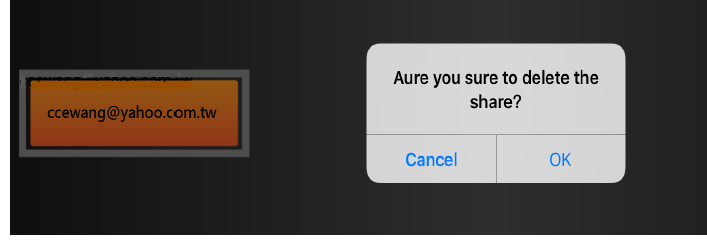
- To delete user, press and hold for 2 seconds and the below message appears. Press OK to delete
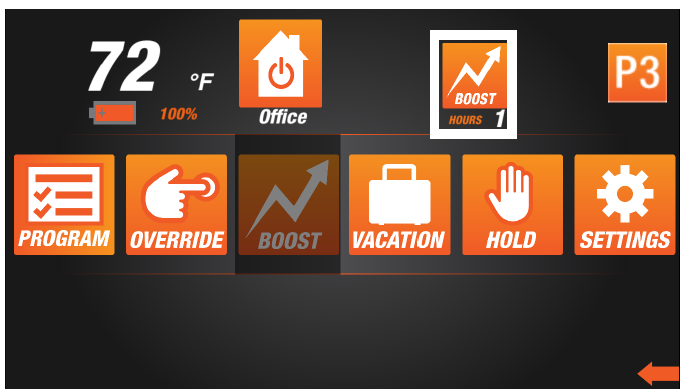
Boost Mode
Boost mode allows user to maintain the current setting and bypass the scheduled program. The thermostat will return to its regular schedule programming after the boost time is finished.
- Select the Password icon below
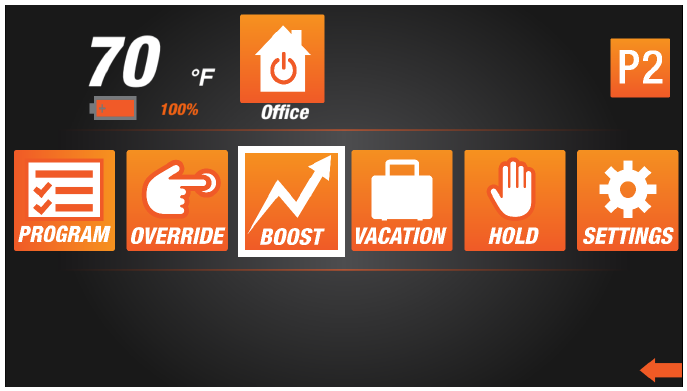
- Select how many hours you wish to boost
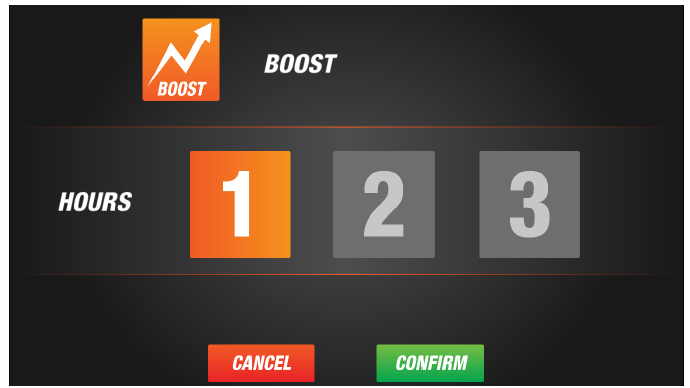
- Select to save changes to thermostat or press to

- Verify Boost Mode is now active with the following
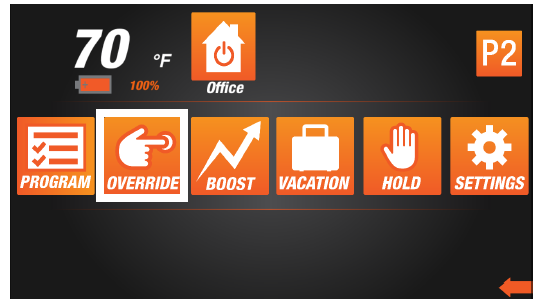
Override
Override mode allows you to manually set the set point to desire temperature, until the next scheduled program.
- Select Override Mode icon
- Press
 or
or  key to set the desired temperature
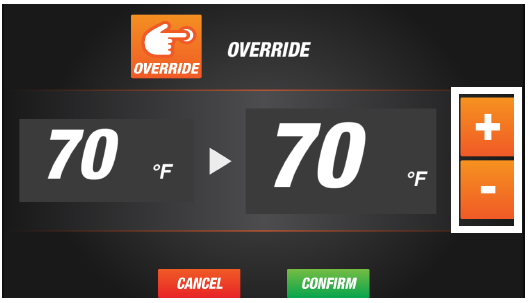
- Verify Override Mode is now active with the following
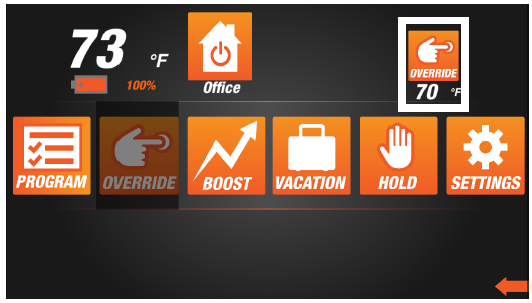
- Press on the top right hand Override icon, this will cancel the Override function and return to programmed schedules
Hold Mode
Holds thermostat a desired set point permanently until canceled
- Selecting the Hold icon will show the following screen. Tapping the or button adjusts temperature set point.
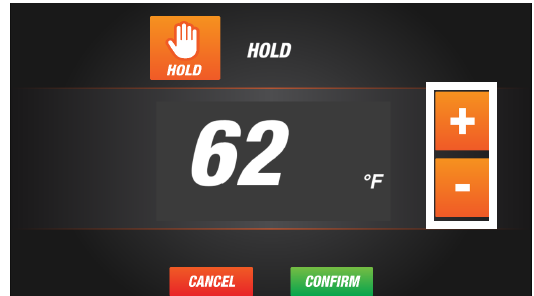
- to save changes to thermostat or HUMM press to exit.
- Verify Override Mode is now active with the following screen. Press on the top right hand Hold icon, this will cancel the Hold function and return to programmed schedules
Resetting your ATMOZ Thermostat
- In case your ATMOZ Thermostat is not functioning correctly, you can reset the unit back to factory default settings.
- Locate the Reset button on the right side of the unit
- Lightly press button with a paper clip or similar and unit resets.
Override Mode
- Thermostat can override the preset temperature setting of default programming (P4 or P6) by pressing the Up or Down arrow keys on the thermostat.

- Press Up or Down arrow button twice and the LCD will show a “Temp. Set” symbol and a flashing “Manual” indicator.
- Proceed and press either the Up or Down button to set a desired temperature. Every time you press the Up or Down button, the temperature will increase or decrease by 1 °F (O.5°C).
- When you’ve completed setting the desired temperature, wait for 5 seconds until the LCD stops showing the “Temp. Set” and the thermostat reaches the desired setting, the unit will function to maintain the set temperature during the period.
- Override function can be disabled by pressing the Standby button.

Hold Function
- The ATMOZ thermostat can hold a desired temperature value permanently by pressing the HOLD button.

- Press the HOLD button and the LCD will show a “Temp. Set” symbol and a fixed “Manual” indicator.
- Proceed and press either the Up or Down button to set a desired temperature. Every time you press the Up button or Down button, the temperature will increase or decrease by 1 °F (0.5°C).
- When you’ve completed setting the desired temperature, wait for 5 seconds until the LCD stops showing the “Temp. Set” and the thermostat starts to operate, the unit will function to maintain the set temperature constantly.
- Hold function can be disabled by pressing the Stand by button.
Keylock Function
- Press and hold the Stand by button and the Down button at the same time.
- Key lock indicator will show up on the screen.
- Key lock function can be enabled or disabled by repeating the procedures above.
Return to factory settings/Remove Password
- Press and hold the Stand by button and then press the Up button for 5 seconds.
- “dEL” symbol will show up on the screen.
- All program settings return to the default values except the “device name”.
- The password setting will resume to default No password.
Clock Function
Once connected with an iOS or Android device, the ATMOZ has a function to show current time. It retrieves the time info from your iOS or Android device.
- Pressing the Time button will allow the ATMOZ to show the current time and the programming mode (P4 or P6).

- Pressing the Time button again will return the screen to show the current room temperature and status display.
MANUAL OPERATION
Standby Function
- Pressing the Standby button will allow the ATMOZ thermostat to disable the relay output permanently.
- Standby indicator shows up on the screen.
- Press the Standby button again will return to normal operation.
- Pressing the Standby button also allows the ATMOZ to quit from the current setting procedure.
Differential Setup
- Press and hold the Up and Down buttons at the same time for 5 seconds.
- Differential indicator shows on the screen. The initial value is 1 °F (0.4°C).
- Press the Up or Down button to adjust the value
- After finishing the adjustment, wait 10 seconds until thermostat returns to normal operation.
Eco Mode
- Pressing the ECO mode button sets a timed period (between 1-24 hours) that the thermostat will run at a predefined energy saving tern perature.
- To Set, Press to select the time period.
- Display shows countdown of ECO time remaining.
- To exit ECO mode, press ECO button again.
KING ELECTRIC MFG CO · 9131 10TH AVENUE SOUTH · SEATTLE, WA 98108 · PH:206 762 0400 · FAX: 206 763 7738 · www.king-electric.com
REFERENCE:
Download Manual:
King ATMOZ1-240-WIFI Programmable Thermostat Product Specification Guide
Other Manual:
King ATMOZ1-240-WIFI Programmable Thermostat Product Specification Guide
![]()
Leave a Reply