
Io-HVAC-controls UT32 Programmable Touchscreen Thermostat
 INTRODUCTION
Your new UT32 is a feature-rich touchscreen thermostat that has been manufactured using the highest quality components and design currently available. When properly installed and configured by a professional heating and air conditioning contractor, the UT32 will provide years of dependable operation. The UT32 has been designed to be an attractive, highly reliable, and easy-to-use thermostat. By taking time to read and understand this User Manual, you can take advantage of the many features offered in this premium product. Although great care has been taken in the preparation of this manual, iO HVAC Controls takes no responsibility for errors or omissions contained herein. It is the responsibility of the installer to ensure that this thermostat and the equipment connected to it operate in a safe and efficient manner. Due to ongoing product improvements, iO HVAC Controls reserves the right to change the specifications of the UT32 Titan thermostat or its components without notice. All rights reserved. ©iO HVAC Controls, LLC 2019. Intellectual rights apply.
USING THE UT32 TOUCHSCREEN DISPLAY

To simplify use, the UT32 only displays information relevant to the current mode of operation. When adjustments are required, the thermostat will display additional information or functional icons. Based on the thermostat configuration, some information and icons may not be displayed. The illustration below shows all the LCD segments and icons along with abbreviated definitions.
TYPICAL DISPLAY
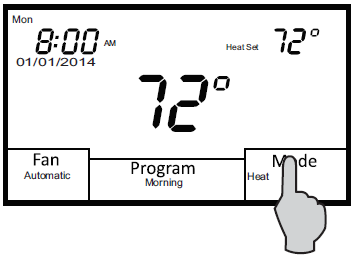
During normal operation, the UT32 typically displays the following:
- Day of the week
- Time of day
- Calendar (M/D/Y)
- Space temperature
- Fan selection
- Program period (programmable mode only)
- Mode of operation
- Set the temperature
- Flashes when the thermostat is in compressor time delay

SETTING THE DAY, TIME, AND CALENDAR
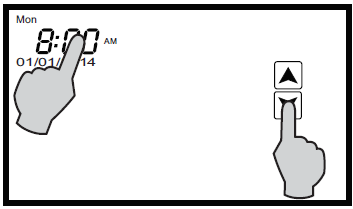
Touch the display with your finger until the backlight comes on. Touch and hold the clock. The thermostat will beep and the hour will flash. Touch the UP or DOWN arrow to change the hour making sure that AM or PM are correct. Touch the clock again and the minutes will flash. Touch the UP or DOWN arrow and change the minutes and then touch the clock. The calendar month will flash. Touch the UP or DOWN arrow to change the month then touch the clock. The day of the month will flash. Touch the UP or DOWN arrow to change the day of the month and then touch the clock. The year will flash. Touch the UP or DOWN arrow to change the year and then touch the clock. After a few moments, the thermostat will return to its operating mode. The correct day of the week will be displayed. NOTE: The thermostat will automatically compensate for Daylight Saving Time. DST is displayed below the AM/PM symbol during the Daylight Saving Time period. In areas where Daylight Saving Time is not observed, this option can be disabled by the installing contractor.
BASIC FUNCTIONS
MODE CONFIGURATIONS
Your contractor can configure the thermostat with different mode selections based on user preference and/or equipment type. Mode configurations can be as follows:
CONVENTIONAL HEATING AND COOLING EQUIPMENT (GAS/ELECTRIC)
- Manual Changeover (Heat/Cool/Off)
- Auto Changeover (Heat/Cool/Auto/Off)
- Heat Only (Heat/Off)
- Cool Only (Cool/Off)
HEAT PUMP AND DUAL FUEL EQUIPMENT
- Manual Changeover (Heat/Cool/*E.Heat/Off)
- Auto Changeover (Heat/Cool/Auto/*E.Heat/Off)
- Heat Only (Heat/*E.Heat/Off)
- Cool Only (Cool/Off)
When the thermostat is placed in the E.Heat (Emergency Heat) mode, only the auxiliary heat source is used and the heat pump is locked out.
MODE SELECTION
To select a mode of operation, touch the display until the backlight comes on. Touch the Mode box repeatedly on the screen to select the mode of operation. Based on the equipment and thermostat configuration, mode selection can be as follows:
- Off – The thermostat will not call for heating or cooling.
- Heat – The thermostat will only call for heating.
- Cool – The thermostat will only call for cooling.
- Auto – The thermostat will call for either heating or cooling.
- E. Heat – The thermostat only controls emergency heat when configured for a heat pump or dual fuel equipment.
FAN SELECTION
Touch the display until the backlight comes on. Touch the Fan box on the screen to select Automatic or Always On fan mode. In Automatic mode, the fan operates with a heating or cooling call. If set to Always On, the fan will run continuously. If the thermostat is turned Off while the fan is set to Always On, the fan will continue to run until it is placed in the Automatic mode.
PROGRAMMABLE FAN (OPTION)
If your thermostat has been configured for Programmable Fan, you can change the fan mode for each scheduled program event. For example, you might wish to have Always On for the morning schedule and Automatic for the Day schedule. Each time the thermostat changes schedules, the selected fan mode will automatically be implemented. (See page 18 for further details).

CHANGING THE HEATING OR COOLING TEMPERATURE SETTING
Manual Heat/Cool Mode
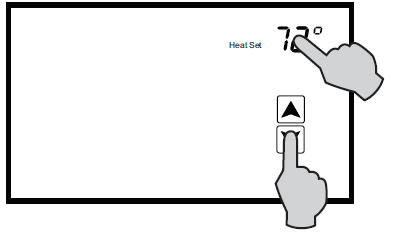
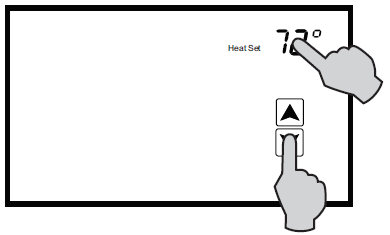
In manual changeover mode, only the heating or cooling temperature setting will be displayed. To change the setting, touch the display until the back light comes on and then touch the temperature displayed on the screen. Depending on the mode, either Heat Set or Cool Set will flash. Touch the UP or DOWN arrow to change the setting. The thermostat will return to its operating mode in 10 seconds and the new temperature will be displayed.
CHANGING THE HEATING OR COOLING TEMPERATURE SETTING
Auto Mode
In auto changeover mode, the heating and cooling temperature setting alternate on the screen. To change the settings, touch the display until the back light comes on and then touch the temperature displayed on the screen. Cool Set will flash three times and then Heat Set will flash three times. To change the cooling setting, touch the UP or DOWN arrow to change the setting when Cool Set is flashing. To change the heating setting, touch the UP or DOWN arrow to change the setting when Heat Set is flashing. The thermostat will return to its operating mode in 10 seconds and the new heating and cooling temperatures will alternately be displayed.
PROGRAMMING
7-DAY SCHEDULE (4 OR 2 DAILY EVENTS)
Your contractor can configure the UT32 with two programming options for 7-day scheduling. You can elect to have 4 daily events (Morning, Day, Evening, Night) or 2 daily events (Day, Night) for each day of the week. You can program both heating and cooling temperatures for each scheduled event when the thermostat is in the Auto (auto changeover) or manual changeover (Heat, Cool) mode. The thermostat can not be programmed in the Off mode. If the thermostat is configured for heat only or cool only, then only that mode can be programmed.

7-DAY SCHEDULE (4 OR 2 DAILY EVENTS)
Your contractor can configure the UT32 with two programming options for 7-day scheduling. You can elect to have 4 daily events (Morning, Day, Evening, Night) or 2 daily events (Day, Night) for each day of the week.
4 DAILY EVENTS
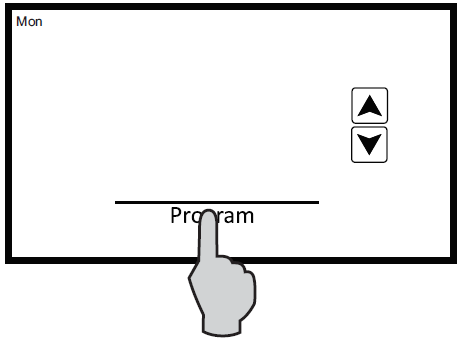
Touch the display until the back light comes on and then touch and hold Program. Mon (Monday) along with the UP and DOWN arrows will appear on the screen.
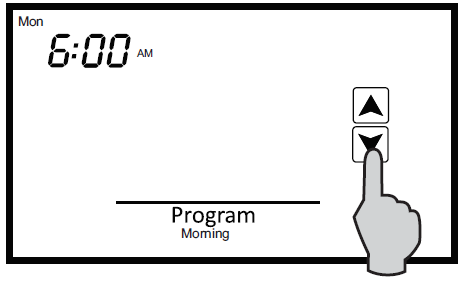
 Touch the Program again and the Morning start time will appear. The hour and AM or PM will flash. Touch the UP or DOWN arrow to change the Morning start time hour. The factory default is 6:00 AM. Touch the Program again and the minutes will flash. Touch the UP or DOWN arrow to change the minutes which can be adjusted in 10-minute increments.
Touch the Program again and the Morning Cool Set temperature will be displayed and flash. Tough the UP or DOWN arrow to change the cooling temperature. The factory default if 75° F for the morning schedule.
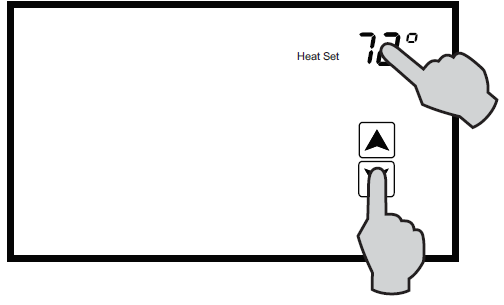
Touch the Program again and the Morning Heat Set temperature will be displayed and flash. Touch the UP or DOWN arrow to change the heating temperature. The factory default is 70° F.
 Touch the Program again and the Day start time will appear. The hour will flash along with AM or PM. Follow the same steps as in the Morning sequence. The factory defaults for the Day event are 8:00 AM, Cool Set 78° F, Heat Set 62° F. After setting the Day Heat Set temperature, touch Program again and the Evening start time will appear. Follow the same steps. The factory defaults for the Evening event are 6:00 PM, Cool Set 75° F, Heat Set 70° F. After setting the Evening Heat Set temperature, touch Program again, and the Night start time will appear. Follow the same steps. The factory defaults for the Night event are 10:00 PM, Cool Set 78° F, Heat Set 62° F.
Touch the Program again and the word cop (copy) will appear. If you want to copy the Monday schedule to consecutive days of the week, touch the UP arrow to add additional days. Each day that you select will flash. For example, you might want to copy the Monday schedule to Tuesday and Wednesday. Once Tue and Wed are flashing, touch Program and Cop will flash confirming that the Monday schedule is being copied to Tuesday and Wednesday. The thermostat will then advance to Thu (Thursday). If you elect to have a different schedule for each day of the week, simply touch Program when the cop appears. The thermostat will automatically advance to the next day. If you elect to have a different schedule for each day of the week, simply touch Program when a cop appears in order to advance to the next day.
2 DAILY EVENTS
Seven-day scheduling for 2 daily events uses the same programming steps as 4 daily events other than you only have to program Day and Night. Once programming is completed, the thermostat will resume normal operation in 10 seconds.
PROGRAMMABLE FAN
If your contractor has configured the UT32 with the Programmable Fan Option, you will be able to select Automatic or Always On fan with each programmed event. When programming the thermostat, the Programmable Fan Option will appear at the end of each programming event. When the word Automatic begins to flash, touch the UP arrow to change to Always On, or simply touch Program to maintain Automatic fan operation for the program period. Just like Temporary Temperature Override, the fan mode can be changed simply by touching Fan. The program event will flash confirming the Programmable Fan mode is in override. To resume normal operation, touch the Program. The hold will appear. Touch Hold and the thermostat will resume programmed operation. Automatic fan mode allows the equipment fan to run whenever there is a call for heating or cooling. Always On fan mode allows the fan to run continuously with or without a call for heating or cooling.
OVERRIDES
When the UT32 is configured for programmable operation, there are two types of temperature overrides available.
TEMPORARY TEMPERATURE OVERRIDE
Temporary Temperature Override is designed to allow you to adjust the heating or cooling temperature without affecting the programmed temperatures. For example, if you want to change the heating temperature, touch the display until the backlight comes on, and then touch the temperature setting. When Heat Set flashes, touch the UP or DOWN arrows to adjust the setting. The thermostat will resume normal operation in 10 seconds and display the new heating temperature. The program period (Morning, Day, Evening, Night) or (Day, Night) will flash continuously to provide confirmation that the temperature has been changed The new heating temperature will remain active until the next scheduled event takes place at which time it will be deleted and only the programmed temperatures will be used. To manually cancel Temporary Override, touch the display until the backlight comes on and then touch Program until Hold appears and then touch Hold. The thermostat will resume normal programmed operation and the override period will stop flashing.
PERMANENT HOLD
There may be times when a permanent override is required such as during a vacation or holiday period. To place the thermostat in Permanent Hold, touch the display until the backlight comes on and then touch Program until the word Hold appears. Next, touch the displayed temperature. While Set Heat or Set Cool are flashing, touch the UP or DOWN arrow to adjust the permanent hold temperature(s) that you want to maintain. Whenever you want the thermostat to resume normal programmed operation, touch the display until the backlight comes on and then touch Hold. The program will again appear and the thermostat will resume programmed operation.
OTHER OPTIONS AND FEATURES
ADAPTIVE RECOVERY OPTION
If your thermostat has been configured for programmable operation, your contractor can add the Adaptive Recovery Option. Adaptive Recovery compares the space temperature deviation from the set temperature for the next scheduled event and brings the equipment on to reach the next temperature setting at the scheduled event start time. Example: If you program a heating temperature to be 70 degrees at 6:00 PM, Adaptive Recovery will calculate when to bring the equipment on so that the temperature will be 70 degrees at 6:00 PM. The program period will flash during the Adaptive Recovery process. If the thermostat is placed in temporary temperature override, Adaptive Recovery is canceled for the next scheduled event.
CLEAN SCREEN
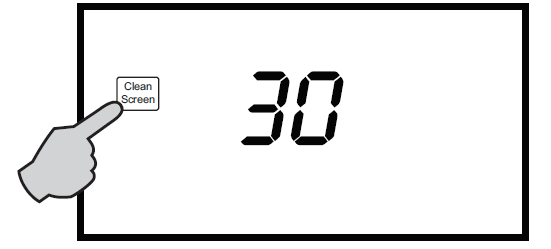
It is recommended that the touch screen be cleaned periodically. Use a slightly moistened clean, nonabrasive cloth. Touch the screen until the backlight comes on. Touch the Clean Screen window. All normal operating functions will be hidden and locked. The thermostat will count down from 30 seconds while you clean the screen. If more time is required, simply touch the Clean Screen box again.
COMPRESSOR TIME DELAY
Your thermostat has a built-in 4-minute time delay to prevent the air conditioner or heat pump from short cycling. When the short cycle timer is active and the thermostat is calling, the word Mode will flash on the display until the time delay has expired.
LOW BATTERY INDICATION
Your thermostat uses two AA batteries to keep the time-of-day clock running in case of a power failure. In some applications, battery power is also used to control the heating and air conditioning equipment. When the Low Battery icon appears on the screen, change the batteries immediately. If the battery power drops to a preset level, the backlight will be disabled and the display will only show the battery icon. All heating and cooling functions will be disabled and an audible beep will sound 3 times every 10 minutes between 7 am to 10 pm.

OUTDOOR TEMPERATURE DISPLAY
If an outdoor sensor has been installed on your thermostat, the outdoor temperature will be displayed from 1 degree Fahrenheit to 130 degrees Fahrenheit. If the outdoor temperature falls below 1 degree F, the thermostat will display LO and if the outdoor temperature rises above 130 degrees F, the thermostat will display HI.
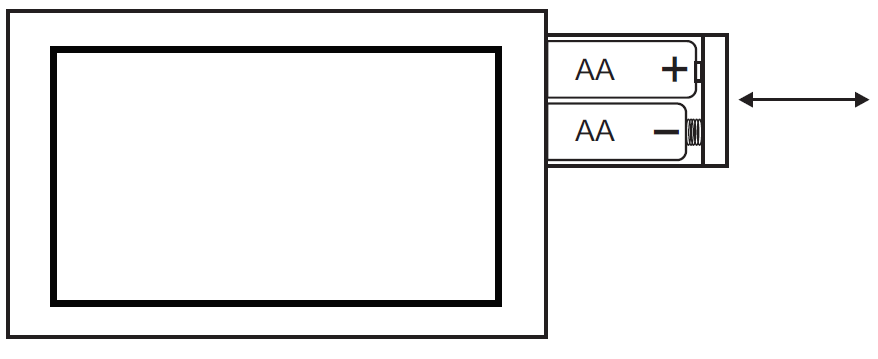
CHANGING THE BATTERIES
Press in on the battery access compartment and slide the drawer out. Install two AA batteries matching the + (Positive) and – (Negative) orientations. Push the battery compartment in until it clicks shut. When the batteries are properly installed, the touchscreen display will resume normal operation with no loss of programming or current time.
TIMED VENTILATION OPTION
Your thermostat may have been set up to provide Timed Ventilation. Timed Ventilation is designed to improve residential indoor air quality by introducing fresh, outside air through a 2-wire, power-open / spring-closed motorized intake damper controlled by the thermostat. The thermostat automatically controls the amount of fresh air required each hour based on ASHRAE 62.2 – 2013 Ventilation and Indoor Air Quality Standard.
HOW IT WORKS
If your thermostat has been set up for Timed Ventilation, it will automatically open the outside air damper and turn on the system fan for a specific period of time each hour regardless of whether the thermostat is calling for heating or cooling. Whenever Timed Ventilation is active, the word FAN on the thermostat will flash. If an optional outdoor temperature sensor is wired to the thermostat, Timed Ventilation can be overridden by setting high and/or low outdoor temperature limits. If the outdoor temperature exceeds these limits the words Outdoor Air Temperature will flash and the outside air damper will remain closed and the system fan will not come on.www.iohvaccontrols.com For Technical Support Call Toll-Free: 866-225-5032
Reference
Download Manual:
Io-HVAC-controls UT32 Programmable Touchscreen Thermostat User Manuals
Other Manual:
Io-HVAC-controls UT32 Programmable Touchscreen Thermostat Installation Manual
![]()
Io-HVAC-controls UT32 Programmable Touchscreen Thermostat User Manuals
Leave a Reply