Hotowell HTW-GM4 Floor Heating Thermostat
Introduction
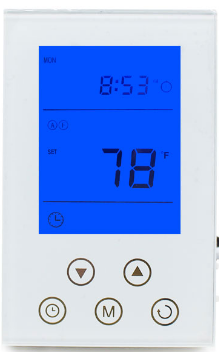
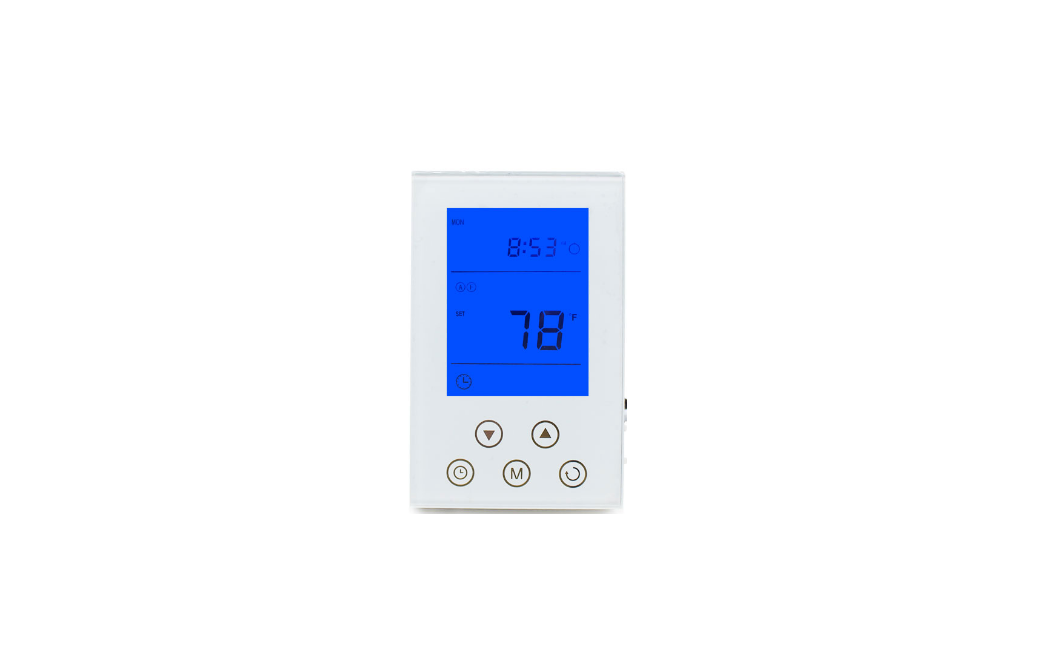
GM4 is a new intelligent heating thermostat for floor warming. It detects the indoor temperature and displays the corresponding value. This device automatically regulates the heating output on 120V/240V in accordance with the set point and the room temperature. The clock controls the 7-day user schedule. It is accurate and sensitive with high reliability and high performance
Parameters
| Power Supply | 120VAC/240VAC 50/60Hz | Self-consumption | <2W |
| Installation Way | 120V electrical box, deep | Dimension | 120mm ×76mm |
| Outer Shell | Tempered glass +PC Alloy | Wiring | Wiring +Terminals |
| GFCI | Class A 5mA | Output Load | 15Amp., resistive |
| Maximum Power | 120VAC/ 1800W , 240VAC/ 3600W | Accuracy | ±0.1℃(1℉ ) |
Installation
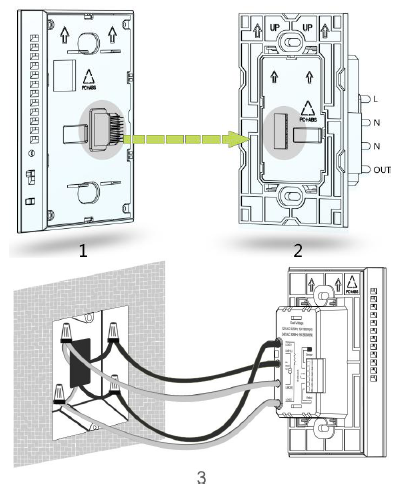
- Use a screwdriver to separate the control panel and power board ofthe thermostat, as figure 1 and figure 2 shown.
- Choose the proper installation location. Installation height is about 41/2 to 5 feet above the floor. For indoor use only.
- Do not install close to a heat source, such as hot water pipe, heating pipe, wall-mounted light fixture or in direct sunlight.
- Connect the power wires to Line 1(L) & Line 2(N) wires of the power board, using the connectors provided, as shown on figure 3.
- Connect the floor heating load wires to the Load 1 & Load 2 wires of the power board, using the connectors, as shown on Figure 3.
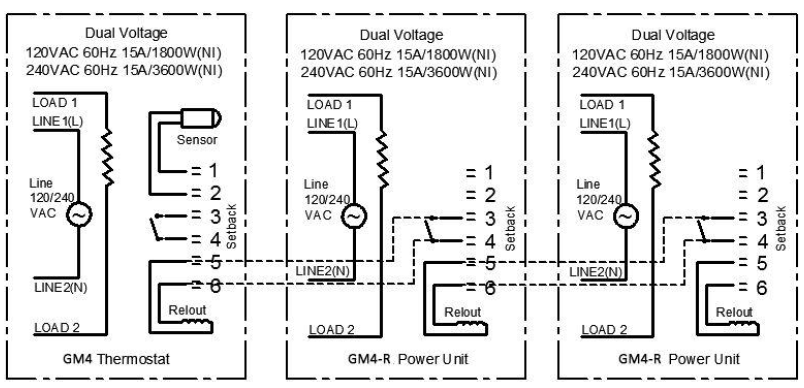
- Connect the floor sensor wire into terminals 1 & 2 behind the power board and tighten the screws with the screwdriver provided in the box.
- If needed, connect an auxiliary power module into terminals 5 & 6 of the thermostat for remote control. See the drawing below.
- Install the power board into the electrical box with the 2 screws provided, and then clip & fasten the front control panel into place with the bottom screw.
Wiring Diagram
Buttons and Display
Operation Instruction
ON/OFF settings
- ON: From the OFF display, slide the ON/OFF side switch up to turn the unit on.
- OFF: From the ON display, slide the ON/OFF switch down to turn the unit off. It will display OFF.
GFCI Test
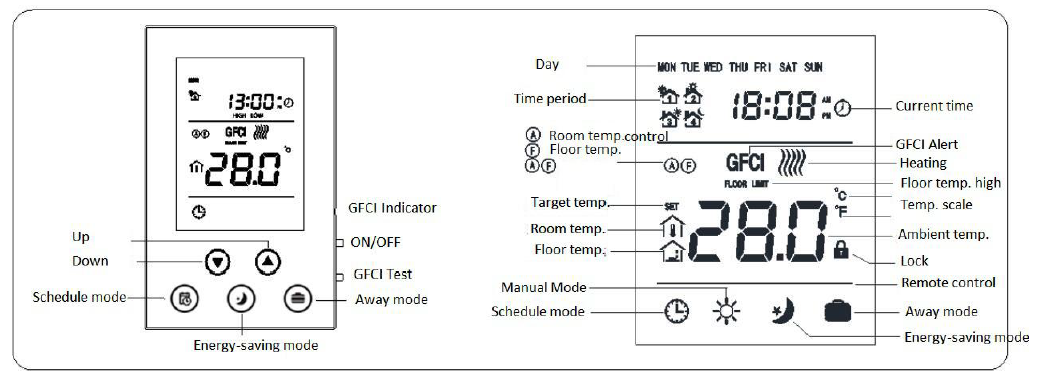
When the thermostat is under normal working status, press the GFCI button on the side of the thermostat, then the screen displays GFCI and the thermostat will stop working, GFCI indicator light is ON. Turn off the thermostat and then turn it on again, the GFCI icon will disappear.
Note: GFCI is used to protect the installer from getting shocked. After installation, please test and see if the GFCI function is OK or not.
- Make sure that the thermostat is under heating mode. Adjusting the target temperature is needed to trigger the thermostat to start heating.
- Press the GFCI button to test. The screen displays GFCI and the GFCI indicator light is on and the thermostat stops heating. If any of these cases does not happen, please contact the supplier for a replacement.
Local Time Setting
During OFF mode, press S3 to set time and the icon which is blinking is adjustable. Press S1 or S2 to adjust and set value and press S4 to switch to the next setting item. After finishing, press S4 to confirm or wait for 5 seconds to return back to the main interface. During setting, press S3 to return back to the main interface quickly
Working Mode Setting
- Schedule mode: during normal display, press S3 to switch to schedule mode, the screen displays

- Energy-saving mode: during normal display, press S4 to switch to energy-saving mode, the screen displays

- Away mode: during normal display, press S5 to switch to away mode, the screen displays

- Manual mode: during normal display, press S1 or S2 to switch to manual mode, the screen displays

Mode setting
- Schedule mode setting: There are 3 kinds of schedule modes for setting: 7days programmable, 5+2 programmable, 6+1 programmable.
- During normal display, press S3 for 5 seconds to enter into the schedule setting interface.
- Then press S3 again to switch between 7:0, 5:2, 6:1. After selecting the schedule mode, then press S4 to confirm.
- The icon blinking is settable. Press S3 to select the Week Day.
- During setting, press S1 or S2 to adjust the value.
- Then press S4 to confirm and switch to the next item. A
- after finishing, press S3 to save the settings and return back to the main interface or wait for 5 seconds without doing anything to save the settings.
The default setting as below
| Period | 1 | 2 | 3 | 4 |
| Mon.–Fri. start time | 5:00 | 7:00 | 17:00 | 22:00 |
| Sat.–Sun. start time | 5:00 | 9:00 | 17:00 | 22:00 |
| Target temp | 28℃(82℉ ) | 24℃(75℉ ) | 28℃(82℉ ) | 24℃(75℉ ) |
- Energy saving mode: during normal display, press S4 to set. Press S1 or S2 to adjust the value and then press S4 to save the settings and return back to main interface.
- Away mode: During normal display, press S5 for 3 seconds to set.Press S1 or S2 to adjust the value and then press S5 to save the settings and return back to main interface.
- Manual mode: During normal display, press S1 or S2 to enter into manual mode setting interface an adjust the value by pressing S1 or S2 and then press S4 to save the settings and return back to main interface.
Check temperature
During normal display, press S4 and S5 at the same time to switch and display the ambient and floor temperature.
Lock keys
Under normal display, press S1 and S2 at the same time to lock the keys. The screen displays. After setting, it is invalid to press any button.
Control methods
- Indoor temperature detected from floor
- Room temperature detected by the temperature sensor built-in
- The thermostat takes the room temperature as the current indoor temperature and floor temperature is for floor high-temperature protection inspection.
- Floor temperature icon
- Room temperature icon
There are 3 ways to control the thermostat: The thermostat takes floor temperature as its current room temperature; The thermostat takes the temperature detected by a sensor built-in it as its current room temperature; The thermostat takes the temperature detected by sensor built-in it as its current room temperature and the floor temperature as a inspection item to protect the floor. When the room temperature is below the target temperature, the thermostat will start heating and the screen displays When the room temperature is equal to or above the target temperature, the thermostat will stop heating and the icon disappears.
High temperature protection
When the thermostat take the floor temperature as the inspection item, once the floor temperature is above 45℃(113℉ ), the screen displays “FLOOR LIMIT”, and the thermostat will enter into high temperature protection mode, and the thermostat stops heating. When the floor temperature is below 40℃(104℉ ), “FLOOR LIMIT” icon disappears and if the target temperature is higher than the room temperature, the thermostat will start heating.
Remote control
- When there is signal detected on the terminal of Setback, the thermostat will enter into remote mode.
- When the room temperature is below the target temperature set on the remote side, the thermostat will start heating, and the screen displays and at the same time, there is output signal on terminal Relout.
- When the room temperature is above the target temperature set on the remote side, the thermostat will stop heating, and the screen displays and at the same time, there is NO output signal on terminal Relout.
Sensor failure
If there is failure in the sensor, the screen displays “EEE” at the temperature display area and the thermostat stops heating.
℃ and ℉ scale switch
Under OFF mode, press S3 and S4 at the same time to switch the scale between ℃ and℉.
During OFF mode, press S3 and S5 at the same time to enter into the secret menu. Press S1 or S2 to change the value and input password “1234”, press S5 to confirm. After entering into the hidden menu, press S4 to switch to the next option to set.
| No. | Parameter | Default setting | Setting range | Note |
| P1 | High-temperature protection temperature | 45℃(113℉ ) | OF/ 45~95℃(113~203℉ ) | OF: Turn off floor temp. protection |
| P2 | Room temperature calibration | 0(00) | -9.5℃~9.5℃(-16~16℉ ) | |
| P3 | temperature setback value | 2℃(04℉ ) | 0.5~10℃(1~18℉ ) | |
| P4 | Button sound volume | 3 | OF/1~9 | OF: OFF 1~9: volume level |
| P5 | backlight brightness | NO | NO/OF | ON: Always on OF: backlight off if no operation |
| P6 | control method | A-F | A-F/Air/Flo | Air: temp. detected by the built-in sensor is the room temp.
Flo: temp. detected by the floor sensor is the room temp. |
| P7 | Time format | 24 | 12/24 | 12: 12 hours format
24: 24-hour format |
| P8 | Floor temp. calibration | 0(00) | -9.5~9.5℃(-16~16℉ ) | |
| P9 | floor temp. control setback value | 1.5℃(03℉ ) | 0.5~10℃(01~18℉ ) | |
| P10 | floor protection temp. setback value | 5.0℃(09℉ ) | 0.5~10℃(01~18℉ ) | |
| P11 | Target room temperature during
remote control mode |
16.5℃(62℉ ) | 5~37℃(41~99℉ ) | |
| P12 | Reset to factory default | 53 | 0~99 | change to 55 and press S3 to reset to factory default. |
| P13 | Room temperature increasing speed during heating | 5 | 0~99 | 5 means 5*30s=150s, it means the thermostat increase the room temperature every 150s till the actual room temperature. |
| P14 | ℃/℉ | OF | OC/OF | OC:℃ OF: ℉ |
| P15 | GFCI detecting level | NOR | NOR, 1, 2, 3, OFF | NOR: Once detected, the thermostat will alarm GFCI.
1,2,3: Delay to alam GFCI OFF: Turn off GFCI. |
REFERENCE:
DOWNLOAD MANUALS:
Hotowell HTW-GM4 Floor Heating Thermostat User Manual
![]()
Leave a Reply