
ESI ESRTP5WiFi Programmable Room Thermostats

Quick Operating Guides
Display and Button Functions
 : Temperature, time and data display
 : WiFi working status (for ESRTP5WIFI WiFi model only)
 : RF working status (for ESRTP5RF RF model only)
 : Auto operation mode
 : Off / Frost protection mode
 : Manual operation mode
 : Flame symbol when system calling for heat
 : Cancels and returns to the previous menu
 : Either confirms and saves the setting, or moves you to next option within a function
- Dial to adjust temperature and parameters
Quick Command Guide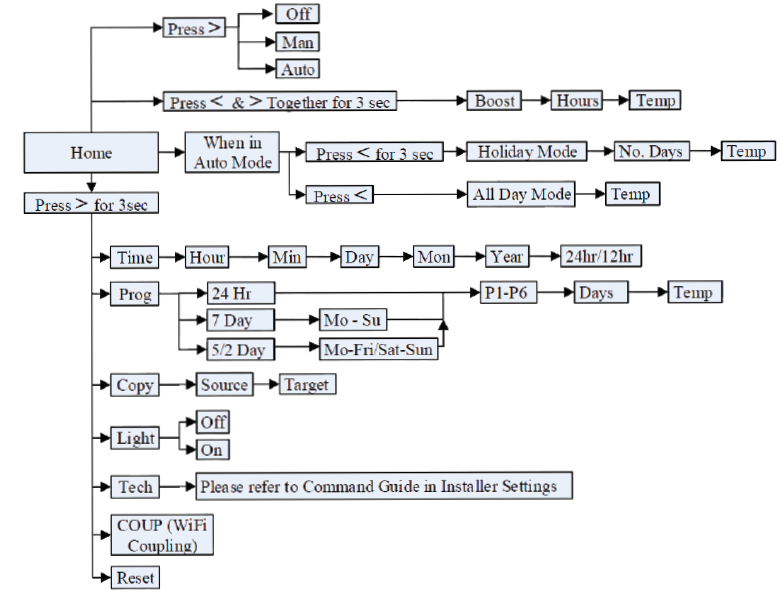
Setting the Time and Date (tINE)
N. B Please note, when first powered or in the event of a power loss the time will be flashing and the time and date will need to be set. Follow steps 2 – 6 to set the time on first setup. Changes between summer and winter time are handled automatically by the unit.
- Press and hold > until the display shows tINE then press >.
- Turn the dial to adjust the hour then press >.
- Turn the dial to adjust the minute then press >.
- Turn the dial to adjust to the current day then press >.
- Turn the dial to adjust to the current month then press >.
- Turn the dial to adjust to the current year then press >.
- Turn the dial to select between 12 or 24 hour format. Press > to confirm and return to step 2. Press < to return to previous menu or leave for 1 minute to automatically return to home -screen.
Operation Modes
Operation Modes:![]() AUTO,
AUTO,![]() MAN,
MAN,![]() OFF Press > in homescreen to choose operation mode.
OFF Press > in homescreen to choose operation mode.
AUTO![]()
- In Auto mode, choose All Day mode. See section 3.2 for details.
- In Auto mode, choose Holiday mode. See section 3.3 for details.
- In Auto mode, choose Boost. See section 3.4 for details.
In Auto mode, if All Day mode, Holiday mode or Boost is not selected, Auto mode will be used. In Auto mode, the thermostat will work as per the user’s previous programming setting. Please see section 5 for details.
Temporary manual override of set temperature. In Auto mode, the user can turn the dial to adjust the set temperature as below:-
- In homescreen, turn dial to temporarily adjust temperature
- The thermostat will automatically accept the change and return to the homescreen. The display will alternate between current room temperature and the time left until the next programmed event. The temporary override will end when the next programmed event starts.
Temporary set temperature range: 5oC – 35oC. Default: 21oC
N.B: The temporary set temperature will not replace the original program event’s set temperature. When the program event ends, it will return to the default heating program automatically.
MAN![]()
Permanent manual override of set temperature.
- In Homescreen, press > to select MAN
- Turn the dial to adjust temperature
- Press > to confirm setting and return to homescreen
Permanent set temperature range: 5oC – 35oC. Default: 21oC
OFF![]()
Turn the heating off permanently.
- 1. In Homescreen, press > to select OFF
When room temperature drops to 5oC, heating is turned on; when
room temperature reaches 7oC, heating is turned off.
All Day Mode (AL)
- In homescreen, press > to select Auto mode
- Press < once to enter All Day mode temperature setting and the screen will display AL
- Turn the dial to adjust the set temperature
- Press > to confirm the set temperature and automatically return to the Homescreen. The display will alternate between AL and current room temperature
To adjust the temperature in All Day mode, turn the dial to desired temperature then press > to confirm and automatically return to the homescreen.
Press < in the homescreen to exit All Day mode and return to Auto mode.
Heating under All Day mode will be on until 23:59 that day. At 23:59, the unit will exit All Day mode and return to Auto mode.
Set temperature range: 5oC – 35oC. Default: 21oC
Holiday Mode (HOLI)
- In homescreen, press > to select Auto mode
- Press and hold < for 3 seconds until HOLI is displayed then release
- Turn the dial to adjust holiday days, press > to confirm
- Turn the dial to adjust set temperature, press > to confirm and return to the homescreen. The display will alternate between: HOLI – Days(Holiday) – HOLI – Current room temperature
To adjust the settings in Holiday mode, turn the dial to adjust holiday days, press > to confirm. Then turn the dial to adjust set temperature, press > to confirm and return to the homescreen. Press < in the homescreen to exit Holiday mode and return to Auto mode.
Holiday mode days setting range: 1 – 99 days. Default: 1 day
Set temperature range: 5oC – 35oC. Default: 7oC
N.B: The Days(Holiday) will numerically countdown. Once the countdown has finished normal operation will resume. It may be advisable to to set the Holiday mode 1 day less so the house is back up to temperature for your return.
Boost (bOSt)
- In homescreen, press > to select Auto mode
- Press and hold < & > for 3 seconds to enter Boost setting. bOSt will display.
- Use the dial to set the number of hours for the boost to run. Then press > to confirm.
- Turn the dial to adjust the Boost set temperature, press > to confirm and return to the homescreen. The display will alternate between:
bOSt – Time remaining in Boost – bOSt – Current room temperature
To adjust the settings in Boost, turn the dial to enter the Boost setting and bOSt will display. Use the dial to adjust the number of hours for the boost to run, press > to confirm. Then turn the dial to adjust boost set temperature, press > to confirm and return to the homescreen. Press < in the homescreen to exit the Boost and return to Auto mode.
Boost hours setting range: 1 hour – 6 hours. Default: 2 hours
Set temperature range: 5oC – 35oC. Default: 21oC
N.B: The time remaining for the Boost will countdown. Once the countdown has finished normal operation will resume.
In the homescreen, press and hold > for 3 seconds then release to enter main menu. Use the dial to choose between tINE, ProG, CoPy, tEcH , CoUP and rESE. Press > to enter desired setting. Press < to return to Homescreen.
Copy Function (CoPy)
The unit is provided with a copy function which allows an adjusted programme to be copied to another day. N.B. This function only works in 7 Day setting.
To operate the copy function:-
- Press and hold > until the display shows tINE. Turn the dial until display shows CoPy then press >
- Use the dial to select the day to be copied then press > to confirm
- Use the dial to select the day to be copied to then press >. The display will show SAuE to confirm and then return to step 2. Press < to return to previous menu or leave for 1 minute to automatically return to homescreen.
Backlight On/Off (LIGH)
The backlight can be turned permanently on/off.
- Press and hold > until the display shows tINE. Turn the dial until display shows LIGH then press >
- Use the dial to choose between turning the light permanently ON or OFF. When OFF, the LED will display only with user interaction and turn off again when there is no operation for 2 minutes. Press > to confirm and return to previous menu.
LIGH setting range: Off/On.
Default: Off
N.B. It is recommended to leave this setting in the default OFF mode as heat generated by the thermostat’s power supply and LED will affect temperature measurement. A deviation of up to 3.5°C may occur, which will be calibrated automatically by the unit within 30 minutes of first connecting the thermostat. It is recommended to leave the thermostat to climatise for 40 minutes before user opera-tion. If set permanently ON, the light will automatically switch to a lower light setting and be dimmer.
Resetting the Unit (rESE)
Resetting the unit will return the thermostat to default setting. The time, date and landlord service settings will all be maintained.
- Press and hold > until the display shows tINE. Turn the dial until display shows rESE then press >
- The display will show – – – -. Press > again to confirm and the display will show LOAd. If the reset is successful, the unit will return to the homescreen after 2 seconds. If the reset is unsucessful, the unit will display FAIL. Either press > to attempt again or press < to return to the previous menu
Programme Settings (ProG)
Factory Pre-Set Programme
This unit has been designed to be a simple-to-use thermostat, requiring minimal user intervention with a pre-programmed heating profile. The pre-set heating times and temperatures will suit most people (see table below).
Operation setting range: 5/2 day, 7 day, 24 Hour. Default: 5/2 Day
Events setting range: 6 events or 4 events. Default: 6 events
Pre-Set Temperatures: 5/2 Day
Mon-Fri pre-set time and temperature settings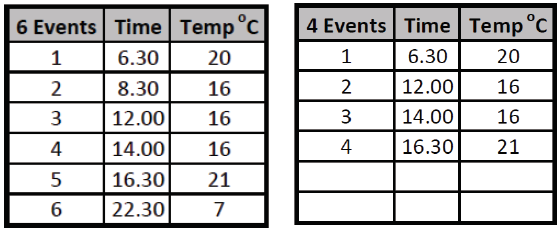
Sat & Sun pre-set time and temperature settings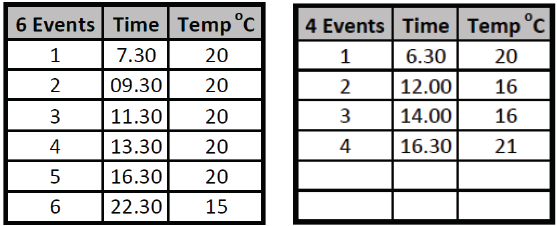
- Pre-Set Temperatures: 7 Day
In 7 day setting, the pre-set settings are the same as the 5/2 Day programme. - Pre-Set Temperatures: 24 Hours
In 24hr setting, the pre-set settings are the same as Mon-Fri of the 5/2 Day programme.
Setting the Operation Mode (5/2 day, 7 day, 24hr) (ProG)
- 1. Press and hold > for 3 seconds until the display shows tINE. Turn the dial until display shows ProG then press >
2. Use the dial to move between 24hr, 7 day or 5/2 day operation.- 24 hr operation is shown by 24Hr
- 7 day operation is shown by 7day
- 5/2 day operation is shown by 5-2d
- 3. Press > to set the programme (see section 5.3 for details) or press < to return to previous menu or leave for 1 minute to automatically return to homescreen
Setting the Programme (ProG)
5/2 Day
- Choose 5/2 day operation (see 5.2 for details). Then press >
- Turn the dial to select the days to programme, either 1-5 for weekdays or 6-7 for weekends then press >
- Turn the dial to choose the program (P1-P6). Then press > to enter time setting
- Turn the dial to adjust the time (10 minutes increments). Then press > to enter temperature setting
- Turn the dial to adjust temperature (increments of 0.5°c). Then press > to save and return to program choice (P1-P6)
- Repeat steps 3-5 for all time and temperature programs. Then press < to return to step 2. Repeat steps 2-6 until all desired days have been programmed then press < to return to previous menu or leave for 1 minute to automatically return to home- screen
7 Day
- Choose 5/2 day operation (see 5.2 for details). Then press >
- Turn the dial to select the days to programme, either 1-5 for weekdays or 6-7 for weekends then press >
- Turn the dial to choose the program (P1-P6). Then press > to enter time setting
- Turn the dial to adjust the time (10 minutes increments). Then press > to enter temperature setting
- Turn the dial to adjust temperature (increments of 0.5°c). Then press > to save and return to program choice (P1-P6)
- Repeat steps 3-5 for all time and temperature programs. Then press < to return to step 2. Repeat steps 2-6 until all desired days have been programmed then press < to return to previous menu or leave for 1 minute to automatically return to home- screen
24 Hour
- 1. Choose 24 hour operation (see 5.2 for details). Then press >
2. Turn the dial to choose the program (P1-P6). Then press > to enter time setting
3. Turn the dial to adjust the time (10 minutes increments). Then press > to enter temperature setting - Turn the dial to adjust temperature (increments of 0.5°c). Then press > to save and return to program choice (P1-P6)
- Repeat steps 2-4 for all time and temperature programs. Then press < to return to previous menu or leave for 1 minute to automatically return to homescreen
WiFi Coupling (CoUP)
Setting Up the WiFi Connecttion
This WiFi thermostat works with the ESi Controls Centro APP which is available on iOS and Android.
- Press and hold > until the display shows tINE. Turn the dial until display shows CoUP then press >.
- The symbol will flash and – – – – will be displayed.
- Now use the ESi Controls Centro APP to establish the WiFi connection.
- In the Centro APP, enter the Heating & Hot Water section then tap + new device.
- Enter the individual thermostat WiFi code (this will be found on the thermostat). Then tap next.
- Select your router and enter your router password. Then tap next and the APP will search for the thermostat.
- Your thermostat should now be connected to your WiFi and the symbol on your thermostat should be constantly on. If the symbol is off or flashing, this means the connection has not been completed. See section 6.2 for details.
Explanation of the WiFi Connecttion
- off means the thermostat cannot find any router to connect to
- flashing means the thermostat is connected to the router but cannot connect to the server
- constantly on means the thermostat is successfully connected to the router and server
Technical Specification
Parameter Settings
| All Day Mode | |
| All day mode temperature | 5oC-35oC (Default: 21oC) |
| Holiday Mode | |
| Holiday mode temperature | 5oC-35oC (Default: 7oC) |
| Holiday mode days | 1-99 days (Default: 1 day) |
| Boost Function | |
| Boost Temperature | 5oC-35oC (Default: 21oC) |
| Boost Hours | 1-6 hours (Default: 2 hours) |
| Default Mode | |
| Temporary set temperature | 5oC-35oC (Default: 21oC) |
| Program event start time | 00.00-24.00 (See 5.1 for details) |
| Program event set temperature | 5oC-35oC (See 5.1 for details) |
| Program operation mode | day) |
| Number of programs | 4 or 6 (Default 6) |
| Manual Mode | |
| Manual mode temperature | 5oC-35oC (Default: 21oC) |
| Delayed Start | |
| DS | Off or On (Default Off) |
| TPI | |
| TPI | Off, 3 cycles or 6 cycles (Default Off) |
| OFF Mode (Frost Protection) | |
| Frost protection start
temperature |
5oC |
| temperature | 7oC |
| Service | |
| SERS | OFF or 1-4 (Default: Off) (See 9.1 for details) |
| Service DATE | 28-366 days (Default 365 days) |
| Other Functions | |
| Operation MODE | Auto, Manual, Off (Default: Auto) |
| Temperature calibration ADJ | 3.0oC-3.0oC (Default: 0oC) |
| SWING | 0.5oC-2.0oC (Default: 1oC) |
| Display backlight | Off/On (Default: Off) |
Thermostat Technical Settings
| Power supply | 230VAC, 3(1)A SPDT |
| Temperature Sensor Type | +/- 1oC at 20oC |
| Total Switch Rating | 3(1)A 230 VAC |
| Contact Type | SPDT (Volt Free changeover contacts) |
| Plastic | Thermoplastic, flame retardant |
| Protection Rating | IP30 |
| Dimensions | 95mm (L) x 95mm (W) x 39mm (D) |
| BST/GMT Time Change | Automatic |
| Factory Pre-Set Programme | Yes, see 5.1 for details |
| Complies with | EN 60730-1, EN 60730-2.7, EN 55014-
1:2006+A1:2009+A2:2011, EN 61000- 3-2:2014, EN 61000-3-3:2013, EN 55014-2: 2015, EN 60730-1:2011, EMC Directive 2014/30/EU, LVD Directive 2014/35/EU |
Installation
Installation Safety Instructions
The unit must be installed by a suitably qualified person in accordance with the latest IEE Wiring Regulations. Isolate mains supply before commencing installation. Please read all instructions before proceeding.
Ensure that the fixed wiring connections to the mains supply is via a fuse rated at not more than 3 Amps and Class ‘A’ switch having a contact separation of a minimum of 3mm in all poles. The recommended cable sizes are 1.0mm sqr or 1.5mm sqr. No earth connection is required as the product is double insulated but ensure continuity of earth throughout the system.
General Safety Instructions
This product complies with the essential requirements of the following EC Directives:
- Electro-Magnetic Compatibility Directive 2014/30/EU
- Low Voltage Directive 2014/35/EU
- EC Marking Directive 2014/30/EU
Please leave the user instructions with the end user where they should be kept in a safe place for future reference.
Warning Notices
WARNING: ALWAYS ISOLATE THE AC MAINS SUPPLY BEFORE INSTALLING. THIS PRODUCT MUST BE FITTED BY A COMPETENT PERSON, AND INSTALLATION MUST COMPLY WITH THE GUIDANCE PROVIDED IN THE CURRENT EDITIONS OF BS767 (IEE WIRING REGULATIONS) AND PART “P” OF THE BUILDING REGULA-TIONS.
WARNING: DO NOT FIT THE RECEIVER TO A BACK PLATE THAT IS LIVE. SWITCH OFF MAINS BEFORE FITTING BACK PLATE AS LIVE AND NEUTRAL CONTACTS MAY TOUCH WHILE MOUNTING RECEIVER ON PLATE AND DAMAGE THE PRODUCT.
Maintenance
Always isolate the mains supply before commencing any work, servicing or maintenance on the system. And please read all instructions before proceeding. Arrange for an annual maintenance and inspection schedule to be carried out by a qualified person on every part of the heating and hot water system.
Fitting the Programmable Room Thermostat
The ideal position to locate the Programmable Room Thermostat is about 1.5m above floor level, in a location where the thermostat is accessible, reasonably lit and free from extremes of temperature and draughts. Do not position the thermostat near sources of heat, such as radiators, lights, TV, direct sunlight or on an outside wall.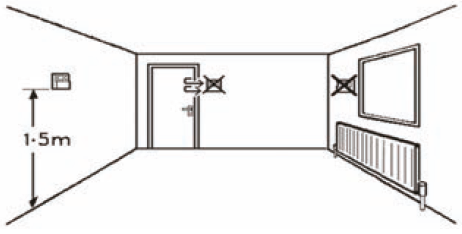
Installing the Programmable Room Thermostat
- Use a flat headed screwdriver to press the fastener at the top of the unit, then gently loosen from the unit, unhooking from top to bottom.
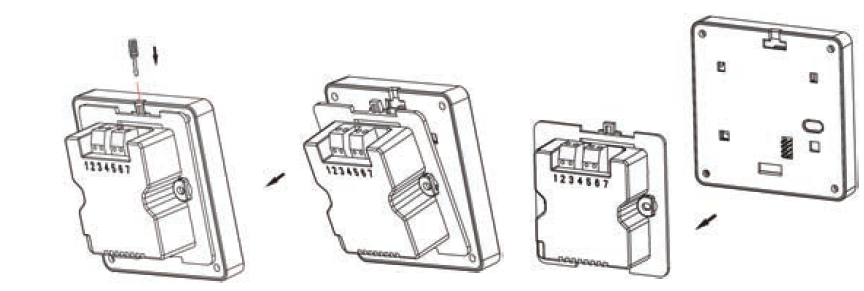
- Fix the 35mm back box, terminals at the top, onto a 2 flange metal back box with 2 BM3.5×23 screws. If installing on a 4 flange metal back box, simply push down the flanges on the top and bottom to leave the flanges on the left and right-hand side.

- Route the wires through the back of the wall plate. Fit the wires to the wall-plate in accordance with the relevant diagram and in accordance with I.E.E. regulations.
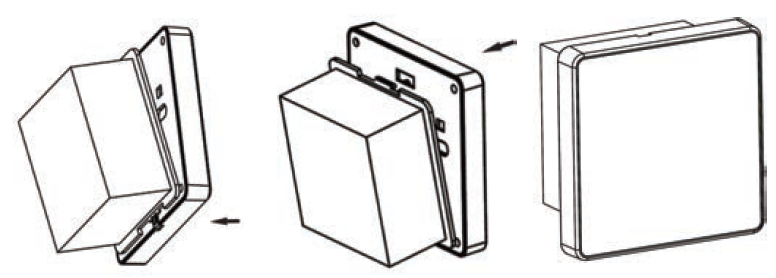
- Fit the unit onto back-plate securing from bottom to top.
- Ensure an appropriate fuse is fitted to the circuit before reconnecting to the mains supply.
Wiring Diagram

Technical Settings:
Quick Command Guide
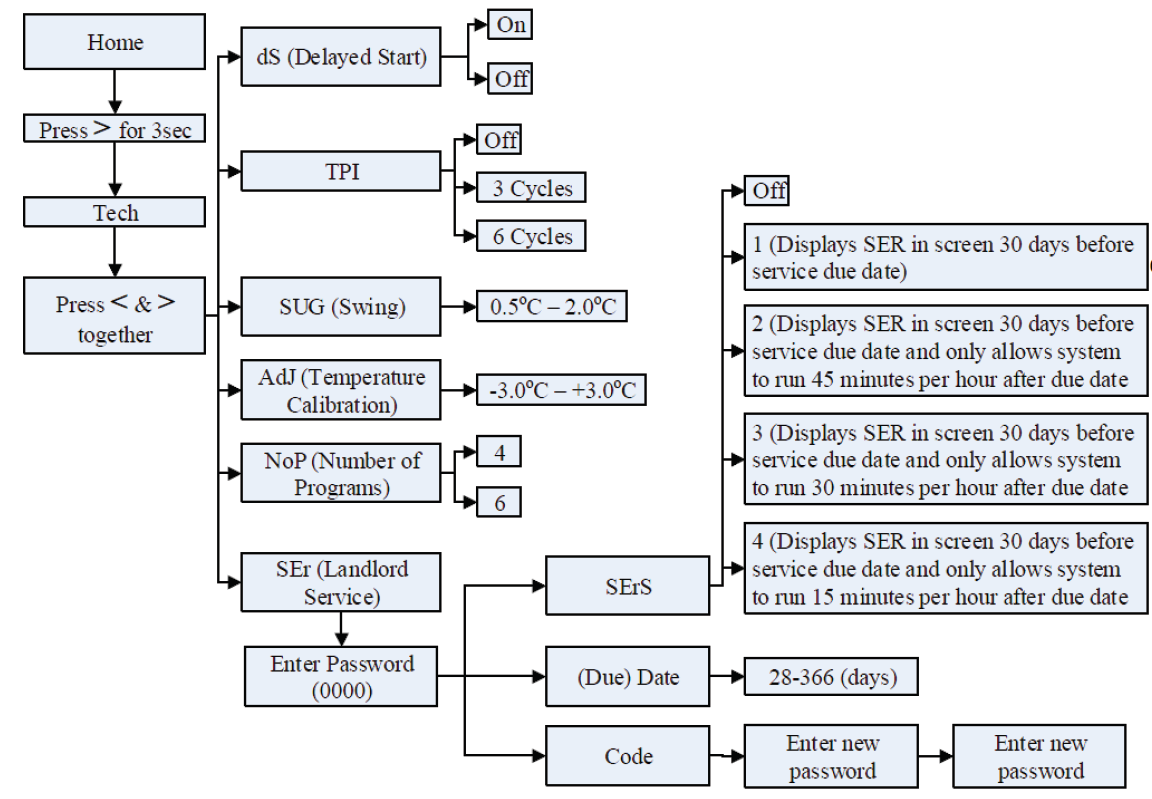
Menu Technical Settings (tEcH)
- Press and hold > until the display shows tINE. Turn the dial until display shows tEcH then press < & > together to enter
- Use the dial to choose between the below, then press > to enter:-
- dS: Delayed Start. Default is OFF. Use the dial to choose between OFF (function disabled) or ON (heating on time is delayed up to 40 minutes according to current room temperature)
- tPI: TPI. Default is OFF. Use the dial to choose between OFF (function disabled), 3CYC (each hour has 3 heating cycles, recommended for oil boilers) or 6CYC (each hour has 6 heating cycles, recommended for gas boilers)
- SUG: Swing. Default is 1.0. Use the dial to choose between 0.5-2.0
- AdJ: Temperature calibration. Default is 0. Use the dial to choose between -3.0oC – 3.0oC
- noP: Number of time and temperature events. Default is 6. Use the dial to choose between 4 or 6 time and temperature events.
- SEr: Landlord Service Interval. Default is OFF. See section 9 to amend
Landlord Service (SEr)
Setting the Landlord Service (SErS)
- To set the landlord service, enter the landlord service settings (see section 8.2). Use the dial to select SErS then press >
- Use the dial to enter the password 0000, using > to move to the next digit. Then press > to enter technical settings.
- Use the dial to choose between the below options, then press to confirm and return to landlord service settings OFF: Disables the service interval
- Reminds the user when the annual service is due by displaying SER in the screen 30 days before due date. The operation of the system will not be affected.
- Reminds the user when the annual service is due by displaying SER in the screen 30 days before due date and only allows the system to run for 45 minutes per hour after the due date has passed
- Reminds the user when the annual service is due by displaying SER in the screen 30 days before due date and only allows the system to run for 30 minutes per hour after the due date has passed
- Reminds the user when the annual service is due by displaying SER in the screen 30 days before due date and only allows the system to run for 15 minutes per hour after the due date has passed
Setting the Due Date (DAtE)
To set the due date, enter the landlord service settings (see section 9.1) and use the dial to select DAtE then press >. Use the dial to set the due date (between 28-366 days) then press > to confirm and return to landlord service settings.
Changing the Password (CODE)
To change the password, enter the landlord service settings (see section 9.1) and use the dial to select CODE then press >. Use the dial to set the first digit of the new password then press > to move to the next digit. Repeat this for all 4 digits. On the last digit, press > to confirm the new password. Then re-enter the chosen password using the dial and > button. On the last digit press > to confirm. If both inputted passwords match, the new password will be saved and the unit will return to the home screen. If the inputted passwords do not match, the unit will return to the landlord settings menu and this step (section 9.3) should be repeated.
WARNING: Interference with sealed parts renders the guarantee void. In the interests of continuous product improvement, we reserve the right to alter designs, specifications and materials without prior notice and cannot accept liability for errors.
ESi Controls Limited
[email protected]
www.esicontrols.co.uk
Reference
Download Manual:
ESI ESRTP5WiFi Programmable Room Thermostats User Instructions
ESI ESRTP5WiFi Programmable Room Thermostats User Instructions
Leave a Reply