
EMOS T13RF WIRELESS THERMOSTAT
The T13RF thermostat is intended to control heating or air conditioning systems. Compared to the common home thermostats, the T13RF thermostatic system has separated and wireless connected control unit (transmitter) and the switching unit (receiver). The switching unit is intended to connect and switch the heating/air conditioning systems and the portable unit is used for the temperature manual adjustment. Both units communicate with each other via the radio signal. The system’s advantage is a variability and much easier access to the temperature adjustment.
Important Notice:
Read the instruction manual carefully before first use. Read carefully as well as the instruction manual to the boiler and to the air conditioning systems.
Before you start the installation, disconnect the power supply!
We strongly recommend that only the qualified person should perform the installation! During the installation observe the ordered standards.
SPECIFICATIONS
- Load Switching: max. 230 V AC; 16 A for resistive load; 4 A for inductive load
- Clock Tolerance: ±60 seconds/month
- Temperature Measuring: 0 °C to 35 °C, tolerance 0.5 °C; tolerance ±1°C at 20 °C
- Temperature Setting: 5 °C to 30 °C, each change in 0.5 °C at a time
- Set Temperature Variance: 0.5 to 2 °C, each move in 0.5 °C at a time
- Units Connection: via the radio signal 433.92 MHz
- Temperature Unit Range: up to 60 m in an open area
- Power: Control Unit (transmitter) 2× 1.5 V batteries of AA type (LR6)
- Switching Unit (receiver) 230 V AC/50 Hz
- Size and Weight: Control Unit: 90 × 113 × 33 mm
- Switching Unit: 77 × 110 × 30 mm
INSTALLATION
Control Unit
It is possible to mount the control unit right on the wall or you can place it into the enclosed stand.
Insert 2× 1.5 V AA batteries before the installation.
Use alkaline batteries of the same kind only, do not use the rechargeable batteries.
During the first start-up the display must show the time and room temperature (such as 28.5 °C).
If different sort of data appear on the display, gently push the RESET button. Use a thin straight object to do so, for instance a straightened office paperclip.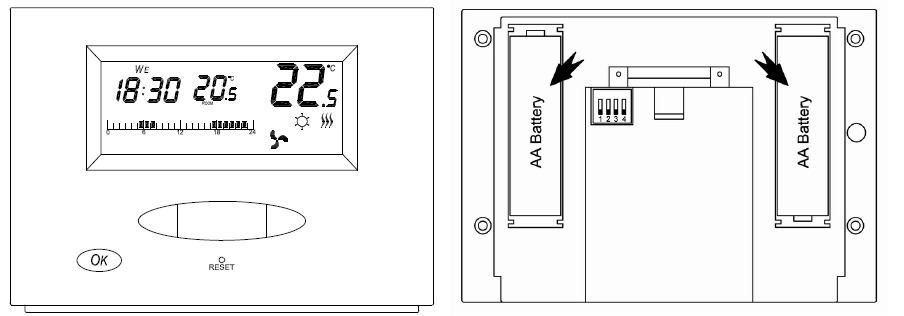
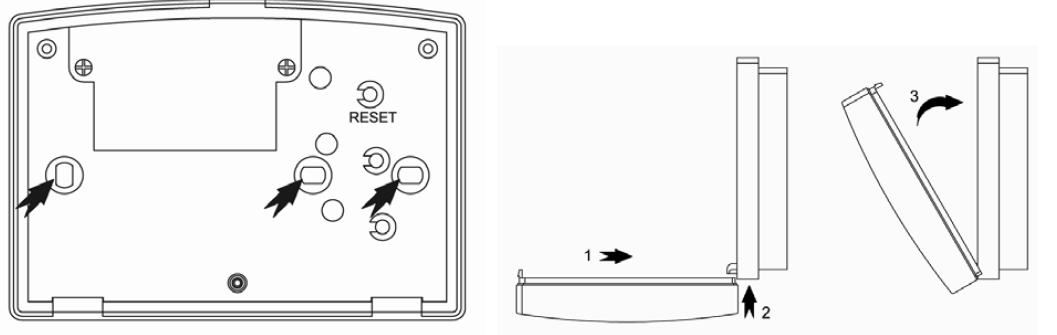
Mounting on the wall:
Use the two enclosed screws, mount the back side on the wall. Slide the control unit on the back side.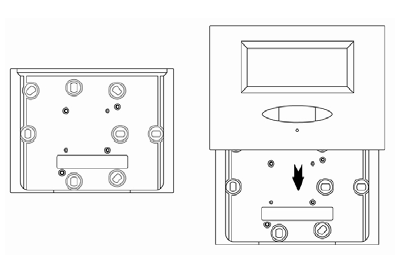
Installation into the stand:
Slide the control unit into the stand and place in the room.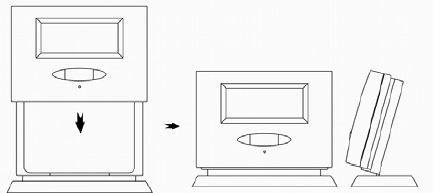
Thermostat’s Location
The thermostat’s location (the control unit) has a significant influence on its functionality. Select such place, where the family members are the most frequently, the best on the inner wall where the air can freely circulate and the direct sunlight does not reach. The thermostat is not meant to be placed close to the sources of warmth (TV sets, radiators, refrigerators) or close to a door. If you do not observe these rules, the temperature will not be maintained correctly in the room.
Switching Unit
Press carefully the lock on the upper part of the front cover and withdraw the cover: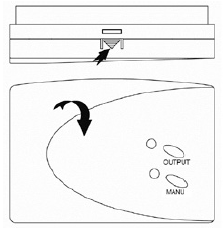
To attach the contacts, loosen 2 cover-screws and slide the cover upwards.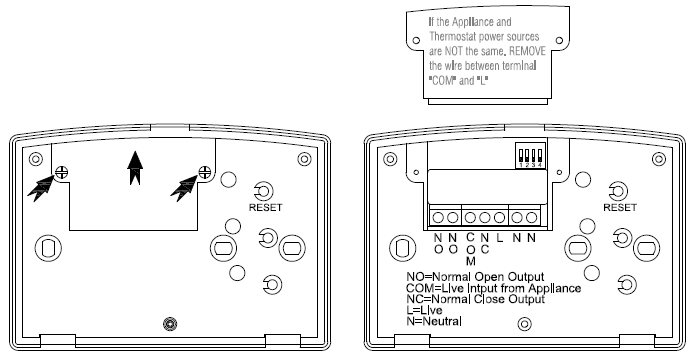
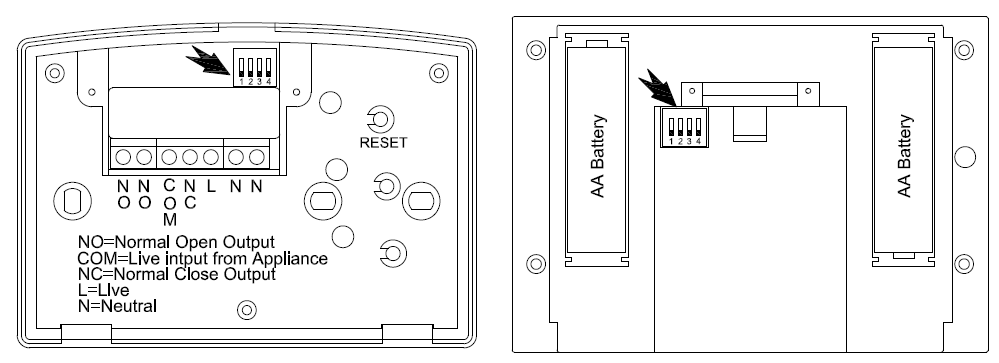
Attach the contacts as follows
Diagram:
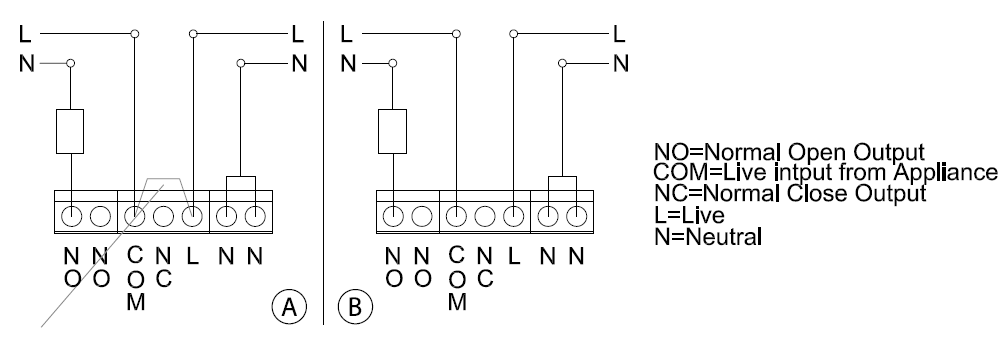
In case the thermostat’s source of the power is the same as well as for the attached device, connect according to the Diagram a). Do not remove the pre-installed wire bridge between the COM contact and L contact!
Connect the phase conductor into the COM terminal.
In case the thermostat’s source of the power is NOT the same, connect according to the Diagram b).
However, before, remove the pre-installed wire bridge between the COM contact and L contact!
Finish the installation of the switching unit by mounting it with the help of 2 enclosed screws. Before screwing the contacts’ cover do not forget to synchronize the control and switching units, see the chapter: Radio Signal Address Setting.
Put the front cover back.
Radio Signal Address Setting
The radio signal address enables the information transfer between the control and switching unit. There may be other different devices operating on the same or similar frequency and they may cause the connection interference or other complications. To avoid such complications it is necessary to use the adequate radio code. For the code setting there are determined 4 switches of a DIP type, placed inside of the both units.
- Before you start to modify the address code, take out the batteries and unplug the main electric cable!
- Withdraw the back cover from the control unit – there are 4 DIP switches on the printed circuit board.
- Set the address code by moving some switches into the ON position and write down their status.
- Set the same code on the switches which are placed in the switching unit. The transmitter’s address code must be the same as the receiver’s address code. DIP switches for the address code setting – marked with the arrow
The Original Thermostat Replacement
ATTENTION: before replacing the thermostat, disconnect the heating / air conditioning system from the main source of
electric voltage in your apartment. Hence you will prevent a possible electric shock. Before disconnecting the electric
cables, read carefully the following instructions:
- Switch off the original thermostat and remove the thermostat’s cover.
- Unscrew the thermostat from the wall plate.
- Unscrew the connecting back plate from the wall. Draw the back plate a small distance away from the wall, however, do not disconnect any wires so far.
- Press carefully the lock of the front cover and withdraw it.
Marking the Wires
- Identify each wire and disconnect it.
- Protect the wires against the possible pull out.
- Avoid any air penetration by using the poly-urethane foam, in case the space behind the thermostat is too large.
Thus you will prevent the incorrect temperature measuring
Testing the Wireless Communication between Units
- By the thumb-wheel set the room temperature about a few degrees higher than is the current room temperature, confirm by pressing OK. Set the AUTO mode on the switching unit.
- Wait a few seconds.
- The upper LED will light up on the switching unit.
- If the LED does not light up, move the control unit closer to the switching unit. By the thumb-wheel set the room temperature lower than is the room temperature – the receiver must shut down and the LED will not be on.
- Repeat the steps 1 to 4. The transmission range between the control unit and switching unit is 60 m in an open area. The range may be shorter indoor due to the signal interference caused by walls and other obstacles.
- After carrying out the test press on the switching unit the RESET button.
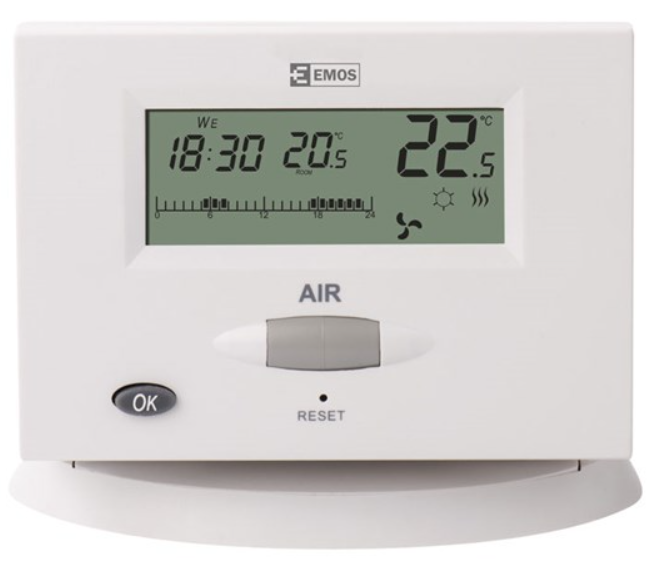
Control Unit (Transmitter) Display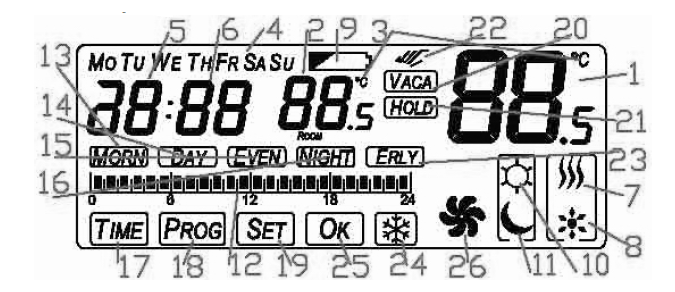
- Set Temperature
- Room Temperature
- Temperature Unit Icon
- Week Days
- Hours
- Minutes
- Heating Icon
- Cooling Icon
- Low Batteries Icon
- Day Icon (comfort)
- Night Icon (cost-saving)
- 24-Hour Day Program
- Program MORN (morning) period
- Program DAY (day) period
- Program EVEN (evening) period
- Program NIGHT (night) period
- Time Setting Icon (TIME)
- Program Setting Icon (PROG)
- Setting Icon (SET)
- Vacations Icon (VACA)
- Temporary Mode Icon (HOLD)
- Manual Mode Icon
- Earlier Start Icon (EARLY)
- Anti-Freeze Function
- Confirmation Icon (OK)
- Spinning Fan Icon – Output Relay Switch
LED Indicators
Automatic Mode
During the automatic mode the red OUTPUT LED will light up when the output relay will be switched on by the thermostat.
Manual Mode
Press the MANU button, the red LED will light up.
To switch on the output relay press the OUTPUT button, the red diode will light up.
By pressing the OUTPUT button you will turn ON/OFF the device.
By pressing the MANU button you deactivate the manual mode, the LED will not be on.
Notice: If the power outage occurs at the receiver, the status before the outage will not be reestablished.
The receiver will be in the switched off status and will await another status change, coming from the transmitter.
THERMOSTAT SETTING
Press long – for 2 seconds – the OK button to access the menu of the thermostat. You can move in the menu by turning the thumb-wheel. To exit menu press the OK button for two seconds or select by the thumb-wheel the OK option and then press OK. Otherwise wait 15 seconds without pressing any button.
Selecting the Heating or Air Conditioning System/Switching off the Thermostat
By the thumb-wheel select the icon ![]() (heating/cooling) and press the OK button.
(heating/cooling) and press the OK button.
By the thumb-wheel select either HT for heating, CL for cooling, OF to switch off the thermostat.
Press OK to confirm and return to the main menu.
Hour and the Week Day Setting
By the thumb-wheel select the TIME icon and press OK button.
- By the thumb-wheel select the current weekday (Mo – Monday, Tu – Tuesday, We – Wednesday, Th – Thursday, Fr – Friday, Sa – Saturday, Su – Sunday) and confirm by pressing the thumb-wheel.
- By the thumb-wheel select hour and confirm by pressing the thumb-wheel.
- By the thumb-wheel select minute and confirm by pressing the thumb-wheel.
Press OK to confirm.
Program Selection
The thermostat enables to set two basic operating modes:
- 24-hour day program (set in hourly steps)
- The day program has 4 periods (morning, day, evening, night)
By the thumb-wheel select the PROG icon (with the illustration of the time line 0–24 hrs/4 periods: MORN – DAY –EVEN NIGHT) and press OK.
By the thumb-wheel select one program and confirm by pressing OK.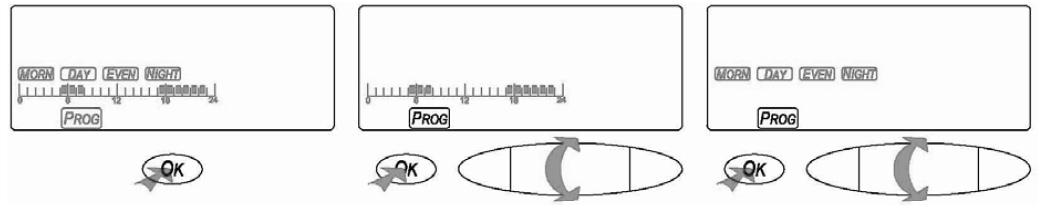
Temperature Setting for Day (Comfort) / Night (Cost-Saving) Mode
(This setting is active within the 24-hour day program only).
By the thumb-wheel select the icon ![]() day / night and press the OK button.
day / night and press the OK button.
By pressing the thumb-wheel you can switch over between the icon of sun (comfort temperature) and moon (costsaving temperature).
By turning the thumb-wheel you can set the temperature. Confirm by pressing OK or pressing the thumb-wheel.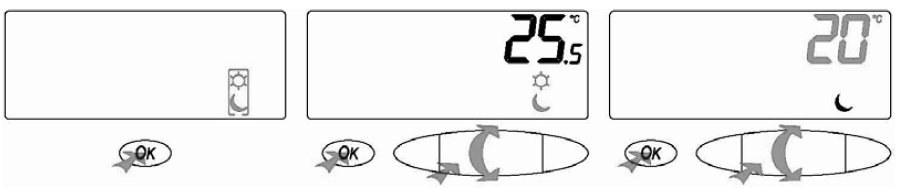
Manual Temperature Change
To change the mode within the 24-hour program you either press the thumb-wheel to select the preset temperature Day (comfort) / Night (cost-saving) or by the thumb-wheel you change the temperature to the desired level without switching over between the icons.
There will be an icon of hand on the display.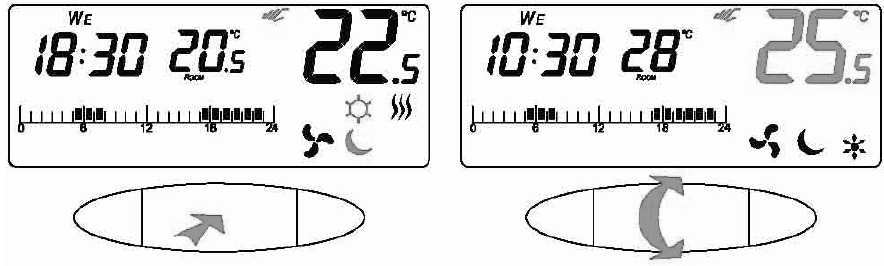
When having a day program divided into 4 periods, press the thumb-wheel and the other periods will start flashing, now by further pressing the thumb-wheel you switch over between the periods (morning, day, evening, night).
The chosen period (not flashing) confirm by pressing OK, otherwise wait a few seconds. You can change the temperature by turning the thumb-wheel.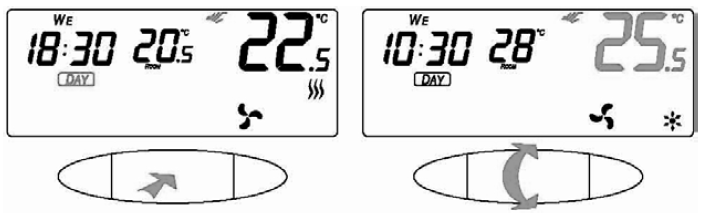
Program Setting
The program you chose will be applied (24 hrs. / 4-day periods)
24-Hour Day Program
To select a program withing the 24-hour cycle, by the thumb-wheel select the PROG icon and then press OK.
By the thumb-wheel set a day or a time interval, confirm by pressing OK.
It is possible to select:
- Monday – Sunday (Mo Tu We Th Fr Sa Su)
- Monday – Friday (Mo Tu We Th Fr)
- Saturday – Sunday (Sa Su)
or particular days, see the names of days in the program Monday – Sunday.
Now, set on the time line, when the thermostat should switch over into what desired temperature (day/night). By pressing the thumb-wheel you can switch over between the day (comfort) and night (cost-saving) temperatures. The flashing cursor starts at the zero hour on the time line, you can see this illustrated above the time line. From this 0 hour select a temperature (day/night) by pressing the thumb-wheel. Now, by the thumb-wheel set the switching time, hour by hour, for the particularly set temperature. The hours are read and the cursor moves on the time line.
To process the next temperature change (day/night) press the thumb-wheel again. Set the desired temperatures for all 24 hours. The day temperature displays as black pieces on the time line, the night temperature is without any pictured pieces. To exit setup and store the changes, confirm by pressing OK.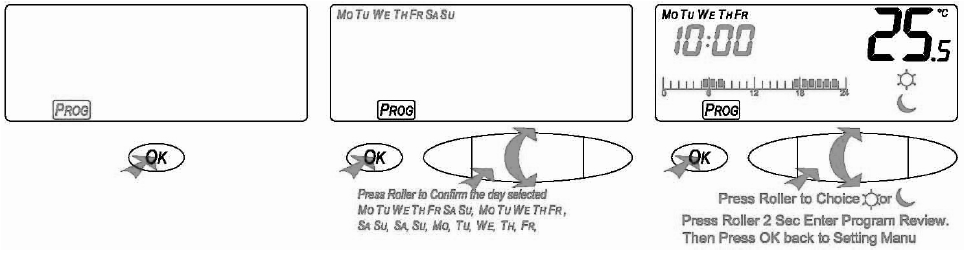
To check the setting within the 24-hour day program, by the thumb-wheel select the PROG icon and then press OK. Press and hold the thumb-wheel for 2 seconds. The rE will be shown on the display.
Now, by the thumb-wheel, you can change the days and you can check your setting for each day.
By pressing OK you will return to the main menu.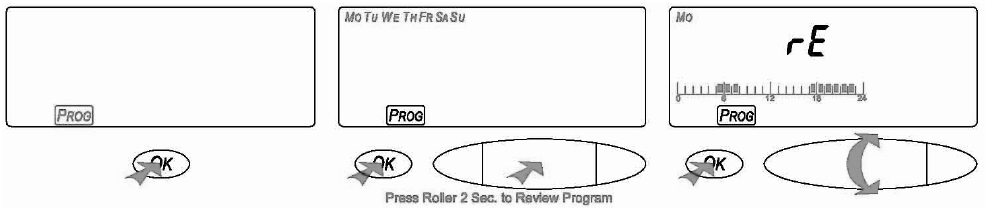
Day Program – 4 Periods
To set the program within the day 4-period program, by the thumb-wheel select the PROG icon and then press OK.
By the thumb-wheel set a day or a time interval, confirm by pressing OK.
It is possible to select:
- Monday – Sunday ( Mo Tu We Th Fr Sa Su)
- Monday – Friday (Mo Tu We Th Fr)
- Saturday – Sunday ( Sa Su)
or particular days, see the names of days in the program Monday – Sunday.
The icon MORN (morning) will start flashing and this you can set. By turning the thumb-wheel select a different period, to set morning (MORN), day (DAY), evening (EVEN), night (NIGHT).
Press the thumb-wheel, access the mode where you can set the time from when the selected period should start. After you set the hour, press the thumb-wheel and set the minutes and confirm by pressing the thumb-wheel again. After this the temperature setting will start flashing.
Set the temperature for possible cooling first (the snow flake icon), confirm by pressing the thumb-wheel.
Then set the heating temperature (the three flames icon) all for a particular period. By turning the thumb-wheel you access the setting mode of the next period (will start flashing). Use the same steps to set the next three periods. Confirm by OK.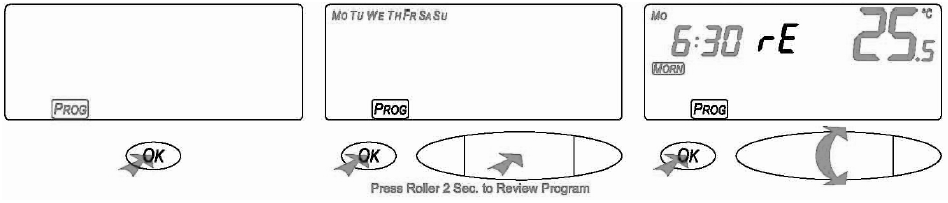
To check the setting within the day program – 4 periods, by the thumb-wheel select the PROG icon and then press OK. Press and hold the thumb-wheel for 2 seconds. The rE will be shown on the display.
Now, by the thumb-wheel, you can change the days and you can check your setting for each day.
By pressing OK you will return to the main menu.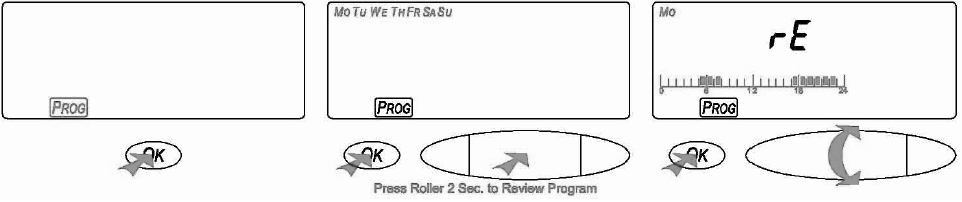
Contemporary Interruption of the Preset Program
Day program – 4 periods setting:
To activate a contemporary setting, by the thumb-wheel select the HOLD icon in the menu and press OK. By the thumb-wheel set the time in the range of 0–24 hours, in hourly steps.
By pressing OK you will return to the main menu.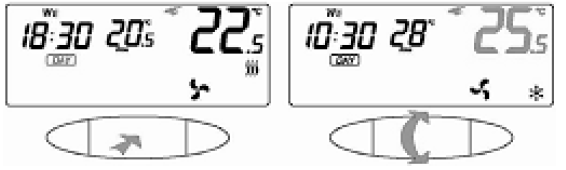
Then manually set by the thumb-wheel your preferred temperature.
Setting within the 24-hour day program
The temperature you want to preserve select manually before accessing the menu.
For the contemporary setting select by the thumb-wheel the HOLD icon and then press OK.
By the thumb-wheel set the time up to 24 hours, in hourly steps. The time starts to be counted from the current, real time. Setting is illustrated in the time line.
By pressing OK you will return to the main menu.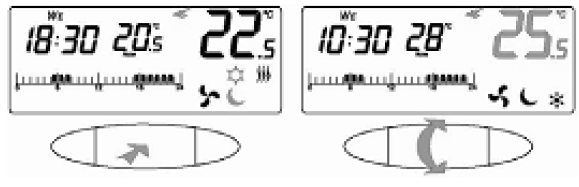
Then manually set by the thumb-wheel your preferred temperature.
Holiday Mode
Setting the Constant Temperature for a longer time period.
By the thumb-wheel select the VACA icon (setting a break) and then press OK.
By the thumb-wheel choose the break’s duration withing the rage from 0 – 99 days, one day tolerance. By pressing OK you will return to the main menu.
By the thumb-wheel you can then set the temperature which will be active for the whole holiday period.
Earlier Start
This system function enables to reach the desired temperature just before the temperature period’s beginning. This setting is enabled within the Day Program – 4 Periods only.
By the thumb-wheel select the ERLY (Earlier Start) symbol and press OK.
By the thumb-wheel set the earlier start ON or OFF.
By pressing OK you will return to the main menu.
Anti-Freeze Function
This system function enables to set the constant temperature of 5 °C.
- By the thumb-wheel select the snow flake icon
 and press OK.
 - By the thumb-wheel set the earlier start ON or OFF.
- By pressing OK you will return to the main menu.
You can combine this function with the Holiday mode.
In this case it is not possible to set a different temperature but 5 °C.
Thermostat Setting Tolerance
- Thermostat hysteresis setting (dF)
- Thermostat delay setting (dL)
- Thermostat’s surrounding temperature calibration (TP)
By the thumb-wheel select the SET icon (setting) and press OK.
Thermostat Hysteresis Setting (dF)
Hysteresis is a temperature difference between the intervals, heating ON and heating OFF modes. E. g. when you set the temperature to 20 °C, variance to 0.5 °C, the heater starts working and when the room temperature falls down to 19.5 °C and switches off when the temperature reaches 20,5 °C.
By the thumb-wheel select the (dF) icon and press the thumb-wheel.
By the thumb-wheel set the hysteresis in the range of 0.5 – 2 °C, in 0.5 °C steps,
confirm by pressing OK and hence you will again access the preset mode.
To return to menu press OK again.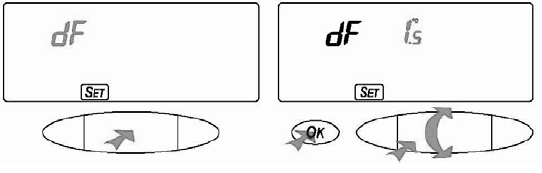
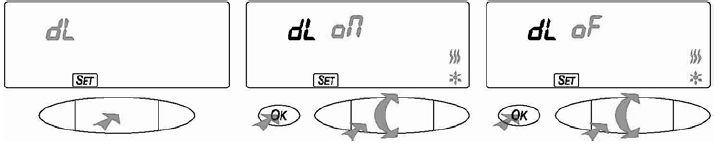
Thermostat Delay Setting (dL)
This function will delay the start about 5 minutes.
By the thumb-wheel select the (dL) icon and press the thumb-wheel.
By the thumb-wheel set on/off.
By the thumb-wheel you can switch over between heating/cooling modes or both (we recommend to set the same way for both modes).
Confirm by pressing OK and hence you will again access the preset mode.
To return to menu press OK again.
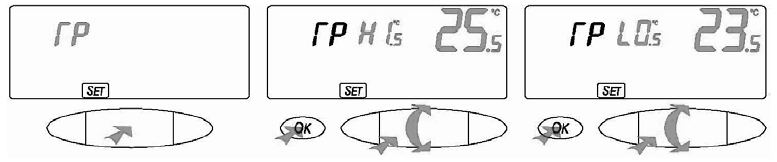
Thermostat’s Surrounding Temperature Calibration (TP)
The thermometer has been calibrated during its production process, however, to optimize it, it is possible to perform the calibration e. g. according to some reference thermometer.
It is possible to do the thermostat’s temperature calibration in the range of -2.5 (L) to +2.5°C (H).
By the thumb-wheel select the (TP) symbol and press the thumb-wheel.
By the thumb-wheel set the required current surrounding temperature which will be shown in the right part of the display.
Low Batteries
When the batteries are low in the thermostat, the following symbols starts flashing on the display![]() . Change the batteries.
. Change the batteries.
ATTENTION: The content of this instruction manual may be changed without a prior notice – due to the limited printing options, the displayed symbols may slightly differ from the illustrations on the display. The content of this instruction manual cannot be multiplied without a prior producer’s consent.
The company Emos spol.s r.o. declares that the T13RF + receiver has been issued a declaration of conformity
with the basic requirements and further relevant provisions of the 2014/53/EU standard. This device may
be freely used within the EU countries. The declaration of conformity is the part of the instruction manual, otherwise it is possible to find this on the following web pages: http://shop.emos.cz/download-centrum.
Reference
Download manual:
EMOS T13RF WIRELESS THERMOSTAT Installational Manual
Leave a Reply