
Delta Dore 8000 MASTER Wireless Programmable Thermostat

DESCRIPTION
Use

- Shutdown mode
- Manual mode
- Auto mode
- Absence mode Settings
- Date and time settings
- Programming Installation
- Configuration
Standby mode:
When left idle for a given period of time, the product switches to standby. To wake the product, press any button or turn the selector know.
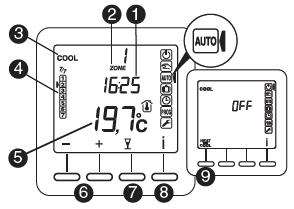
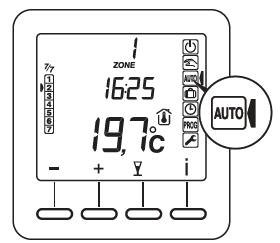
- Time
- Relevant zone
- HEAT or COOL mode for reversible installation
- Day
- Measured room temperature in the zone or temperature setting
- Adjustment buttons
- ‘Party’ mode
- Information mode
- Heat/Cool button
 Measured temperature
 Door/window magnetic contact
- Steady = mode active
- Flashes = detection in progress
 Keypad locked
HEAT/COOL button: appears in OFF mode, according to the system’s configuration. Press and hold the button to switch from one mode to another.
From the![]() or
or![]() modes. The information button ( i shows the following information:
modes. The information button ( i shows the following information:
- For each zone, measured room temperature or current temperature setting (according to configuration), Use + and – to select the zone.
- Outdoor temperature (if an outdoor sensor is associated with at least one zone),
Successively press the![]() button to display this information. Press
button to display this information. Press![]() or wait 10 seconds to exit the view mode.
or wait 10 seconds to exit the view mode.

SETTING THE CLOCK
- Turn the selector knob to

- Set the year with + and – and confirm with OK.
- Set the day and month with + and – and confirm with OK
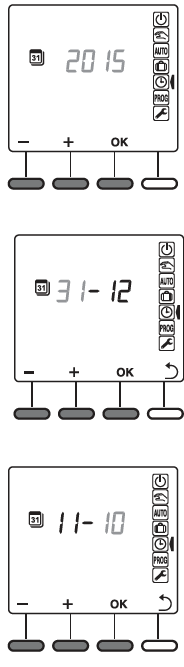
- Set the hour value with + and – and confirm with OK
- Set the minutes value with + and – and confirm with OK.
- Back to the AUTO, Manual or Shutdown mode.
Press![]() to return to the previous setting. You can decide not to use the calendar function (no automatic changeover between summer and winter). In this case, when you select the year, select ‘-.-‘.
to return to the previous setting. You can decide not to use the calendar function (no automatic changeover between summer and winter). In this case, when you select the year, select ‘-.-‘.
PROGRAMMING
Programming involves changing different temperature settings for each day of the week and for each zone (Heat: +5°C to +30°C, Cool: +16°C to +35°C) according to requirements. You can programme 1 to 7 temperature setting changes. For a reversible installation, you have two separate programming operations in HEAT and COOL mode (according to the active mode).
Example:
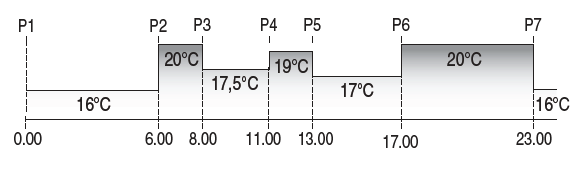
- Turn the selector knob to
 , select the zone, then the day to programme with + and -. At this point, initialisation is recommended by pressing ‘-‘ for 3 seconds. Then confirm with ОК
 - Set the temperature value at 0.00h (e.g.: 16°C), and confirm with OK.
- Set the time for the next temperature change (e.g: 6h), and confirm with OK.
- Set the temperature you want at 6 o’clock (e.g.: 20°C, and confirm with OK.
- Set the time for the next temperature change (e.g: 8h), and confirm with OK.
- Set the temperature you want at 8 o’clock (e.g.: 17.5°C, and confirm with OK.

Repeat these operations as many times as necessary. To close and save the day’s programming, press![]() . The day cursor flashes. Press + to switch to the next day and repeat the operations above (or COPY function). To exit the programming mode, turn the selector knob. Automatically returns to the AUTO, Manual or Shutdown mode after a 30-second time-out.
. The day cursor flashes. Press + to switch to the next day and repeat the operations above (or COPY function). To exit the programming mode, turn the selector knob. Automatically returns to the AUTO, Manual or Shutdown mode after a 30-second time-out.
COPY function: When choosing the zone or day, pressing ‘+’for 3 seconds copies the programming for the current zone or day to the next zone or day.
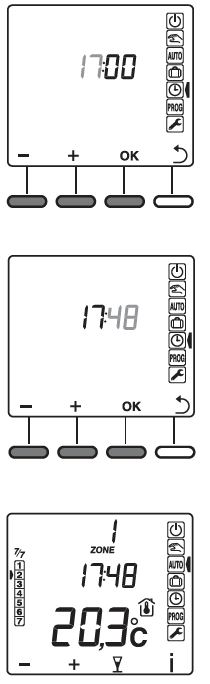
AUTO MODE
In AUTO mode, the programmer follows the daily programme for each zone. The automatic programme can be temporarily suspended by:
- A temporary modification of the temperature setting, from a zone, to the next programme change. In this mode, the
 a symbol indicates the current override.
 - A ‘Party Mode’ (
 ) override, which enables a specific temperature setting to be applied to a zone over an adjustable period from 30 minutes to 12 hours.
 - Window magnetic contact, if the function is activated at the zone thermostat level (CF06). The heating will then switch to Frost Protection mode (7°C).
- The different zones are displayed by pressing + and -.
- If the screen shows’-°C, the zone’s thermostat is in Shutdown mode.
MANUAL MODE
This mode sets a temperature setting for an undetermined period of time (in all zones simultaneously).

- Turn the selector knob to
- Use + and – to set the temperature setting. Confirm with OK.
To exit this mode, turn the selector knob.
The Manual mode can be suspended by:
- A ‘Party Mode’ () override, which enables a specific temperature setting to be applied to one or all the zones over an adjustable period from 30 minutes to 12 hours.
- Display of’- instead of the temperature setting if this is different from one zone to another
PARTY MODE
The ‘Party’ mode temporarily suspends the automatic (or manual) programme for a zone by applying a selected temperature setting over a programmed period (30 minutes to 12 hours).
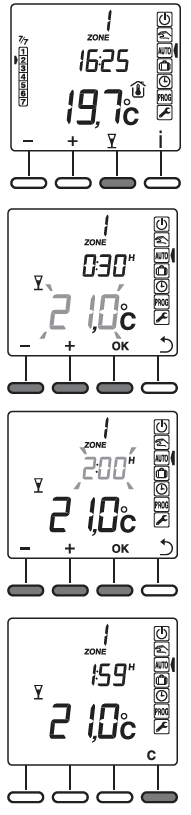
- From the (AUTO (or Manual) mode, press .
- Use + and – to select the zone required. Confirm with OK.
- Set the required temperature setting with + and – (e.g. 21°C). Confirm with OK.
- Set the required duration (e.g.: 2h). Confirm with OK. Countdown starts.
At the end of the countdown the AUTO (or Manual) mode will be activated. Press C or turn the selector knob to exit the active mode.
A symbol![]() is displayed on the screen of the thermostat whose zone is in ‘Party’ mode.
is displayed on the screen of the thermostat whose zone is in ‘Party’ mode.
ABSENCE MODE
This mode protects your home from frost if you are absent for several days (from 1 to 365).
Example: Away on Friday 10 – Back on Sunday 19, programme 9 days of absence.
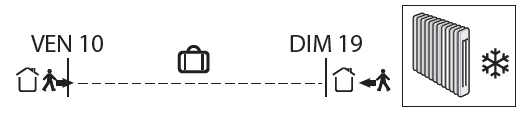
- Turn the selector knob to

- Use + and – to set the number of days of absence. Confirm with OK.
- Countdown starts. At the end of the countdown, the AUTO (or Manual) mode and settings are opened.
To exit the active mode, turn the selector knob. If at least one zone is in Shutdown mode, the screen will not display ‘ALL’, but the zones that are in Absence mode. Display with ‘+’ and’
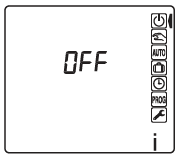
OFF MODE
Press ![]()
In this mode, heating is shut down. Only the Information button ( i) is active. Turn the selector knob to exit the shutdown mode. Depending on the installation’s configuration, the HEAT/COOL button may be displayed.
LOCKING DOWN SETTINGS
- From the
 or modes
 - Press and hold the ‘I’ button for 5 seconds. The symbol appears.
- In Lock mode, only the Information button (i) is active.
- To unlock, press and hold the i button for 5 seconds. The symbol disappears.

TROUBLESHOOTING
When a defect is detected on the system, the symbol![]() flashes on the programmer display. Press ‘i’ to display the type of defect.
flashes on the programmer display. Press ‘i’ to display the type of defect.
Error messages
| |
Wireless defect of at least one door/window magnetic contact associated with the system |
| |
Wireless defect of at least one motion detector associated with the system |
| |
Battery defect of at least one door/window magnetic contact associated with the system |
| |
Battery defect of at least one motion detector associated with the system |
| |
Internal sensor shorted on at least one thermostat (*) |
| |
Internal sensor cut off on at least one ther- mostat (*) |
| |
Fault in outdoor sensor associated with the system |
| |
At least one hard-wired thermostat (Bus) of the system is no longer detected (*). |
| |
At least one wireless thermostat (X3D) of the system is no longer detected (*). |
(*) Check the zone thermostats.
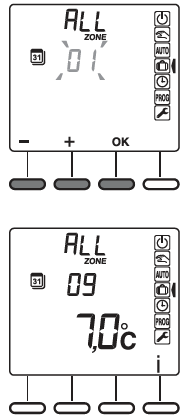
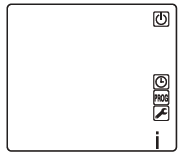
Stop on all zones :
if the programmer displays the screen opposite then the system’s thermostats are in shutdown mode
Reference
Download Manual:
Delta Dore 8000 MASTER Wireless Programmable Thermostat User Guide
Other Manual:
Delta Dore 8000 MASTER Wireless Programmable Thermostat Installation Instructions
Delta Dore 8000 MASTER Wireless Programmable Thermostat User Guide
Leave a Reply