
Breeze33 BZ33-201NP Non-Programmable Thermostat
Wall locations
The thermostat should be installed approximately 4 to 5 feet above the floor. Select an area with average temperature and good air circulation
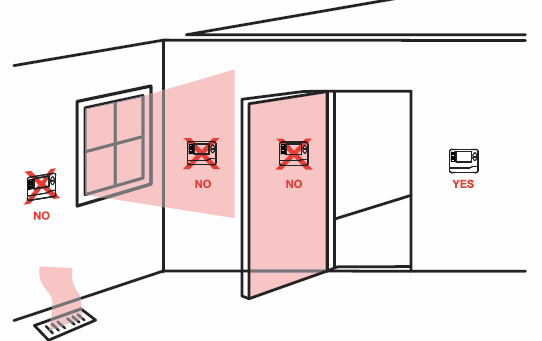
Do not Install thermostats In locatlons:
- Close to hot or cold air ducts
- That are in direct sunlight
- With an outside wall behind the thermostat
- In areas that do not require conditioning
- Where there are dead spots or drafts On comers or behind doors)
- Where there might be concealed chimneys or pipes
Subbase Installation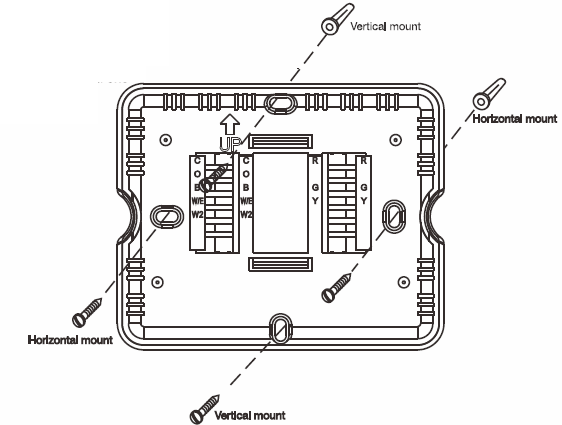
Wiring
- Tum Off Power to Healing/Cooling System

- Remove the Old Thermostat
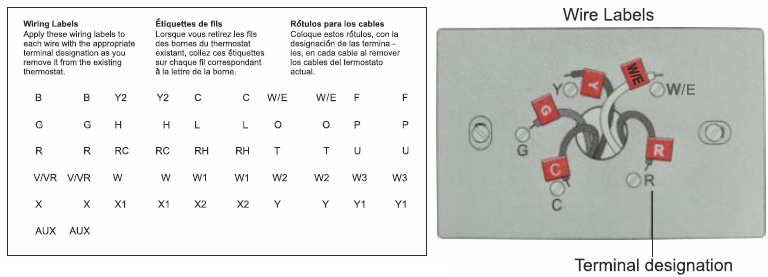
- Label wires with Tags
- Separate Wallplate from the new thermostat Remove Wallplate from the new thermostat and mount into well

- Mount the new wallplate using the included screws and anchors
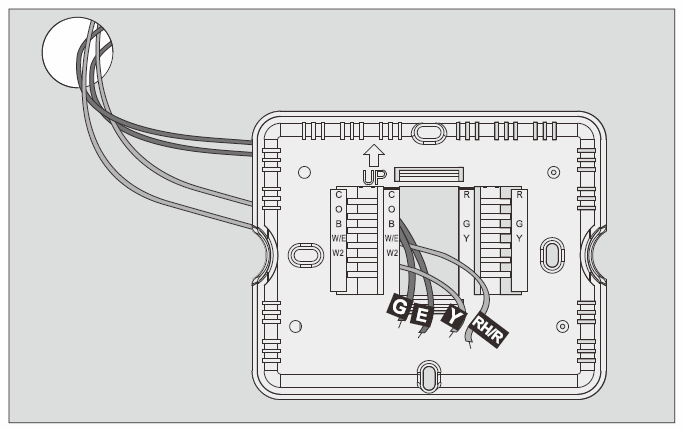
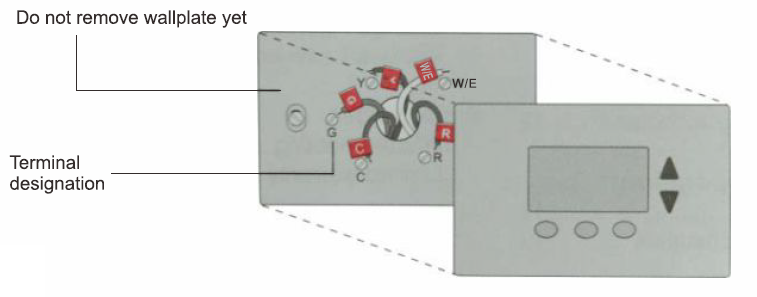
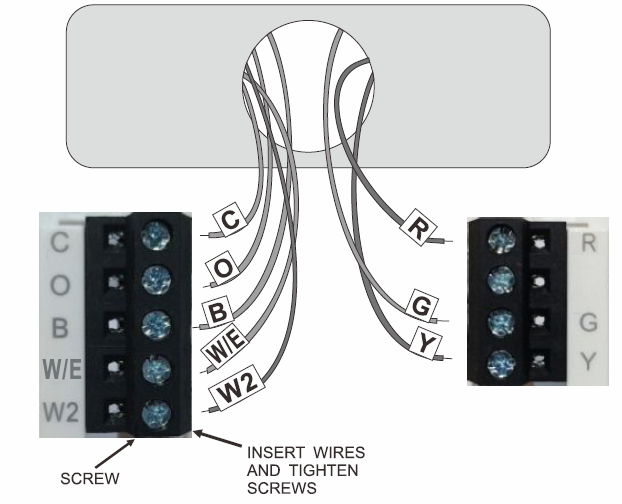
Connect Wires
Simply malt:h wi111 labels. If labels do not match the letters”‘ on the thermostat, check ‘Allamata Wiring (Conventional Systama)” on – 9 and connect tc terminal BB shown (sea 1111U18, below).
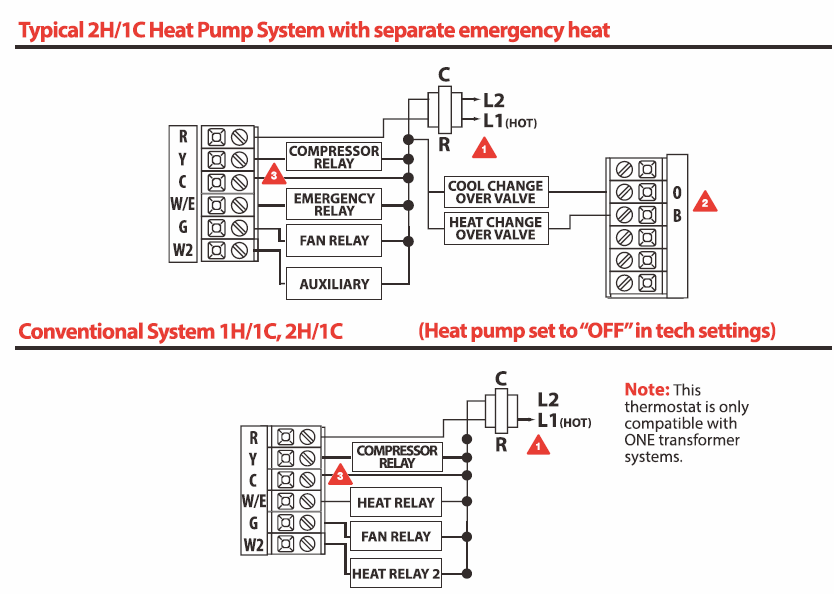
Alternate Wiring (Conventional Systems)
If labels do not match the letters on the thermostat, check the chart below and connect to the terminal as shown here (See notes, below).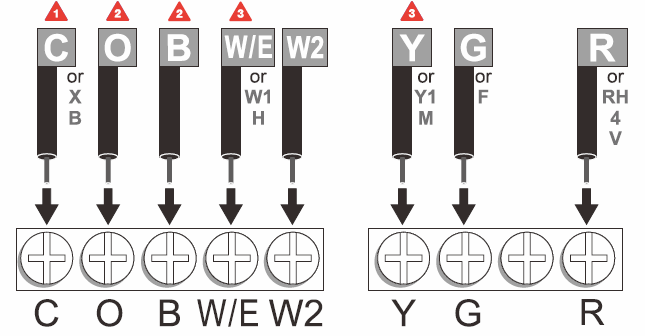
Terminal Designation
- Power supply
- Use either O or B terminals for the changeover valve
- Optional 24 VAC common connection when the thermostat is used in battery power mode.
- Jumper (not supplied
Wiring Diagram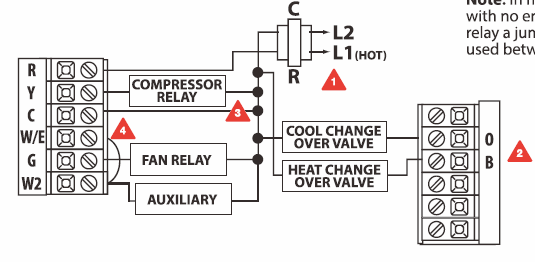
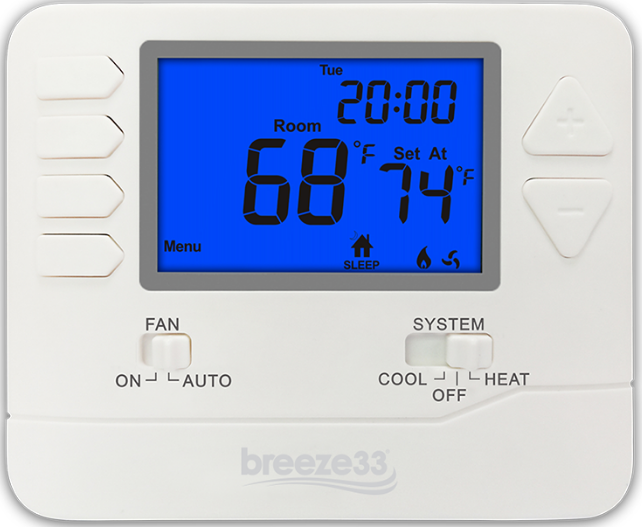
Thermostat Operation
- LCD Display
- Fan Switch
- System Switch
- Temperature Setpoint Buttons
- User Buttons
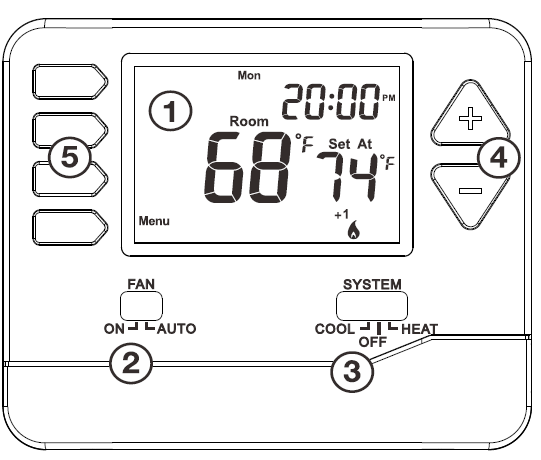
LCD Display
See page 15 for details about this display read out.
Fan Switch
Select ON or AUTO. ON will run the fan continuously. AUTO will cycle the fan on only when the heating or cooling system is on.
System Switch
Selects the operation mode on your HVAC system. Selecting HEAT turns on the heat mode. Selecting COOL turns on the cool mode. Selecting OFF turns both heating and cooling off.
Temperature Setpoint Buttons
Press the + or – buttons to select the desired room temperature.
User Buttons
Use these buttons to set up your options. Refer to the next page for detail.
Thermostat Quick Reference
Battery Door Information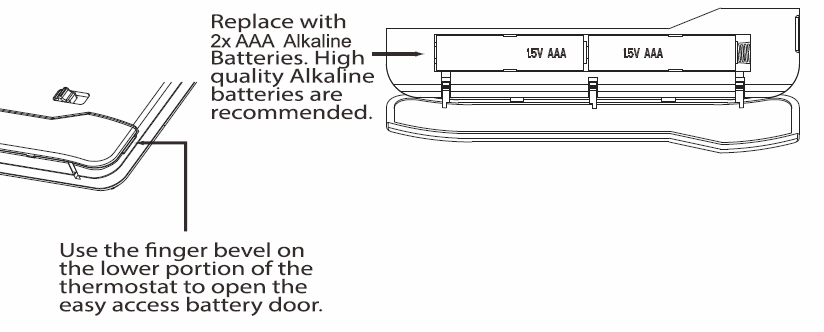
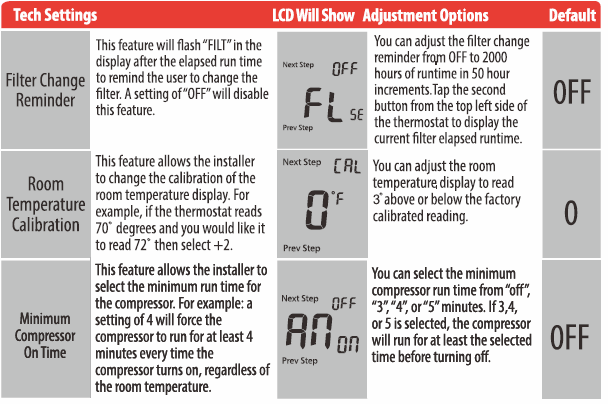
Filter Change Reminder
If your HVAC contractor has configured the thermostat to remind you when the air filter needs to be changed, you will see FILTER in the display when your air filter needs to be changed. Resetting the filter change reminder:When FILTER reminder is displayed; you should change your air filter and reset the reminder by holding down the secona button from the top left side of the thermostat for 3 seconds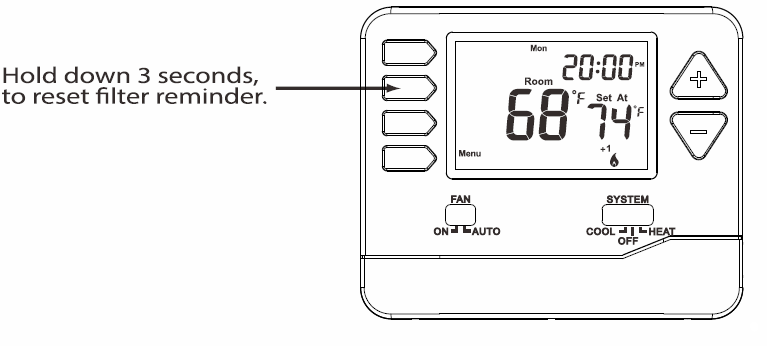
SetTime
- Press the MENU button
- Press SET TIME
- The day of the week will be flashing. Use the
 key to select the current day of the week.
 - Press NEXT STEP
- The current hour is flashing. Use the key to select the current hour. When usinQ 12-hour time, make sure the correct a.m. or p.m. choice 1s selected.
- Press NEXT STEP
- Minutes are now flashing. Use the key to select current minutes.
- Press DONE when completed
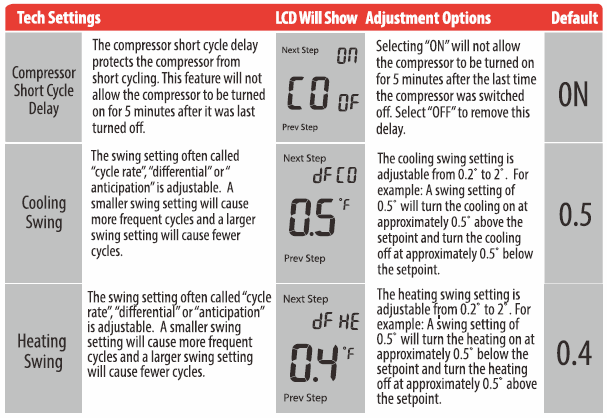
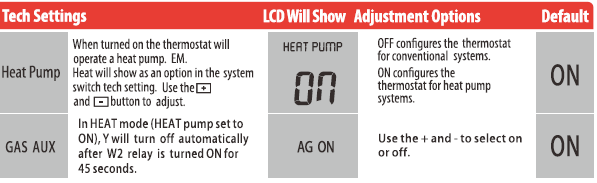
Menu
- Press MENU button.
- Press and hold TECH SET button for 3 seconds.
- Configure the installer options as desired using the table below.
- Use the+ OR – keys to change settings and the NEXT STEP or PREV STEP key to move from one option to another.
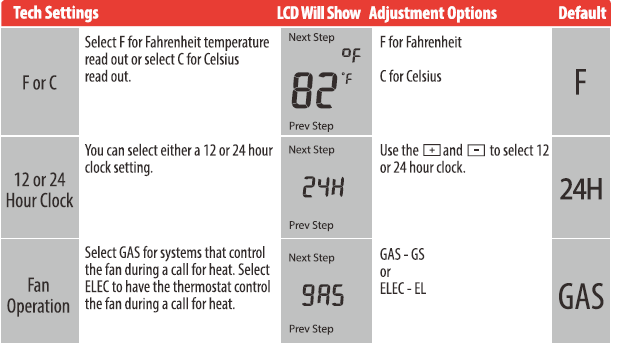
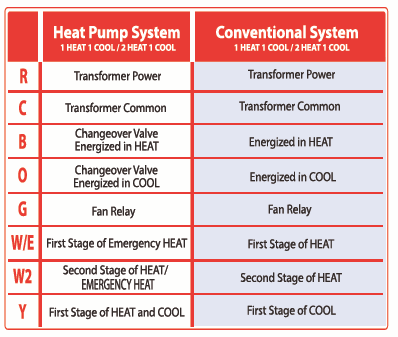
Terminal Designations
- W2 ——— Auxiliary heat relay
- Y —- Compressor relay
- G —Fan relay
- O—Heat pump changeover valve energized in cooling
- R —Transformer power
- C —Common wire from system transformer
- B —- Heat pump changeover valve energized in heating
- W/E——— Emergency heat relay
Warranty
Breeze33 Products LLC (Breeze33) warrants to the ORIGINAL PURCHASER that its thermostats shall be free from defects in material and workmanship under normal use and service for a five (5) years. This warranty cannot be transferred – it is extended only to the original Purchaser or First User of the Product. By accepting and keeping this Product you agree to all of the warranty terms and limitations of liability described below. Breeze33’s obligations under the warranty set forth above shall be to replace any Breeze33 Thermostat which is defective.
WHAT IS NOT COVERED?
The warranty above does not cover and Breeze33 is not liable for, (i) installation, (ii) any labor charges or (iii) products which have been damaged as a result of any accident, misuse, abuse, neglect, improper installation or maintenance, the use of abrasive or organic solvent cleaners, modification, failure to use the register, grille, or diffuser in accordance with instructions provided by Breeze 33.
HOW TO OBTAIN WARRANTY SERVICE
Contact our warranty department at 740-314-4404 to report the defect. Return failed product with proof of purchase,your name, and address within 30 days offailure to:
- Breeze33 Products LLC
- 350 Courtney Road Sebring,
- Ohio 44672 USA
LIMITATION OF LIABILITY
Breeze33’s liability on any claim of any kind, including, without limitation, warranty, negligence and/or breach of contract, shall in no case exceed the purchase price paid by the Customer. IN NO EVENT SHALL BREEZE33 BE LIABLE FOR ANY SPECIAL, INCIDENTAL, CONSEQUENTIAL (INCLUDING, WITHOUT LIMITATION, DAMAGE TO PROPERTY) OR PUNITIVE DAMAGES, DAMAGES IN THE NATURE OF PENALTIES OR SIMILAR OR RELATED DAMAGES OF ANY KIND.
DISCLAIMER OF WARRANTIES
BREEZE33 EXPRESSLY DISCLAIMS ALL WARRANTIES, EXCEPT AS EXPLICITLY STATED HEREIN, TO THE FULLEST EXTENT PERMITTED BY LAW, WHETHER WRITTEN, ORAL, EXPRESS OR IMPLIED, INCLUDING ANY WARRANTY OF PERFORMANCE, MERCHANTABILITY, FITNESS FOR A PARTICULAR PURPOSE, AND NON INFRINGEMENT. THIS DISCLAIMER INCLUDES ANY ORAL WARRANTIES OR REPRESENTATIONS MADE OR IMPLIED BY ANY AGENT, EMPLOYEE, SUBCONTRACTOR, MANAGER, DIRECTOR AND/OR REPRESENTATIVE OF BREEZE33.
REFERENCE:
DOWNLOAD MANUALS:
Breeze33 BZ33-201NP Non-Programmable Thermostat Installational Manual
![]()
Breeze33 BZ33-201NP Non-Programmable Thermostat Installational Manual
Leave a Reply