
bnthermic PROSTAT2 PROGRAMMABLE ROOM THERMOSTAT
Thank you for purchasing a BNThermic product. Manufactured to a high standard, this product will, if used according to these instructions and properly maintained, give you years of trouble free performance. Please ensure instructions remain with your customer for their reference.
REGISTER: PLEASE REGISTER THIS PRODUCT ONLINE TO ACTIVATE YOUR GUARANTEE AT www.bnthermic.co.uk
IMPORTANT: PLEASE READ THESE INSTRUCTIONS, NOTE THE SAFE OPERATIONAL REQUIREMENTS, WARNINGS, AND CAUTIONS. USE THIS PRODUCT CORRECTLY, AND WITH CARE FOR THE PURPOSE FOR WHICH IT IS INTENDED. FAILURE TO DO SO MAY CAUSE DAMAGE AND/OR PERSONAL INJURY AND WILL INVALIDATE THE WARRANTY.
USER INSTRUCTIONS
For installation instructions.
INTRODUCTION & SPECIFICATION
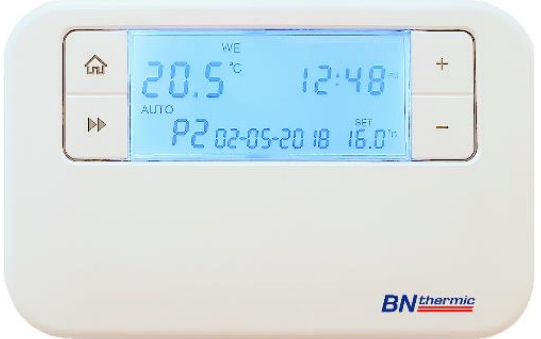
The PROSTAT2 Thermostat is an easy-to-install and use 7 Day, 5/2 Day or 24 Hour Programmable Room Thermostat which offers four or six time and temperature changes each day, with different programmes available for weekdays and for weekends. It is designed to provide automatic time and temperature control of heating systems. A large backlit LCD screen and easy-to-use function buttons ensures simplified programming and operation for all users.
The Thermostat includes special features designed to save you energy. These features are factory set to be OFF to enable the user to choose whichever features are preferred.
Specification
| PROSTAT2 – Programmable Room Thermostat | |
| Programming | 7 Day, 5/2 Day & 24Hr |
| Power Supply | 2 x 1.5V Lithium Batteries (type: AA size) Supplied |
| Temperature Sensor Type | +/- 1°C at 20°C |
| Temperature Adjustment Range | 5°C to 35°C |
| Total Switch Rating | 6(2)A 230VAC |
| Contact Type | SPDT (Volt Free changeover contacts) |
| Plastic | Thermoplastic, flame retardant |
| Number of Programs | 4 or 6 (Default: 4) |
| Number of Events per Day | 4 – 6 |
| Factory Pre-Set Programme | Yes |
| BST/GMT Time Change | Automatic |
| Dimensions | 127mm(L) x 81mm(W) x 28mm(D) |
| Protection Rating | IP30 |
| Complies with: | EN60730-1 EN 60730-2.7, EMC Directive 2014/30/EU, LVD Directive 2014/35/EU |
Special Features
Delayed Start
Thermostats with the Delayed Start function have been shown to reduce heating costs by as much as 10%. This feature delays the start-up of the heating, depending on how warm the room temperature is at the time when the heating is due to come on.
The heating start can be delayed for up to 45 minutes if the room is already relatively warm, when the weather is milder for example. This often reduces how long the heating is on per day, with no comfort loss, saving you energy and money! The Delayed Start feature can be fully automated and needs no extra programming.
Optimum Start
The Optimum Start function adjusts the starting time for the heating according to the temperature measured within the room / building. Instead of setting an arbitrary time for the heating to come on, you programme the time that the room / building should be at the desired temperature. Up to 10% of energy costs can be saved, as the warm up time is automatically reduced according to the ambient temperature. Many users set their heating to start a couple of hours before use to warm up the room / building. With the Optimum Start function you don’t need to do this. The actual start time is automatically delayed or advanced to ensure your room / building reaches the set temperature by the programmed time. The Optimum function is designed to work on rooms / buildings that do not have a through put of people and doors or windows being opened regularly before the heating period.
Optimum Stop
Optimum Stop saves energy by switching the heaters off a little earlier than the programmed OFF time. If the room / building is up to temperature. We only recommend trying this option if you are using radiant panel or cassette heaters (Models – ESP2 or RP) you should not notice the effect on the temperature but you should see a slight difference in your energy bill.The following options are available BUT are only of use if using the thermostat with a gas boiler.
Chrono proportional Control (TPI)
Only if thermostat is used with a gas boiler
Chrono proportional control is a load compensator as it ensures that the boiler ‘ON’ time is reduced to a minimum and matches the boiler heat output with the heat loss. This reduces the net temperature of the return water to the boiler. This is due to the TPI (Time Proportional and Integral) advanced energy saving feature. Rather than just a simple ON/OFF control, like other domestic room thermostats, room thermostats with TPI increase boiler efficiency by firing the boiler at regular intervals, adjusting firing duration with demand, to maintain set room temperatures.
Landlord Service
Only if thermostat is used with a gas boiler. DON’T USE ON ELECTRIC SYSTEMS. The optional Landlord Service safety feature offers protection for tenants and landlords against illegal boiler negligence (in compliance with Gas Safety Regulation 36). 30 days before the boiler is due to be serviced, the LCD will display SER. If the annual maintenance is not carried out before the 30 days, the system will only run for a pre-determined number of minutes per hour before turning off.
QUICK OPERATING GUIDE
 Home (takes you back to home screen)
 (moves you to next option within a function)
- Temporary Override/Settings Adjustment
- Accepts/Confirms selection in functions/AIl Day Mode
- copy (COPY)
 Holiday Mode
- Sets Time and Date
- Selects and adjusts Programme (PROG)
- Places Thermostat into Frost Protection Mode (OFF)
- Places Thermostat into Manual Mode (MAN)
- Runs Programme (AUTO)
- Reset
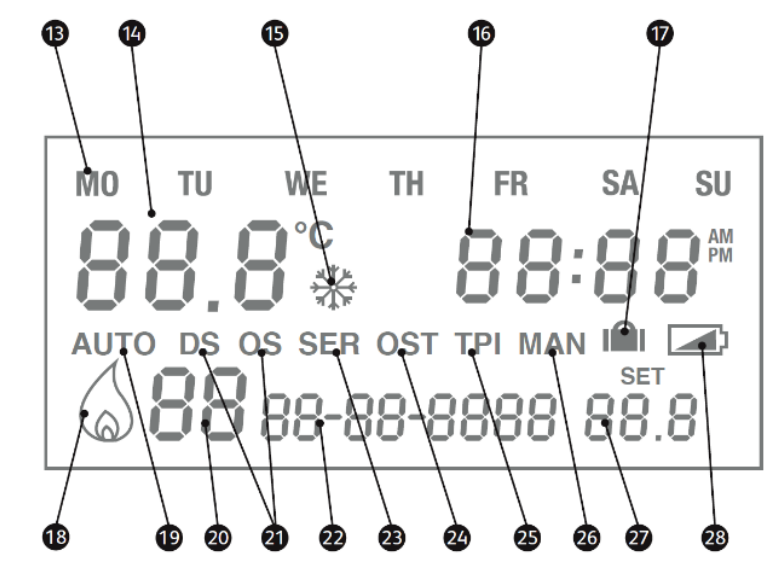
- Day Display
- Room Temperature
- Frost Protection Mode
- Time Display (12 hour AM/PM or 24 hour)
- Holiday Mode symbol
- Flame symbol when system calling for heat
- Operation Mode symbol & Auto Mode symbol
- Programme Events Display & All Day symbol.
- Delayed Start (DS) Optimum Start (OS) is active
- Date (DD-MM-YYYY)
- Annual Service is due (SERV)
- Optimum Stop (OST) is active
- TPI is active
- Manual Mode symbol
- User Set Temperature
- Low Battery Warning
FACTORY PRE-SET PROGRAMMES
This Programmable Room Thermostat has been designed to be a simple-to-use thermostat, requiring minimal user intervention with a pre-programmed heating profile. The pre-set heating times and temperatures will suit most people (see table below). To accept the factory pre-set program, move the slider to AUTO which will revert the thermostat to Run Mode (the colon (:) in the LCD display will begin to flash).
Pre-Set Temperatures: 5/2 Day
| Mon – Fri | Sat & Sun | Mon – Fri | Sat & Sun | |||||||||||
| 4 Events | Time | Temp ⁰C | 4 Events | Time | Temp ⁰C | 6 Events | Time | Temp ⁰C | 6 Events | Time | Temp ⁰C | |||
| 1 | 06.00 | 20 | 1 | 07.30 | 20 | 1 | 06.00 | 20 | 1 | 07.30 | 20 | |||
| 2 | 08.00 | 15 | 2 | 09.30 | 20 | 2 | 08.00 | 15 | 2 | 09.30 | 20 | |||
| 3 | 17.00 | 21 | 3 | 16.30 | 21 | 3 | 12.00 | 15 | 3 | 11.30 | 20 | |||
| 4 | 22.00 | 15 | 4 | 22.30 | 15 | 4 | 14.00 | 15 | 4 | 13.30 | 20 | |||
| 5 | 17.00 | 21 | 5 | 16.30 | 21 | |||||||||
| 6 | 22.00 | 15 | 6 | 22.30 | 15 | |||||||||
Pre-Set Temperatures: 7 Day
In 7 day setting, the pre-set settings are the same as the 5/2 Day programme (Default 4 events).
Pre-Set Temperatures: 24 Hours
In 24hr setting, the pre-set settings are the same as Mon-Fri of the 5/2 Day programme (Default 4 events).
NOTE:- To change the number of events per day from 4 to 6 or 6 to 4 see Section 19 “SETTING PRE-SET PROGRAMMES”.
SETTING THE OPERATION MODE (5/2 DAY, 7 DAY OR 24 HOUR)
- Switch the slider to PROG.
- Press +/– buttons to move between 7 day, 5/2 day or 24hr operation.
5/2 Day operation is shown by MO, TU, WE, TH, FR flashing (5 Day) and then SA, SU flashing (2 Day). 7 Day operation is shown by just one day flashing at a time.
24 hr operation is shown by MO, TU, WE, TH, FR, SA, SU flashing at the same time. - Wait 15 seconds to automatically confirm and return to Run mode or press Next Programme’.
SETTING THE PROGRAMME
- Choose between 5/2 day, 7 day or 24 hr operation (see above steps 1-2).
- Press the button. The time will flash and P1 will be displayed (the 1st temperature event).
- Press +/– to set the time (10 minutes increments). Press thebutton and the temperature will flash.
- Press +/– to set the temperature (increments of 0.5°c). Press thebutton to go to the next time temperature event (e.g. P2).
- Repeat steps 3 – 4 for all temperature events.
- Press A to accept/confirm temperature events and move to the next day / block of days.
- Repeat steps 3 – 6 until all days have been set. Then wait 15 seconds to automatically confirm and return to run mode or press the Home button.
ALL DAY SETTING
- Switch the slider to AUTO.
- Press the A button under the fascia. The display will now show AL (All Day).
- Press the +/– button to set the temperature (increments of 0.5°c).
- The mode will quit by 00.00 that day. Press the Home button to cancel and return to Auto Mode.
PERMANENT MANUAL OVERRIDES
- Switch the slider to MAN. MAN will appear in the display.
- Press +/– to adjust the temperature to the desired setting. This will set a constant temperature 24hrs a day.
- Switch the slider to AUTO to revert back to Auto mode.
TEMPORARY MANUAL OVERRIDES
- To temporarily override the Programmable Room Thermostat status or temperature press the +/– buttons. The Programme Events Display (e.g. P1) will no longer be shown.
- Press the + button to increase the set temperature in increments of 0.5°c and / or press the – button to decrease the set temperature in increments of 0.5°c.
- Once the desired temperature is reached (and after approx. 6 seconds) the time display will be replaced by a display indicating the time left to the next programme (the length of time the temporary override will run, if left unhindered) and the display then alternates between the time left and the current time. When the next ON / comfort programme is arrived at, the temporary override will end and Auto mode is reactivated.
- Press the Home button to cancel this function and reactivate Run mode.
HOLIDAY MODE
Holiday Mode saves energy by letting you reduce the temperature for 1 to 99 days while you are away from home, resuming normal operation on your return.
To set the Holiday Mode:
- Make sure the Programmable Room Thermostat is in Auto mode. Press the H button, underneath the fascia and the suitcase symbol will appear on the display and the number of days will flash.
- Press +/– to set the number of days you will be away.
- Press the button and the temperature will flash. Press +/– to set the desired temperature.
- Press the t or Home button or wait 15 seconds to automatically confirm.
- The number of days chosen will alternate with the time symbol on display and the number of days will count down.
- Once the countdown has finished the thermostat will return to normal operation. It may be advisable to set the Holiday Mode 1 day less so the house is back up to temperature for your return.
- To cancel the Holiday Mode setting or to exit the function at any time, press the Home button to revert back to Run mode.
FROST PROTECTION
This function is provided as an option if it is desirable to turn the heating off permanently. It is usually used in summer.
To set the Frost Protection Mode:
- Switch the slider to OFF to enter the Frost Protection Mode. The display will show the frost protection snowflake symbol and the set temperature will be 5°C.
- Switch the slider to AUTO to exit Frost Protection Mode and revert to AUTO mode.
SETTING THE TIME AND DATE
The time and date are factory set so it will not normally be necessary to do this on site. Changes between summer and winter time are handled automatically by the unit.
- Switch the slider to Time / Date. The hour symbols will flash, use + or – to adjust.
- Press the button and the minute symbols will flash, use + or – to adjust.
- Press the button and the day date will flash, use + or – to adjust the day.
- Press the button and the month date will flash, use + or – to adjust the month.
- Press the button and the year date will flash, use + or – to adjust the year.
- Press the button and choose between 12hour or 24hour clock by using the + or – buttons.
- Press the or Home button or wait for 15 seconds to automatically confirm and return to Run mode.
USING THE COPY FUNCTION
The unit is provided with a copy function which allows an adjusted programme to be copied to another day or set of days. This avoids the necessity of re-entering a desired programme for another day or sets of days.
N.B. This function only works in 7 Day setting.
To operate the copy function:
- Switch the slider to PROG and press the Home button.
- Press the C button to enter the COPY mode.
- The A button chooses the day you want to copy from (day not flashing) and the +/- buttons choose the day you want to copy to (flashing).
- Press the C button to confirm. The screen will show SEr (to show the Copy function is set).
BATTERY REPLACMENT
When the low battery symbol ![]() flashes in the LCD display, the batteries need to be replaced as soon as possible. The battery compartment is located on the front of the thermostat, under the fascia cover. Remove the old batteries and insert new ones. All settings including time are maintained.
flashes in the LCD display, the batteries need to be replaced as soon as possible. The battery compartment is located on the front of the thermostat, under the fascia cover. Remove the old batteries and insert new ones. All settings including time are maintained.
- N.B. If the display ever goes blank during normal operation, the batteries need to be replaced with high quality alkaline cells. The date, time and factory pre-set heating times will be retained (assuming the backup battery in the back of the thermostat has not failed).
RESETTING THE UNIT
To reset the programmer to the default settings:
- Switch the slider to OFF.
- While holding in the Next button press and hold in the reset button for approx. 3 seconds.
- Release the reset button while still holding in thebutton.
- Now release the button.
The programmer will now reset to factory defaults with the time and date needing to be reset.
INSTALLATION AND MASTER SETTINGS
INSTALLATION SAFETY INSTRUCTIONS
- The unit must be installed by a suitably qualified person in accordance with the latest IEE Wiring Regulations.
- Isolate mains supply before commencing installation.
- Please read all instructions before proceeding.
- Ensure that the fixed wiring connections to the mains supply is via a fuse rated at not more than 6 amps and class ‘A’ switch having a contact separation of a minimum of 3mm in all poles.
- The recommended cable sizes are 1.0mm² or 1.5mm².
- No earth connection is required as the product is double insulated but ensure continuity of earth throughout the system.
General Safety Instructions
When fitting batteries, do not mix old and new batteries together. Do not use rechargeable batteries. This product complies with the essential requirements of the following EC Directives:
- Electro-Magnetic Compatibility Directive 2014/30/EU
- Low Voltage Directive 2014/35/EU
- EC Marking Directive 93/68/EEC
Please leave the user instructions with the end user where they should be kept in a safe place for further reference.
Maintenance
Always isolate the mains supply before commencing any work, servicing or maintenance on the system. And please read all instructions before proceeding.
Wiring diagram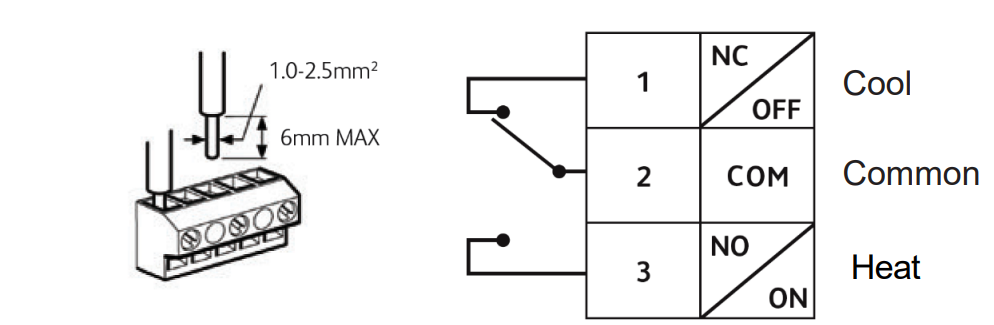
Fitting the Programmable Room Thermostat
The ideal position to locate the Programmable Room Thermostat is about 1.5m above floor level, in a location where the thermostat is accessible, reasonably lit and free from extremes of temperature and draughts. Do not position the thermostat near sources of heat, such as radiators, lights, TV, direct sunlight or on an outside wall.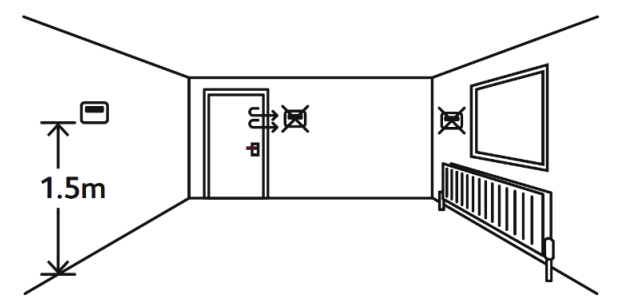
- Remove the front cover using a flat screwdriver in the two holes at the top of the programmer and separate from back plate.
- Fix the back plate directly on the wall using suitable wall plugs and screws.
- Unscrew the cover that is protecting the live terminals. Lift the cover to expose the wiring block, taking care to retain the screw.
- Complete the connections in accordance with the wiring diagram (page 6, Section 15).
- Replace the thermostat onto the back plate, securing the bottom of the thermostat first and clicking the thermostat into place.
- Insert the 2 x AA batteries provided in the battery compartment on the front of the thermostat, underneath the fascia. The Programmable Room Thermostat is now installed and will automatically start to control the room temperature according to the factory pre-set programme as shown in the User Instructions. The display shows the correct time and date which is automatically set together with the actual room temperature.
SETTING DELAYED START, OPTIMUM START, OPTIMUM STOP OR TPI
Note: TPI should only be used if connecting thermostat to a gas boiler and not used foe electric heating systems.
These settings may be accessed by
- Switch the slider to OFF position
- Press and keep holding the A and H buttons together (under the fascia)
- Now press the button to enter the Master settings.
- Release all 3 buttons.
- You should now see OP dl StAr in the bottom of the screen. If not repeat steps 1-4
Now press the +/– buttons to choose between:-
- OFF: The programme will run according to settings
- DS (dL StAr DS): When ON, the programmer will run in Delayed Start mode. The start of the next programme may be delayed up to 45 minutes depending on the room temperature
- S (OP StAr OS): When ON, the programmer will run in Optimum Start mode
- Now press the button and press the +/– buttons to turn OP STOP (Optimum Stop) ON/OFF.
If using with a gas or oil boiler now press the ![]() button to enter the TPI settings.
button to enter the TPI settings.
Press +/– to choose between
- OFF: Working under normal swing value
- 3 Cycles: ON/OFF one cycle is 20 minutes. This is recommended for oil boilers
- 6 Cycles: ON/OFF one cycle is 10 minutes. This is recommended for gas boilers (default setting)
- Now press the button to continue to the Sensitivity/ Swing and Calibration settings below.
Note:– TPI should only be used if connecting thermostat to a gas or oil boiler. If at any time you wish to exit the menu just press the Home ![]() Button.
Button.
SETTING SENSITIVITY / SWING AND CALIBRATION
- Switch the slider to OFF. Press and keep holding the A and H buttons together (under the fascia), now press the button and the technical settings menu will be displayed. Release all buttons.
- Press the button until you get to the SWING settings (5U1n9 is displayed at the bottom of the LCD next to a flashing 0.5). Press +/– to choose between 0.5 to 2.0 in 0.1 steps (this sets the difference in degrees C between the heat turning off and it coming back on. e.g. if set at 1.6 and temperature set at 20⁰C the heating will turn off at 20⁰C and turn back on at 18.4⁰C).
- Press the button to enter the ADJ settings. Press +/– to choose between -3⁰C to 3⁰C in 0.1⁰C steps (this calibrates the temperature setting).
Note:- If at any time you wish to exit the menu just press the Home
SETTING NUMBER OF PRE-SET PROGRAMMES TO 4 OR 6
Switch the slider to OFF. Press and keep holding the A and H buttons together (under the fascia), now press the ![]() button and the technical settings menu will be displayed. Release all buttons.
button and the technical settings menu will be displayed. Release all buttons.
Press the ![]() button slowly six times until you get to PROGRAMMES setting, press +/– to choose either 4 or 6 time / temperature events per day.
button slowly six times until you get to PROGRAMMES setting, press +/– to choose either 4 or 6 time / temperature events per day.
Note:- To exit the menu just press the Home ![]() Button.
Button.
SETTING THE LANDLORD SERVICE
PLEASE NOTE:– We recommend you do NOT turn on landlord service – this is solely designed to be used on gas boilers in rented accommodation and NOT with electric heating. We have listed the settings solely encase you accidently turn it on as a way of turning it off.
- Switch the slider to OFF. Press and keep holding the A and H buttons together (under the fascia), now press the button and the technical settings menu will be displayed. Release all buttons.
- Press the button until you get to SER (service interval) Settings. A numeric password will be required to enter this section. The factory default password is 0000. N.B. The screen will display Err if the incorrect password is entered.
- Press +/– to enter the first digit of the password. Press the H button to move to the next digit. Repeat this until all 4 digits have been entered.
- Press the button to enter the service interval settings.
- Use the +/– buttons to choose between:-
OFF: Turns the service interval off- Reminds the user when the annual service is due by displaying SER in the screen 30 days before due date
- Reminds the user when the annual service is due by displaying SER in the screen 30 days before due date and only allows the system to run for 45 minutes per hour after the due date has passed
- Reminds the user when the annual service is due by displaying SER in the screen 30 days before due date and only allows the system to run for 30 minutes per hour after the due date has passed
- Reminds the user when the annual service is due by displaying SER in the screen 30 days before due date and only allows the system to run for 15 minutes per hour after the due date has passed
- Press the button. Use +/– to set the due date (from 28 – 366 days).
- The left of the LCD screen will display the recorded running time. Holding the C button for 2 seconds will zero to the time.
- To change the code, go to the Due Date setting (in SER settings), press the A button for 2 seconds. NEU CODE will appear at the bottom of the LCD display. Press +/– to set the first digit, then press the H button. Repeat this for all four digits. Press the A button for 2 seconds again to set the new code. The screen will display SET to confirm the change.
- The system will start timing after the thermostat is powered on (Running Time). When the running time reaches 30 days from the Due Date, the screen will display SER. When the running time is more than or equal to the Due Date, the screen will display SER constantly and the system ON time will be controlled by the SER SET.
- N.B. When the system is running to the ON condition, but is limited by the SER SET (and therefore cannot be ON), the screen will flash the ON symbol.
Note:- To exit the menu just press the Home Button.
SETTING THE LOCKOUT FEATURES
The PROSTAT2 comes with a lockout feature which enables the installer to disable certain functions of the thermostat to a complete lockdown depending on the mode selected. This can be useful if using the Thermostat in a public area to stop certain buttons / modes from operating.
Setting the Installer lockout mode
- Switch the slider to OFF. Press and keep holding the A and H buttons together (under the fascia), now press the button and the technical settings menu will be displayed. Release all buttons.
- Press the button until you get to SER (CODE) Settings. A numeric password will be required to enter this section. The factory default password is 0000.
N.B. The screen will display Err if the incorrect password is entered. - Press +/– to enter the first digit of the password. Press the H button to move to the next digit. Repeat this until all 4 digits have been entered.
- Press the button until you get to Pro Part (Lockout mode).
- Use the +/– buttons to choose between:-
- Default Setting 1
This mode works as a standard Programmable Room Thermostat. - Partial Lockout 2
This mode allows the installer to set the Maximum temperature Setpoint (factory default 21°c) and allows the end user to adjust all other settings apart from maximum temperature set point. - Partial Lockout 3
- This mode allows the installer to set the Maximum temperature Setpoint (factory default 21°c) and locks all keys/slider except, to change the time and date, off (frost protection) and allow temporary manual
- override (temperature Up / Down arrows).
- Partial Lockout 4
This mode allows the installer to set the Maximum temperature Setpoint (factory default 21°c) and locks all keys/slider except from off (frost protection) and allow temporary manual override (temperature Up / Down arrows). - Full Lockout 5
This mode locks all keys / slider. The End user cannot adjust anything. - Setting the Maximum Program Temperature
- Press the Next button until you get to Pro tenp.
- Press the +/– buttons to adjust the maximum temperature in 0.5⁰C steps.
Note:- If you have exited the installer lockout features repeat steps 1-3 above.
- Default Setting 1
- To exit the Installer Menu, press the Home Button
|
Number |
Time / Date |
Program |
Permanent Manual Override | Temp
Manual Override |
All Day |
Holiday |
| 1 | ✓ | ✓ | ✓ | ✓ | ✓ | ✓ |
| 2 | ✓ | ✓ | ✓* | ✓* | ✓* | ✓* |
| 3 | ✓ | ✗ | ✗ | ✓* | ✗ | ✗ |
| 4 | ✗ | ✗ | ✗ | ✓* | ✗ | ✗ |
| 5 | ✗ | ✗ | ✗ | ✗ | ✗ | ✗ |
N.B. *Temperature can only be adjusted up to the maximum temperature setpoint. (21⁰C Default)
NOTE: It is our policy to continually improve products and as such we reserve the right to alter data, specifications, and component parts without prior notice.
This product conforms to EU Directive 2002/96/EC.
This appliance bears the symbol of the crossed waste bin. This indicates that, at the end of its useful life, it must not be disposed of as domestic waste, but must be taken to a collection center for waste electrical and electronic equipment. It is the user’s responsibility to dispose of this appliance through the appropriate channels. Failure to do so may incur penalties established by laws governing waste disposal.
REGISTER: Activate your warranty by registering online www.bnthermic.co.uk and retain this installation data for future reference IMPORTANT: No liability is accepted for incorrect use of this product.
WARRANTY
Your BN Thermic product is guaranteed for one year from the date of purchase. We will repair or replace at our discretion any part found to be defective. We cannot assume any consequential liability. This guarantee in no way prejudices your rights under common law and is offered as an addition to consumer liability rights.
BN Thermic Ltd,
- Address: 34 Stephenson Way, Crawley, RH10 1TN
- Tel: +44 (0) 1293 547361
- Email: [email protected]
- Web: www.bnthermic.co.uk
Reference
Download Manual:
bnthermic PROSTAT2 PROGRAMMABLE ROOM THERMOSTAT INSTRUCTIONS Manual
bnthermic PROSTAT2 PROGRAMMABLE ROOM THERMOSTAT INSTRUCTIONS Manual
Leave a Reply