
Beok BOT-R9B-WIFI Smart Thermostat

Instruction
- The equipment function is stable and reliable, and the operation is simple and convenient
- The device has an antifreeze function, child lock function, and humidity function (only Wi-Fi model)
- Knob-type control temperature setting is more convenient, flexible, and more experience
- With dual mode settings, the operation can be set at will, with comfortable Freedom and control of life
- RF transmitter desktop design, compatible with wall-mounted design, installation is very simple, flexible
- Relying on stable RF wireless technology, the thermostat is paired with the receiver, the signal is stable, and the pairing speed is fast
Standard Accessories
- Product

- USBwrie

- Screw pack

- Manual

Product Overview
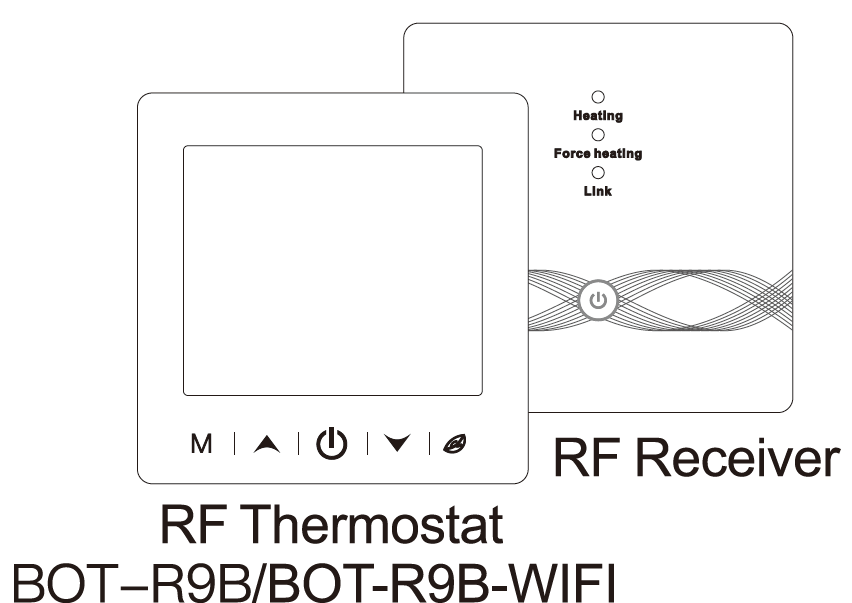
This set is suitable for wall-hung boiler temperature control. As long as you install the receiver RC9 device near the wall-hung oiler, even if the thermostat T9N/T9W is placed in the living room or room (with an open distance of 100 meters), the RC9 can be controlled by the T9N/TOW thermostat.
Rf thermostat
| Power supply | 3 x 1.5 V alkaline AA batteries |
| Temp. setting range | 5~95’C |
| Ambient temperature | -5~50’C |
| Measurement accuracy | 0.1•c |
| Setting temp. accuracy | 0.5°C |
| Transmission distance | .;2oom in the open air |
| Protection level | IP20 |
| Wireless frequency | 433MHz (FSK) /
433MHz (Bidirectional FSK) |
RF RECEIVER
| Power supp | AC100~240V; 50/60Hz |
| Devioe power consumption | 1W Max |
| Ambient temperature | -5-50’C |
| Transmission distanoe | ,;;200m in the open air |
| Wireless frequency | 433MHz (FSK) /
433MHz (Bidirectional FSK) |
Display Symbols
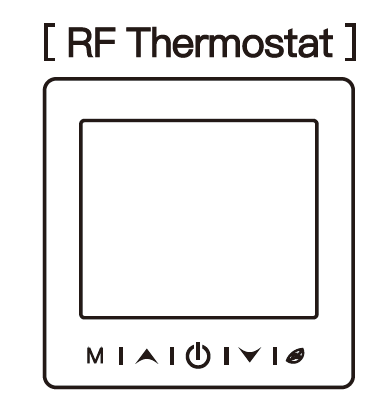
[ RF Thermostat l

[ RF Receiver l

Battery Power RF Smart Thermostat for wall-hung boiler
- The equipment function is stable and reliable, and the operation is simple and convenient.
- The device has antifreeze function, child lock function nd humidity function ( only Wi-Fi model) .
- Capacitive touch and extra-large screen – better user interaction experience .
- Dual mode settings, operation can be set at will, comfortable Freedom and control of life.
- RF transmitter desktop design, compatible with wall-mounted design, installation is very simple, flexible.
- Relying on stable RF wireless technology, the thermostat is paired with the receiver, the signal is stable, and the pairing speed is fast.
User routine operation
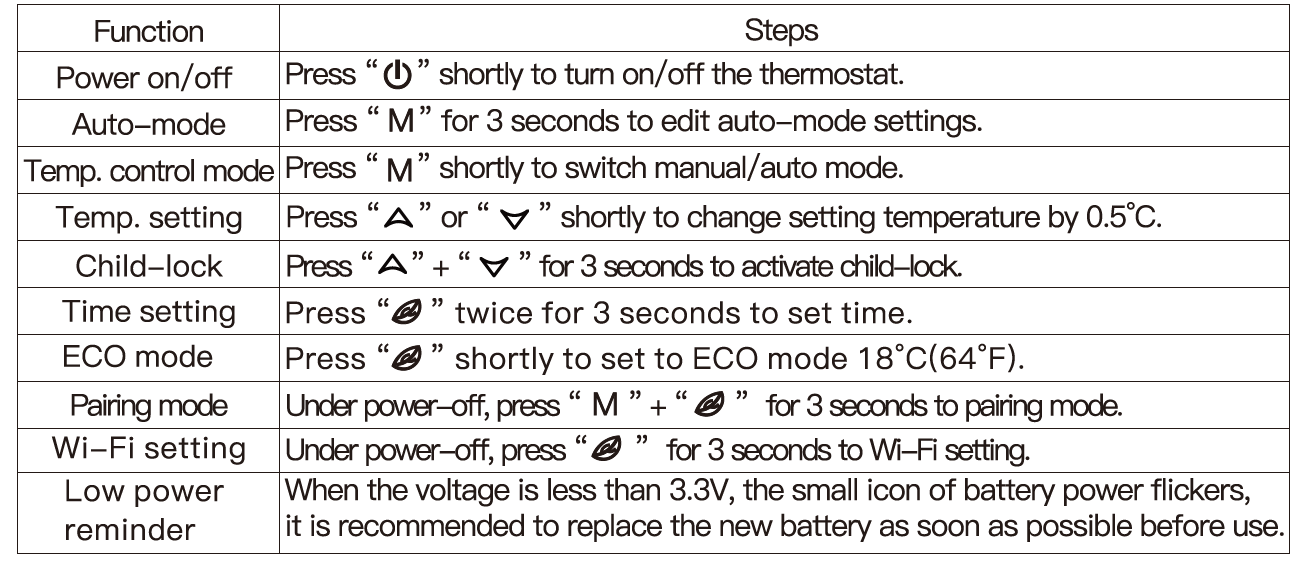
Auto-mode Setting
Press ‘the knob key for 3 seconds to edit the auto-mode setting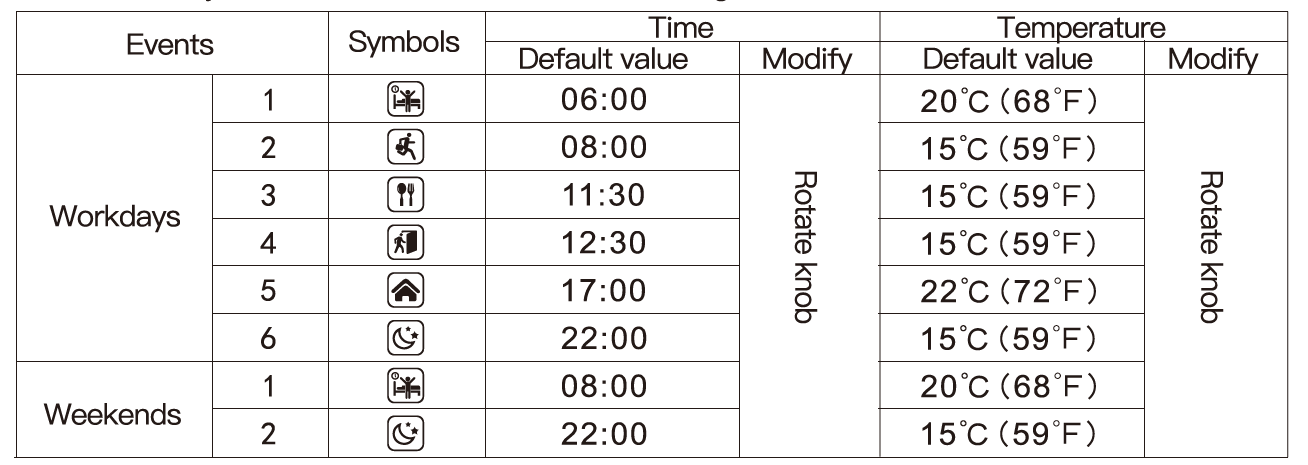
RF Thermostat advanced setting (Usually for Professional Technicians)
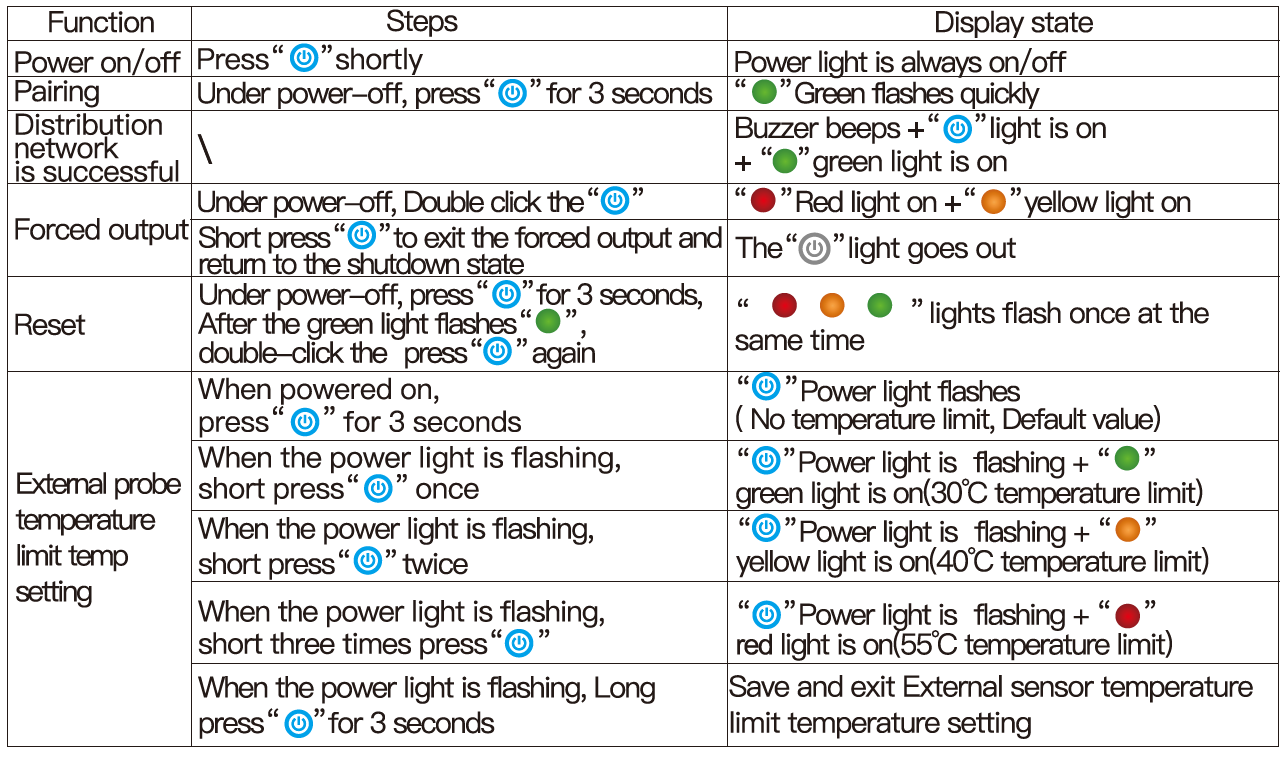
Under power-off, press “M ” for 3 seconds to enter advanced setting mode, then repress “M ” to switch to next mode. Press “(!)” to save and exit advanced setting mode.
| Code | Meaning | Default value | |
| 01 | Temp. calibration | -9.9~9.9’C(-9~9’F) | -1’C |
| 02 | Temp. Dif. | 0.5~1O’C(1~1O’F) | ±1’C |
| 03 | Temp. upper limit | 5~95’C(41 ~199’F) | 50’C |
| 04 | Temp. lower limit | 5~47’C(41 ~117’F) | 5″C |
| 05 | Frost protection | ON: frost protection on OFF: frost protection off | OFF
·c |
| 06 | Temperature unit | °C/°F | |
| 09 | flOJ’JTTTiing
ootting |
12345: 5/2 week mode 123456: 6/1 week mode
1234567: 7/0 week mode |
12345 |
|
12 |
Child-lock |
00: ChikHock inactivate when roeen off, lock all when chikHock activate 01: ChikHock activate when roeen off, lock all when chik:1–lock activate 02: ChikHock activate when roeen off, lock all except Fai Sr-eoo,
Up and Down when chikHock activate 03: ChikHock activate when roeen off, lock all except PcM.e- on/off when chik:1–lock activate |
00 |
| 13 | Power-on-reset | 00: Power OFF
01: Power ON 02: The last status before power loss |
02 |
| 19 | Reset | Press “A”for 3 seconds to reset |
RF Receiver Operating Instructions
Dimensions (Unit: mm)

Installation location
The installation distance between the thermostat and the receiver does not exceed 100m (the distance can be judged according to the actual network coverage)
Tip: There are many ways to install the RF thermostat,
- Owall mounting
- desktop placement

RF thermostat mounting steps
* Note: two power supply methods
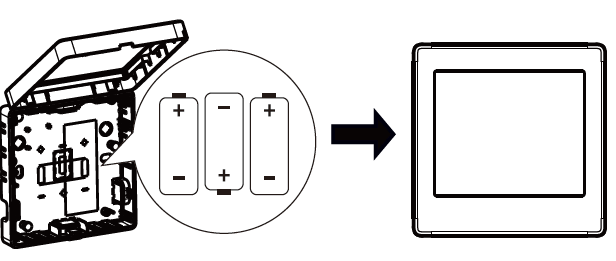
- It is recommended to use brand new 1.5 V alkaline AA batterie
- Please ensure the correct polarity when installing the battery.
3×5 Alkalibatterien
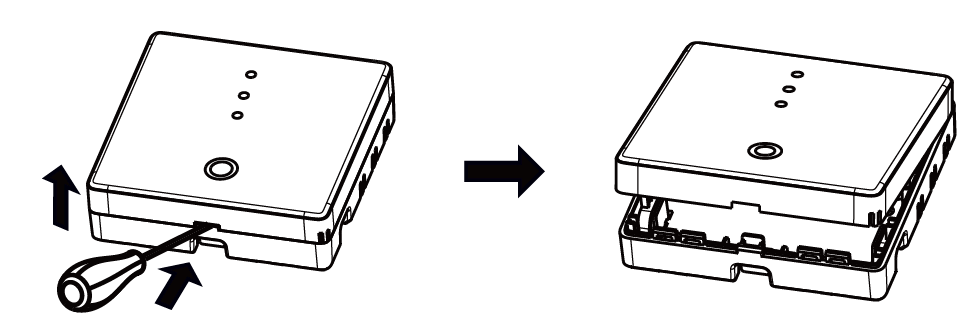
- Release the front cover by inserting a head screwdriver into the bottom crack.
- Mount the backing plate into wall cassette, put screws, and then fix the thermostat. Make sure that the thermostat is fixed without deformation. The suggested torque is 0.2-0.4N.m (2.0-4. 1kgf.cm).
- After inserting the battery, align the frame of the blank panel with the buckle, close the panel, and complete the installation.
RF Thermostat Installation step
- Release the front cover by inserting a head screwdriver into the bottom crack.
- The user can choose the wiring method by himself
- Exposed wiring: choose any one of the four directions, then use a flat-blade screwdriver to pry open along the dotted line;
- Concealed installation and routing: along the dotted line in the middle of the bottom shell, use a flat-blade screwdriver to pry it open)
- Put the wire into the terminal and tighten it with a flat-blade screwdriver. After tightening the terminal screws, cover the upper cover to complete the installation.
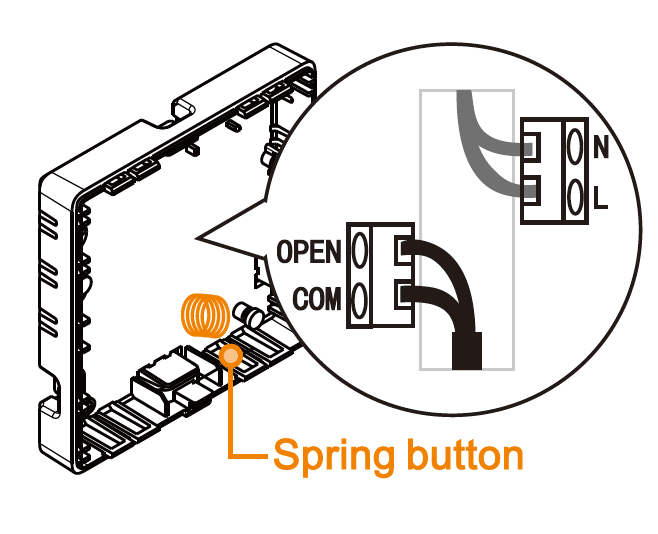
Note: The wire line can not touch the spring button, otherwise it will affect the button touch function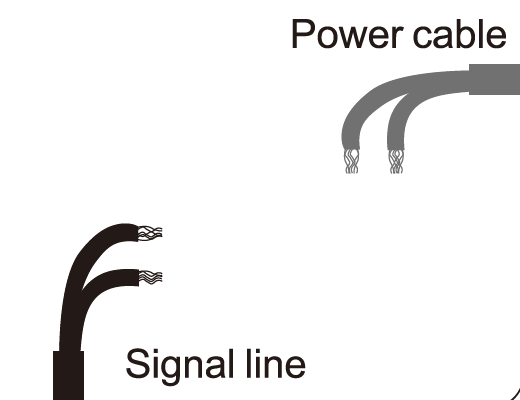
RF Receiver wiring diagram
The thermostat operates in full capacity in areas with the altitude of less than 2500 above sea level. Power rating of external load should be less than or equal to 80%rated power of thee thermostat in areas with altitude of 2500m to 4200m.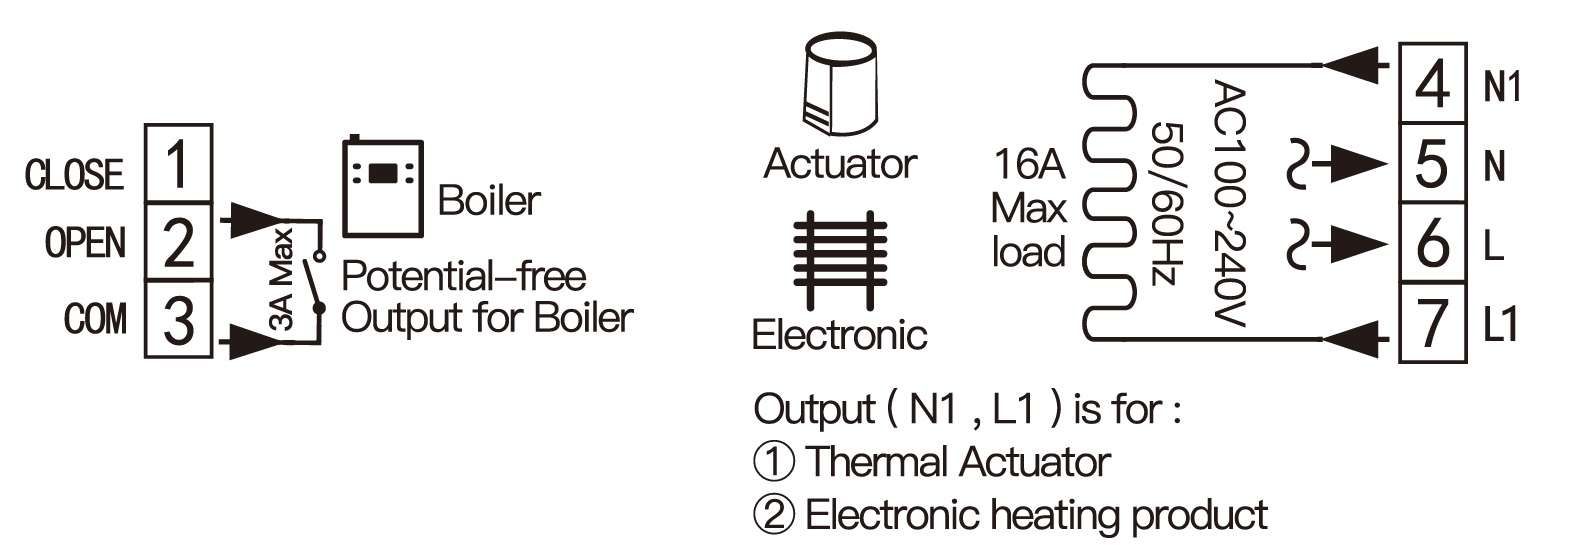
Pairing steps
- Under power-off, press ”
 ” for 3 seconds, when the green light
  flashes, the receiver enters the pairing state.
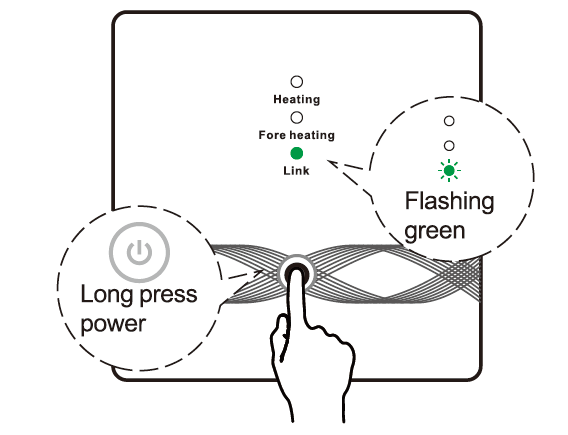
- Under power-off, press the” power button +knob key” for 3 seconds, the thermostat enters the pairing state.
- When the receiver’s buzzer beeps once, and the power light the green light always on, the pairing is successful are
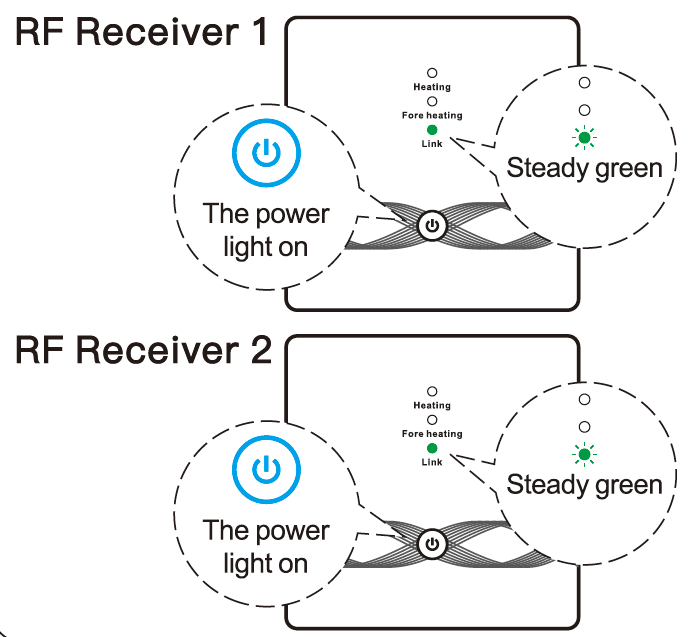
Tip: Support one RF thermostat to pair with multiple RF receivers. After the pairing is successful, you need to short-press the “power button to exit the pairing mode
APP remote control and voice control (Wi-Fi only)
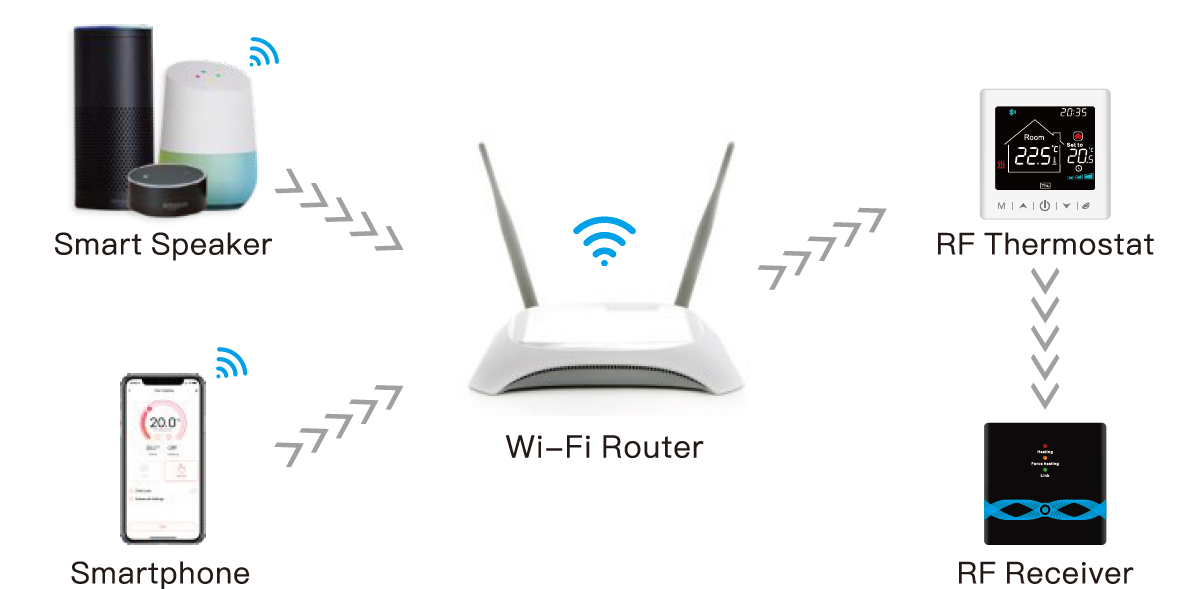
Network Configuration (Wi-Fi only)
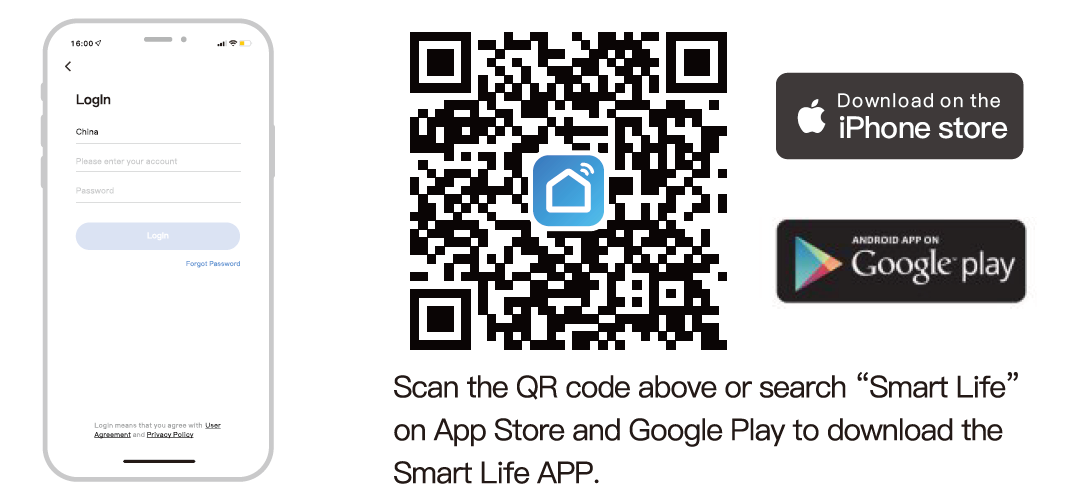
Download Smart Life APP
Wi-Fi setting (VWi-Fi only)
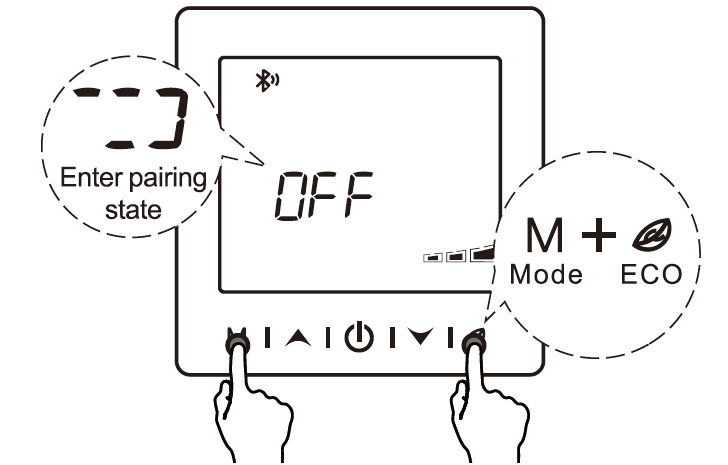
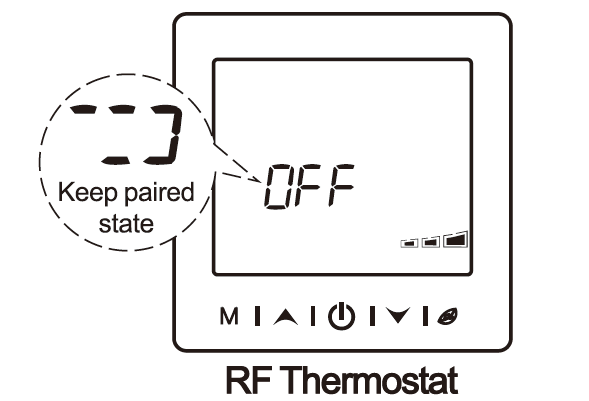
- On the OFF state, long press the “power button” for 3 seconds, when the screen flashes and ” ” , the thermostat Enter the state of distribution network;

- Enter the Home” interface of the APP, click in the upper right comer, select the “Go to add ” button in the pop-up window, and finally click ” to enter the Wi-Fi password interface
Please turn on the Bluetooth of your phone in advance.

- Select 2.4G Wi-Fi and enter the password, click “Confirm “, and then wait for the connection to succeed;

- After the addition is successful, click “phone, and the RF thermostat has been added successfully.’

Voice control (Wi-Fi only)
After waking up the speaker, you can say:
Amazon Alexa : Alexa, Turn on the HEATER
- *Turn off the HEATER.
- *Make the HEATER cooler in here.
- *Make the HEATER warmer in here.
- *What is the temperature of the HEATER?
- *Turn on child lock for the HEATER
- *Turn off child lock for the HEATER
Google Assistant: OK google
- *Turn on the HEATER Turn off the HEATER. Set the HEATER to 26 degree
- * Drop the HEATER by 1 degree
- *Raise the HEATER by 1 degree Turn on child lock for the HEATER
- * Turn off child lock for the HEATER
*Attention: ” HEATER is the device name, you can also name it yourself.
The temperature unit of thermostat and smart speaker must be identical.
REFERENCE
Download Manual
Beok BOT-R9B-WIFI Smart Thermostat User Mnaual
![]()
Leave a Reply